
Just put LEDS in the dash!
#1
 08-02-2009, 12:59 AM

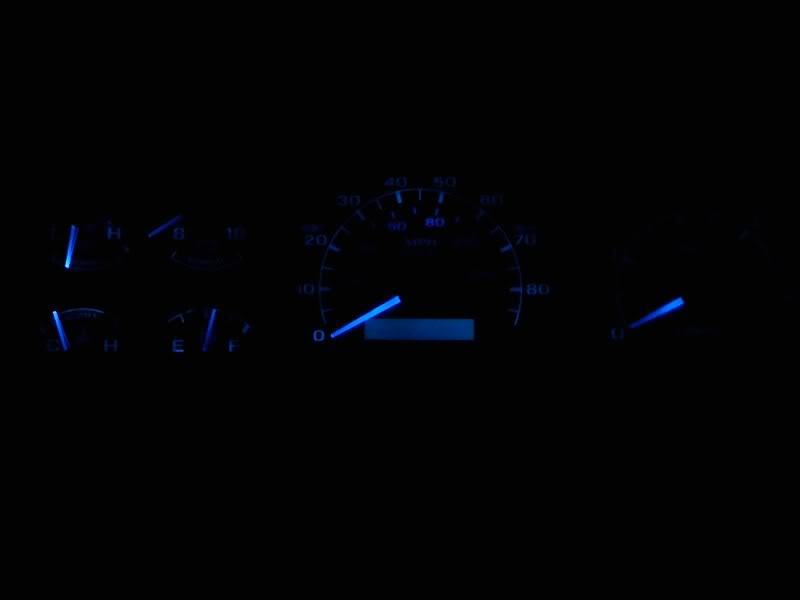
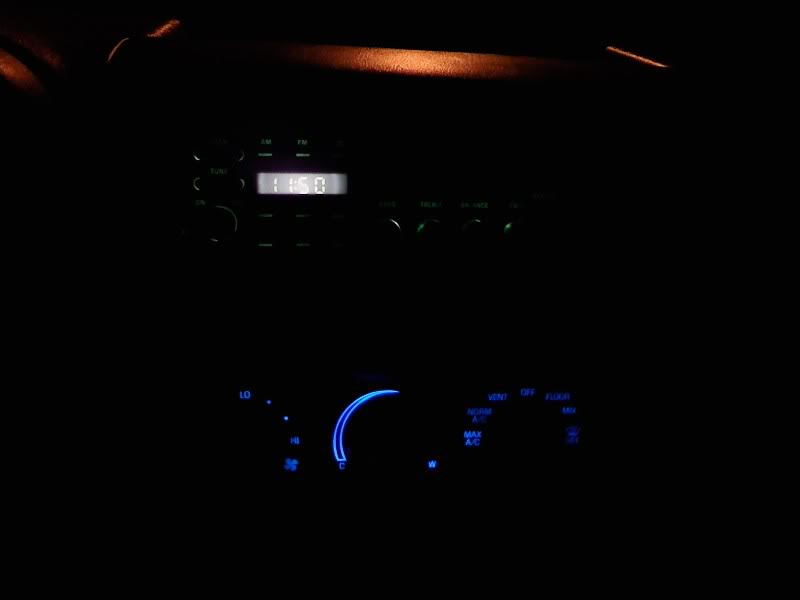
I did a little searching and didn't really see any mention of someone using LED's in their guage cluster. I decided to give it a try and ordered 7 #194 style LED bulbs. Each bulb has 5 LED's, 1 straight up and 4 radially mounted. I got blue to hopefully change the color. I must say I am quite pleased with how it turned out. The dash is fully illuminated, and the dimmer control works which I had heard was an issue with LED's. Since the guage needles are clear, they show up really blue while the numbers are more aqua marine due to the green filter. I put 5 bulbs in the dash and 2 in my HVAC panel. I took some pics, the light looks patchy, but it really does illuminate the whole cluster. The red sections turn more of a dark purple and dont show up on camera at all. I need to change my radio to something with blue in it now.
#2
08-02-2009, 11:20 AM
Posting Guru
Join Date: Jul 2009
Location: Toledo, Ohio
Posts: 1,069
Likes: 0
Received 0 Likes
on
0 Posts
Ok, ill be the first to say I think thats awesome. Im not one for all kinds of add on lights but that looks cool. I always wanted one of those reverse dashes where the background lights up but the numbers are all black. So, you just added colored LED's in the dash sockets? I wont take blue but id like to do something different. I dont have the knowhow to make an all new gauge cluster...
#3
08-02-2009, 11:41 AM
Elder User
#4
08-02-2009, 12:04 PM
As far as the 92-96 cluster goes, it's pretty easy to remove. You need a small metal rod to remove the headlight ****, then a knife or flathead screw driver to pop off the trim pieces to expose 2 retaining screws. Then just pry the cluster surround off, it's held in by spring clips. Once it's loose you have to unplug the fuel tank switch and the warning lights on the right if you have a diesel. Then it's 4 screws holding the cluster in and 3 plugs on the back to remove. When you have the cluster out, I have been told not to lay them face down, not sure why. I have an old 1995 cluster in my garage that has a sticker on it stating the same thing.
#5
08-02-2009, 12:30 PM
Elder User
#6
08-02-2009, 04:50 PM

Senior User
Join Date: Mar 2008
Location: Jupiter
Posts: 368
Likes: 0
Received 0 Likes
on
0 Posts
Mine had the backlights disabled when I bought it and had blue leds on the bottom of the cluster facing up to light the gauges. I couldnt see crap with them so I changed it back to stock. Your set up looks brighter though, but not bright enough for me  I guess I just like the stock look on mine.
I guess I just like the stock look on mine.
#7
08-02-2009, 07:19 PM
Posting Guru
Trending Topics
#8
08-11-2009, 09:50 PM
#9
08-11-2009, 11:43 PM
Postmaster
Join Date: Sep 2008
Location: raymond alberta
Posts: 2,995
Likes: 0
Received 0 Likes
on
0 Posts
that is mean that is EXACTLY what i wanted to do with my 95 but i thought the filters would mess it up more than that...i have to get some of these lights and do this....i already have a blue LED stereo and i am getting a cobra cb with blue lighting hehe
did 7 bulbs fill all the sockets or are there some empty ones in there now...ive replaced clusters but never torn them appart to change blubs.
did 7 bulbs fill all the sockets or are there some empty ones in there now...ive replaced clusters but never torn them appart to change blubs.
#10
08-12-2009, 01:34 AM
There are a bunch of bulbs in the cluster, but only 5 are for illumination, and there are 2 bulbs in the HVAC panel. I figure the other bulbs(warning lights) rarely get used so they should last awhile. It would also cost a small fortune to replace all of them with LED's. The cheapest I have found the LED's I used were $3.75 each.
#11
08-12-2009, 02:14 AM


#12
08-12-2009, 03:12 AM
Logistics Pro
This is For Roger T., the reason for not laying the instrument panel face down, or face up:
Always store and place instrument cluster in upright (Normal in dash) position. Failure to do so can result in loss of gauge anti-vibration fluid and contimination of gauge face with fluid.
It's always handy with a manual. The only thing I must say about the whole removal process is the DARN HEADLIGHT ****!!!!!!!!!!!!!!!!!!!!!!!!!!!!!!!
I have been thru (2) of these. Not cheap!!! I have 3 different hooked tool's and not one of them has been able to "...remove the headlight **** by depressing the spring inside the ****" They could have done something where is would have just been easier to access the retaining pin for the headlight assembly so as to depress it and slide the entire rod and **** out as one.
Had to be the worst design for a **** procedure, or i'm stumpified!! I have put a dab of petrol jelly on it, and still to no avail. This last time, I was able to mistakenly pull the new **** back of the spring housing that is inside, and then slid it off, smoothed the rod off with my dremel and emory cloth. IT has made it very easy now. Just got it back on after a week of using an alligator clip to pull it out. I'm thinking for the next round, I will drill 2 3/32 holes in the **** slider, and then insert 2 locking allen screws.
Matthew
P.S. LOVE THE BLUE L.E.D.S. Great idea and glow!
#13
08-12-2009, 10:06 AM
Junior User
Join Date: Aug 2007
Location: Bartlett, TN
Posts: 73
Likes: 0
Received 0 Likes
on
0 Posts
looks good. i am actually working on this myself. only excpetion is i am removing the green tint. then will add blue leds. to remove the tint, just pull off the needles and peel off gauge face. then scratch or wipe off the green tint layer and reinstall everything. only downside is that you have to recalibrate some of the gauges.
sample pic from a spare cluster with my led work light:

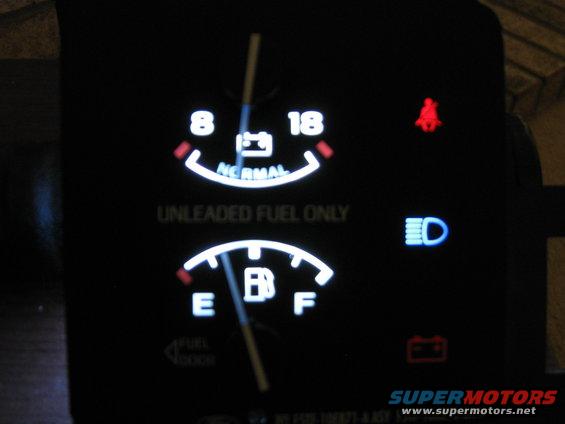
sample pic from a spare cluster with my led work light:
#14
08-12-2009, 01:46 PM
A simple screwdriver or other rigid, slender item will easily release the **** from the shaft. Done it dozens of times.
#15
08-12-2009, 03:00 PM
Posting Guru