?s about wiring gauges :(
Thread Starter
|
Posting Guru
Joined: Dec 2007
Posts: 1,377
Likes: 3
From: Oklahoma
?s about wiring gauges :(
Ok, so I've read several different instructions and this is where I am. I have my pillar out and the 3 gauge pod connected with the access holes drilled. I have my trans temp, egt, and boost down and out the the engine bay. So far so good. Here comes the question. I can't find any instructions about wiring the gauge lights and power. How did you wire the gauge light and so on?  I would guess that you bring the power and the lights up to them and basically piggy back from one to the next? Thanks y'all
I would guess that you bring the power and the lights up to them and basically piggy back from one to the next? Thanks y'all
Butt-Head
Joined: Apr 2004
Posts: 9,458
Likes: 2,938
From: Reed Point, MT
Under the steering column behind the access panel, there is a connector (flat connector to the left of the column) that has a red wire with black tracer....there's your key power. For the dash lights, the easiest thing is to pop out the headlight switch and find the light blue with red tracer...there's your illumination!
Posting Guru
Joined: Feb 2007
Posts: 1,244
Likes: 1
From: North Cackalacky
What I did was pop out the headlamp switch and use a test light to figure out which wire powers up when turning on park lamps, then go over to the dash lamp rheostat and find your power there and then just run you a jumper up to the power side of the illumination. This way the guages will be able to dim when you want them to. You can ground it just about anywhere.
Hotshot
Joined: Jan 2008
Posts: 13,144
Likes: 11
From: Rochdale MA

Ok, so I've read several different instructions and this is where I am. I have my pillar out and the 3 gauge pod connected with the access holes drilled. I have my trans temp, egt, and boost down and out the the engine bay. So far so good. Here comes the question. I can't find any instructions about wiring the gauge lights and power. How did you wire the gauge light and so on? I would guess that you bring the power and the lights up to them and basically piggy back from one to the next? Thanks y'all
I would guess that you bring the power and the lights up to them and basically piggy back from one to the next? Thanks y'all3-Gauge Install Pictures
Ign power on
3-Gauge Install Pictures
Lights (dimmable)
Lead Driver

Joined: Jan 2007
Posts: 6,708
Likes: 5
From: Kiowa CO

Yup, I followed Diesel Manor's instructions to the letter and all is well. The only problem I had was a ground wire popped loose from the piggyback connection but I noticed it right away when my tranny gauge was acting erratically. Rewired and still is good after 3 years.
Thread Starter
|
Posting Guru
Joined: Dec 2007
Posts: 1,377
Likes: 3
From: Oklahoma
Thanks everyone! What I am trying to find out is how did you connect all three gauge wires to the light source and the gauge wires for power to the power source. Did you bring all 3 light wires together at one location and splice them to your dimmer wire source, or did you daisy chain them from one to the other? Same with the power source wire? Does this make sense at all? I think if there is enough slack I should be able to bring all three together, twist them and crimp a connector on, then crimp to my power or light source.
Trending Topics
Lead Driver
Joined: Jan 2007
Posts: 6,708
Likes: 5
From: Kiowa CO
IIRC, I tied together the lights for the gauges on one side of a butt connector and the other side goes to the light source of the truck.
FTE Stories
Ford Trucks for Ford Truck Enthusiasts

Top 6 Best Deals Available on New Fords & Lincolns Right Now
Brett Foote
This Hennessey Takes the Expedition Tremor's Off-Roading Capability to the Next Level
Verdad Gallardo
Top 10 Fords at 2026 Carlisle Ford Nationals
Joe Kucinski
3 Best / 3 Worst Parts of Modern Ford Ownership
Brett Foote
10 Amazing Upgrades That Solve Common Ford Truck Owner Headaches
Pouria Savadkouei
Every 2026 Ford Engine Explained
Brett Foote
10 Ugly Ford Trucks That We Still Kinda Love
Joe Kucinski
10 Things Every Truck Owner NEEDS (2026 Edition)
Michael S. Palmer
Rezvani's Latest Post-Apocalyptic Monster Is a Ford F-150 Raptor Underneath
Verdad GallardoHotshot
Joined: Jan 2008
Posts: 13,144
Likes: 11
From: Rochdale MA
I tend to over do things so I ran seperate wires for the light to each guage, then seperate wires for the ign power to each guage(that needed it) put them on a terminal block and fed them from there. I don't like the look of the block that I used so I will change it out at some point.
You can take your source and daisy chain them form guage to guage so that you only have to connect 2 wires down below. In my guage pod I used crimp style caps.
You can take your source and daisy chain them form guage to guage so that you only have to connect 2 wires down below. In my guage pod I used crimp style caps.
Butt-Head
Joined: Apr 2004
Posts: 9,458
Likes: 2,938
From: Reed Point, MT
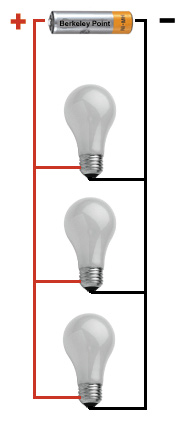
Wiring the lights in "series" or daisychain as the OP suggested will result in overall "dimmer" lights, but less load on the truck's dimming circuit.
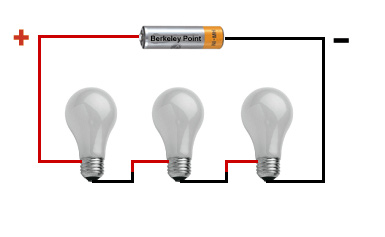
Wiring the lights in parallel will result in nice, bright light. The load on the dimming circuit is higher, but 3 little 1/4 watt lights aren't going to hurt anything.
Run 1 power wire for the lighting up to the gauges and splice that with the 3 red light wires. Do the same for the grounds. This will give you a parallel circuit. Not that mixing up the red and black will hurt anything.....bulbs don't care which way you run power through them. I'll put a picture in this thread....wait a minute.