


Upper control arms.

Senior User
Joined: Nov 2004
Posts: 463
Likes: 0
Pablo-I think we are talking the same thing when I say "A"-arm bushing. I'm an old General Motors car guy and even though I say they are the same the look is totally different.
My Van like yours-4 wheel drive was wearing out suspension wise. Mine was popping very badly when I was pulling out of the driveway or turning any corner. I first took my Eddie Bauer to Big Ten Tires to have it looked at. Now mind you I knew that they would give me the High dollar look over. Well, I simply got their opinion and then determined if it was within my range of knowledge to repair. I do have almost 190 thou on her and I do know that things are worn out ieu cv rubber boot on axle shat, shocks could use replacement as well.
They gave me a $1,500.00 estimate and I simply thanked them and took there paper they had prepped for me. I went over the list and was most interested only at the time of what would allow me to get back on the road NOW.
Since the 4-wheel version have a different coil spring seat I started there. Nothing noted until I looked at the "UPPER "A" ARM & Upper Control Arm are the same. The rubber bushing were worn so badly that the rubber on the passenger side wheel area was missing. There is a more forward one-it wasn't so bad, but the rear one-(they are both the horizontal one).
The area is on the top of the frame. On either end it is called the Upper Mount Assy. There are two nuts on either end. I believ 18MM-don't remember. Once these are removed you are to pull out the round cylindrical bushing. They have a metal bushing on the inside and a rubber bushing on the outside. getting these out are very hard.
What I did?---I needed more play-freedom if you will. I went ahead and unboltd my lower steering rod link on my pass. side. It needed repacing as well and would afford me the "looseness" I needed. "IT WORKED"---I replaced the bushings first and then the ball joint.
Have a taken it into the shop yet for re-alignment? No-why not? Well, a lot of other things need to be changed first and 3 thous miles later I haven't noticed any wear to my tires or inadvertant loss of steering control. I put everything back exactly-by pre-marking everything.
$1,500.00 dollars? Well, I guess I saved 4 hrs of labor there x I only spent 28 dollars.
When I here back from you Pablo I'll be more specific and give you better size measurements.----Boz
Senior User
Joined: Nov 2004
Posts: 463
Likes: 0
Pablo-if you get this far today I would recommend something else that I didn't mention before. My trick at making the bushings as slick as snot in helping me wit the install--Vaseline. I caked it on and the bushings glided on. On more note. You will notice that more of one side of the bushing will be exposed after the install. I have found this to be normal. After driving fro about a week they both slide into place.--Good Luck--Boz
Lead Driver


Joined: Sep 2003
Posts: 7,018
Likes: 210
From: SoCal

I could not get enough space to disassemble mine while in-car, so I removed the entire upper control arm assemblies. Anyway you remove the upper mounts, you have to undo those 3 giant bolts, which require a 15/16" (24mm) socket on the bottom end while using a 18mm socket or box-end on the bolt heads on the top end. Before doing that, it is advisable to mark the position on the steel plate that the mounts sit on, and to the frame, to try to put the parts back to the same positions on assembly. You will have to get it aligned afterward, because the bushings will not get pressed into the mounts in exactly the same way.
I had to pound the old bushing shells to get them out of the mount assemblies. I used a carpenter's tool called a "cat's claw", a small nail puller with a 90 degree bend, and a 5 pound sledge hammer. I used a hydraulic press to push the new bushings into the mounts.
A lot of work, but I think it's something you can easily handle.

Former ******
Joined: Nov 2004
Posts: 4,901
Likes: 2
From: Salt Lake City, Utah
Emphasis on the bottom end. I had mine done by a shop we do a lot of business with. The guy there, saw those big bolts on the brackets and tried cranking away. Two wrenches alter he still didn't have them loose, so I went back there and put an impact gun on the nuts on the bottom of the frame. Needless to say I made the mechanic feel really stupid. Now in his defense, he did have a bad headache that day, so he wasn't all there, but still, I'm never letting him live that one down.
Trending Topics

Thread Starter
|
Post Fiend
Joined: Oct 2005
Posts: 5,242
Likes: 0
From: Kiev, Ukraine
FTE Stories
Ford Trucks for Ford Truck Enthusiasts

Top 6 Best Deals Available on New Fords & Lincolns Right Now
Brett Foote
This Hennessey Takes the Expedition Tremor's Off-Roading Capability to the Next Level
Verdad Gallardo
Top 10 Fords at 2026 Carlisle Ford Nationals
Joe Kucinski
3 Best / 3 Worst Parts of Modern Ford Ownership
Brett Foote
10 Amazing Upgrades That Solve Common Ford Truck Owner Headaches
Pouria Savadkouei
Every 2026 Ford Engine Explained
Brett Foote
10 Ugly Ford Trucks That We Still Kinda Love
Joe Kucinski
10 Things Every Truck Owner NEEDS (2026 Edition)
Michael S. Palmer
Rezvani's Latest Post-Apocalyptic Monster Is a Ford F-150 Raptor Underneath
Verdad Gallardo
Senior User
Joined: Nov 2004
Posts: 463
Likes: 0
Originally Posted by xlt4wd90
I had to pound the old bushing shells to get them out of the mount assemblies. I used a carpenter's tool called a "cat's claw", a small nail puller with a 90 degree bend, and a 5 pound sledge hammer. I used a hydraulic press to push the new bushings into the mounts.
A lot of work, but I think it's something you can easily handle.


Posting Guru
Joined: Aug 2007
Posts: 1,036
Likes: 2
From: Portland, Oregon
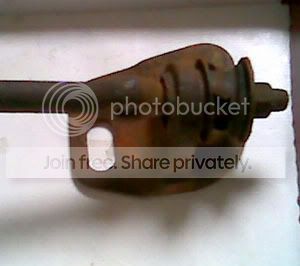
hey, could any of you guys post up some pics of the bushings you're talking about? My front end goes POP some times when i back out of my drive way, and i noticed the bushings that are on the frame rail in the engine bay are all dry, cracked and old.... and rusty....
Post Fiend
Joined: Apr 2005
Posts: 5,720
Likes: 5
From: Washington state
those are some rusted uca bushing shaft threads, pablo
any threads left?
my rust fighting trick, smear grease on new/rebuilt/ replace part threads exposed to road water and salts.
when i wire brush it off years later to remove bolt or nuts have bright shiny threads like new.
even works on exhaust manifold bolts and muffler clamps using a heavy moly grease. some burns off but the moly remains
Senior User
Joined: Nov 2004
Posts: 463
Likes: 0
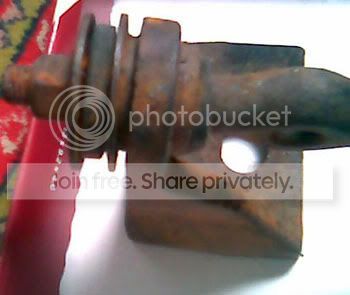
Pablo-great pics. DCRB-The popping your hearing? Do you see is Pablo's awsome pics? See the where he has removed the whole "frame" so to speack? The bushing has rubber (oreo cookie look to it) well, if your is bad the whole rubber insert will be missing and then what happens is that you have about a 3/8" gap thu sallowing all of the slop and play.
96_4wdr has a very important reminder which holds true about putting heavy grease on anything exposed to the elements. In your case Pablo it is a day late and a dollar short. You must have very bad winters and salt on your roads. Something that I'm well aware of coming from the mid-west. Just the other day I found a shorty all wheel drive from New York in our Junk yard. I looked underneath for a spare drive shaft going to the from pumkin from the transfer case. It was COMPLETELY RUSTED BADLY. No chance on salvaging anything. I took the bug deflector off of the hood-that was about it.
Even if you could have removed the items like I suggested/did you probably would have snapped off the mounting area's shaft.
It might be possible to dip them in a rust remover. Have you considered that? Sometimes the acid will remove more than what you want and leave you with nothing. Let me know what happens. Like I said, we have very nice weather down here, no SALT! If you aren't on a time schedule I could remove a set and sent it your way.
Id say to everyone-2wheel drive and 4-wheel drive since these set ups appear to be the same is to go ahead and set yourself up with a spare set of these moun pin & frame(mount bracket) combo's. We'll never know exactly how friendly the parts department will be in teh near future.