


flanging tool

Thread Starter
|
Elder User

Joined: Mar 2006
Posts: 670
Likes: 0
From: Western, PA
flanging tool
Im going to be puting some patch panels on my truck and Im in need of a flanging tool. I saw one from eastwood that looks almost like a set of vice grips, my question is how well do these things work around curves and such?
Thanks
Thanks
Posting Guru
Joined: Mar 2006
Posts: 1,118
Likes: 0
From: Williamson, NY
The flange tool is only used on flat or very shallow curved panels and your going to have very tired hands/arms flanging a lot of metal with a vise grip style flanger. I bought a air powered flanger off of eBay for ~ $30 and it flanges and punches holes in sheet metal effortlessly. You also may want to consider using 3M's panel adhesive to attach your panels. I used it to install new cab corners on my truck and it worked great and rather than use a flange tool to make a glue surface for the the curved section of the cab corner, I glued in a sheet metal glue strip behind the curved section leaving ~ 1" exposed to glue the cab corner to. According to the 3M site a properly done sheet metal glue joint is 11 times stronger than welding. When we lifted my cab up and put it back on the frame we actually used the cab corners to lift the cab and they feel totally solid. Check out my WebShots album for pictures of this repair.


Tuned


Joined: Aug 2007
Posts: 459
Likes: 123
From: Maryland
If you are going to use panel adhesive, like cujo did, then flanging would be needed. If you plan on welding, a butt weld would be best. With one metal thickness on one side of the weld and two on the other, it will make it more difficult to hammer and dolly any imperfections. The flanging operation has a tendency to take some of the crown out of a panel, and if welding the overlap becomes a trap for dirt and moisture, and thus your next rust generator.
Posting Guru
Joined: Mar 2006
Posts: 1,118
Likes: 0
From: Williamson, NY
Originally Posted by MP&C
If you are going to use panel adhesive, like cujo did, then flanging would be needed. If you plan on welding, a butt weld would be best. With one metal thickness on one side of the weld and two on the other, it will make it more difficult to hammer and dolly any imperfections. The flanging operation has a tendency to take some of the crown out of a panel, and if welding the overlap becomes a trap for dirt and moisture, and thus your next rust generator.
Tuned
Joined: Aug 2007
Posts: 459
Likes: 123
From: Maryland
I think you probably chose the best solution for where you were repairing. It shows kuhunas for trying something not widely used yet, but gaining popularity. It also gives viable options to those without welding equipment.
Another point to make on the welding, here's some floorpan halves I butt welded together, looks nice and shiney up top. Would be similar to welding in the "groove" of a flange joint.
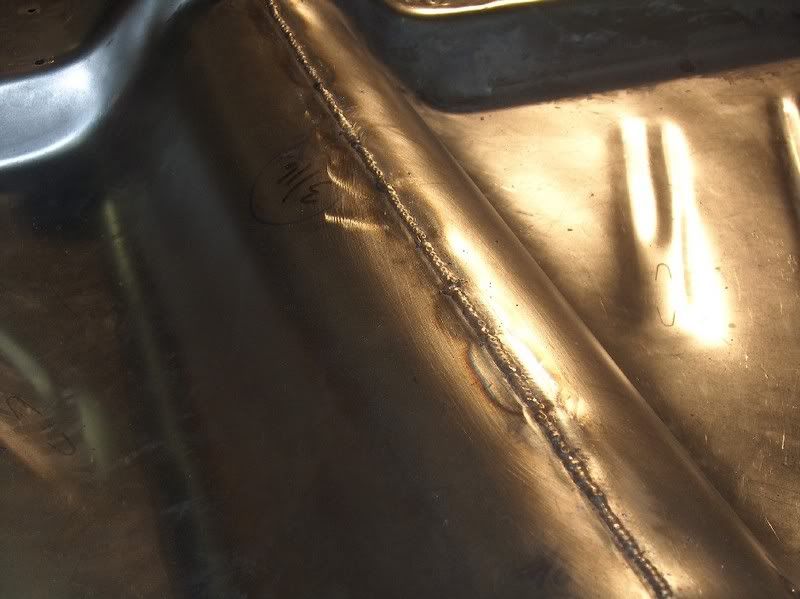
Now a short time later, this picture was taken of the bottom view when the car was placed on the rotisserie. If you look down both sides of the weld, you will see that the welding process also causes a flash rust. If this were the back side (inside) of your overlapped flange, you've just started the rust process without having to add dirt, water, etc. By having access to the back side (by using a butt weld), you can prep and paint to get rid of this condition.

Just something else to consider.....................
Another point to make on the welding, here's some floorpan halves I butt welded together, looks nice and shiney up top. Would be similar to welding in the "groove" of a flange joint.
Now a short time later, this picture was taken of the bottom view when the car was placed on the rotisserie. If you look down both sides of the weld, you will see that the welding process also causes a flash rust. If this were the back side (inside) of your overlapped flange, you've just started the rust process without having to add dirt, water, etc. By having access to the back side (by using a butt weld), you can prep and paint to get rid of this condition.
Just something else to consider.....................
Last edited by MP&C; Jan 28, 2008 at 08:57 PM.
Trending Topics
Posting Guru
Joined: Mar 2006
Posts: 1,118
Likes: 0
From: Williamson, NY
MP&C, that's some excellent welding technique! You must be a welder by trade from the looks of those welds. I'm assuming this was done with a MIG welder correct or did you TIG weld these floor pans?
FTE Stories
Ford Trucks for Ford Truck Enthusiasts

Top 10 Fords at 2026 Carlisle Ford Nationals
Joe Kucinski
3 Best / 3 Worst Parts of Modern Ford Ownership
Brett Foote
10 Amazing Upgrades That Solve Common Ford Truck Owner Headaches
Pouria Savadkouei
Every 2026 Ford Engine Explained
Brett Foote
10 Ugly Ford Trucks That We Still Kinda Love
Joe Kucinski
10 Things Every Truck Owner NEEDS (2026 Edition)
Michael S. Palmer
Rezvani's Latest Post-Apocalyptic Monster Is a Ford F-150 Raptor Underneath
Verdad Gallardo
Top 10 Most Expensive Ford Trucks Ever Sold on Bring a Trailer
Joe Kucinski
2027 Ford Super Duty Buyer's Guide (Every Model, Engine, & Package)
Brett FooteTuned
Joined: Aug 2007
Posts: 459
Likes: 123
From: Maryland
Cujo, thanks, the floor pans there were all done with a MIG. I'm not a welder by trade, but I have been exposed quite a bit by working on street rods. My official class room time was actually on the TIG. But unless you can get the butt joint tight together, you're better off using the MIG as a TIG will have a tendency to blow holes if there is a slight gap there, and it is also less forgiving to any dirt/contamination you may have missed. The method I used on the floors is something I call "dot" welding. Welding sheet metal is a different animal than welding up some thick steel angle in that the sheet metal is not as forgiving to excess heat. For example, when you start your weld bead with your mig welder set up properly for the gauge sheet metal you are using, if you were to actually do a weld pass you would see the start of the weld had little to no penetration due to the metal still being cold, as you progress the metal is heating up and you get better flowout on the bead and penetration of the weld, and if you go much further you will blow a hole. To combat this problem, as well as minimize heat buildup and deformation of the sheet metal, most suggest using a tack weld process, sometimes combined with short weld passes, skipping around to minimize heat buildup. When welding sheet metal, I will typically set my machine up for the next highest setting, for example, if welding 18 ga, I will use the machine setting for 16 ga. When I weld the first tack, or "dot", you will see full weld penetration due to this higher setting. If we were doing a weld pass it would blow a hole, but because it is only a single tack (dot) that chance is less likely. If you do tend to blow a hole while using this process, before reducing heat, try turning up the wire feed speed a bit. (If you have adequate heat to perform the weld process and the wire feed is not providing enough filler material, the machine is going to melt something-hence the blow hole. Speeding up the wire feed speed combats this) Skip around to minimize heat, or if you're in an area that has less chance of deforming (like next to a door jamb crease) you can do a few tacks in a row. In a case like this, I would let the first tack cool until the red glow starts to disappear, overlap about 1/3 to 1/2 of the last tack and do another. Repeat for about 1/4 to 1/2" pass, or as the metal will tolerate for the location. So actually you are still doing single tack welds, and allowing some cooling in between. On a final note, if you aren't getting full penetration on your welds and have to weld again from the back side, you are defeating the purpose by interjecting additional heat, and possibly causing additional deformation of the metal. Hope this may help some out there with their butt welds.
Tuned
Joined: Aug 2007
Posts: 459
Likes: 123
From: Maryland
Andy, here's one doing a lower fender repair, may help you or someone out if you decide to butt weld it in. The repair piece was made using a brake and Lancaster shrinker/stretchers. The first order of business is to clamp the lower edge flush with the bottom, align the side, and tack weld in place. As you can see I got a little too happy trimming and the long side has a bit too much gap there.

When welding, much of the distortion you'll see in the metal comes from the heat stretching it out, and when it cools down, you'll get a bit more shrinkage than what stretched. It helps to planish out the weld tacks as you go (hammer and dolly), minimizing any shrinkage issues. (Thoughts of George Costanza enter my mind) Just don't overdo it.

With any welding you are doing, check the back side to insure full penetration, or adjust your machine accordingly. If you need to weld it from both sides due to lack of weld penetration, you just doubled your chance of overly shrinking the area.
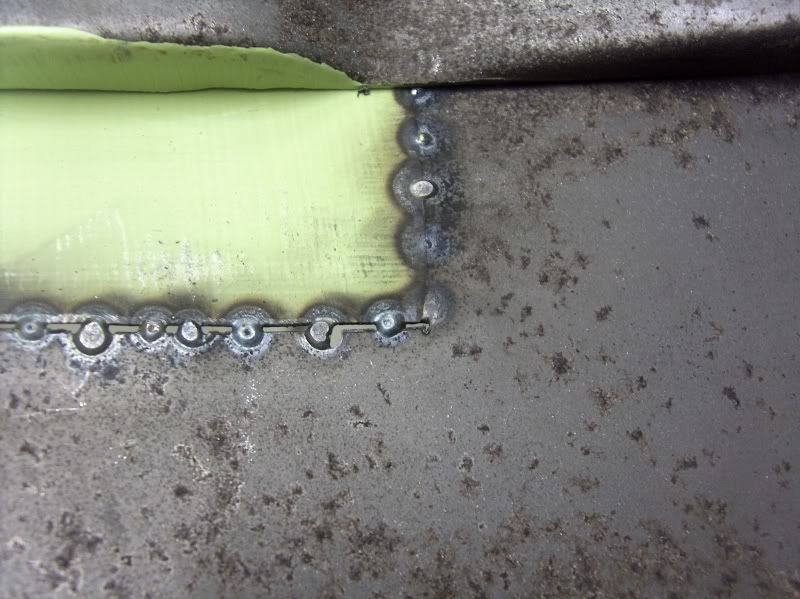
Ground some welds off as I went. As the weld "dots" tend to fill in and get closer, you'll run out of room, so this gets some of the excess out of the way for planishing the new welds.


The rest of the welds are filled in, skipping around as usual to minimize heat buildup, and then ground smooth.


When welding, much of the distortion you'll see in the metal comes from the heat stretching it out, and when it cools down, you'll get a bit more shrinkage than what stretched. It helps to planish out the weld tacks as you go (hammer and dolly), minimizing any shrinkage issues. (Thoughts of George Costanza enter my mind) Just don't overdo it.
With any welding you are doing, check the back side to insure full penetration, or adjust your machine accordingly. If you need to weld it from both sides due to lack of weld penetration, you just doubled your chance of overly shrinking the area.
Ground some welds off as I went. As the weld "dots" tend to fill in and get closer, you'll run out of room, so this gets some of the excess out of the way for planishing the new welds.
The rest of the welds are filled in, skipping around as usual to minimize heat buildup, and then ground smooth.
Posting Guru
Joined: Mar 2006
Posts: 1,118
Likes: 0
From: Williamson, NY
MP&C, I've been learning MIG welding on my own and I've not had any formal training, but I've read some welding books that covered the subject. I like your advise about turning the voltage up a little hotter than you would use for continuous welding of the size metal you are using and at the same time increasing the wire feed speed to get good penetration w/o blowing a hole in the material. Looking forward to trying this out, since I sometimes have a problem with poor penetration when MIG welding sheet metal. I believe that is why many people stress that you need to have a 1/16" gap between the sheet metal panels being butt welded, so if you fill the gap you'll have complete penetration. The problem with this gap is you're more likely to burn a hole with the gap there unless you use a copper plate behind the gap as you weld. From your pictures it looks like you tend to keep the panels as tight as possible and use your voltage/wire feed speed trick to get good penetration w/o blowing through your material.
Tuned
Joined: Aug 2007
Posts: 459
Likes: 123
From: Maryland
Yes, you want to keep the metal as tight together as possible using this method. It will give you less chance of blowing a hole, and doesn't provide all that room for the metal to shrink even more. Ever use the Eastwood type sheet metal clamps and weld on either side, only to have them get real tight and hard to remove? Good example of the gap providing shrinkage room. One method to reduce this if you're real **** is to file a small relief for the clamps to fit in so the rest of the joint is tight. 
Cargo Master


Joined: Dec 2004
Posts: 2,232
Likes: 3
From: NE Texas
To get back to the original question, air operated flanging tool/plug cutters can be had for about $35. I would not even consider one without the plug cutter even if you see no need for it. You never know what the future might hold.

Lead Driver
Joined: Aug 2003
Posts: 6,305
Likes: 18
From: Boulder Creek, Ca

Also looking at the Eastwood flange air tool, did not consider looking on ebay, think will make it my next cyber shopping excursion. MP&C, appreciate the info. and Pic's. Recently picked up a used MIG welder so I can install floor pans. Have no experience with MIG, as Cujo, I have read couple books on subject. Found the pic's and explanation very helpful, hope to start project when weather permits. Also have quarter panel that needs to be replaced, likely have it done by professional. I bookmarked this thread for reference, again thanks for the info.
dave
dave
Last edited by daveengelson; Jan 29, 2008 at 05:26 PM.

Thread
Thread Starter
Forum
Replies
Last Post
Occidental
1967 - 1972 F-100 & Larger F-Series Trucks
9
Oct 19, 2016 06:45 AM
meck1
1983 - 2012 Ranger & B-Series
1
Aug 5, 2016 04:25 AM
Cecil Little
1997 - 2006 Expedition & Navigator
4
Nov 28, 2004 02:35 PM