


Patching Holes/Prep for Paint

Thread Starter
|
Mountain Pass
Joined: Jan 2006
Posts: 211
Likes: 0
From: Westminster, Maryland
Patching Holes/Prep for Paint
Rebuilding a 1977 F150
I have removed the trim as it was damaged beyond repair and I cannot afford $600 for a new set... (who knows why it cost so much)
So.........
I have obvious holes in my body from the trim clips. As I prep my project for paint how do I patch these holes? what is the easiest method? will it turn out to look good in the long run?
I know I can patch with fiberglass patches, just not sure if I can get to every hole from the backside of the sheetmetal. Anyone have experience doing what it is I need to do?
THANKS!!! HAPPY NEW YEAR!!!

I have removed the trim as it was damaged beyond repair and I cannot afford $600 for a new set...
(who knows why it cost so much)So.........
I have obvious holes in my body from the trim clips. As I prep my project for paint how do I patch these holes? what is the easiest method? will it turn out to look good in the long run?
I know I can patch with fiberglass patches, just not sure if I can get to every hole from the backside of the sheetmetal. Anyone have experience doing what it is I need to do?
THANKS!!! HAPPY NEW YEAR!!!
Tuned


Joined: Aug 2007
Posts: 459
Likes: 123
From: Maryland
Any holes that are about 1/6-3/16 you should be able to easily mig weld them closed. To grind down the welds, I like to use a 3" x 1/16 cutoff wheel perpendicular to the weld, and move back and forth along the weld to grind it down. If you stay in one spot, that's when the wheel has a tendency to cut, so keep it moving back and forth. The minimal contact area of the cutoff wheel will also give you much less heat buildup than using a sanding disc, flap wheel, etc. Grind the weld down until it is just above the surface of your panels, then you can switch to a 3" angle sander with about a 60 grit roloc, to finish it smooth. Once ground down flush, I'd get to the back sides and paint with a good epoxy primer (or something, it's better than bare steel left to rust).
For larger holes, I like to cut out a tight fitting disc of 18 ga (or matching, if your panel is a different thickness) cold rolled steel. I'll either use a magnet to hold it in place or weld on a temporary "handle". As I'm sure you've heard, jump around to minimize heat and just do tack welds. Allow the panel to cool in between welds, use an air nozzle or damp cloth to assist, if needed. Much of the distortion you'll see when welding comes from the shrinking of the metal as the weld cools. By skipping around with tack welds, you can use a hammer and dolly to "planish" out the tacks as you go to get rid of this shrinkage, and if you can use the previous steps to control heat, it may not be needed at all. After planishing any tack welds, grind them down so they won't be in the way of planishing any following tack welds.
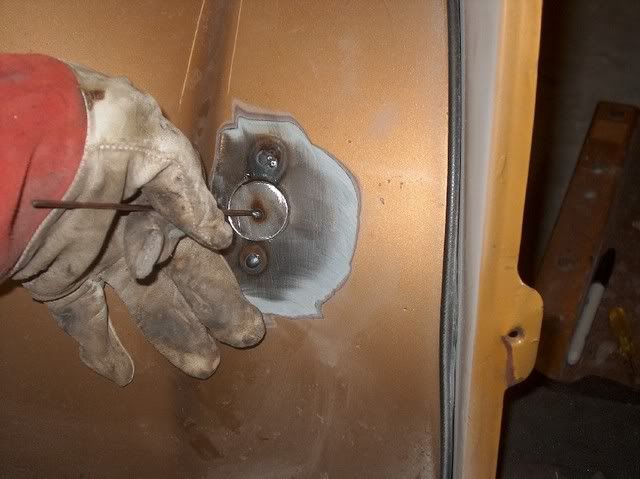
For larger holes, I like to cut out a tight fitting disc of 18 ga (or matching, if your panel is a different thickness) cold rolled steel. I'll either use a magnet to hold it in place or weld on a temporary "handle". As I'm sure you've heard, jump around to minimize heat and just do tack welds. Allow the panel to cool in between welds, use an air nozzle or damp cloth to assist, if needed. Much of the distortion you'll see when welding comes from the shrinking of the metal as the weld cools. By skipping around with tack welds, you can use a hammer and dolly to "planish" out the tacks as you go to get rid of this shrinkage, and if you can use the previous steps to control heat, it may not be needed at all. After planishing any tack welds, grind them down so they won't be in the way of planishing any following tack welds.
Senior User
Joined: Sep 2007
Posts: 436
Likes: 0
Very good suggestions on here. If you do not have a welder you can follow the same steps as welding except you can use body adhesive in place of the actual welding. This is what i prefer just because there is no heat involved, which for some reason eventually leads to rust. Anyway, which ever way you go, you can access the holes from behind fairly easily for the doors and the bed. I'm not sure about the font fenders but i assume you can also get to the back sides. I would take the time to prep the back sides patch the holes, using the best method for you, and then protect the backside with a coat of paint/encapsulating coating/undercaoting. Again what you prefer to use.
Good luck. i know what you mean about trim being expensive. I assume you have already looked locally at junk yards, you should post a thread advertising your need of trim pieces and see what some of these guys have. You may get it cheap from some of your old buddies on this forum.
Good luck. i know what you mean about trim being expensive. I assume you have already looked locally at junk yards, you should post a thread advertising your need of trim pieces and see what some of these guys have. You may get it cheap from some of your old buddies on this forum.
Cargo Master


Joined: Dec 2004
Posts: 2,232
Likes: 3
From: NE Texas
dludlow,
I would HIGHLY recommend that you weld these holes shut as opposed to any kind of adhesive, fiberglass or anything. Since you don't weld, look for a neighbor or friend with a small MIG welder. It would be much better done with shielding gas, but you could get by with Flux core.
The popularity of wire (MIG) welders has skyrocketed in the last few years and I would be willing to bet that someone you know has one and could help. If not, it would be an inexpensive job to have this done at a welding shop.
The important thing is to do a quick weld on a hole, don't dwell on the hole to make a very hot puddle. You can warp the metal.
Good luck,
Thread Starter
|
Mountain Pass
Joined: Jan 2006
Posts: 211
Likes: 0
From: Westminster, Maryland
Doc,
Thanks, I was already looking for a friend who can weld or getting prices from someone.
Anyone in Maryland interested??? Truck is in Westminster - Carroll County
Thanks, I was already looking for a friend who can weld or getting prices from someone.
Anyone in Maryland interested??? Truck is in Westminster - Carroll County
Trending Topics
Senior User
Joined: Sep 2007
Posts: 436
Likes: 0
[QUOTE=MBDiagMan]dludlow,
I would HIGHLY recommend that you weld these holes shut as opposed to any kind of adhesive, fiberglass or anything. [QUOTE]
Why?
I would HIGHLY recommend that you weld these holes shut as opposed to any kind of adhesive, fiberglass or anything. [QUOTE]
Why?
Last edited by Duke78; Jan 3, 2008 at 08:19 AM.
FTE Stories
Ford Trucks for Ford Truck Enthusiasts

Top 6 Best Deals Available on New Fords & Lincolns Right Now
Brett Foote
This Hennessey Takes the Expedition Tremor's Off-Roading Capability to the Next Level
Verdad Gallardo
Top 10 Fords at 2026 Carlisle Ford Nationals
Joe Kucinski
3 Best / 3 Worst Parts of Modern Ford Ownership
Brett Foote
10 Amazing Upgrades That Solve Common Ford Truck Owner Headaches
Pouria Savadkouei
Every 2026 Ford Engine Explained
Brett Foote
10 Ugly Ford Trucks That We Still Kinda Love
Joe Kucinski
10 Things Every Truck Owner NEEDS (2026 Edition)
Michael S. Palmer
Rezvani's Latest Post-Apocalyptic Monster Is a Ford F-150 Raptor Underneath
Verdad GallardoTuned
Joined: Aug 2007
Posts: 459
Likes: 123
From: Maryland
<HR style="COLOR: #d1d1e1" SIZE=1><!-- / icon and title --><!-- message -->If you use adhesive to secure a panel, it has to be a lap joint. Then you have to use filler to smooth the joint, whether it's a simple lap joint (with a mismatch in height of one sheetmetal thickness), or a flanged lap joint (where you have a step on one panel, but there's always a gap to fill and flanging is not always going to be precise). The other thing about flanging is that it tries to straighten any low crown surfaces - and it stiffens the panel to where it's difficult to straighten with a hammer and dolly.
The knock on an adhesive lap joint is that you'll have a witness line on the seam when the panel is heated in the sun, or when it's real cold, due to differences in thermal expansion of the metal, adhesive, and filler. You can get a similar result with a welded lap joint. That's why most if not all the "advanced" metal working you'll see here has welded butt joints. With a single metal thickness you can straighten any imperfections much easier.
If you can hide the joint under some stainless trim, then adhesives become more attractive. Another place you could use them is on some floor panel patches where a witness line would never be seen.
Originally Posted by dludlow
Doc,
Thanks, I was already looking for a friend who can weld or getting prices from someone.
Anyone in Maryland interested??? Truck is in Westminster - Carroll County
Thanks, I was already looking for a friend who can weld or getting prices from someone.
Anyone in Maryland interested??? Truck is in Westminster - Carroll County
My shop is in southern MD so I think it may be more convenient finding someone more local to you.
Last edited by MP&C; Jan 3, 2008 at 08:35 AM.
Thread Starter
|
Mountain Pass
Joined: Jan 2006
Posts: 211
Likes: 0
From: Westminster, Maryland
My shop is in southern MD so I think it may be more convenient finding someone more local to you.[/QUOTE]
If I was still where I grew up you'd have the job! Calvert boy here
If I was still where I grew up you'd have the job! Calvert boy here
Cargo Master
Joined: Dec 2004
Posts: 2,232
Likes: 3
From: NE Texas
[QUOTE=Duke78][QUOTE=MBDiagMan]dludlow,
I would HIGHLY recommend that you weld these holes shut as opposed to any kind of adhesive, fiberglass or anything.
Why?
IMHO, welding is the ONLY way that you KNOW that they will not give trouble later on down the road. If one is only fixing something to sell right away then chemical rather than mechanical methods might suffice as long as your conscience will allow you to sell it that way.
BTW, I did not point out the importance of SEALING the welded surfaces properly so that there is no paint delamination later on. A good way to seal the welds is with fiberglass reinforced plastic filler or Epoxy Primer over metal prep.
My opinion and $0.02,
I would HIGHLY recommend that you weld these holes shut as opposed to any kind of adhesive, fiberglass or anything.
Why?
BTW, I did not point out the importance of SEALING the welded surfaces properly so that there is no paint delamination later on. A good way to seal the welds is with fiberglass reinforced plastic filler or Epoxy Primer over metal prep.
My opinion and $0.02,
Logistics Pro
Joined: Aug 2003
Posts: 4,701
Likes: 6
I am not necessarily recommending this, but I had a chewed up bubblegum rear corner above the taillight, and I thoroughly cleaned it, hammered it out the best I could, and filled it with JB weld. Then I sanded it down and painted it (with spray paint, of course) and guess what? It is holding up just the same as the parts I welded shut. My truck had an entire spraypaint job, and sits outside 365 days a year. It was painted 3 years ago.
Again, not necessarily recommending it, but if you are doing a budget job and can't find a welder, it "could" be an option.
Try to find a welder
Again, not necessarily recommending it, but if you are doing a budget job and can't find a welder, it "could" be an option.
Try to find a welder
Cargo Master
Joined: Dec 2004
Posts: 2,232
Likes: 3
From: NE Texas
Ted,
If I understand you correctly, you were not filling a hole, rather were using the JB Weld as body filler to smooth out the dents. You have a better chance of properly prepared JB Weld holding up in that case, and it probably would in many cases. In the case of a hole, however, such a repair will most likely crack, shrink, delaminate or something.
Welding actually makes the repaired area part of the area itself. No adhesive can do that.
It is a matter of "Do you feel lucky?" If you are not lucky and it DOES delaminate, a lot of time and money is lost.
My $0.02,
Logistics Pro
Joined: Aug 2003
Posts: 4,701
Likes: 6
Yeah, I am not necessarily advocating it. The spot was literally heavily pock-marked. I am not a body man, but was trying to do a decent job. My point was that JB weld isn't bad for a cheap job, but I wouldn't probably use it for filling holes.
The absolute best way is to weld it
The absolute best way is to weld it
Posting Guru
Joined: Feb 2008
Posts: 1,795
Likes: 1
From: Lubbock, Texas
What about patching holes on the roof of a vehicle? The last owner had some equipment mounted on the front of the roof (light bar? siren? who knows) but now there are just screw holes letting water in. What would be the best way to patch those? jb weld?