


Electric Tailgate Lock
Elder User
Joined: Jan 2007
Posts: 547
Likes: 0
Originally Posted by littlewillie
tooldad,
I�m having trouble understanding your original hookup. Works with the lock / un-lock button, but not the remote. I didn�t know there was a separate wire for each. The folks that installed the unit last year indicated that the remote control functions were run on a separate circuit from the hardwired switches. Apparently this is correct by what I have experienced in terms of existing wiring.
I�m not sure if having a 12-volt constant that you spoke about had to be connected to actuator to stop working. Your actuator may not be bad; I think you�re connected to the wrong wires. There was no way for me to hook up the wrong wires when I went back to the original install wiring as I never removed the quick connects, thus the wires remained easily identifiable. Also, for other reasons, I know I could not have rehooked the wires backwards. I would love for the actuatr to still be good, but I do not think it is.
Too keep this short; do you know how to view my gallery? I have a detailed picture gallery on exactly what I did. If you have any questions, send me a private message or email me. I checked your gallery before I proceeded actually. What you refer to as the light pink w/black looks like what I identified as bright pink w/black, and this is what I found to have a constant 12V signal. Also, I found two identical wires.you show looks like what I identified as light/pale pink w/black. I did not find one that shade of pink with either a yellow or orange stripe. Seems like maybe they changed the wiring harness a bit between 04/05 and my 06.
Willie

Thread Starter
|
Freshman User
Joined: Jul 2007
Posts: 34
Likes: 0
From: TN
tooldad, Are you on the right wires? Did you look at my DIY in my gallery? If you have to buy a new unit, $58.39 from Amazon.com is the best price. Choose the free super saver shipping. You'll have it at your door in about 3 days regardless of when the website say's you'll get it.
Willie
Willie
Thread Starter
|
Freshman User
Joined: Jul 2007
Posts: 34
Likes: 0
From: TN
tooldad, I missed your responses in blue in your above post.
<O
<O
I was thinking you might have a bad connection at your connectors. Hooking it up backwards would only cause the actuator to work opposite the way it�s supposed to. It would lock with the un-lock push & un-lock with the lock push.
<O
<O
Did you test these 2 wires? I used a voltmeter. I stuck the wire with the red lead & put the black lead to ground. I then pushed the lock button on the remote. When the voltmeter indicated "12", I knew I had the proper wire for the lock side of the actuator. It would be easier to do this with a 12v test light. <O
<O
The pink / orange stripe wire is in the rear door. It is the un-lock wire. I have to push the remote twice to get the passenger & 2 rear doors to un-lock. I didn�t want the tailgate lock to work with the front driver door because it would get worked more.
<O<O
Keep me updated on this. I�ll help you as needed.<O
Willie</O
<O
Originally Posted by tooldad
There was no way for me to hook up the wrong wires when I went back to the original install wiring as I never removed the quick connects, thus the wires remained easily identifiable. Also, for other reasons, I know I could not have rehooked the wires backwards. I would love for the actuatr to still be good, but I do not think it is.
I was thinking you might have a bad connection at your connectors. Hooking it up backwards would only cause the actuator to work opposite the way it�s supposed to. It would lock with the un-lock push & un-lock with the lock push.
<O
Originally Posted by tooldad
Also, I found two identical wires.you show looks like what I identified as light/pale pink w/black.
<O
Did you test these 2 wires? I used a voltmeter. I stuck the wire with the red lead & put the black lead to ground. I then pushed the lock button on the remote. When the voltmeter indicated "12", I knew I had the proper wire for the lock side of the actuator. It would be easier to do this with a 12v test light. <O
Originally Posted by tooldad
I did not find one that shade of pink with either a yellow or orange stripe. Seems like maybe they changed the wiring harness a bit between 04/05 and my 06.
The pink / orange stripe wire is in the rear door. It is the un-lock wire. I have to push the remote twice to get the passenger & 2 rear doors to un-lock. I didn�t want the tailgate lock to work with the front driver door because it would get worked more.
<O
<OKeep me updated on this. I�ll help you as needed.<O
Willie</O
Elder User
Joined: Jan 2007
Posts: 968
Likes: 0
From: Greenville, SC
Originally Posted by tooldad
Littlewillie,
Yes, see my prior post. My wiring just appears to be different. Thanks for the heads up about Amazon. Definitely less than I paid for the first unit.
Tooldad
Yes, see my prior post. My wiring just appears to be different. Thanks for the heads up about Amazon. Definitely less than I paid for the first unit.
Tooldad
http://cgi.ebay.com/DEI-524T-Power-D...QQcmdZViewItem
Elder User
Joined: Jan 2007
Posts: 547
Likes: 0
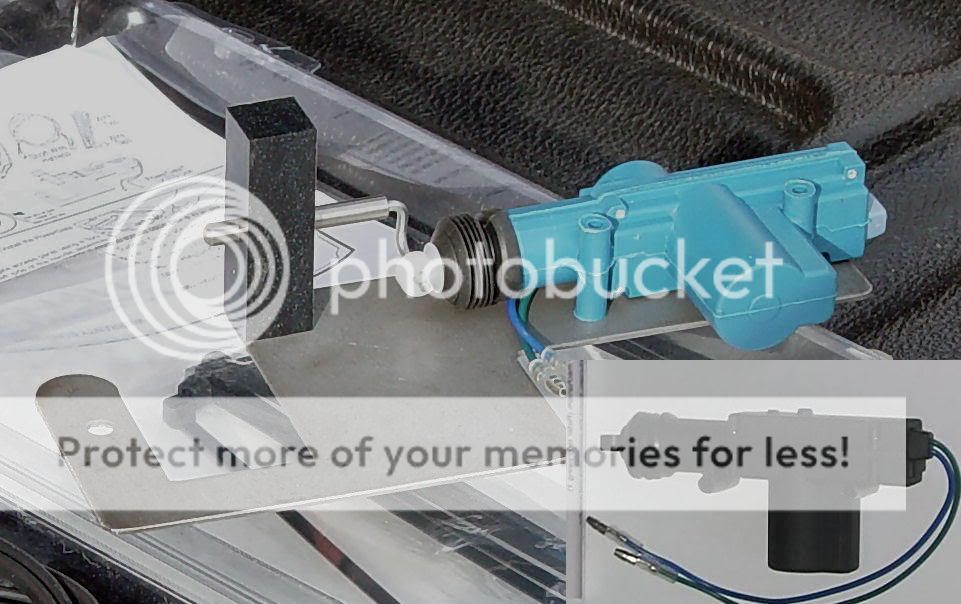
Received the replacement actuator Saturday. Connected it to the bracket today. Perfect match. Now to identify the correct wires and install/connect.
Can someone please explain how to remove the rear door panel so that I do not mess it up trying to figure it out? I want to look at the lock actuator wire colors as extra insurance for making the right connection this time. THANKS!
Can someone please explain how to remove the rear door panel so that I do not mess it up trying to figure it out? I want to look at the lock actuator wire colors as extra insurance for making the right connection this time. THANKS!
FTE Stories
Ford Trucks for Ford Truck Enthusiasts

Top 10 Fords at 2026 Carlisle Ford Nationals
Joe Kucinski
3 Best / 3 Worst Parts of Modern Ford Ownership
Brett Foote
10 Amazing Upgrades That Solve Common Ford Truck Owner Headaches
Pouria Savadkouei
Every 2026 Ford Engine Explained
Brett Foote
10 Ugly Ford Trucks That We Still Kinda Love
Joe Kucinski
10 Things Every Truck Owner NEEDS (2026 Edition)
Michael S. Palmer
Rezvani's Latest Post-Apocalyptic Monster Is a Ford F-150 Raptor Underneath
Verdad Gallardo
Top 10 Most Expensive Ford Trucks Ever Sold on Bring a Trailer
Joe Kucinski
2027 Ford Super Duty Buyer's Guide (Every Model, Engine, & Package)
Brett Foote
Thread Starter
|
Freshman User
Joined: Jul 2007
Posts: 34
Likes: 0
From: TN
Tooldad, Taking the rear door panel off for "extra insurance" is not necessary. The wire you�re looking for is the un-lock wire under the plastic door seal on the floor. Pop this panel & find the color wire you �think� is the one. Take a 12v test light. There is an alligator clip on the tester. Connect the clip too anything metal in the doorjamb (ground). The other end of the tester has a metal point. Stick this point into the wire that you �think� is the proper one. Stick the wire deep to get past the plastic coating to the actual metal wire (positive). Push the remote un-lock twice to un-lock the rear doors. If the tester lights up, you have the proper wire. If the tester light does light up, it will only be for a very short amount of time. Just long enough to go from locked to un-locked. If the tester does not light, you don�t have the proper wire. I used a voltmeter to do this. It�s harder to do than the test light.
Even if you pull the door panel & locate the wire in the door, you�ll have to locate the wire in the wire bundle on the floor. You will not be able to follow the wire from the lock to where it�s located at the floor because of the bundle it�s in. You�ll need to test the wire regardless of how you do it. Let the tester do what it�s designed to & you�ll save yourself some steps & still get the results your after.
Willie

New User
Joined: Nov 2006
Posts: 1
Likes: 0
Thanks for the pics in the gallery. Had a problem finding the "red w/ orange wire" on the passengers side...PER THE DIRECTIONS for a 2004 F150. Luckily you smart people (and per directions for the Super Duty), mentioned the pink w/ orange wire, so found that on the drivers side, just before a nice little rubber drain plug. So, I ran the wire down through that drain hole and to the back (easier to keep the fuse connected that way), cut a slit in the rubber plug and put it back. Works like a champ.
Thanks
Tracy
Thanks
Tracy

Thread
Thread Starter
Forum
Replies
Last Post
revytrucks
1997 - 2003 F150
158
Feb 17, 2026 03:36 PM
sjniii
1983 - 2012 Ranger & B-Series
15
Oct 24, 2009 10:01 PM
hd4ever
1999 - 2016 Super Duty
3
Mar 14, 2008 06:53 PM