When you click on links to various merchants on this site and make a purchase, this can result in this site earning a commission. Affiliate programs and affiliations include, but are not limited to, the eBay Partner Network.
Hey Forum-
Need some help.
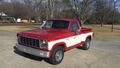
So, an update on the 1966 F100 I purchased. The thing needed new brake system, got some new rims and tires, and some period correct caps. But I am having problems with the engine. It is a 1972 300 6 cylinder, with an 1985 head on it. I have cleaned up the engine and fit an original oil fill air filter. Looks pretty good, but it has no power and I cannot seem to dial in a misfire at accelerating (2000 -2500 RPM). The motor just starts sounding like it is misfiring and wont accelerate- and bogs- sounds terrible- like its misfiring. Anyway. I have went through the ignition system, got new plugs, wires, and cap. I checked the coil resistance and it reads 1.5 ohms. Spark looks decent, but even after installing new spark plugs, the carbon build up on them is insane. They are black. I cleaned the inside of the valves when I replaced the intake manifold gasket, they were filthy. So the spark plugs look dry and sooty. All intake and exhaust manifolds are solid- the seal up- after I had to weld an ear that was broken off- but no leaks. I purchased a YF carb and dialed that in, it doesn't leak- not much to adjust there. But it sure smells rich, Like I know its just an air mixture screw, but this thing can burn they eyes working the garage. I took off the valve cover and looked at rockers and valve movement, the rockers/valves were looking good, and the push rods spun as they stroked- seems legit. So, why does this thing have no *****, why does it feel like it misfires at higher RPM? I took it for a spin a few minutes ago after checking the timing and all vacuum (No leaks)- I can only maintain about 12.5 inches of vacuum- seems low. Is that low?
What next- So I checked the compression next:
1) 105
2) 130
3) 130
4) 125
5) 132
6) 115
Looking at this forum, it seems if pressure is less than 120 psig then the engine/rings are worn. I did squirt some oil in #1 cylinder and pressure went up to around 140 psig.
So, what are your thoughts on why I am getting a misfire at high RPM?
I know it might need new rings, but if I go that route, I suppose just rebuild it. Anyway, your feedback is much appreciated. I am frustrated with this thing.
Thanks.
-Matt 1966 shorty. After new radiator valve cover, painted, new YF Carb, and oil fill air filter.
Try asking down on the 6 cyl forum. Does the vacuum advance work? What shape is the harmonic balancer? If old, it may have shifted causing the timing to be off. How much advance do you think you have?
Try asking down on the 6 cyl forum. Does the vacuum advance work? What shape is the harmonic balancer? If old, it may have shifted causing the timing to be off. How much advance do you think you have?
John, thanks for your response. Actually the harmonic balancer isn’t something I thought of and it does look a bit old. Could that be the reason for the chatter/misfire feeling at higher RPMs?
Vacuum advance does seem to be working.
How much advance, not sure, I am trying to control advance by intake; get the intake vacuum to the lowest and then throttle back a bit. Vacuum is like 12.5 inches, which seems low. I can get it to 15 at times, but the last I messed with it.
But why are my plugs all fouled up with carbon ? Harmonic balancer has some cracks in rubber.
Carbon build-up can be caused by an incomplete burn of the fuel and air mixture. Or it can be caused by oil leaking into the combustion chamber.
Rich air-fuel mixture
Poor quality fuel or water in the fuel
Defective ignition components - the condenser is often overlooked as a culprit but can cause a wide range of problems.
If your compression is low it might be blow-by past the piston rings which is oil getting into the chamber. Or the valve stems and seals may be letting oil in from the top.
A leak-down test can tell where the problem is coming from if it's wear and tear related. Not a difficult test but it does require compressed air to pressurize the cylinder.
Points or electronic ignition? If points, make sure you're only getting appx 6 volts in the run position. Are the points burnt and gapped correctly? Burnt points will also cause your problem. Is the spark advance working? Pull a vacuum on the advance line and watch the points plate for movement.
Get it running, advance the timing until the engine is running free, then slowly retard until there is a slight load on the engine. Then adjust the carb screw in until it slows the engine. Open until it runs very free, then screw in until it just starts to slow the engine. Then test drive.
This should give you an indication of whether you have deeper problems of your balancer is off, causing all your other adjustments are off.
Also, pull #1 plug and hand rotate the engine is at TDC using a wooden dowel in the plug hole. Then check the pointer. Wait until the piston is close to TDC before putting the dowel in so it won't break off in the cylinder.
Points or electronic ignition? If points, make sure you're only getting appx 6 volts in the run position. Are the points burnt and gapped correctly? Burnt points will also cause your problem. Is the spark advance working? Pull a vacuum on the advance line and watch the points plate for movement.
Get it running, advance the timing until the engine is running free, then slowly retard until there is a slight load on the engine. Then adjust the carb screw in until it slows the engine. Open until it runs very free, then screw in until it just starts to slow the engine. Then test drive.
This should give you an indication of whether you have deeper problems of your balancer is off, causing all your other adjustments are off.
Also, pull #1 plug and hand rotate the engine is at TDC using a wooden dowel in the plug hole. Then check the pointer. Wait until the piston is close to TDC before putting the dowel in so it won't break off in the cylinder.
yes, I do have points for now. I checked the voltage to the coil and running it reads 11.5 volts. So, the line does not have a resister in it to drop to 6 volts. It is my understanding that this is to ensure the coil does not burn out quick and last. Is that true? Could the voltage be causing this misfire at higher RPMs?
I hooked up a vacuum to the vacuum advance and it seems to be working. It’s moving to advance when I apply vacuum.
I did check TDC multiple times, I had it at BDC one time, and it would not start, but it’s correctly at TDC and firing order is correct.
I am checking ohms on the coil now, to see what that reads. It checks out good.
The points gap is looking about .035, which seems big. I will adjust that to .25 as I have read.
That did seem to help.
I had purchased a 3 Ohm Coil for the Petronix system I was going to install, because after checking the input coil wire it did not appear that the wire had an internal resister. So…
I took it for a spin and she still is misfiring while I accelerate. Sad really.
Could it be something else in the distributor?
I mean, she runs pretty good at idle, with a misfire every once in a while, a shutter that you can pick up from listening to the exhaust.
I followed your guidance on setting up the engine but what exactly do you mean -“Then adjust the carb screw in until it slows the engine. Open until it runs very free, then screw in until it just starts to slow the engine”, what does open until it runs free.
So, I replaced the original radiator because it was shot with a similar one, but the original engine was a 240 6 cyl, and this is a 300. It seems to get really hot, I have had a few old cars but the radiator to engine hose is too hot to even touch. No, the thermostat is not working on this motor, but I am feeling like I should have gotten a larger radiator instead. Could the engine being to hot be a reason it misfires during acceleration? It’s too hot and there is bad fuel vapor Ratios?
Points at around .18 The voltage you are seeing will burn the points and cause the misfire you are seeing. I have been through that myself. The engine sounded like a machine gun out the exhaust under heavy throttle.
Change points and run a full 12 volt line from the back pole of the solenoid to the coil, then put a resistor in the line that is now on the coil for running voltage. Tie both of these wires together. That way you will have 12 volts for starting and 6 for running. If you don't have the full 12 for starting, you will have a hot start issue.
Your truck should be set up to have both 6 and 12 volts at the points, but who knows what has been changed through the years.
Put in new points, and check the timing and other things I mentioned in my earlier post.
Points at around .18 The voltage you are seeing will burn the points and cause the misfire you are seeing. I have been through that myself. The engine sounded like a machine gun out the exhaust under heavy throttle.
Change points and run a full 12 volt line from the back pole of the solenoid to the coil, then put a resistor in the line that is now on the coil for running voltage. Tie both of these wires together. That way you will have 12 volts for starting and 6 for running. If you don't have the full 12 for starting, you will have a hot start issue.
Your truck should be set up to have both 6 and 12 volts at the points, but who knows what has been changed through the years.
Put in new points, and check the timing and other things I mentioned in my earlier post.
Thanks Yardbird, that makes a lot of sense. I purchased a few things recently so I will update you. And I will look at the two lines, one coming from the starter solenoid to the + coil, and the other with a 6 volt resister to the + coil as well.
I purchased a Petronix 3 ohm coil, which I had read allows you to run 12 volts directly to the + coil, is that true ? Funny you read things but it that is true then I was hoping that would have fixed my issue. But test driving it last night resulted in the misfiring during acceleration I described.
I also purchased an original refurbished auto-lite distributor for the 1966 300 6 cyl. The one I have in there has a different internal set up, looks Chinese, and also had a different from original rotor. Anyway.
I had mentioned in another post that I had put an original style new radiator in the truck to replace the old one. It was 18” x18”x1.25” so I got the same one. There are mounting points on the truck for a larger radiator and a spacer cover the difference that is original. I probably should have bought an 18”x24”x1.25” radiator, because this engine seems to be running hot. After my drive last night, the upper radiator hose was very hot, like I would say it was running at like 235 ish. Anyway thought I would throw that information in there.
As far as the harmonic balancer slipping, I am not sure, I will check the timing marks and put a picture below. There isn’t any shaking at low rpm’s. It doesn’t appear to be slipping, I checked the timing again with compressions stroke (TDC) top with #1 piston and #1 position on distributor, still lines up.
Ok you said it is at TDC now was that with the wood dowel to make sure the timing mark showed TDC.
If the mark is not showing right you can never set timing with a light.
As for "seams to" it would be nice to see numbers.
Like what is base timing set to, vacuum removed and plugged, after the mark is known to be 100% right?
Bring the RPM up to 3000 RPM what it the timing?
Hook the vacuum up did the mark move from base at idle?
Now bring the RPM up to 3000 what is it?
This will show that the dist. is working as it should.
You can adjust the timing & carb with a vacuum gauge.
Motor up to temp, vacuum removed and plugged turn the dist. to get the highest vacuum reading.
Hook vacuum up and road test an das said earlier if you get hard start or pinging kick the timing back a little.
For the carb, Is the choke opening all the way?
Get it up to temp and adjust the idle mix screw to get the highest vacuum reading.
Now you may want to pull the carb apart and check the float level.
If the level is to high it will run rich and foul the plugs. Do you know who kicked the box when it was shipped to you or the store?
Also when apart you will see a needle that fits into a jet / seat, this is the high speed or main needle assy.
You will also see you can adjust this needle. lower in the seat leaner, up out of the seat richer.
Check out what this screw uses. My factory carb uses a Torx but my Ebay carb uses a slotted screw driver.
You do not need to pull the top to make adjustments. Look around the air filter gasket area there should be a hole or a plug (factory) that the tool fits down to turn the screw. Note clock wire will raise the needle.
The only way I know to adjust this right is with a air fuel ratio meter other wise it is a guess.
You could go out for a drive at high way speed and when safe shut the motor off, out of gear and coast to the side of the road.
Pull a few plugs and see what they look like and adjust from there.
BTW dont rule out a bad plug just because they are new dost not mean good with any prats you get now days.
Could get it up to temp and if you have a miss at idle pull 1 wire at a time and the one that dose not make a change is not doing its job.
Dave ----
Thank you Dave @FuzzFace2 , I appreciate you helping me out.
I did not use a dowel to set the timing mark, I just used a flashlight and watched the piston rise on the compression stroke and then reach its peak. Tweaking the crank counter and clockwise to get the peak. I will use a dowel though- good point. I will go back and check it and let you know what I find.
I will check then verify the timing with a light and follow your instructions. I will let you know what I find out- I will have to do that tomorrow night or Tuesday though.
As far as the carb, I purchased it remanufactured manual choke YF, so I know the choke is open, but as far as the float and adjustments, the only adjustment on this thing is the air/fuel mixture screw. I texted the remanufacturer and he sad that the float is set to factor specs and cannot be adjusted from outside. This is a single barrel YF style carb- manual choke. Remanufactured Carb I purchased on eBay.
I will message you when I find out the status of the timing marks, and settings with vacuum advance and without- and at 3000 rpm.
Heat may be a symptom of the problem, rather than the cause. If timing is retarded at idle, it will run hot at idle.
On pre-smog vehicles, vacuum advance is hooked to manifold vacuum. At idle, vacuum is high, and vac advance is high. This early ignition keeps exhaust gas temps low and the engine runs at 'normal' temp.
On smog vehicles, advance at idle was eliminated by hooking up to ported vac, which is negligible at idle. This raises EG temps, and burns ***’s - which was the goal, but it caused overheating.
It sounds like you’ve confirmed TDC and the timing pointer and the wires on the cap are in the right spot and going to the right cyls.
Points and condenser add variables. If you are going to install a pertronix unit and coil, I might do that to eliminate those variables. Otherwise get the points clean and gapped right and try a new condenser as previously suggested.
I highly suggest you get a timing light. Based on what you’ve bought so far, this seems to be in your budget. You’re having too many issues to investigate this by ear or by vacuum. You should verify and set initial timing with the light. Then work the throttle and verify centrifugal advance is working – the timing advance should climb up to 30 BTC or something at 3000 rpms. Then re-attach vacuum advance line and verify it is working – advance at idle might be up to 20 BTC or more, and it will drop out quickly when you hit the throttle.
Lot's of goods suggestions on things to TS, definitely check the condenser, and something I dealt with once on my 240, I had one the springs on the mechanical advance in the dist that was broken, although that was causing a pinging. If your plugs are dark, I would def check your carb, when you are accelerating, if the float spring is weak it could be flooding the engine as the fuel pump is pumping more fuel, pushing it into the venturi and making it run rich...
I did do an ohm check on my condenser and it checked out satisfactory. The float does not have an external adjustment and needs to be set during rebuild- as someone said in a previous post, someone may have kicked the thing in shipment, but I will wait on messing with that.
This Hennessey Takes the Expedition Tremor's Off-Roading Capability to the Next Level
Slideshow: The VelociRaptor Expedition gains a lift, upgraded suspension, Brembo brakes, and trail-ready equipment while retaining the stock 440-horsepower EcoBoost V6.
Rezvani's Latest Post-Apocalyptic Monster Is a Ford F-150 Raptor Underneath
Slideshow: Called the Fortress, the 850-horsepower pickup combines Raptor underpinnings with military-inspired features, survival equipment, and a starting price of $285,000.