When you click on links to various merchants on this site and make a purchase, this can result in this site earning a commission. Affiliate programs and affiliations include, but are not limited to, the eBay Partner Network.
I'm down to my last wire of my installation and I am stumped here. I need to heat up my red module wire and ballast resistor feed with hot in run only, but in my '86 my hot in run wire (i1 in my switch, red/Lt.grn) will also be hot in start because my hot in start (i2 in switch, brn/pnk) is connected to it before the instrument cluster. How do I heat up my red module wire and my ballast resistor in run only?
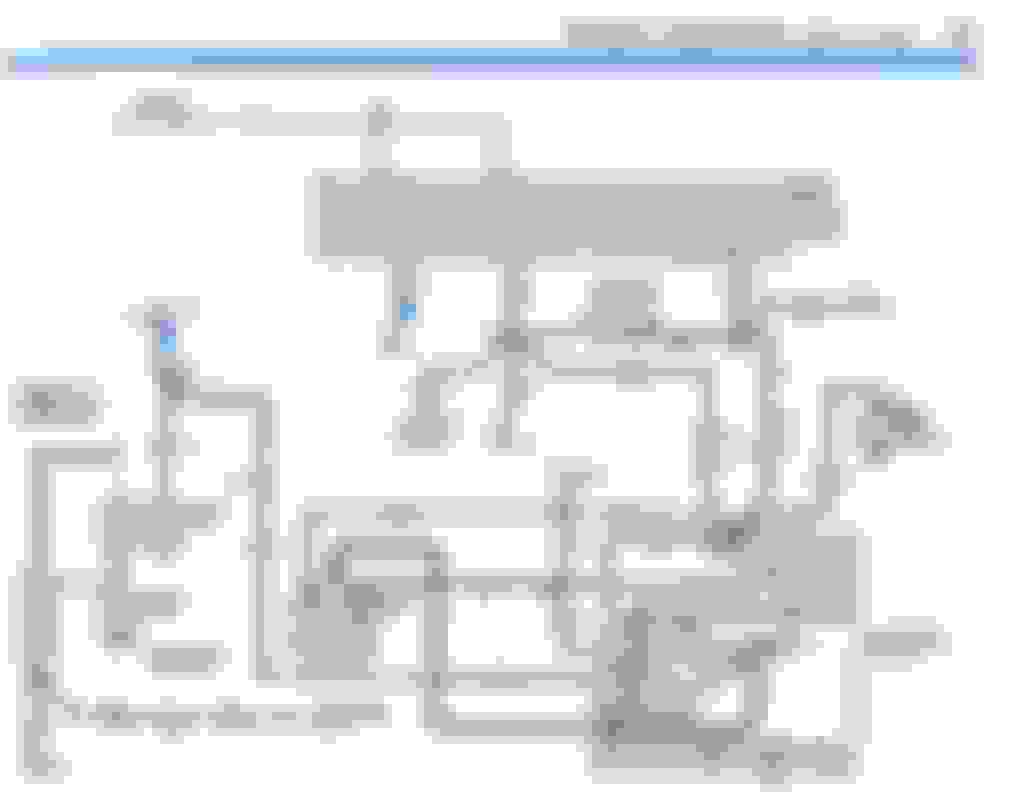
How much of the factory wiring out under the hood do you have left? Below is a better factory diagram of your original wiring. What happened to the white/lightblue that fed your original square coil? That would give you a hot in run and start if you are going to use a external ballast resistor.
But your truck already has the ballast resistor. Your truck was made for engines that use the dursapark (Canada) as well as the ones that used the computer TFI setup.
Thanks for your reply Franklin2. All the factory wiring is still there. I was waiting to complete before cleaning out all the obsolete wires. But don't I need a HOT IN RUN ONLY to feed my external resistor and my module red wire? The coil is fed by "i" post on my starter relay during cranking. Isn't the white/blue wire hot in both run AND start? The way I understand it (and perhaps I don't) my module red wire and my external ballast resistor feed must only be hot run and dead during cranking.
Also, I've been thru, under and inside every inch of the truck and haven't seen that resistor wire. I've even got the steering column down right now while I'm making sense of the switch and it's wiring.
The resistor wire is there in the harness, as it leaves the ignition switch.
You need power in start and in run. The way the factory did it, they gave the coil resistor power in start and run, and power straight to the coil for starting. This is called the resistor bypass. You don't need to switch power back and forth for starting and running, you just need to add straight power to the coil during starting. Of course you need straight 12v power in start and run to the module.
All the above is already done in your truck. In these year trucks Ford did away with using the i terminal on the starter solenoid for the resistor bypass, and started using another bypass contact in the ignition switch.
What you need to do;
Go out under the hood and find a connector 325. It will have a red/lightgreen wire, a white/red stripe wire and a red/white stripe wire, and a few others. Find the wires that go to the temp sensor and the oil pressure sensor for the engine. Follow these wires back to the driver's side inner fender, you should run into this 325 plug. Look for the red/lightgreen wire. This will feed your coil and is already setup with the resistor wire and the start bypass.
In the same area is another plug, C321. Find your old coil wire plug in. One of the wires feeding the old coil was a white/lightblue. Follow this wire back to the driver's side inner fender area. You will hit a splice (you might have to unwrap the factory tape) and then the white/lightblue will continue till you hit plug c321. This plug will also have a red/lightblue wire in it. You need to take this white/lightblue wire and hook it to your red module wire. The red/lightblue wire in this plug needs to go to the white module wire.
I see you were looking at a wiring diagram in the start of this post. Not all people can read wiring diagrams. If you can't, that is fine. But the first diagram in my post above is your truck and how it was originally wired. The picture below is how your truck would have been wired if it had the duraspark type wiring that you are trying to convert to. I am assuming you are cutting and hard wiring you wires. If you had the correct plugs, the duraspark II system would just plug in. You can see this in the diagrams. The same c325 plug and the c321 plugs are in both diagrams. The factory would just plug in the correct harness for the ignition they wanted to use. Here's the duraspark wiring you are trying to achieve.
Franklin, that's awesome. I'm not hardwiring except what was necessary. I had all new stuff and the Painless Performance harness so I have all the connectors. I looked under the hood and there, right next to where I installed my new module, is connector that mates to my new 1 red and 1 white wire connector of my module! Can I just plug that in, connect my coil with the red/Lt.grn wire, and get rid of my new bypass (from "i" post of starter relay) and then I should be good to go?
If that connector on the module plugs into a connector on the truck, and the connector on the truck has a white/lightblue wire and a red blue striped wire, yes plug it in. You are correct on the rest of it also.
Thanks a million Franklin. I wish I'd asked for help sooner. Anyhow, now I can move forward with replacing my carb for my rebuilt, non-feedback carb.
I do have one more ignition related question.....does the position of my distributor matter? I under-estimated how much the shaft would rotate as the gears meshed and I wound up with my number 1 wire in about the 6 o'clock position instead of 2:45 like shown in my Haynes manual. I do have plenty of room to rotate distributor for timing adjustment when I fire her up. I am confident, BTW, that I got the timing very close and then I retarded it just a smidge for a safe start-up later. Do I need to re-install my distributor to get it orientated like the manual says or can I leave it? Thanks, Ted
#1 can be anywhere on the cap and at any clock position as long as #1 on the cap is #1 TDC and the firing order is right it will run.
What happens come time to adjust timing the vacuum can may hit something and not be able to get enough advance or someone that knows where #1 should be on the cap just hooks the timing light to that wire and cant get the timing mark to show up.
Other wise it can stay that way but if you are there why not fix it?
Dave ----
In the position it's currently in I believe the vacuum has more room in either direction for timing adjustment than if it was installed like the illustration. Also, to get it in the position as illustrated I would have to remove the oil dipstick tube bracket bolt and rotate the bracket/dipstick out of the way, then reinstall. I know that's no big deal but if it works this way, it will make it easier to service the distributor later if I should need to.
In the position in the pic, my vacuum advance would be underneath that bracket.
P.S. After thinking on this, I realize I could reinstall paying attention only to rotor orientation and then rotate distributor and vacuum under bracket and into proper timing and position like the pic, without messing with that bracket and dipstick.
Be careful with this. You need to have your head on straight to figure this out and I get confused on it sometimes. How did you pull the distributor? There are basically 3 ways to do it;
1. You had the position of the old one marked, and put the new one in so it's exactly the same regardless of engine position? or
2. You turned the engine to tdc#1, marked the dist, and put the new one in exactly like the old one? or
3. You pulled the distributor, messed up, then turned the engine and found TDC #1 and then put the new distributor in place pointing to #1 plug?
If you want to start changing the position of the new distributor, without messing up the timing, assuming it's in correct now, you will have to pull the cap and see what wire the rotor is pointing to. Then pull the distributor and put it back in where you want it. Then put the dist cap back in place and then move that wire that the rotor was pointing to, to the new spot on the cap where the rotor is pointing now. Then move all the rest of the wires around the cap in the same order as they were to get them all back in position. It can be confusing.
These trucks were provisioned to accept duraspark from the factory as some heavy duty models still came equipped from the factory.
Meaning you should not have to be cutting or splicing any wiring for the Duraspark. It plugs right in.
You can toss out the remaining unused harness or post on Ebay for some poor Californian.
for the distribution install, I had the best luck turning the crank to 0*
TDC and installing dizzy with rotor at #1 and enough room to turn without hitting vac advance.
Problem is finding the harness, no one makes it. The module will plug right in, but you need the short harness from the module to the distributor. Then painless comes along and offers their generic kit which really confuses the situation. If someone wanted to buy the plugs and make this harness up, I think they could sell them and make a little money, especially if it was just a little bit cheaper than the Painless kit.
I figured the painless part about the painless is that you wouldn�t need to cut or splice.
That's the problem with their kit. It's made to put the duraspark II ignition system on any vehicle, whether it was originally wired for it it or not. That is why he was messing with a ignition resistor and the starter relay bypass. That was all in the painless instructions, which are generic for any vehicle.
Rezvani's Latest Post-Apocalyptic Monster Is a Ford F-150 Raptor Underneath
Slideshow: Called the Fortress, the 850-horsepower pickup combines Raptor underpinnings with military-inspired features, survival equipment, and a starting price of $285,000.