


Bedside toolbox mounting?
Thread Starter
|
Fleet Mechanic


Joined: Nov 2005
Posts: 1,852
Likes: 437
From: Lehigh Valley, Penna.
Bedside toolbox mounting?
Can anyone tell me how the bedside toolbox was supposed to be mounted or better yet the factory installation instructions. My toolbox was not factory installed based on the crude job cutting the hole in the side of the bed. It had the screws into the bed side and two bolts through the floor. I seem to remember seeing a bracket in a photo somewhere which mine doesn't have. Just wondering if I'm missing something. Thanks.
Lead Gopher


Joined: Aug 2012
Posts: 10,067
Likes: 1,622
From: Seattle

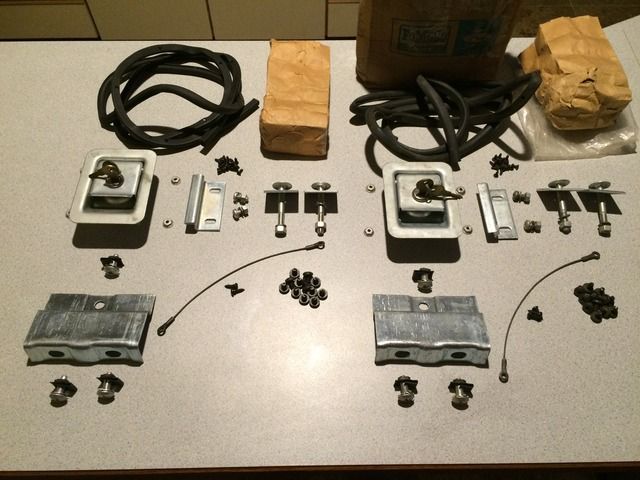
These two pre-packs of tool compartment related hardware both came with three instruction sheets each - one set is much more yellowed from not being in a cardboard box. The other set is nearly perfect.
Sheet 1 of 3 of the install instructions is for the box including where F100 (shortbed) differs from F250 (longbed). Now, before you say there were F100 longbeds, also....I know. This is just the terminology used on these instructions - it is considering F100 to be the smaller box and F250 to be the bigger box. We also know these boxes were designed to fit 1964-1966. Notice the instructions say 1965 on them and are a Copyright of 1964 just below the Ford logo (this close-up not shown). Given that - here's what I have.
They called the set of three "Instruction Sheet 1493" or I.S. 1493. All of their instruction sheets were uniquely numbered for reference.
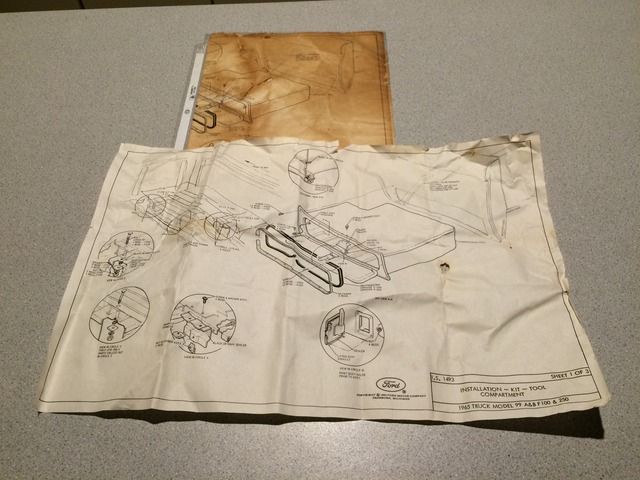
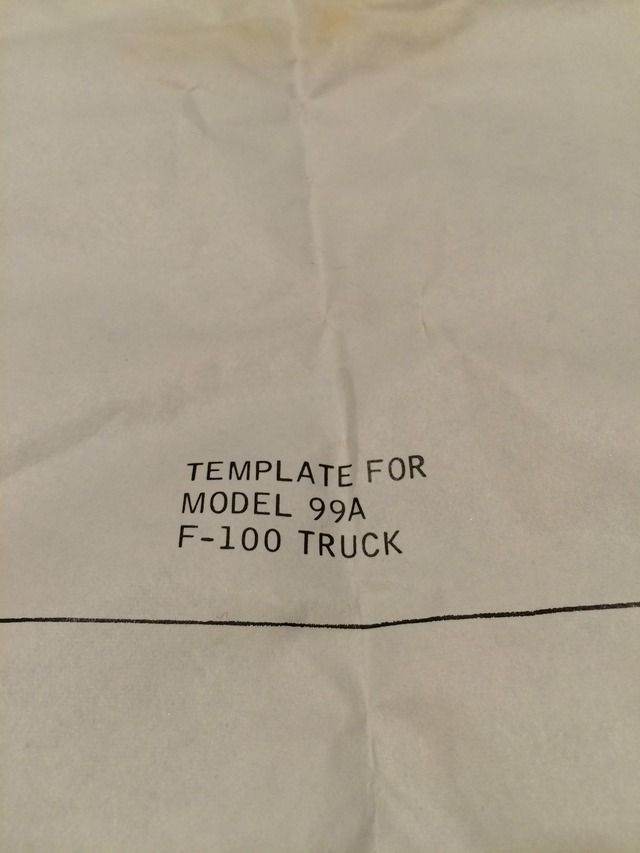
Sheet 2 of 3 is the F250 template.
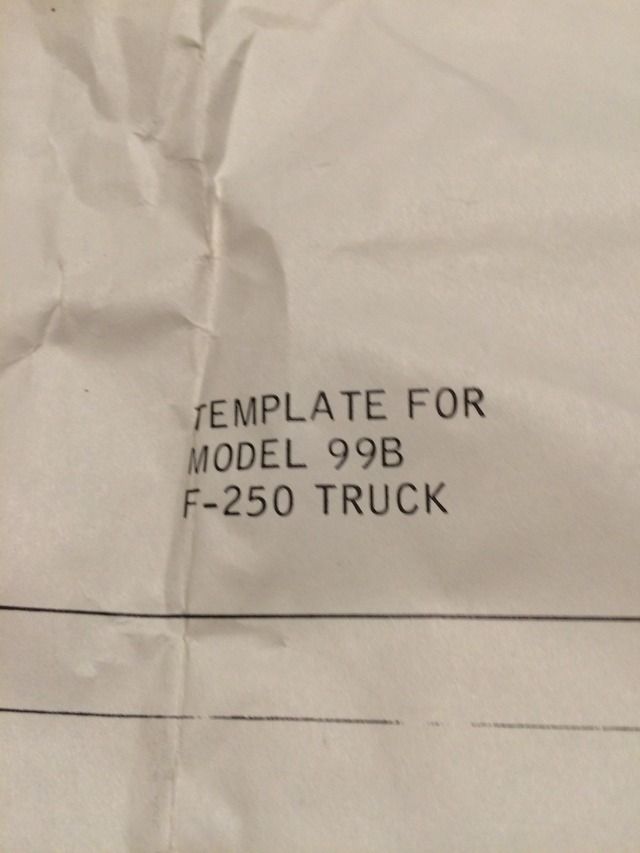

And sheet 3 of 3 is the F100 template.

Both sizes used the bracket on the back side to support the weight of the box and whatever was inside. In the first picture above the bracket is the closest one in the picture, along with the 3 larger screws and J-nuts (2 below and 1 above the bracket in the picture).
C4TZ-9946160-A - Tool Storage Compartment Bracket - 1 each
375615-S7 - Screw - 5/16" - 24 x ?" - 3 each
359952-S2 - J-nut - 5/16" - 24 - 3 each
I haven't measured the length of the screw yet. Two screws secure the bracket to the bed underside and the other goes from inside the tool box through the bracket and J-nut to support the back side.
Chad
.

Sheet 1 of 3 of the install instructions is for the box including where F100 (shortbed) differs from F250 (longbed). Now, before you say there were F100 longbeds, also....I know. This is just the terminology used on these instructions - it is considering F100 to be the smaller box and F250 to be the bigger box. We also know these boxes were designed to fit 1964-1966. Notice the instructions say 1965 on them and are a Copyright of 1964 just below the Ford logo (this close-up not shown). Given that - here's what I have.
They called the set of three "Instruction Sheet 1493" or I.S. 1493. All of their instruction sheets were uniquely numbered for reference.

Sheet 2 of 3 is the F250 template.


And sheet 3 of 3 is the F100 template.


Both sizes used the bracket on the back side to support the weight of the box and whatever was inside. In the first picture above the bracket is the closest one in the picture, along with the 3 larger screws and J-nuts (2 below and 1 above the bracket in the picture).
C4TZ-9946160-A - Tool Storage Compartment Bracket - 1 each
375615-S7 - Screw - 5/16" - 24 x ?" - 3 each
359952-S2 - J-nut - 5/16" - 24 - 3 each
I haven't measured the length of the screw yet. Two screws secure the bracket to the bed underside and the other goes from inside the tool box through the bracket and J-nut to support the back side.
Chad
.
Thread Starter
|
Fleet Mechanic
Joined: Nov 2005
Posts: 1,852
Likes: 437
From: Lehigh Valley, Penna.
On the instruction sheet, what is in the lower left corner? It looks like it is instructions for the longer carriage bolts shown in you picture of the parts, the ones with the large square washers. My box, F100 LWB, had these two bolts through the bed floor and right through the rear of the box. I shortened my box to make it fit a short bed, cut out 14". Now I'm down to just one bolt. I could easily add a second bolt but just curious how it was supposed to be.
Lead Gopher
Joined: Aug 2012
Posts: 10,067
Likes: 1,622
From: Seattle
On the instruction sheet, what is in the lower left corner? It looks like it is instructions for the longer carriage bolts shown in you picture of the parts, the ones with the large square washers. My box, F100 LWB, had these two bolts through the bed floor and right through the rear of the box. I shortened my box to make it fit a short bed, cut out 14". Now I'm down to just one bolt. I could easily add a second bolt but just curious how it was supposed to be.
FOR F-250 ONLY
PARTS CALLED OUT
IN CIRCLE Z
So, yes, only one square washer (reinforcement), carriage bolt, lock washer and nut. They do show a bit of sealer applied to the top of the square washer before putting it on so it seals around the hole(s). Also some sealer between the bracket mentioned in my first post and box where the screw goes through from the inside - just to give you those details, too.
I'll see if I can scan the instructions in two passes and stitch it together so I can post a copy of it that looks decent.
Chad
.
Thread Starter
|
Fleet Mechanic
Joined: Nov 2005
Posts: 1,852
Likes: 437
From: Lehigh Valley, Penna.
Thanks for the info.
On the plus side, I didn't have a key for the lock, but today I went through some old keys I had, found two keys, marked Hudson on one side and HL212 on the other. The keys fit the lock but didn't turn. Pulled out the tumbler, rearranged the pins to match the key, now I have two working keys.
On the plus side, I didn't have a key for the lock, but today I went through some old keys I had, found two keys, marked Hudson on one side and HL212 on the other. The keys fit the lock but didn't turn. Pulled out the tumbler, rearranged the pins to match the key, now I have two working keys.
Trending Topics
Lead Gopher
Joined: Aug 2012
Posts: 10,067
Likes: 1,622
From: Seattle
But, you didn't ask what 28067 is. Another true sign of an original compartment.
Chad
.
FTE Stories
Ford Trucks for Ford Truck Enthusiasts

3 Best / 3 Worst Parts of Modern Ford Ownership
Brett Foote
10 Amazing Upgrades That Solve Common Ford Truck Owner Headaches
Pouria Savadkouei
Every 2026 Ford Engine Explained
Brett Foote
10 Ugly Ford Trucks That We Still Kinda Love
Joe Kucinski
10 Things Every Truck Owner NEEDS (2026 Edition)
Michael S. Palmer
Rezvani's Latest Post-Apocalyptic Monster Is a Ford F-150 Raptor Underneath
Verdad Gallardo
Top 10 Most Expensive Ford Trucks Ever Sold on Bring a Trailer
Joe Kucinski
2027 Ford Super Duty Buyer's Guide (Every Model, Engine, & Package)
Brett Foote
Top 10 Ford Truck Tragedies
Joe KucinskiLead Gopher
Joined: Aug 2012
Posts: 10,067
Likes: 1,622
From: Seattle
Here's a picture I already had of the reinforcement piece for the bottom of the opening on my longbed. Just an extra strip of metal a little thicker than the bed metal gauge with the same radius as the bed in that bottom one inch.

Chad
.

Chad
.

Thread Starter
|
Fleet Mechanic
Joined: Nov 2005
Posts: 1,852
Likes: 437
From: Lehigh Valley, Penna.
Off on a tangent, anyone remember the TV show Fall Guy? He had a Chevy pickup where the front section of the bed opened up like a door to a storage area. I'm sure it was a one off custom build.


Lead Gopher
Joined: Aug 2012
Posts: 10,067
Likes: 1,622
From: Seattle
It's not attached to the toolbox - it's called the
"Quarter Panel To Wheelhouse Seal"
C4TZ-9928067-A
Here's a picture of an original one still installed. Only used if the tool storage compartment was originally installed. If you look close you might be able to see the 3 lines molded into the rubber, very much like the radiator overflow tube and certain other rubber parts.


If you refer back to the drawing from the MPC you can probably make out one of the clips
379177-S -the Text portion refers to a 382570-S. - It used 4 of these clips to hold the rubber in place.
If you look at my picture above you can probably likewise make out the clips.
Chad
.