

50 Cent Mod

Thread Starter
|
Rocky Mountain High
Joined: Nov 2007
Posts: 135
Likes: 0
From: Parker, CO
50 Cent Mod
I keep reading about this 50 Cent Mod and how easy and great it is. But I cannot find what it is exactly or how to do it. Anyone got a good link to doing it and what it solves/improves?
Laughing Gas
Joined: Oct 2009
Posts: 831
Likes: 2
From: Vacaville, CA
It solves the loose connections in the UVCH that is common with our trucks. Ford also makes a clip that can be purchased to do the same thing, but if you can spare 2 quarters, you already have the parts.
Grind or clip a quarter off to the top of washingtons head
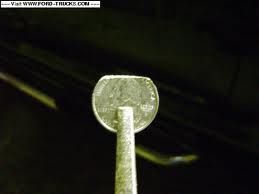
Then slip it into the connector on the UVCH and it holds the clip in place.
Here is a you tube video showing it as well.
Grind or clip a quarter off to the top of washingtons head
Then slip it into the connector on the UVCH and it holds the clip in place.
Here is a you tube video showing it as well.
Laughing Gas
Joined: Aug 2012
Posts: 915
Likes: 3
From: Palatka, FL
I have this write up that I did saved at home and work so I can just paste and go.
I hope it helps.
For the 50 cent mod you will need two quarters, a short 13mm socket, deep 13mm socket and a universal or wobble short extension to get the back bolt on the drivers side and a few of the bottom bolts on the passenger side, a 13mm wrench and a long(6-8 inch) extension. Various wrenches and sockets for pulling harness connector and Intercooler boot clamps.
Only takes 20-25 minutes to pull the Turbo intake hoses and Turbo pipe(metal) on the driver's side. Be careful with the boots. Just be easy with them.
Don't pay too much attention to all the oil inside of the inlet tube and metal pipe as you can clean them any time IN THE FUTURE.
Right now focus on taking the valve cover off. I take out the stock filter and all the inlet tubing going to the turbo then I gently shove a not so good towel into the stock filter box AND lay a moving blanket( very thick folded over several times) over the battery and stock filter box so I can lay on it while I take the Valve cover bolts out. Be careful of the towel in the stock box for the sensor in that box. They are fragile. I am short so please laugh and work with me at the same time.<?xml:namespace prefix = v ns = "urn:schemas-microsoft-com:vml" /><v:shape style="WIDTH: 11.25pt; HEIGHT: 11.25pt; VISIBILITY: visible; mso-wrap-style: square" id=Picture_x0020_1 type="#_x0000_t75" alt="http://images.ford-trucks.com/forums/images/smilies2/biglaugh.gif" o:spid="_x0000_i1028"><v:imagedata src="file:///C:\DOCUME~1\DOTSON~1\LOCALS~1\Temp\msohtmlclip1\01 \clip_image001.gif" o:title="biglaugh"></v:imagedata></v:shape>
Unbolt the 42 pin electrical connector on top of the valve cover. If you have an air compressor, now is the time to blow any debris around the valve cover down out of the way.
Take a PICTURE or take note which fasteners are bolts and which ones are studs with a nut to mount something else to. You will want to put it back exactly as it was. Get the 13mm socket and a 13mm wrench.
DO NOT TAKE THE Positive Crankcase Vent or CrankCase Vent(CCV) DOGHOUSE OFF UNLESS YOU HAVE THE FOUR ORINGS TO RESEAL IT
4 Viton O-rings to reseal the Crank Case Vent cover
OR THE ORINGS WILL SWELL UP AND BE NO GOOD AND YOU WILL LEAK OIL ALL OVER THE PLACE UNTIL YOU GET THE NEW ORINGS.
Using the 13mm wrench carefully remove the bolt just above the CCV dog house and leave the CCV in place. You will not be able to use the socket with the CCV in the way. Now you can use that 13mm socket and take all the rest of the bolts out. The hardest one is on the rear of the cover and you can not see the bolt without a mirror. Don't worry about the mirror, just loosen it and place the bolts to the side. I use a 5 gallon pail to put my fastners in. Slow down when you get the bolts loose and keep a tight grip on them unless you like fishing for metal in the pit of hell. I put a tarp under the truck for items I drop to easily find them.
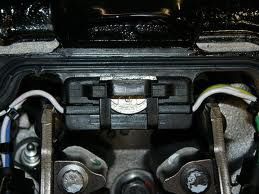
When you pull the cover loose, be slow and easy so you don't put any debris in the VC area. If your harness connection is loose, very gently push the connector towards the top of the VC gasket and let the clips clip UPWARD into place. You could also unclip it and inspect for burnt connectors. Place the connector back firmly in place. Now take the quarter that you have shaved off right at the top of the hair line on the head and slide it in round side down and flat, cut side toward the TOP of the valve cover. DO NOT FORCE ANYTHING unless you have a fresh Benjamin Franklin laying around to spend on a new gasket/harness.
The clips should be clipped fully in and pushing up whilist the quarter holds the clips up. The flat spot gives the valve cover enough room to be installed and keeps the quarter from going anywhere.
If you want to you can now check the torque on the:
Lower injector hold down bolts at 120 INCH lbs.
Rocker arm bolts at 20 Foot lbs
Valve cover bolts when reinstalled will be 96 INCH lbs.
Verify all of the injector connectors are secured and clipped
Verify all of the glow plug wires are tight.
Do everything in the reverse order to put it all back together. Wipe the oil coated pipes down to remove any excess oil and start on the passenger side
Remove the intercooler pipe. You will figure out that you have to move it above the turbo to get it out. Lots of room above that turbo. I loosened my boost pressure gauge and tied it back with string or a small bungee.
Bungee cord the two heater pipes toward the passenger side fender. I put the Moving blanket on this side but did not lean on the A/C pipes. Same thing on this side except you have a bolt holding down the Engine Oil Dipstick so be careful with the dipstick. Only pull the dipstick high enough to remove it from the stud. The bolt near the AC compressor is tight but you can get to it with a few extensions and a deep socket. Same one as the oil dipstick. Note the stud positions again. Don't loose the heater hose clips because they are 28$ at the dealer. Loosen and remove the rest of the bolt/studs. Same thing as the driver's side from here.
Man, that is a lot of typing. Talking thru it is much less time consuming. LOL. Put a wrench in your hands and get to work.<v:shape style="WIDTH: 19.5pt; HEIGHT: 21pt; VISIBILITY: visible; mso-wrap-style: square" id=Picture_x0020_2 type="#_x0000_t75" alt="http://images.ford-trucks.com/forums/images/smilies2/party0031.gif" o:spid="_x0000_i1027"> <v:imagedata src="file:///C:\DOCUME~1\DOTSON~1\LOCALS~1\Temp\msohtmlclip1\01 \clip_image002.gif" o:title="party0031"></v:imagedata></v:shape>The sooner you get it done, the sooner you can drink that favorite cold beverage<v:shape style="WIDTH: 45pt; HEIGHT: 30pt; VISIBILITY: visible; mso-wrap-style: square" id=Picture_x0020_3 type="#_x0000_t75" alt="http://images.ford-trucks.com/forums/images/smilies2/party0005.gif" o:spid="_x0000_i1026"> <v:imagedata src="file:///C:\DOCUME~1\DOTSON~1\LOCALS~1\Temp\msohtmlclip1\01 \clip_image003.gif" o:title="party0005"></v:imagedata></v:shape>and relax that another inexpensive mod is done and you will feel better for not spending any money at the mechanic shop or Stealership <v:shape style="WIDTH: 48.75pt; HEIGHT: 37.5pt; VISIBILITY: visible; mso-wrap-style: square" id=Picture_x0020_4 type="#_x0000_t75" alt="http://images.ford-trucks.com/forums/images/smilies2/sick0021.gif" o:spid="_x0000_i1025"><v:imagedata src="file:///C:\DOCUME~1\DOTSON~1\LOCALS~1\Temp\msohtmlclip1\01 \clip_image004.gif" o:title="sick0021"></v:imagedata></v:shape>It might even run much better or have gained some power back. Same torque values as mentioned above. Be careful whilist VC's are open. If it rains you need to shut the hood all the way immediately after you remove the blanket and slowly slip the VC in place. I hope this helps and is not too mundane. I prefer air tools but you need to put it back together with regular rachet/wrench and get torque values correct.
Dwayne <O ></O>
></O>
I hope it helps.
For the 50 cent mod you will need two quarters, a short 13mm socket, deep 13mm socket and a universal or wobble short extension to get the back bolt on the drivers side and a few of the bottom bolts on the passenger side, a 13mm wrench and a long(6-8 inch) extension. Various wrenches and sockets for pulling harness connector and Intercooler boot clamps.
Only takes 20-25 minutes to pull the Turbo intake hoses and Turbo pipe(metal) on the driver's side. Be careful with the boots. Just be easy with them.
Don't pay too much attention to all the oil inside of the inlet tube and metal pipe as you can clean them any time IN THE FUTURE.
Right now focus on taking the valve cover off. I take out the stock filter and all the inlet tubing going to the turbo then I gently shove a not so good towel into the stock filter box AND lay a moving blanket( very thick folded over several times) over the battery and stock filter box so I can lay on it while I take the Valve cover bolts out. Be careful of the towel in the stock box for the sensor in that box. They are fragile. I am short so please laugh and work with me at the same time.<?xml:namespace prefix = v ns = "urn:schemas-microsoft-com:vml" /><v:shape style="WIDTH: 11.25pt; HEIGHT: 11.25pt; VISIBILITY: visible; mso-wrap-style: square" id=Picture_x0020_1 type="#_x0000_t75" alt="http://images.ford-trucks.com/forums/images/smilies2/biglaugh.gif" o:spid="_x0000_i1028"><v:imagedata src="file:///C:\DOCUME~1\DOTSON~1\LOCALS~1\Temp\msohtmlclip1\01 \clip_image001.gif" o:title="biglaugh"></v:imagedata></v:shape>
Unbolt the 42 pin electrical connector on top of the valve cover. If you have an air compressor, now is the time to blow any debris around the valve cover down out of the way.
Take a PICTURE or take note which fasteners are bolts and which ones are studs with a nut to mount something else to. You will want to put it back exactly as it was. Get the 13mm socket and a 13mm wrench.
DO NOT TAKE THE Positive Crankcase Vent or CrankCase Vent(CCV) DOGHOUSE OFF UNLESS YOU HAVE THE FOUR ORINGS TO RESEAL IT
4 Viton O-rings to reseal the Crank Case Vent cover
OR THE ORINGS WILL SWELL UP AND BE NO GOOD AND YOU WILL LEAK OIL ALL OVER THE PLACE UNTIL YOU GET THE NEW ORINGS.
Using the 13mm wrench carefully remove the bolt just above the CCV dog house and leave the CCV in place. You will not be able to use the socket with the CCV in the way. Now you can use that 13mm socket and take all the rest of the bolts out. The hardest one is on the rear of the cover and you can not see the bolt without a mirror. Don't worry about the mirror, just loosen it and place the bolts to the side. I use a 5 gallon pail to put my fastners in. Slow down when you get the bolts loose and keep a tight grip on them unless you like fishing for metal in the pit of hell. I put a tarp under the truck for items I drop to easily find them.
When you pull the cover loose, be slow and easy so you don't put any debris in the VC area. If your harness connection is loose, very gently push the connector towards the top of the VC gasket and let the clips clip UPWARD into place. You could also unclip it and inspect for burnt connectors. Place the connector back firmly in place. Now take the quarter that you have shaved off right at the top of the hair line on the head and slide it in round side down and flat, cut side toward the TOP of the valve cover. DO NOT FORCE ANYTHING unless you have a fresh Benjamin Franklin laying around to spend on a new gasket/harness.
The clips should be clipped fully in and pushing up whilist the quarter holds the clips up. The flat spot gives the valve cover enough room to be installed and keeps the quarter from going anywhere.
If you want to you can now check the torque on the:
Lower injector hold down bolts at 120 INCH lbs.
Rocker arm bolts at 20 Foot lbs
Valve cover bolts when reinstalled will be 96 INCH lbs.
Verify all of the injector connectors are secured and clipped
Verify all of the glow plug wires are tight.
Do everything in the reverse order to put it all back together. Wipe the oil coated pipes down to remove any excess oil and start on the passenger side
Remove the intercooler pipe. You will figure out that you have to move it above the turbo to get it out. Lots of room above that turbo. I loosened my boost pressure gauge and tied it back with string or a small bungee.
Bungee cord the two heater pipes toward the passenger side fender. I put the Moving blanket on this side but did not lean on the A/C pipes. Same thing on this side except you have a bolt holding down the Engine Oil Dipstick so be careful with the dipstick. Only pull the dipstick high enough to remove it from the stud. The bolt near the AC compressor is tight but you can get to it with a few extensions and a deep socket. Same one as the oil dipstick. Note the stud positions again. Don't loose the heater hose clips because they are 28$ at the dealer. Loosen and remove the rest of the bolt/studs. Same thing as the driver's side from here.
Man, that is a lot of typing. Talking thru it is much less time consuming. LOL. Put a wrench in your hands and get to work.<v:shape style="WIDTH: 19.5pt; HEIGHT: 21pt; VISIBILITY: visible; mso-wrap-style: square" id=Picture_x0020_2 type="#_x0000_t75" alt="http://images.ford-trucks.com/forums/images/smilies2/party0031.gif" o:spid="_x0000_i1027"> <v:imagedata src="file:///C:\DOCUME~1\DOTSON~1\LOCALS~1\Temp\msohtmlclip1\01 \clip_image002.gif" o:title="party0031"></v:imagedata></v:shape>The sooner you get it done, the sooner you can drink that favorite cold beverage<v:shape style="WIDTH: 45pt; HEIGHT: 30pt; VISIBILITY: visible; mso-wrap-style: square" id=Picture_x0020_3 type="#_x0000_t75" alt="http://images.ford-trucks.com/forums/images/smilies2/party0005.gif" o:spid="_x0000_i1026"> <v:imagedata src="file:///C:\DOCUME~1\DOTSON~1\LOCALS~1\Temp\msohtmlclip1\01 \clip_image003.gif" o:title="party0005"></v:imagedata></v:shape>and relax that another inexpensive mod is done and you will feel better for not spending any money at the mechanic shop or Stealership <v:shape style="WIDTH: 48.75pt; HEIGHT: 37.5pt; VISIBILITY: visible; mso-wrap-style: square" id=Picture_x0020_4 type="#_x0000_t75" alt="http://images.ford-trucks.com/forums/images/smilies2/sick0021.gif" o:spid="_x0000_i1025"><v:imagedata src="file:///C:\DOCUME~1\DOTSON~1\LOCALS~1\Temp\msohtmlclip1\01 \clip_image004.gif" o:title="sick0021"></v:imagedata></v:shape>It might even run much better or have gained some power back. Same torque values as mentioned above. Be careful whilist VC's are open. If it rains you need to shut the hood all the way immediately after you remove the blanket and slowly slip the VC in place. I hope this helps and is not too mundane. I prefer air tools but you need to put it back together with regular rachet/wrench and get torque values correct.
Dwayne <O
></O>
Last edited by 1fixitman; Oct 30, 2012 at 11:09 PM. Reason: Remove bad smiley links
FTE Legend


Joined: Aug 2004
Posts: 37,887
Likes: 20
From: North Central Rural Sask.
Good write ups!
I just did this mod a week or two ago, and definately make sure you retorque stuff under the valve covers when you have them off as well.
This is a very easy mod, took me a few hours to do of casually working on it.
Well worth it for the reliability factor of things.
I just did this mod a week or two ago, and definately make sure you retorque stuff under the valve covers when you have them off as well.
This is a very easy mod, took me a few hours to do of casually working on it.
Well worth it for the reliability factor of things.
Senior User
Joined: May 2011
Posts: 454
Likes: 0
From: Portland, OR
Recommend doing the CCV mod at the same time while everything is apart. Others have recommended the retorquing of the rockers and injector hold down bolts. I had about 240k when I did all this and the difference in the truck sound with everything down tight cannot be overstated. Quarters seem to work better than the shim kit from Ford. I had one of each, and guess which one rattled out again a couple weeks ago?

Thread
Thread Starter
Forum
Replies
Last Post
Braggs
1980 - 1986 Bullnose F100, F150 & Larger F-Series Trucks
11
Jun 4, 2016 06:56 AM
Lowe
6.0L Power Stroke Diesel
22
Jul 16, 2012 07:49 PM
goin_campin
1999 - 2016 Super Duty
11
Jun 24, 2012 12:46 PM
Copedawg
1994.5 - 1997 7.3L Power Stroke Diesel
39
Mar 16, 2011 08:34 AM