Alternator/Smog Pump Bracket Mod With Pics
#16
 02-17-2012, 12:36 PM

Originally Posted by Skoiv
Nice Lariat. I would really like to see a pic of the whole engine bay though. From what I can see, it looks incredible!!! Give us a few more pics please.
Originally Posted by 81ChopTop
Quit teasing, let's see more of that engine.
Originally Posted by dakota-boy
subscribed......i want to see more pics of the engine too. Did your 302 come efi origonally?
I have spent a great deal of time and money getting it right again, and it runs like a wet dream now. My engine specs are in my signature below. Thanks from the guidance of some great members on this site, I now have a truck with outstanding power and torque while still delivering 15+ miles per gallon. Best of all, this truck actually starts up quicker than any modern fuel-injected vehicle I have ever owned, and it doesn't stall at all, even when it got close to freezing last winter.
I had the engine bay painted the original Canyon Red when the motor was out. I still have to hook the entire A/C back up and the air cleaner air snorkels to the radiator, so I am still not completely finished. I have spent the last five years collecting NOS Ford trim parts and hope to do a full restoration on the exterior and interior within the next year or two. Here a couple more pictures:


#17
02-17-2012, 12:43 PM

#18
02-17-2012, 12:49 PM
#19
02-17-2012, 02:17 PM
#20
02-17-2012, 05:08 PM
Laughing Gas
Lariat 85,that is a fine looking engine and engine bay. I wish mine looked that good.
I noticed in the last picture that had the 4100 in it that the bracket that is on the
the right side of the carb that has what looks like a vacuum line running though it, was
originally used to hold a heater hose close to the choke to help it heat up. This was
on 4100s and 2100s in the 1960s. I had a 1965 Fairlane that had a 289 2bbl that
had that same bracket on the carb and that what it was used for. Very nice setup
that you have on your truck.
#21
02-17-2012, 05:30 PM
Originally Posted by Old Hickory
Lariat 85,that is a fine looking engine and engine bay. I wish mine looked that good.
I noticed in the last picture that had the 4100 in it that the bracket that is on the
the right side of the carb that has what looks like a vacuum line running though it, was
originally used to hold a heater hose close to the choke to help it heat up. This was
on 4100s and 2100s in the 1960s. I had a 1965 Fairlane that had a 289 2bbl that
had that same bracket on the carb and that what it was used for. Very nice setup
that you have on your truck.
I noticed in the last picture that had the 4100 in it that the bracket that is on the
the right side of the carb that has what looks like a vacuum line running though it, was
originally used to hold a heater hose close to the choke to help it heat up. This was
on 4100s and 2100s in the 1960s. I had a 1965 Fairlane that had a 289 2bbl that
had that same bracket on the carb and that what it was used for. Very nice setup
that you have on your truck.
The later Motorcraft 2150 carburetor (essentially an updated 2-barrel version of the older Autolite 4100) didn't have this saddle at all for a heater hose. They used an electric assist choke in addition to the hot air choke for emissions purposes.
Neither is totally necessary and the thermostatic hot air choke works great.
#23
02-18-2012, 07:39 AM
Posting Legend
#24
02-18-2012, 08:03 AM
Originally Posted by Gary Lewis
Lariat - How do you have the flapper valves in the snorkels plumbed? Do you have hot air to either side? Do you have any plans to run cold air from the radiator support to the snorkels?
I do not have the flapper valves in the snorkels hooked up yet. Since I am now running two snorkels with headers, I have two short pieces of metal tube open on both ends I plan to clamp to the header pipe. From there, I will clamp aluminum flex tubing from the tube up to the snorkel. The open ends will route hot air from the header pipe up to the flapper valve, much like the hot air choke setup I have in picture 4.
For the cold air intake, I still have the stock plastic piece that bolts to the radiator support on the passenger's side, and I am going to have to make something up for the driver's side. There's a slot there like what is on the passenger's side radiator support for the cold air duct, but the plastic piece will not work on that side as it does on the passenger's side, so I still have figure out how to do that. Then all I have to do is connect the flex tubing from the plastic ends to the snorkel ends.
#25
02-18-2012, 08:31 AM
Posting Legend
Sounds like a good plan on the snorkels. My plans are similar, but a bit different:
- I think I'll mod the existing housing to use two snorkels
- I'll plumb both flappers to work in parallel
- But, I'm going to block off the hot air inlet on the driver's side so when the flappers are closed the engine will pull from the existing stove on the passenger's exhaust manifold. Don't think I'll be pushing the engine enough when it is cold to need both hot-air feeds.
- On mine there's a cut-out on the driver's side of the radiator support, but only through the piece of metal on the rear of the support, that matches the one on the passenger's side. I'll just cut that all the way through, smooth it up, and paint it so it doesn't rust.
- I'll use another plastic "pickup" just like the one on the passenger's side to fasten to the radiator support. And then another piece of the flex hose and it'll look like it came from the factory that way.
#26
02-18-2012, 09:17 AM

#27
02-22-2012, 07:14 AM

#28
02-22-2012, 11:26 AM
The following users liked this post:
#29
02-22-2012, 11:52 AM
Thanks, Chief! 
Your engine looks nice too. You need to paint the rusty distributor vacuum advance, though. It kind of sticks out like a sore thumb next to that nice new Ford Blue paint and shiny chrome air cleaner. My vacuum advance did the exact same thing. I sanded mine lightly and spayed it with Rustoleum followed by Cast Coat Aluminum paint.
Your engine looks nice too. You need to paint the rusty distributor vacuum advance, though. It kind of sticks out like a sore thumb next to that nice new Ford Blue paint and shiny chrome air cleaner. My vacuum advance did the exact same thing. I sanded mine lightly and spayed it with Rustoleum followed by Cast Coat Aluminum paint.
#30
02-23-2012, 06:49 AM
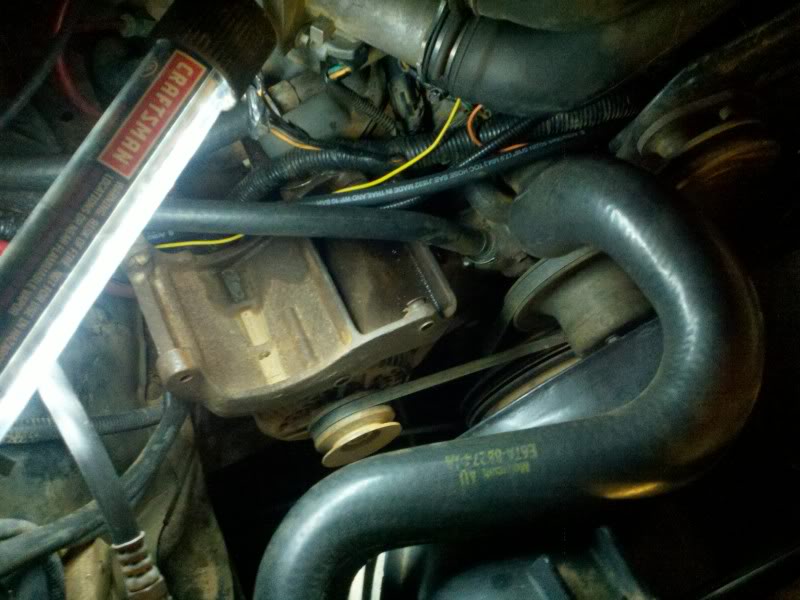
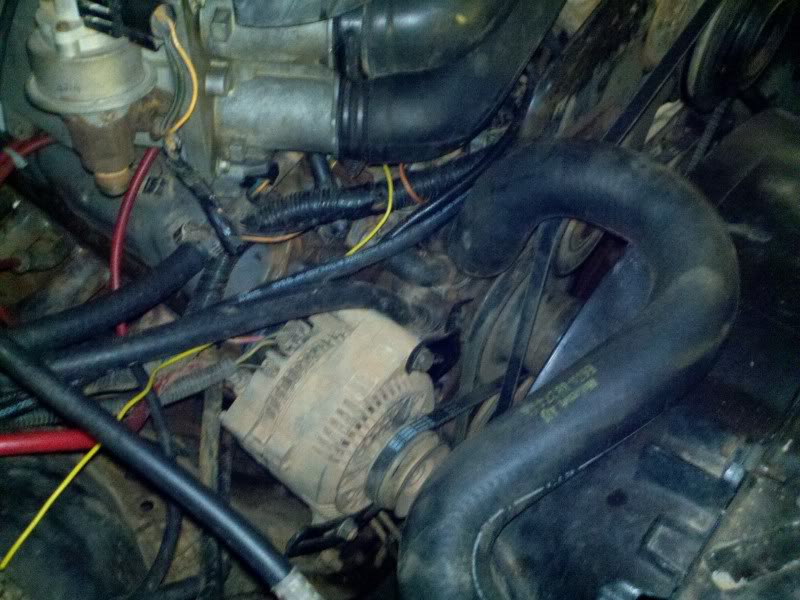
Well i did this last night. I didnt clean up my engine bay though, and my truck is dirty, as i like to play in the mud, so excuse the dirty mud covered alternator....lol Also, if you have a 3g alternator and do this, you need to get a 15mm wide 41 inch belt, the 39 will not go over the pulley with the alternator all the way towards the engine. Other than that, i didnt have any problems putting this in. This is the first time i have seen the top of my alternator since i did the 3g mod about 5 years ago! (ive had the truck pretty buried in mud between then and now too if you cant tell...lol)
The following users liked this post: