Dad's Truck Build
#4351
 11-08-2013, 07:02 PM

Mirror Questions
Ok, next problem - mirrors. David/1986F150six sent me a PM with a link to eBay for a set of mirrors: http://www.ebay.com/itm/1980-1986-FORD-OEM-TRUCK-MIRROR-Set-Pair-NOS-EXTENDED-TRAILER-TOW-F-150-BRONCO-/151157544035?pt=Motors_Car_Truck_Parts_Accessories&hash=item2331b11463&vxp=mtr#ht_486wt_1170. He and I kicked it around and compared the mirrors that came on Dad's truck with the ones on eBay. David pointed out that the eBay mirrors mount with 3 bolts on the top and bottom while mine mount with 2 each. But, otherwise they looked identical so I bid on them.
Then I got to looking a bit closer and decided the arm looks bigger than on mine. So I sent a query to the seller and he confirmed that with these dimensions:
Door to pivot point of the swing bar:
Centerline of top to bottom holes:
So, the pivot point of the bracket sits out in the breeze almost 2 1/2" further. I'm not sure I want to do that, but am asking for your thoughts. Here are some pictures of mine and you can compare to those on eBay. First, here's one of both mirrors. Note that I do have the bottom mount.

Here's one of a repair Dad made at one point using washers that have rusted. And, other things have rusted and stained the brackets and swing arms. Further, Dad wasn't always too gentle with things when he clamped them in the vise, and there are numerous spots that have indentions/serrations from such an encounter.

Last, I'm confused as to why Dad's truck has the mirrors it has. Here's the page from the catalog showing the available Type 9 mirrors, which both mine and the ones on eBay are. I only see one set of dual-position stainless 6 x 9" mirrors - E0TZ 17696-D. And that is exactly what the ones on eBay are. But they are different than mine and mine are original to the truck.

I don't like the idea of the mirrors being that much further out, but I do like the idea of having new mirrors to replace mine. One approach would be to buy these and move the heads and at least the swing arms over to my arms. In fact, I could also change over to the 3-hole brackets if i wanted to. But, I'll have to refinish the arms, which means some form of powder coating.
So, the bottom line is what do you think? What suggestions do you have? I have just over a day to decide if I want to cancel my bid. Thanks in advance.
Then I got to looking a bit closer and decided the arm looks bigger than on mine. So I sent a query to the seller and he confirmed that with these dimensions:
Door to pivot point of the swing bar:
- His: 9 7/8"
- Mine: 7 1/2"
Centerline of top to bottom holes:
- His: 8 3/4"
- Mine: 9 1/4"
So, the pivot point of the bracket sits out in the breeze almost 2 1/2" further. I'm not sure I want to do that, but am asking for your thoughts. Here are some pictures of mine and you can compare to those on eBay. First, here's one of both mirrors. Note that I do have the bottom mount.
Here's one of a repair Dad made at one point using washers that have rusted. And, other things have rusted and stained the brackets and swing arms. Further, Dad wasn't always too gentle with things when he clamped them in the vise, and there are numerous spots that have indentions/serrations from such an encounter.
Last, I'm confused as to why Dad's truck has the mirrors it has. Here's the page from the catalog showing the available Type 9 mirrors, which both mine and the ones on eBay are. I only see one set of dual-position stainless 6 x 9" mirrors - E0TZ 17696-D. And that is exactly what the ones on eBay are. But they are different than mine and mine are original to the truck.
I don't like the idea of the mirrors being that much further out, but I do like the idea of having new mirrors to replace mine. One approach would be to buy these and move the heads and at least the swing arms over to my arms. In fact, I could also change over to the 3-hole brackets if i wanted to. But, I'll have to refinish the arms, which means some form of powder coating.
So, the bottom line is what do you think? What suggestions do you have? I have just over a day to decide if I want to cancel my bid. Thanks in advance.

#4353
11-08-2013, 07:37 PM
Elder User
Join Date: Jan 2012
Location: Corvallis, OR
Posts: 582
Likes: 0
Received 0 Likes
on
0 Posts
Gary, I'm tempted to say your truck may have had the oval type mirrors originally, because that is what your arms look like. The oval mirrors did not stick out as far and they had the bottom-hole mounting you have. (Because yours are shorter, I'd almost be willing to bet the two bottom holes you have that point down, are in the same position as the two bottom holes the eBay guy has that point up).
Is it possible your Dad grafted the rectangular mirrors with the pivot onto the original shorter arms?
EDIT: This page on the LMC catalog allows you to see both styles at once.
EDIT AGAIN: I guess it's not the difference between the oval and rectangular mirrors, it's the difference between "single" and "dual" position arms.
#4354
11-09-2013, 06:50 AM


#4357
11-09-2013, 08:46 AM
Post Fiend
Gary, just as an FYI, my 80 has the same mirrors as your dad's truck, just without the extension peice between the arm and head.
I currently have non-OEM mirror heads on it, due to the glass losing it's backing, and 1 cracked years ago, so ~1/2 the glass just fell out a while back.
I plan to get new glass for the original heads, as they are slightly bigger than the newer round corner heads, plus they were never the convex style that are a pain to back a trailer with......
#4358
11-09-2013, 09:04 AM
Jim - Your air box looks identical to mine. You said yours are E5TE-90675-FA & E3TE-90675-DC, and those are the same #'s on mine that have the hose attached in one of the earlier pictures. Thanks.
Jerry - Bill is right, what I'm really wanting are the medium ones as that's what I have. They tuck the mirrors in ~2 1/2" from where the ones on eBay put them. And, mine are the dual-position units like the other ones, they just start that much further in but will go out 6" from that point, which I think is plenty.
I'm thinking I'll go ahead and get the one from eBay as I can use the new heads and swing arms on my U-brackets as they unbolt. But, I'm going to send a note back to the seller and discuss this with him a bit. Perhaps he knows of the medium sized ones. Anyway, I'm open to suggestions.
#4359
11-09-2013, 03:13 PM
Elder User
Join Date: Jan 2012
Location: Corvallis, OR
Posts: 582
Likes: 0
Received 0 Likes
on
0 Posts
Not to have too many topics going on at once, but since you are getting your "new" aluminum valve covers today, perhaps it will be timely. I wonder have you given any thought to whether you will coat them with something after you re-polish them, and if so, what?
I was just getting ready to glue the gaskets on mine when I remembered the photos of the corrosion that Brandon recently posted. It got me thinking that unless I do something to them now I might be asking for more work down the road.
I was just getting ready to glue the gaskets on mine when I remembered the photos of the corrosion that Brandon recently posted. It got me thinking that unless I do something to them now I might be asking for more work down the road.
#4360
11-09-2013, 03:27 PM
#4361
11-09-2013, 07:48 PM
Youse guys are ahead of me. Brandon did bring the valve covers today and I snapped some pics and then started cleaning them up. Here's the as-delivered, with a comparison to the original covers, which are 1 3/8" shorter:

Another comparison:

This is after I cleaned them up, with the better of the two in front:

Here's more of the worst one:

And here's the same one after a bit of work with a gray scuff pad:

So, the question is - how am I going to finish them. What little work I've done on them tells me they will polish nicely and I can lay down some new black in the grooves then powder coat them clear like I did the wheels. Or, I could do black crinkle and make the grooves aluminum, sorta like this:
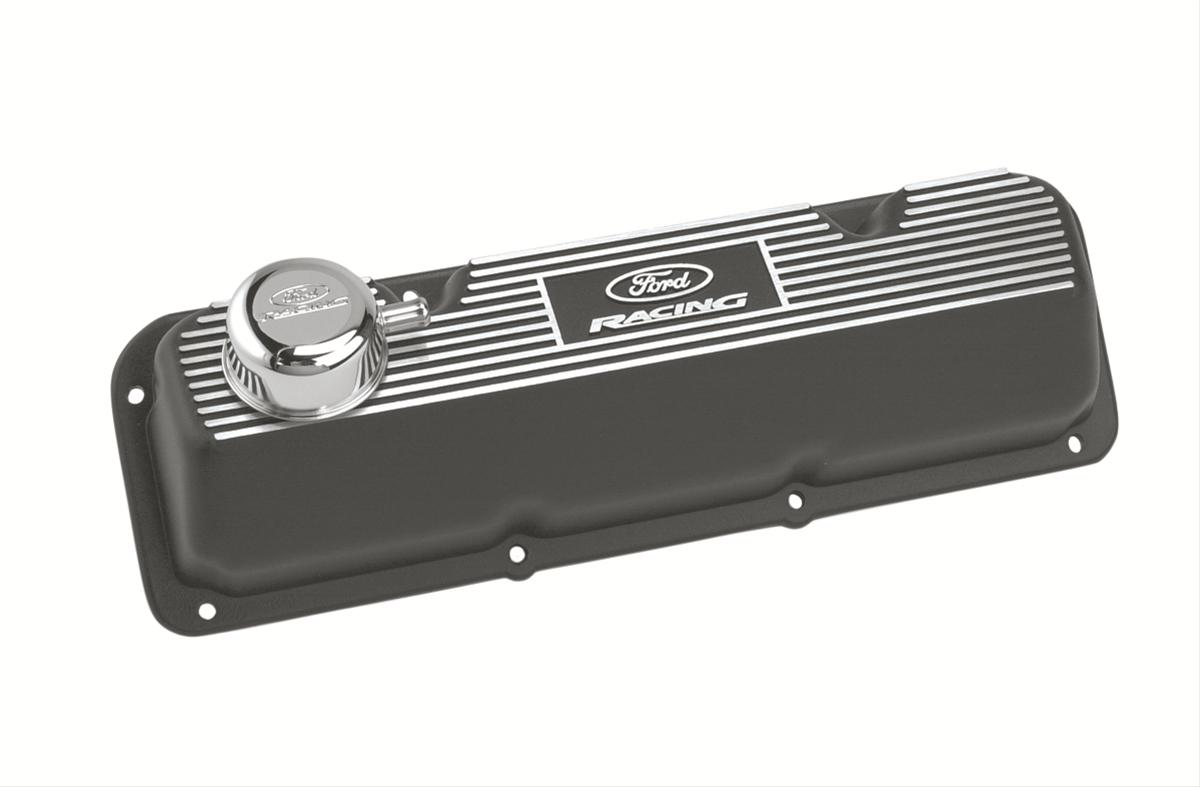
But, Bruno and I actually like the valve covers shown here, although I can't seem to get the picture to show up. Anyway, we like the crinkled finish better than the one in the picture above. In fact, we are thinking the finish I accidentally put on the spacers for the console might be the way to go. (And, by the way, I tried to take it off with aluminum oxide @ 80 psi in the blast cabinet - no dice.) The picture of the spacer is below, but I'd like your input.
Another comparison:
This is after I cleaned them up, with the better of the two in front:
Here's more of the worst one:
And here's the same one after a bit of work with a gray scuff pad:
So, the question is - how am I going to finish them. What little work I've done on them tells me they will polish nicely and I can lay down some new black in the grooves then powder coat them clear like I did the wheels. Or, I could do black crinkle and make the grooves aluminum, sorta like this:
But, Bruno and I actually like the valve covers shown here, although I can't seem to get the picture to show up. Anyway, we like the crinkled finish better than the one in the picture above. In fact, we are thinking the finish I accidentally put on the spacers for the console might be the way to go. (And, by the way, I tried to take it off with aluminum oxide @ 80 psi in the blast cabinet - no dice.) The picture of the spacer is below, but I'd like your input.
#4362
11-09-2013, 09:57 PM
Here is one of the funnier things that happened today at the powder coat party.
Gary had the aluminum valve covers sitting on the cleaning table. He looked at them and then looked at me and said "I don't think these valve covers are much taller than the factory ones". So we had to go get a factory cover to see what the difference was. Turns out the aluminums were about 1-3/8"taller than the factory covers. Which doesn't sound like much, but in reality is about 35% taller. Once we had them side by side it was more than obvious.
Gary had the aluminum valve covers sitting on the cleaning table. He looked at them and then looked at me and said "I don't think these valve covers are much taller than the factory ones". So we had to go get a factory cover to see what the difference was. Turns out the aluminums were about 1-3/8"taller than the factory covers. Which doesn't sound like much, but in reality is about 35% taller. Once we had them side by side it was more than obvious.
#4364
11-09-2013, 11:15 PM
Elder User
Join Date: Jan 2012
Location: Corvallis, OR
Posts: 582
Likes: 0
Received 0 Likes
on
0 Posts
I'm curious how you could make the grooves shiny aluminum, and the rest black, given the grooves are inset. I like valve covers with that scheme but the examples are always like the ones you've shown, where the ribs and lettering are raised.
But if you could do it, I agree the black crinkle you accidentally created would look great.
But if you could do it, I agree the black crinkle you accidentally created would look great.
#4365
11-10-2013, 09:04 AM
Matthew - I don't know the answer to that question, but am just thinking about the options and want other's ideas on them. Perhaps someone will suggest something that I like a bunch. Or maybe everyone will say "What are you thinking!" and make me re-think my plans.
Luke - I don't know how to make the grooves shiny aluminum and the rest wrinkled black, but I will research it. However, as I think about it one problem would be that if the aluminum wasn't protected it would eventually tarnish - like the covers are now. So I might need to coat the whole valve cover with a clear after baking the black. But, I'm not sure how that would look. Or, maybe hand-paint the bare aluminum grooves with a clear?
Speaking of hand-painting, what about just laying in a coat of aluminum paint on the black in the grooves? Hmmm, I don't think I like that for two reasons - it would have the wrinkle/crinkle finish, and aluminum paint probably wouldn't look like shiny aluminum. Plus, it wouldn't be an even line with me doing it.
So, I guess I'd better research it. But suggestions, both on what paint/powder treatment or combination to use as well as procedure, would be appreciated.