
Show Me your Bucket Seats and Interiors
#16
 12-10-2011, 09:36 AM

Join Date: Sep 2011
Posts: 351
Likes: 0
Received 0 Likes
on
0 Posts
#17
12-10-2011, 06:08 PM
are you talking about painting the dash and trim? because all of the paint in my interior is covered with trim and carpet. i dont think you can see any paint except when you open the doors

#19
12-11-2011, 06:53 AM
Join Date: Sep 2011
Posts: 351
Likes: 0
Received 0 Likes
on
0 Posts
#20
12-11-2011, 07:38 AM
I thought we could upload pictures to FTE, but seemingly I haven't done it in so long I couldn't figure it out uncaffienated. Anyway, here ya go:
'89 Chrysler Minivan Seats in the front of my crewcab:

Some of the bracketry/framing I made for the two seats, so that they install as a bench seat:

Another picture of the framing as it goes under the driver's seat. That's the diagonal 1" square tubing that goes underneath the driver's seat just below the black adjustment lever:

And finally, a non-seat picture of the town car column I installed (tiltwheel!) and the Windstar digital cluster I grafted in place of the original.

For the seats, what I did was remove the bench seat from the sliders, leaving the sliders mounted to the floor of the truck. I welded a steel frame out of 1/8" wall, 1" square tubing to go across the bench sliders, which is basically a rectangle with two additional cross pieces that land on the sliders themselves. The frame is then wider than the width of the seat brackets. I then created eight "tabs" and bolted them to the seat mounts of the Chrysler bucket seats, then placed the seats on the frame, so that all four tabs per seat touch the frame I made. Wiggled to alignment, adjusted left and right, then welded the tabs.
The tabs allow me to leave the steel frame and remove the seats individually for repair or replacement, or I can remove the entire frame from the sliders and put the factory bench seat back on top of the sliders with the original four bolts, should I ever want to return the truck to stock.
I probably should have painted the steel frame to reduce surface rust but halfway through the project I was offered a job that afternoon so as often is the case, I rush through things to get it back on the road, "now" with the intention of getting to it later, and never do.
Sorry for the really big pics... I thought facebook resized them as they once did. Oops
'89 Chrysler Minivan Seats in the front of my crewcab:
Some of the bracketry/framing I made for the two seats, so that they install as a bench seat:
Another picture of the framing as it goes under the driver's seat. That's the diagonal 1" square tubing that goes underneath the driver's seat just below the black adjustment lever:
And finally, a non-seat picture of the town car column I installed (tiltwheel!) and the Windstar digital cluster I grafted in place of the original.
For the seats, what I did was remove the bench seat from the sliders, leaving the sliders mounted to the floor of the truck. I welded a steel frame out of 1/8" wall, 1" square tubing to go across the bench sliders, which is basically a rectangle with two additional cross pieces that land on the sliders themselves. The frame is then wider than the width of the seat brackets. I then created eight "tabs" and bolted them to the seat mounts of the Chrysler bucket seats, then placed the seats on the frame, so that all four tabs per seat touch the frame I made. Wiggled to alignment, adjusted left and right, then welded the tabs.
The tabs allow me to leave the steel frame and remove the seats individually for repair or replacement, or I can remove the entire frame from the sliders and put the factory bench seat back on top of the sliders with the original four bolts, should I ever want to return the truck to stock.
I probably should have painted the steel frame to reduce surface rust but halfway through the project I was offered a job that afternoon so as often is the case, I rush through things to get it back on the road, "now" with the intention of getting to it later, and never do.
Sorry for the really big pics... I thought facebook resized them as they once did. Oops
#21
12-11-2011, 08:51 AM

#22
12-11-2011, 10:32 AM

Elder User
Join Date: Mar 2004
Location: Salem, NH
Posts: 503
Likes: 0
Received 0 Likes
on
0 Posts
I may get flamed for this but...easiest seat swap ever....Some idiot cash for clunker'd a 93 lightning....apparently it was all rotted...
 well, at least the seats from it have a use. I had to replace the wire mesh support in the middle of the seat, and welded the broken recline handle, pulled all the foam and covers, washed with tide, hose and scrub brush, came out great.

well, at least the seats from it have a use. I had to replace the wire mesh support in the middle of the seat, and welded the broken recline handle, pulled all the foam and covers, washed with tide, hose and scrub brush, came out great.
#25
12-11-2011, 12:56 PM
Here's what I did, more or less step by step: F350/Windstar Cluster Swap
Because the trucks lagged behind the cars (including minivans) in electronics, slightly older-year minivan clusters are fairly easy to swap into the F-series. The key is to find a digital cluster that reads analog sensors, rather than display information provided from the computer only.
The mounting ears even lined up, and when I bought the windstar cluster I pulled a piece of the harness out with it, then mapped the pinout of the windstar cluster to the original F350 cluster, and adapted it that way.
The only caveat is the windstar was a V6, and my truck is a V8, so the tachometer is always off by 25%. I didn't need a tach so it being "off" doesn't bother me in the least because I never had a tach in this truck until I added the digital cluster.
I wanted digital because it's far easier to read a giant glow-in-the-dark "65" at night as compared to having to tilt my head to see where the needles are pointing, because I wear bifocals.
#26
12-11-2011, 01:51 PM
Senior User
Join Date: Nov 2010
Location: La Crosse, WI
Posts: 440
Likes: 0
Received 0 Likes
on
0 Posts
Here's what I did, more or less step by step: F350/Windstar Cluster Swap
Because the trucks lagged behind the cars (including minivans) in electronics, slightly older-year minivan clusters are fairly easy to swap into the F-series. The key is to find a digital cluster that reads analog sensors, rather than display information provided from the computer only.
The mounting ears even lined up, and when I bought the windstar cluster I pulled a piece of the harness out with it, then mapped the pinout of the windstar cluster to the original F350 cluster, and adapted it that way.
The only caveat is the windstar was a V6, and my truck is a V8, so the tachometer is always off by 25%. I didn't need a tach so it being "off" doesn't bother me in the least because I never had a tach in this truck until I added the digital cluster.
I wanted digital because it's far easier to read a giant glow-in-the-dark "65" at night as compared to having to tilt my head to see where the needles are pointing, because I wear bifocals.
Because the trucks lagged behind the cars (including minivans) in electronics, slightly older-year minivan clusters are fairly easy to swap into the F-series. The key is to find a digital cluster that reads analog sensors, rather than display information provided from the computer only.
The mounting ears even lined up, and when I bought the windstar cluster I pulled a piece of the harness out with it, then mapped the pinout of the windstar cluster to the original F350 cluster, and adapted it that way.
The only caveat is the windstar was a V6, and my truck is a V8, so the tachometer is always off by 25%. I didn't need a tach so it being "off" doesn't bother me in the least because I never had a tach in this truck until I added the digital cluster.
I wanted digital because it's far easier to read a giant glow-in-the-dark "65" at night as compared to having to tilt my head to see where the needles are pointing, because I wear bifocals.
#27
12-11-2011, 05:45 PM
Join Date: Sep 2011
Posts: 351
Likes: 0
Received 0 Likes
on
0 Posts
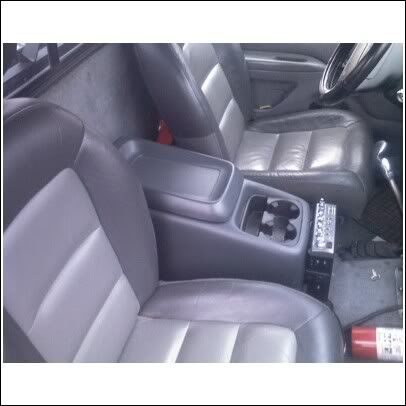
kdOaxs, thats the cleanest interior and a similar seat to the one im getting. But mines gold/tan. that console looks to be out of a 90s chev ex cab. I have a similar one but am using one from a 2001 super cuty. I like how you mounted your cb to it. got any pics of that bracket? thats a sharp loooks digital cluster too frederic!
#28
12-11-2011, 08:30 PM
Fleet Owner
I may get flamed for this but...easiest seat swap ever....Some idiot cash for clunker'd a 93 lightning....apparently it was all rotted... well, at least the seats from it have a use. I had to replace the wire mesh support in the middle of the seat, and welded the broken recline handle, pulled all the foam and covers, washed with tide, hose and scrub brush, came out great.
well, at least the seats from it have a use. I had to replace the wire mesh support in the middle of the seat, and welded the broken recline handle, pulled all the foam and covers, washed with tide, hose and scrub brush, came out great.
#30
12-13-2011, 07:00 AM
kdOaxs, thats the cleanest interior and a similar seat to the one im getting. But mines gold/tan. that console looks to be out of a 90s chev ex cab. I have a similar one but am using one from a 2001 super cuty. I like how you mounted your cb to it. got any pics of that bracket? thats a sharp loooks digital cluster too frederic!
Unfortunately, I don't have the truck anymore so I don't have any more pics. If you are wondering how I mounted the CB bracket, I just ran some sheet metal screws right into the plastic.
When the guy at the junkyard told me I could have those seats for $150 if I pulled them, I didn't have to think twice. The hardest part about putting them in was figuring out the wiring for the power and heat. I was kind of thinking the console looked like a GM style, but I got it for $30 off of eBay so I didn't really care what it came from.

Thread
Thread Starter
Forum
Replies
Last Post
juang316
1961 - 1966 F-100 & Larger F-Series Trucks
17
04-07-2016 03:39 PM

