When you click on links to various merchants on this site and make a purchase, this can result in this site earning a commission. Affiliate programs and affiliations include, but are not limited to, the eBay Partner Network.
I did this, put a valve on the red hose, running it inside to a small vacuum canister, attaching it to the black hose that came in through the firewall, I am still having the issue under WOT, either the back flow valve is bad, or I have a leak elsewhere.
Similar issue, I went through and relocated a custom vacuum canister and check valve.... but to no availe. Apparently I have a small vacuum leak elsewhere! Grrrr!
Similar issue, I went through and relocated a custom vacuum canister and check valve.... but to no availe. Apparently I have a small vacuum leak elsewhere! Grrrr!
What are your symptoms before and after the new canister?
FWIW this is where simply changing parts tends to cost unnecessary effort and money that might have been saved with a small bit of troubleshooting in advance. While most issues with the ventilation system are due a defective vacuum canister it can also be the Function Control electro-switch as well. Or it could be a failed connection somewhere in the system.
Good news is none of those are difficult to repair.
I did this, put a valve on the red hose, running it inside to a small vacuum canister, attaching it to the black hose that came in through the firewall, I am still having the issue under WOT, either the back flow valve is bad, or I have a leak elsewhere.
I've bought one of the Dorman valves at AA and it blew air in both directions, also be sure not to install it backwards. The end that allows you to draw air thru needs to attach to the engine side of things. A hand vacuum pump such as a "Mityvac" or it's chinese copies can be a real problem solver in vacuum leak solutions.
Last edited by jeffreyclay; 01-07-2019 at 11:58 AM.
Reason: typo
What are your symptoms before and after the new canister?
FWIW this is where simply changing parts tends to cost unnecessary effort and money that might have been saved with a small bit of troubleshooting in advance. While most issues with the ventilation system are due a defective vacuum canister it can also be the Function Control electro-switch as well. Or it could be a failed connection somewhere in the system.
Good news is none of those are difficult to repair.
No change after my new remote canister and check valve - although my custom canister is about twice the size of the original so it does hold a bit more vacuum and delays the inevitable default to the defrost on steep mountain roads with low vacuum.
I've bought one of the Dorman valves at AA and it blew air in both directions, also be sure not to install it backwards. The end that allows you to draw air thru needs to attach to the engine side of things. A hand vacuum pump such as a "Mityvac" or it's chinese copies can be a real problem solver in vacuum leak solutions.
2002 E250. I took off the side panel and went through the fender. Probably would have been easiest to just install another reservoir in the engine compartment, but I wanted to get to the bottom of this. The only difficult part of going through the side was unbolting the outer panel from the front bumper panel. It wasn't too bad, just a small 5/16" ratcheting wrench, some time, and skinned knuckles. Also there was a bolt behind the headlight, but a big hole drilled in the plastic made it easily accessible.
2002 E250. I took off the side panel and went through the fender. Probably would have been easiest to just install another reservoir in the engine compartment, but I wanted to get to the bottom of this. The only difficult part of going through the side was unbolting the outer panel from the front bumper panel. It wasn't too bad, just a small 5/16" ratcheting wrench, some time, and skinned knuckles. Also there was a bolt behind the headlight, but a big hole drilled in the plastic made it easily accessible.
That's quite an undertaking to replace that damned reservoir and check valve---kudos for digging in that deep. I am curious if that rectangular access window had to be cut or was it already there, just the plastic inner fender covering it?
I've been highly curious where the reservoir was physically located but never enough to remove a fender or cut into the body---not with too many other easier ways to effect a good fix. I was able to see for myself when my engine was being replaced, took a few photos of it all. Along with that I added more info about the vacuum control and devices---its here in the tech folder: Vacuum Reservoir Location & Operation
Good info from all---for such a simple cheap part the amount of trouble it causes never ceases to amaze me.
The access window was created by an angle grinder. I had spent a couple hours tracing all these lines and devices (I hadn't found seen the vacuum control link below) so 20 minutes to get access to the reservoir wasn't too bad (though 5 minutes through the wheel well is also a practical route).
The problem, as for others, is the 3 inch hose between check valve and reservoir, had severely degraded. I don't think this is planned obsolescence as one commenter put it, but just a part with inferior material. The check valve seems fine, and I don't plan to replace the reservoir.
Originally Posted by JWA
That's quite an undertaking to replace that damned reservoir and check valve---kudos for digging in that deep. I am curious if that rectangular access window had to be cut or was it already there, just the plastic inner fender covering it?
I've been highly curious where the reservoir was physically located but never enough to remove a fender or cut into the body---not with too many other easier ways to effect a good fix. I was able to see for myself when my engine was being replaced, took a few photos of it all. Along with that I added more info about the vacuum control and devices---its here in the tech folder: Vacuum Reservoir Location & Operation
Good info from all---for such a simple cheap part the amount of trouble it causes never ceases to amaze me.
A bit after the fact however the diagram/schematic shows a check valve separate from the reservoir. If the check valve fails or the reservoir leaks your condition would exist.
Thanks for the update!
Does anyone know the part number or even the name of the black vacuum line that goes from the check valve to the function control switch?
Does anyone know the part number or even the name of the black vacuum line that goes from the check valve to the function control switch?
Those colored semi-hard plastic lines aren't replaceable separately---if yours is damaged its best to replace it with typical vacuum tubing/hose you can get at the local auto parts sellers. Most times you'd be looking for a 3 or 4 MM ID line. I use silicone tubing found on eBay.
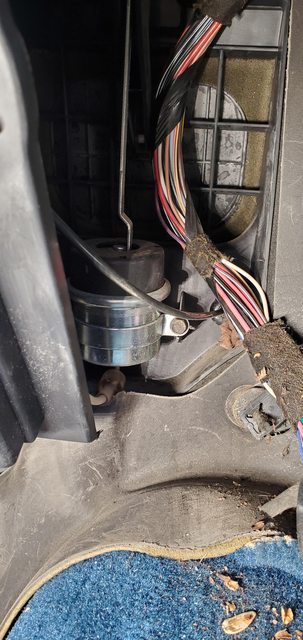
This is how I re-located my vacuum reservoir and check valve to inside the cabin, showing this only to highlight have to successfully splice in replacement vacuum lines:
Follow up: I finally had time to tackle this over the holidays... I took a lot of the existing methods and feedback and put different pieces together. IMHO this was the easiest way to approach the fix:
Attach vacuum canister to steel crush zone under passenger dash. Canister fits up into steel corrugation with ports mounted to the top. Amazon vacuum canister (Note: this canister is not ideal, it's actually a little bigger than optimum to fit up into the crush zone. A canister more oval shaped as pictured earlier in the thread by GreeVan might fit up under the dash better)
Disconnect red vacuum line at firewall connection near the battery, and reroute to under dash. I drilled a hole next to the dash support bracket and used a rubber grommet (but some just remove a bolt and feed through the bolt hole). I removed the rubber fitting at the end of the vacuum line to feed through the hole then reattached. Then I used the existing fitting to the vacuum port on the new canister.
I pulled the black vacuum line at the bottom right corner of the evaporator box (under the passenger dash/footwell) as there is a vacuum line junction here. I pulled the vacuum line from the junction and then pushed the junction back into the grommet to seal up the hole as it was. Then I attached a right angle vacuum line fitting to the vacuum hose and attached to the new vacuum canister.
After reassembling everything, it works like a champ. I think this is the simplest/easiest way to fix this common problem, so hope it helps someone else needing to make this repair. It also does not cut or change any of the existing configuration or lines, so could be reverted back to original if ever needed (other than the hole drilled in the firewall).
So an almost one year follow up: After a month or two the problem returned, but not *quite* as bad as before. As it turns out, the built in check valve in the replacement canister was bad! After adding an external/secondary check valve, the system is back to functional and working as it should. So if the problem returns, a quick and cheap check would be to add that additional/external check valve.
So an almost one year follow up: After a month or two the problem returned, but not *quite* as bad as before. As it turns out, the built in check valve in the replacement canister was bad! After adding an external/secondary check valve, the system is back to functional and working as it should. So if the problem returns, a quick and cheap check would be to add that additional/external check valve.
I don't intend to sound as though I'm bragging but the way I went about replacing and re-locating the vacuum reservoir seems to be the easiest, at least from what I've read in various threads about this issue. Using the better quality parts along with tucking everything under the dash gives a long-lived repair. In the event anything fails again its all easily accessible.
Apart from the tubing I spent like $30 for the reservoir and check valve. Reservoir from eBay about $18, check valve from dealer for $10, both naturally Motorcraft. FWIW my '05 E350 had one of those cheap spherical reservoirs under the dash but it must have failed because I had to replace it because it had developed a problem of some sort. It didn't conceal as well as the OEM part so that's another upside to using the better stuff.
Hello all. I know this thread is old but I would greatly appreciate any help.
I have my pvc canister and dorman check valve. When I went out to my 93 E150 to put them in... it doesn't look the same as the pics on here.
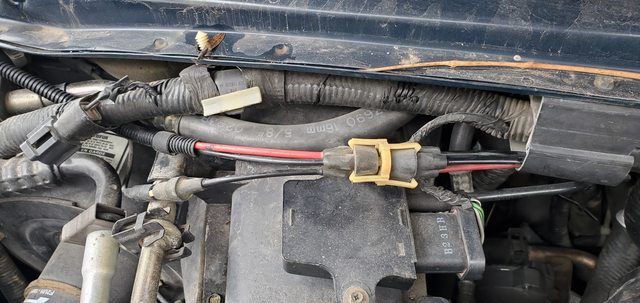
I have this weird vacuum line connector setup on the passenger side.
And this black vacuum line coming in thru the firewall at the passenger foot.
If someone could, please help me understand where the new check valve and canister goes? Thanks!
An alternative is to remove the dog house then look for a vacuum port on the manifold to tap into to supply the new reservoir. There should be a grommet in the firewall between the engine and passenger footwell. Run a line with the check valve to the reservoir, then route the black hose in the footwell to the reservoir.
Determine which hose along the cowl in the engine bay feeds the AC system and cap it.
 01-02-2019, 05:45 PM