My 66 F250 Restoration
#1
 03-20-2011, 04:24 PM


Join Date: Feb 2011
Location: Casper Wyoming
Posts: 16
Likes: 0
Received 0 Likes
on
0 Posts
My 66 F250 Restoration
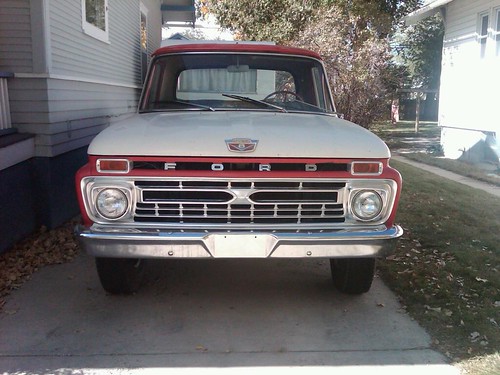
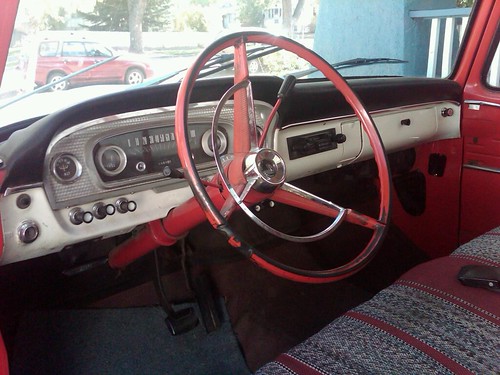
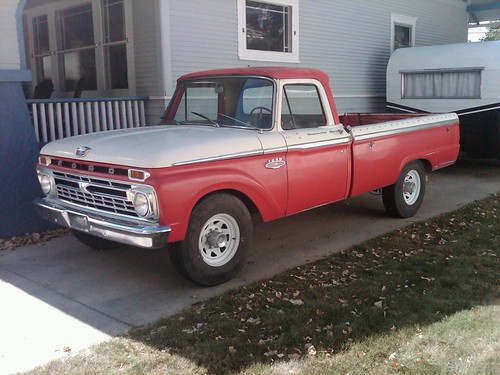
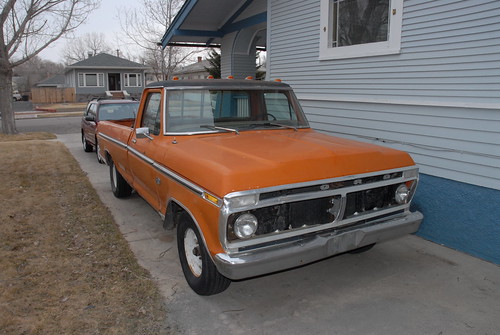
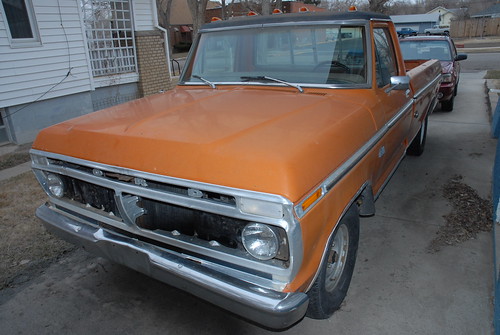
I Recently Bought a 1966 F250 Camper Special this last fall. The truck was all original with 40K miles and looked great. It is custom cab so it has the dash Pad (cracked like all of them of this year) with all of the gauges and trim. The truck is from Wyoming where i live and is rust free.
This winter it got very cold and cracked the block. I was very pissed off because i knew better and knew this was going to cost me big. I found out by driving it to the gas station and water slowly coming out. I had changed all of the fluids but the antifreeze. It was -37 with windchill here this winter. The block cracked by the alternator mount where right by the grounding cable bolt. I tried all of the remedy's with no success(JB Weld and Stop Leak). I knew there was no hope but getting a new engine.
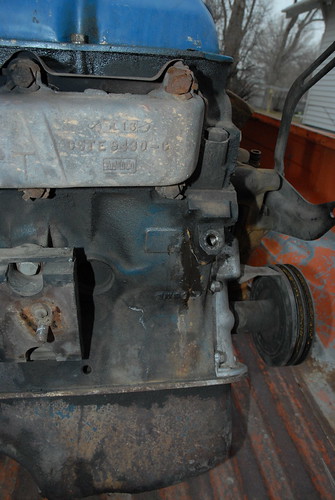
I had been reading all of the forums and really did want to have power brakes and steering. I kept running into the same thing Donor Truck. You Have to have a Donor truck from a later year so i got one. Now that i really needed one. I found a Long box F100 Ford Ranger 1972.

This Ranger had everything i needed to get my truck up and running. Power Disc brakes and Power Steering with a Rebuilt 390 FE. The engine is fixed up with headers and holly carburetor. It had a 4 speed that i did not need.

Here is some Pictures and where I'm at right Now!

This winter it got very cold and cracked the block. I was very pissed
off because i knew better and knew this was going to cost me big. I found out by driving it to the gas station and water slowly coming out. I had changed all of the fluids but the antifreeze. It was -37 with windchill here this winter. The block cracked by the alternator mount where right by the grounding cable bolt. I tried all of the remedy's with no success(JB Weld and Stop Leak). I knew there was no hope but getting a new engine.I had been reading all of the forums and really did want to have power brakes and steering. I kept running into the same thing Donor Truck. You Have to have a Donor truck from a later year so i got one. Now that i really needed one. I found a Long box F100 Ford Ranger 1972.
This Ranger had everything i needed to get my truck up and running. Power Disc brakes and Power Steering with a Rebuilt 390 FE. The engine is fixed up with headers and holly carburetor. It had a 4 speed that i did not need.
Here is some Pictures and where I'm at right Now!
#2
03-20-2011, 04:35 PM
Join Date: Feb 2011
Location: Casper Wyoming
Posts: 16
Likes: 0
Received 0 Likes
on
0 Posts
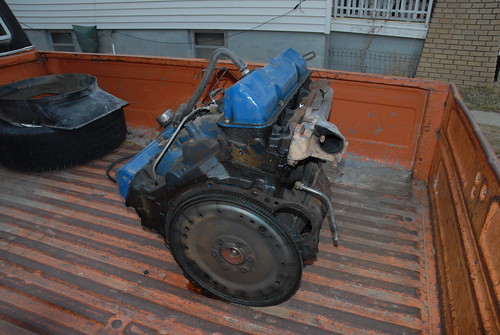
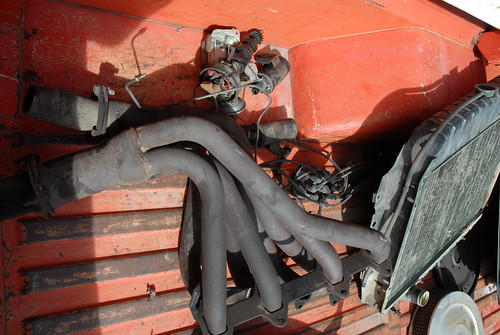
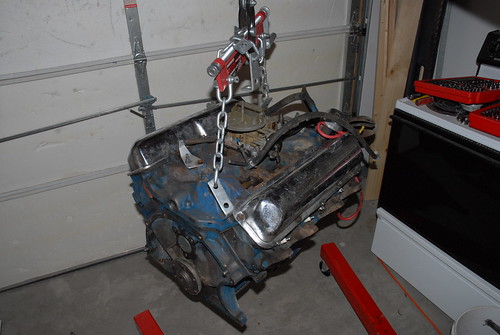
Here are some more pictures of engine and parts from the restoration
<a href="http://www.flickr.com/photos/60817575@N05/5544467122/" title="DSC_0756 by ParkStreet432, on Flickr"><img src="http://farm6.static.flickr.com/5176/5544467122_6f222b519f.jpg" width="334" height="500" alt="DSC_0756" /></a><a href="http://www.flickr.com/photos/60817575@N05/5543891575/" title="Ford FE 390 by ParkStreet432, on Flickr"><img src="http://farm6.static.flickr.com/5098/5543891575_e767a8a750.jpg" width="500" height="334" alt="Ford FE 390" /></a>
I have removed both engines from both trucks. I took the new engine to the car wash getting it ready for some paint. going to put some new gaskets in before the new paint waiting for next weekend.
<a href="http://www.flickr.com/photos/60817575@N05/5543886313/" title="DSC_0755 by ParkStreet432, on Flickr"><img src="http://farm6.static.flickr.com/5052/5543886313_ed151ef3a7.jpg" width="500" height="334" alt="DSC_0755" /></a>
I installed a new drain in the block so i will never have this problem. For anyone who has drained the radiator then pulled and cracked open a block plug and found another gallon antifreeze knows this is going to come in handy.
#3
03-20-2011, 07:07 PM
Join Date: Feb 2011
Location: Casper Wyoming
Posts: 16
Likes: 0
Received 0 Likes
on
0 Posts
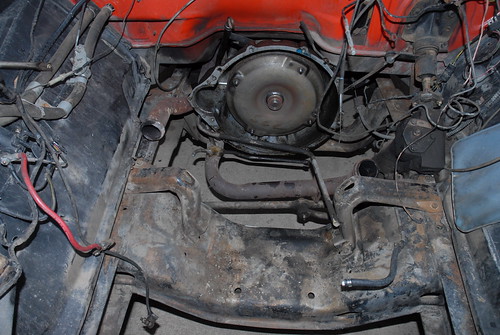
Now that i have the engine pulled i'm debating if i should go a head and paint the truck looking up all of the parts needed like weatherstripping and gaskets. I have a welder i can use and fill all of the holes around the bed and the cover caps.
<a href="http://www.flickr.com/photos/60817575@N05/5544435226/" title="DSC_0737 by ParkStreet432, on Flickr"><img src="http://farm6.static.flickr.com/5057/5544435226_013a6b85eb.jpg" width="334" height="500" alt="DSC_0737" /></a><a href="http://www.flickr.com/photos/60817575@N05/5543845665/" title="DSC_0731 by ParkStreet432, on Flickr"><img src="http://farm6.static.flickr.com/5095/5543845665_688a68ea2b.jpg" width="500" height="334" alt="DSC_0731" /></a>
The thing about that if i do all of that im going to want to shave the drip rail and fill the cab seams above the rear window. <a href="http://www.flickr.com/photos/60817575@N05/5544435226/" title="DSC_0737 by ParkStreet432, on Flickr"><img src="http://farm6.static.flickr.com/5057/5544435226_013a6b85eb.jpg" width="334" height="500" alt="DSC_0737" /></a>
Has anyone done this weld up that cab seam???? Any Ideas?
#5
03-20-2011, 08:01 PM
Join Date: Feb 2011
Location: Casper Wyoming
Posts: 16
Likes: 0
Received 0 Likes
on
0 Posts
Yeah i was going to get the block welded up but when i found the donor truck for 600 with a 390 FE i just decided to use that motor. Welding cast is not the best idea. Some people say the can weld cast like any other metal but i disagree. There is lots of oils and plus you have to preheat the block just to get a good weld. I really did think it over hard. Its cool when you have all original truck.
Thanks for your reply
Thanks for your reply
#6
03-20-2011, 11:55 PM
Senior User
Join Date: Jan 2011
Location: Phoenix, AZ.
Posts: 139
Likes: 0
Received 0 Likes
on
0 Posts
#7
03-21-2011, 12:17 AM
Join Date: Feb 2011
Location: Casper Wyoming
Posts: 16
Likes: 0
Received 0 Likes
on
0 Posts
I have not checked the size of the motor but i don't believe many 427 came with a two barrel carburetor. That would be awesome if it was i have not looked into it yet just pulled the motor yesterday. The weird thing it had a .38 caliber shell plugging something on the carburetor. I will have to get a picture posted. I the Plug worked i drove the truck home.
i have not looked into it yet just pulled the motor yesterday. The weird thing it had a .38 caliber shell plugging something on the carburetor. I will have to get a picture posted. I the Plug worked i drove the truck home.
Trending Topics
#8
03-21-2011, 12:25 AM
Logistics Pro
I Recently Bought a 1966 F250 Camper Special this last fall. The truck was all original with 40K miles and looked great. It is custom cab so it has the dash Pad (cracked like all of them of this year) with all of the gauges and trim. The truck is from Wyoming where i live and is rust free.
This winter it got very cold and cracked the block. I was very pissed off because i knew better and knew this was going to cost me big. I found out by driving it to the gas station and water slowly coming out. I had changed all of the fluids but the antifreeze. It was -37 with windchill here this winter. The block cracked by the alternator mount where right by the grounding cable bolt. I tried all of the remedy's with no success(JB Weld and Stop Leak). I knew there was no hope but getting a new engine.
I had been reading all of the forums and really did want to have power brakes and steering. I kept running into the same thing Donor Truck. You Have to have a Donor truck from a later year so i got one. Now that i really needed one. I found a Long box F100 Ford Ranger 1972.
This Ranger had everything i needed to get my truck up and running. Power Disc brakes and Power Steering with a Rebuilt 390 FE. The engine is fixed up with headers and holly carburetor. It had a 4 speed that i did not need.
Here is some Pictures and where I'm at right Now!
This winter it got very cold and cracked the block. I was very pissed
off because i knew better and knew this was going to cost me big. I found out by driving it to the gas station and water slowly coming out. I had changed all of the fluids but the antifreeze. It was -37 with windchill here this winter. The block cracked by the alternator mount where right by the grounding cable bolt. I tried all of the remedy's with no success(JB Weld and Stop Leak). I knew there was no hope but getting a new engine.I had been reading all of the forums and really did want to have power brakes and steering. I kept running into the same thing Donor Truck. You Have to have a Donor truck from a later year so i got one. Now that i really needed one. I found a Long box F100 Ford Ranger 1972.
This Ranger had everything i needed to get my truck up and running. Power Disc brakes and Power Steering with a Rebuilt 390 FE. The engine is fixed up with headers and holly carburetor. It had a 4 speed that i did not need.
Here is some Pictures and where I'm at right Now!
First off WELCOME!
Beautiful 1966 F250. Too bad about the block cracking. The pin method works very well for fixing a crack like that but probably a better gig doing what you are doing.
Only problem is now its the "Might as well's" that are going to happen. Happens to me each time I touch a slick. My current 2day project is now going on its 3rd week. The last one that was supposed to be a weekend project took 5 months with more to do.
What is the history on the truck it looks to be in great shape.
#9
03-21-2011, 12:36 AM
Join Date: Feb 2011
Location: Casper Wyoming
Posts: 16
Likes: 0
Received 0 Likes
on
0 Posts
Thank you. Yes I'm am getting to that stage where i want to rip the whole truck apart and build it up right. I had no plans to do anything to the truck until the engine cracked and now it whole new ball game. A part of me is saying put the new engine back in and call it good. The other part is saying power everything and paint the whole truck. There is so much to buy and do when it comes to paint with weatherstripping and removing glass and interior and rewiring. I have pulled 2 motors in 2 weekends so far don't know where I'm headed yet.
#10
03-21-2011, 12:39 AM
Senior User
Join Date: Jan 2011
Location: Phoenix, AZ.
Posts: 139
Likes: 0
Received 0 Likes
on
0 Posts
I have not checked the size of the motor but i don't believe many 427 came with a two barrel carburetor. That would be awesome if it was i have not looked into it yet just pulled the motor yesterday. The weird thing it had a .38 caliber shell plugging something on the carburetor. I will have to get a picture posted. I the Plug worked i drove the truck home.
i have not looked into it yet just pulled the motor yesterday. The weird thing it had a .38 caliber shell plugging something on the carburetor. I will have to get a picture posted. I the Plug worked i drove the truck home.Jim
#11
03-21-2011, 12:44 AM
Join Date: Feb 2011
Location: Casper Wyoming
Posts: 16
Likes: 0
Received 0 Likes
on
0 Posts
I bought this wheels of a friend at work and it was my plan to buy the wheel adapters to the 8 lug metric and put them on the truck. Check them out tell me what you think. They are 20" wheels off an new Ford all forged aluminum. They are 275/65R20 tires they are much bigger than the originals that's for sure.
<a href="http://www.flickr.com/photos/60817575@N05/5544359680/" title="DSC_0685 by ParkStreet432, on Flickr"><img src="http://farm6.static.flickr.com/5295/5544359680_0d415d6c5e.jpg" width="334" height="500" alt="DSC_0685" /></a><a href="http://www.flickr.com/photos/60817575@N05/5544357792/" title="DSC_0684 by ParkStreet432, on Flickr"><img src="http://farm6.static.flickr.com/5172/5544357792_25c02f4436.jpg" width="500" height="334" alt="DSC_0684" /></a><a href="http://www.flickr.com/photos/60817575@N05/5544361394/" title="DSC_0686 by ParkStreet432, on Flickr"><img src="http://farm6.static.flickr.com/5134/5544361394_eceaa41d3b.jpg" width="500" height="334" alt="DSC_0686" /></a><a href="http://www.flickr.com/photos/60817575@N05/5543785707/" title="DSC_0688 by ParkStreet432, on Flickr"><img src="http://farm6.static.flickr.com/5131/5543785707_6c591f0bf8.jpg" width="500" height="334" alt="DSC_0688" /></a>
what do you think?
#12
03-21-2011, 12:49 AM
Join Date: Feb 2011
Location: Casper Wyoming
Posts: 16
Likes: 0
Received 0 Likes
on
0 Posts
<a href="http://www.flickr.com/photos/60817575@N05/5543889773/" title="DSC_0757 by ParkStreet432, on Flickr"><img src="http://farm6.static.flickr.com/5172/5543889773_f18157e42e.jpg" width="500" height="334" alt="DSC_0757" /></a><a href="http://www.flickr.com/photos/60817575@N05/5543891575/" title="Ford FE 390 by ParkStreet432, on Flickr"><img src="http://farm6.static.flickr.com/5098/5543891575_e767a8a750.jpg" width="500" height="334" alt="Ford FE 390" /></a>
#14
03-21-2011, 01:05 AM
Join Date: Feb 2011
Location: Casper Wyoming
Posts: 16
Likes: 0
Received 0 Likes
on
0 Posts
Sorry but i'm trying to figure out more about cross-bolt blocks. Not much out on the web about them but they are very rare and only used in the high performance cars?? does any one know where i can find a picture of one?
#15
03-21-2011, 01:12 AM
Senior User
Join Date: Jan 2011
Location: Phoenix, AZ.
Posts: 139
Likes: 0
Received 0 Likes
on
0 Posts