By Kevin Kozak
Front Axle Shaft U-joint Replacement For Dana 44 axle with Warn manual locking hubs – 1978 F150 4×4
References:
Tools Required:
Preparation:
- Place drain pan under front differential and loosen (10) 1/2" bolts holding differential cover to housing. Loosen cover and allow fluid to drain. Remove bolts and cover and inspect gears for wear.

- Remove lug nuts from wheel and remove wheel.
- Remove 9/16" caliper key retaining screw and drive out caliper support key with hammer and large screwdriver.
 � �
- Remove caliper and pads. Inspect pads and rotor for wear and replace if needed.
- Remove (6) 9/64" hex key screws holding manual lock-outs to hub and remove lock-outs.
�
- Remove inner retaining ring, gear, and spring (not required but it doesn’t hurt to remove it and clean it up while you have it apart).
- Remove outer lock ring retainer and outer gear.

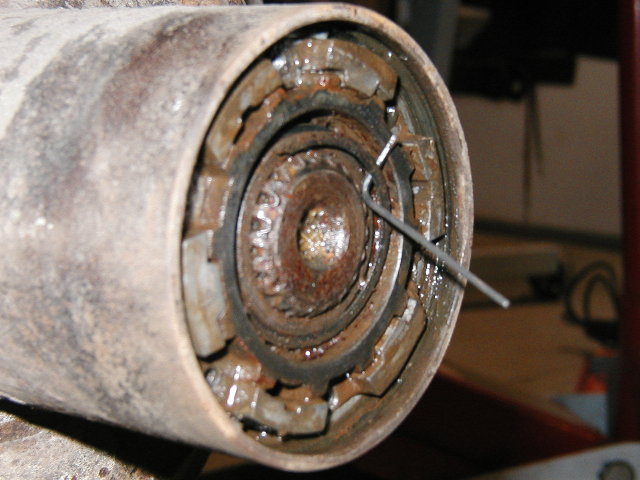
- Using a center punch, place a mark on the bearing lock nut and spindle shaft (shown here in white). This is to make sure we tighten it back to where it was.

- Using a special socket, remove bearing lock nut. If you don’t have the special socket, you can make one from a 5"-6" long piece of 2" PVC. (You may have to loosen the nut with a hammer and screwdriver if it’s really tight.)
 � �
- Remove retainer ring
- Remove bearing adjusting nut with special socket or homemade tool.
- Carefully remove hub and rotor assembly. It’s not a bad idea to inspect, clean and re-grease the bearings at this point

It helps to lay out all the pieces in the order you removed them.
- Remove (5) 11/16" nuts that hold the spindle shaft to the steering knuckle.
- (According to Haynes) Carefully tap the spindle loose from the knuckle. (In reality, I had to whale on it from the back with a long pipe and big hammer, and pry it away from the knuckle with a 4 foot crow bar… …carefully.)

- Inspect the rubber seal that goes between the shaft flange and spindle and replace if necessary.
- Inspect and grease bearings at rear of spindle. Replace if necessary.
- Slide axle shaft out of axle tube being careful not to damage splines.
- Remove u-joint retainer clips from the inside of the joints. See new u-joints to see what I mean.
- Press out old u-joints with a press if available.
- If no press is available, set the spline end of the shaft on a 4×4 and the u-joint end on a 1 1/8" socket. Using a torch, heat the flange of the shaft to loosen the u-joint caps. Place a 3/4" socket on the top cap of the u-joint, and tap out joint with a hammer. Pounding too hard on the flanges could damage the shaft and prevent the new u-joints from fitting properly. Once the first cap is out, rotate the axle 180 deg. and remove the opposite cap in the same manner. Repeat this for all four caps.

- Once old u-joints are removed, clean the yokes with very fine sandpaper to remove any rust.
- Install new u-joints and retainer clips. It’s easiest to remove two of the end caps and insert the u-joint into the yoke without them. Then install the end caps from the outside and snap on the retainer clips. Make sure the needle bearings are all in place in the cap while assmebling.
It’s not a bad idea to clean all the parts before reassembly. I used a bench grinder, 3" hand grinder, and a drill with wire wheels to clean mine. I also gave everything a coat of paint to prevent rust and make it look a little nicer.
You should also clean out the axle tube. The axle seals for this axle are in the differential as opposed to being at the ends of the tube. Making it easy for the tubes to fill up with sand and dirt. I used a shop vac to clean mine and it worked pretty well.
- Carefully reinsert the axle shaft into the tube taking special care not to damage the splines or the seals.
- Replace spindle onto steering knuckle and tighten the (5) 11/16" nuts to spec. (my Haynes book doesn’t list the torque specs for these nuts.)
- Replace hub onto spindle making sure bearings are seated properly.
- Replace bearing adjusting nut with special socket or homemade tool. Tighten so that the marks you made earlier line up. (If you’re replacing the bearings, tighten to 50 ft. lbs. while turning rotor and back off approx. 90 deg..)
- Install retainer ring and lock nut with special socket or homemade tool. Tighten to line up marks (or to 80 � 100 ft. lbs for 73-76 and 50 � 70 ft. lbs. for 77-79)
- Reassemble spring, gear, and retainer into outer gear.
- Slide assembly into hub.
- Install outer lock ring retainer.
- Install lock-out onto hub and tighten the (6) 9/64" hex key screws.
- Reinstall pads and caliper.
- Using a hammer, tap the caliper support key into place.
- Replace 9/16" caliper key retaining screw.
- Reinstall wheel and tighten lugs to spec. (90 ft. lbs. for 1/2" nuts)
- Jack up axle, remove jack stand and lower vehicle.
Repeat these steps for the other side.
- Reinstall differential cover and gasket. Replace gasket if needed. Tighten (10) 1/2" bolts to 30-40 ft. lbs..
- Remove filler plug on differential cover.
- Refill differential with appropriate lubricant.
- Replace filler plug and tighten to 40 ft. lbs.
- Reconnect battery cables, unchock wheels and road test.
That should do it.
Park vehicle on hard level surface. Chock rear wheels, and remove positive battery cable. Jack up one side of front axle and place jack stand under it. Lower axle onto stand. Jack, jack stands, lug wrench, oil drain pan, 1/2" socket, 9/16" socket or box end wrench, hammer, regular screwdriver, 9/64" hex key wrench, needle-nose pliers, bearing retainer/lock nut tool (can be made), center punch, 11/16" socket, pry bar, press (can use 3/4" socket, 1 1/8" socket and hammer if press in not available), and a propane torch Haynes Repair Manual # 36054 – Ford Pick-ups & Broncos 73-79 |