97 Mountianeer chirping
#1
 11-15-2008, 03:02 PM


Join Date: Feb 2003
Location: Vacaville California
Posts: 102
Likes: 0
Received 0 Likes
on
0 Posts
97 Mountianeer chirping
--------------------------------------------------------------------------------
I have a squeek under the hood that I thought was a belt related squeek. But after using a piece of hose to listen and reading a few post on this site, I am pretty sure it is coming from the cam sensor area. I have heard about the magnet falling down and some have said something about using some oil. I would just like to get some input on where to start with this. Right now it is like a chirp that comes and goes. Is this something that could cause a imediate breakdown? and should I be seeing a code for this. I discovered this after the noise started and I then pulled a P0405 code which is for the EGR valve. Found a cracked hose and fixed it. Still have the chirp. Where to start?
I have a squeek under the hood that I thought was a belt related squeek. But after using a piece of hose to listen and reading a few post on this site, I am pretty sure it is coming from the cam sensor area. I have heard about the magnet falling down and some have said something about using some oil. I would just like to get some input on where to start with this. Right now it is like a chirp that comes and goes. Is this something that could cause a imediate breakdown? and should I be seeing a code for this. I discovered this after the noise started and I then pulled a P0405 code which is for the EGR valve. Found a cracked hose and fixed it. Still have the chirp. Where to start?
#2
11-16-2008, 02:43 AM
Posting Guru
Join Date: Mar 2005
Location: In the Middle
Posts: 1,004
Likes: 0
Received 0 Likes
on
0 Posts
#3
11-16-2008, 11:27 AM
Join Date: Feb 2003
Location: Vacaville California
Posts: 102
Likes: 0
Received 0 Likes
on
0 Posts
Chirp Chirp
So you replaced the whole thing sensor and synchronizer? Or did you re use the sensor? Also how did it go. It looks to me that it could be done by removing the bracket that holds the ignition coils, unpluging all the plug wires (marking them first) and unpluging the coils on the side. Does that sound right? Then remove the bolt that holds the syncro in place and pull it out. Did the new Syncro come with any instructions like coat with oil before installing or anything like that? Do you have any advice after doing this task, (lessons learned)? Also did you purchaxe the syncro from the dealer or elseware?
Any advice would be greatly appreciated.
Tim.
Any advice would be greatly appreciated.
Tim.
#4
11-16-2008, 01:03 PM
Posting Guru
Join Date: Mar 2005
Location: In the Middle
Posts: 1,004
Likes: 0
Received 0 Likes
on
0 Posts
.
Ok, are you ready? Grab some popcorn...
Yes, I replaced the sensor and synchronizer. I bought the good parts because I plan to keep my Explorer for a while. I replaced them before the sensor got chewed up because it makes the repair MUCH easier for the novice like myself.
Here are the parts I bought:
These are for my '97 with a 5.0. Other years may be different. Part numbers:
F7TZ-12A362-AC = Ford Mortorcraft synchronizer $140 (Ford dealer)
OTC6469 = Camshaft Sensor Synchronizer Tool $47.99 (O'reilly's)
SS10499 = Delphi brand Sensor $39.99 (Napa)
From what I understand, a rebuilt OE Ford sync can be bought from Napa. Part number NRD48S2801 and is called a "crankshaft angle sensor" on their website Crankshaft Angle Sensor
There is a "Dorman" brand sync that comes with a new sensor and alignment tool. The tool is required. The Dorman sync has been reported to not fit in the block correctly, which is why I bought a new Ford part. The Dorman part is cheap though, so you could buy it just for the tool and sensor, then buy a Ford sync if you want and just not use the Dorman sync. I went with a Delphi sensor since it was what Ford used as OE.
I did this job in just over hour. I am typing from memory of a job I did a year ago, so some small details may be forgotten, but most of it should be here:
Label (if you want) the plug wires and remove them from the coil packs.
Unplug wires from the side of the coil packs.
The coil packs can stay mounted to the bracket. Remove the bracket and coil packs. It seems like there were 3 bolts/nuts that held the bracket on. Once all the bolts are removed, the bracket will not want to come off because one of the studs will not allow it to move. If I remember correctly it's the horizontally positioned stud to your left if you are standing in front of the vehicle. You can remove tons of other stuff at this point, or do as I did and use a prybar to "bend" the bracket off of that stud. No worry though, it goes back together perfectly.
You must find TDC of the compression stroke. This is easier than it sounds. Remove the sensor from the top of the sync. The tool that you bought will fit properly into the old sync when the engine is at TDC of the compression stroke. Look at the tool and you can visualize how far the engine must be turned to allow the tool to fit in the sync. You can use the starter if needed to "bump" the engine until it's close to lining up. Now you can use an 8 mm allen wrench in the end of the power steering pump shaft to "fine tune" the rotation of the engine until the tool fits into the sync. It would be a good idea to look at the timing pointer to verify that it is on 0*. It can be very difficult to see. You almost need to put your eye on stick and hold it down there.
Once you have the engine at TDC of the compression stroke take a moment to note the direction the arrow on the tool is pointing. It should be about 15* to your right if standing in front of the Explorer looking at the engine. Now you can remove the tool from the sync, then remove the hold down bolt and clamp, then pull the old sync from the engine.
Use plenty of fresh motor oil all over on the new sync on the areas that go into the engine, but not on any external areas that stick up out of the engine. Don't forget to oil the o-ring either. You can soak it in oil overnight if you have enough time. Be sure that oil gets into the main body of the sync, on the drive gear, and up into the bottom of the shaft where the oil pump drive rod goes. Rotate the shaft to help get the oil into the new sync body.
Put the alignment tool into the new sync and drop the new sync in the engine using a twisting motion to allow the gears to mesh. The arrow on the tool should be pointing about 15* to your right as it was before, otherwise lift the sync up and try again. A few tries may be needed.
Once the new sync is properly installed (with the tool still in place) check to be sure it's sitting in the engine properly and not sitting too high. Now you can put the hold down clamp and bolt back in and tighten.
Remove the tool and install the new sensor.
You should know the rest of the reassembly procedure now.
I've included all major steps involved with this process. I may have forgotten minor details such as removing a wire or something, but you'll figure it out.
I hope this info helps...
.
#5
11-16-2008, 01:19 PM
Posting Guru
Join Date: Mar 2005
Location: In the Middle
Posts: 1,004
Likes: 0
Received 0 Likes
on
0 Posts
.
One of these is my pic and the others have been "borrowed" from other forums.
A brief description of each pic is included just above that pic.
This is the sync still in the engine with the alignment tool installed. Note the direction of the arrow.

From left to right: New sync, alignment tool, and new sensor.

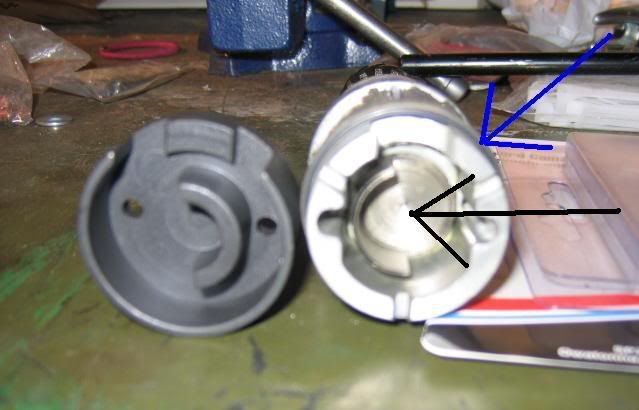
The tool is on the left and a top view of the sync on the right. The black arrow points the the vane that moves when the engine is rotated. You can see how the two half circles of the tool and the vane need to fit together.
One of these is my pic and the others have been "borrowed" from other forums.
A brief description of each pic is included just above that pic.
This is the sync still in the engine with the alignment tool installed. Note the direction of the arrow.
From left to right: New sync, alignment tool, and new sensor.
The tool is on the left and a top view of the sync on the right. The black arrow points the the vane that moves when the engine is rotated. You can see how the two half circles of the tool and the vane need to fit together.


Thread
Thread Starter
Forum
Replies
Last Post
mfp4073
1983 - 2012 Ranger & B-Series
12
09-20-2016 06:36 PM
SoCalAngler
1987 - 1996 F150 & Larger F-Series Trucks
1
05-08-2015 08:42 AM