
Steering Wheel Wiring Harness
#16
 08-01-2011, 02:11 PM


#17
12-07-2011, 11:37 PM

Steering Wheel Wiring Harness
I have a 2004 ford expedition that i just installed a new steering wheel with radio controls on it the cruise works fine but i can't get the radio controls to work. Do i need something else to make it work. the radio is factory without nav with 6 disk cd changer built in. my email is bigjohnandkristin@sbcglobal.net
#18
12-09-2011, 12:34 PM

#19
12-09-2011, 12:42 PM
#20
12-09-2011, 05:27 PM
#21
12-10-2011, 09:16 AM
#22
01-01-2012, 07:36 PM

If you end up changing your head unit to an after market unit there are items out there that allow the use of steering wheel radio controls. Since I did my wheel swap I installed an aftermarket head unit with a steering wheel remote interface module from PAC. Works like a charm.
I have added the wheel with the CC/HVAC/Stereo controls to my '05 F350. Can you post the correct clock spring part number as well as the PAC part number?
From your previous posts it sounds like a no-brainer clock spring swap and I'm up and running, at least with CC.
Darren
#23
01-01-2012, 08:07 PM
<!--[if gte mso 9]><xml> <w:WordDocument> <w:View>Normal</w:View> <w:Zoom>0</w:Zoom> <w:PunctuationKerning/> <w:ValidateAgainstSchemas/> <w:SaveIfXMLInvalid>false</w:SaveIfXMLInvalid> <w:IgnoreMixedContent>false</w:IgnoreMixedContent> <w:AlwaysShowPlaceholderText>false</w:AlwaysShowPlaceholderText> <w:Compatibility> <w:BreakWrappedTables/> <w:SnapToGridInCell/> <w:WrapTextWithPunct/> <w:UseAsianBreakRules/> <w ontGrowAutofit/> </w:Compatibility> <w:BrowserLevel>MicrosoftInternetExplorer4</w:BrowserLevel> </w:WordDocument> </xml><![endif]--><!--[if gte mso 9]><xml> <w:LatentStyles DefLockedState="false" LatentStyleCount="156"> </w:LatentStyles> </xml><![endif]--><!--[if gte mso 10]> <style> /* Style Definitions */ table.MsoNormalTable {mso-style-name:"Table Normal"; mso-tstyle-rowband-size:0; mso-tstyle-colband-size:0; mso-style-noshow:yes; mso-style-parent:""; mso-padding-alt:0in 5.4pt 0in 5.4pt; mso-para-margin:0in; mso-para-margin-bottom:.0001pt; mso-pagination:widow-orphan; font-size:10.0pt; font-family:"Times New Roman"; mso-ansi-language:#0400; mso-fareast-language:#0400; mso-bidi-language:#0400;} </style> <![endif]-->Clockspring w/ redundant controls - p/n 5C3Z-14A664-AA (That last A is really important). If you try to order the clockspring and the supplier requires a VIN don't give him yours. They will send you the wrong clockspring. I went through that hassle the first time around. Ultimately, I called the guys at Tasca parts and got exactly what I needed.
The PAC controller is only used for aftermarket head units and is dependent the head unit manufacturer. I added a Pioneer to my 06 F250 and used the PAC SWI-PS. If you are trying to control a factory head unit you don't need the PAC controller. You do need to run a wire from the clockspring harness to the radio harness shown a few posts back.
ontGrowAutofit/> </w:Compatibility> <w:BrowserLevel>MicrosoftInternetExplorer4</w:BrowserLevel> </w:WordDocument> </xml><![endif]--><!--[if gte mso 9]><xml> <w:LatentStyles DefLockedState="false" LatentStyleCount="156"> </w:LatentStyles> </xml><![endif]--><!--[if gte mso 10]> <style> /* Style Definitions */ table.MsoNormalTable {mso-style-name:"Table Normal"; mso-tstyle-rowband-size:0; mso-tstyle-colband-size:0; mso-style-noshow:yes; mso-style-parent:""; mso-padding-alt:0in 5.4pt 0in 5.4pt; mso-para-margin:0in; mso-para-margin-bottom:.0001pt; mso-pagination:widow-orphan; font-size:10.0pt; font-family:"Times New Roman"; mso-ansi-language:#0400; mso-fareast-language:#0400; mso-bidi-language:#0400;} </style> <![endif]-->Clockspring w/ redundant controls - p/n 5C3Z-14A664-AA (That last A is really important). If you try to order the clockspring and the supplier requires a VIN don't give him yours. They will send you the wrong clockspring. I went through that hassle the first time around. Ultimately, I called the guys at Tasca parts and got exactly what I needed. The PAC controller is only used for aftermarket head units and is dependent the head unit manufacturer. I added a Pioneer to my 06 F250 and used the PAC SWI-PS. If you are trying to control a factory head unit you don't need the PAC controller. You do need to run a wire from the clockspring harness to the radio harness shown a few posts back.
#24
01-01-2012, 08:37 PM
Here is the complete write up from when I did my wheel swap. I couldn't get it posted at the time but here it is now.
Well, after months of trial and error I finally have this complete. To preface this discussion I have a 2006 F250 XLT with OEM 6 Disc stereo and cruise control only on the steering wheel. This is not for the Sync system. I agree with Frakenbiker, if you want to have something like that it is better to go after market on a new head unit. The objective was to change out the wheel for the one with reundant audio and EATC controls. I don't have the EATC and may not do that upgrade. That being said, now that I have it working it is a simple thing to do. Here's what you need:
Ford Steering Wheel w/ redundant controls - p/n 5C7Z-3600-CBA
Clockspring w/ redundant controls - p/n 5C3Z-14A664-AA (That last A is really important)
Metra wiring harness into vehicle - p/n 71-5520
16 gauge wire
Female computer harness connectors.
Crimp on butt connector.
I ordered the Ford parts from Tasca. Give them a call. Don't try to order this from the website because it's a little unclear what you're ordering. They were extremely helpful.
Tools you need:
8mm socket, 7mm socket, T50 torx for socket wrench (to remove the steering wheel), wire crimpers, needle nose pliers, small (I mean small) flathead screw driver.
Steps
1. Disconnect battery(ies) positive lead(s).
2. Remove the airbag. This is not as scary as I was lead to believe but treat this thing with respect. There are two 1" plastic caps on the steering wheel behind the airbag. Pop these off with the small screwdriver. The bolts in each of these holes is 8mm. Once the bolts are removed lift off the airbag and unplug it. There are two plugs; one for the airbag itself and one for the horn.
3. Remove the wheel. Unplug the clockspring harness. It�s right in front of you. Use the T50 torx wrench and loosen the bolt half way. I just forcefully wiggled it back and forth until it was loose. You can always use a wheel puller but I didn�t find it necessary. Take bolt and wheel off.
4. Now disassemble the steering column cover. There are screws on the bottom. You need to remove the tilt lever. It just unscrews.
5. Remove the ignition cylinder. With the key in the ignition turn towards the on position. It will pull straight out from there.
6. Remove the clock spring. Take the tab off the ignition cylinder housing and under the dash pull the harness off the �frame� and unplug both the main clock spring harness and the airbag harness. Pull the clock spring off the steering column.
7. Install the new clock spring. Place the new clock spring on the steering column. Don�t plug it into the main harness just yet because you need to do some work down there.
8. Reassemble the steering column and install the new steering wheel. Just go in reverse order of the steps above. Again, no need to plug the clockspring into the main harness just yet. All of the connections to the new wheel are plug and play so this should be easy.
Now the work begins. You will notice that the new clock spring harness has eight wires coming down to the harness where the old one only had six. These two new wires are for the radio control and the EATC control. You will be hooking up the radio wire in this procedure although I added the extra wire for the EATC so I don�t have to get back into the plug later to install it. Here�s a diagram of the connector on the main harness:

Pin position 4 is for the radio control wire. This diagram is of the female end on the main harness. You will notice yours does not have a wire in this position. You will be adding it. Take one of the female connectors and attach it to 30� +/- length of wire. Set it aside.
A note on the type of female connector you get. Make sure it�s about an inch long. You need the length to fit into the harness connector. I bought these at Fry�s Electronics in the computer parts section. Radio Shack didn�t have anything like this. Here are pictures of what I bought:

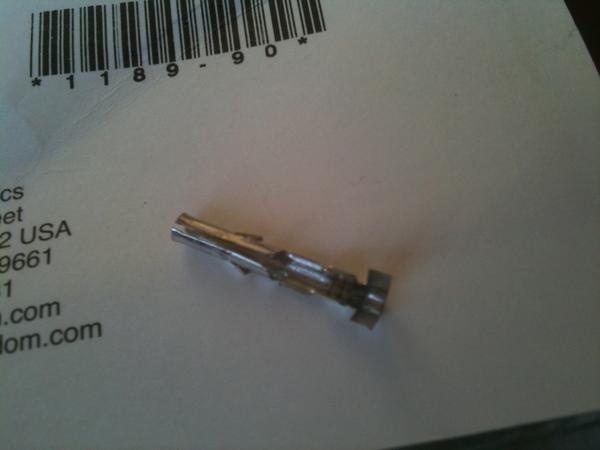
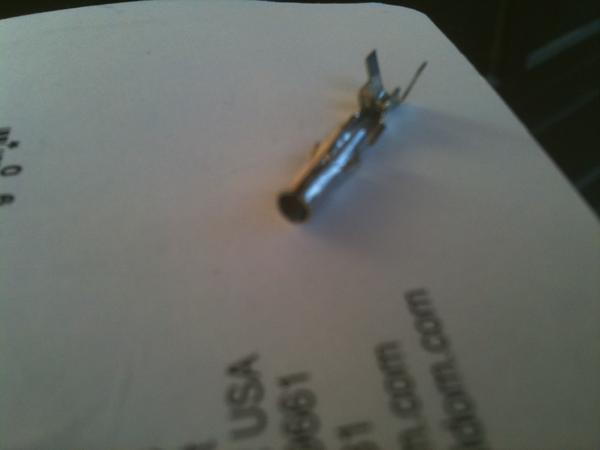
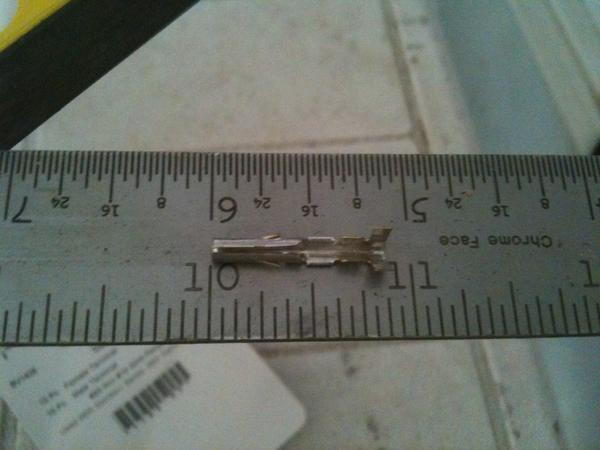
I opened up the female end a bit with a nail set because these are a little smaller than the male counterpart on the clockspring.
Now, take the Metra harness out. We are going to remove one of the pre-wired pins from the harness to use on the other end of the wire you just started making. Looking at the Metra harness you�ll see that there are two different pin sizes. You need one of the smaller ones. While you are looking at the harness take a close look at pin position 18. This is the position where the control wire comes into the radio. See this diagram:

Here�s the real thing:


With the small screw driver pry that red cap off. Take your time. Here�s what it looks like half done:

When it�s off look inside the end you just pulled the cap off. You�ll see all the pins. Just under each one is little spring retainer holding the pin in the harness.

Use the small screw driver under the pin you want to remove and push the retainer away from the pin. Now you can grab the wire to that pin and gently remove it from the connector. Take note of its orientation in the hole. It goes in one way but it�s easier to put it in right side up the first time.
Now you should have two wires on the work bench: the one you made and the one you pulled out of the Metra harness. Connect them with a butt connector. This is now the wire from the clockspring to the radio. Time to install it.
First thing to do is pull off the dash front. Set the parking brake good and tight. Put the key in the ignition, turn to On and shift the gear lever into 1<sup>st</sup> gear. Tilt the steering wheel all the way down. Just grab the top of the dash front above the gauge cluster and gently pull towards you. It should start to come loose. Work your way around the piece until it is disconnected from the dashboard. Reach behind the dash front and start disconnecting all the connectors to the various dash components. There�s about nine of them. Some are sort of tough and awkward to unplug. I used the trusty screw driver again to coax some of the retaining clips loose. Unplug all of these carefully. If one of them gets damaged then you could have real troubles. They�re not terribly fragile but just go easy and take your time. Take the dash piece and set it aside.
Remove the radio. The four bolts are 7mm. Hopefully the radio you have is not the older version that requires the removal tool. You can tell by looking at the face of the radio for 4 ominous looking holes, two on each side of the radio face. Once the radio is removed disconnect the harness(es). The big one should look familiar to you.
Go get the wire you made. Time to pry off the red cap just as before. Don�t worry about the pins falling out. Remember they are retained by that little spring tab. Time to insert the small pin end of the wire you made. You are going for pin position 18. Take your time and make sure you�re in the right hole. When you insert the pin make sure it goes all the way in and that the spring retainer is engaged. (I didn�t double check that when I did it and I had to take it all apart again.) Here�s what mine looked like with the wire inserted:

It�s the red wire right in the middle. Realize that this picture has the connector flipped over in relation to the other pics posted. Just double check that you are in position 18. Once the pin is seated push the red cap back in. Feed the rest of the wire into the dash and fish it down towards the clockspring connector.
Plug the radio in, reinstall it and reinstall the dash front.
Back under the dash now. Time to install the other end of the wire into the clockspring connector. This pin goes into position 4 (refer to the diagram above). If you look at the side of the connector you�ll see a slot with a small button inside. Like the red cap on the other harness there is a piece to be removed before you install the pin. Push that button and work the spline out of the middle of the connector. Here�s a picture (albeit not very good):

The connector in the foreground is from the clockspring (notice the 8 wires). The one in the background is where we are adding the wire. Pin position 4 is in the upper right corner. The upper left corner is the EATC position (8) where I installed the additional wire as well. The retainer spline is that grey bar in the middle of the connector. Slide the pin into position 4 and reinstall the spline. Double check that the pin is snuggly in the connector. Plug the connector in and reattach it to the �frame�. Also plug in the airbag connector.
At this point everything should be installed and no extra parts should be laying in the driveway. Reconnect the battery(ies) and try it out.
Well, after months of trial and error I finally have this complete. To preface this discussion I have a 2006 F250 XLT with OEM 6 Disc stereo and cruise control only on the steering wheel. This is not for the Sync system. I agree with Frakenbiker, if you want to have something like that it is better to go after market on a new head unit. The objective was to change out the wheel for the one with reundant audio and EATC controls. I don't have the EATC and may not do that upgrade. That being said, now that I have it working it is a simple thing to do. Here's what you need:
Ford Steering Wheel w/ redundant controls - p/n 5C7Z-3600-CBA
Clockspring w/ redundant controls - p/n 5C3Z-14A664-AA (That last A is really important)
Metra wiring harness into vehicle - p/n 71-5520
16 gauge wire
Female computer harness connectors.
Crimp on butt connector.
I ordered the Ford parts from Tasca. Give them a call. Don't try to order this from the website because it's a little unclear what you're ordering. They were extremely helpful.
Tools you need:
8mm socket, 7mm socket, T50 torx for socket wrench (to remove the steering wheel), wire crimpers, needle nose pliers, small (I mean small) flathead screw driver.
Steps
1. Disconnect battery(ies) positive lead(s).
2. Remove the airbag. This is not as scary as I was lead to believe but treat this thing with respect. There are two 1" plastic caps on the steering wheel behind the airbag. Pop these off with the small screwdriver. The bolts in each of these holes is 8mm. Once the bolts are removed lift off the airbag and unplug it. There are two plugs; one for the airbag itself and one for the horn.
3. Remove the wheel. Unplug the clockspring harness. It�s right in front of you. Use the T50 torx wrench and loosen the bolt half way. I just forcefully wiggled it back and forth until it was loose. You can always use a wheel puller but I didn�t find it necessary. Take bolt and wheel off.
4. Now disassemble the steering column cover. There are screws on the bottom. You need to remove the tilt lever. It just unscrews.
5. Remove the ignition cylinder. With the key in the ignition turn towards the on position. It will pull straight out from there.
6. Remove the clock spring. Take the tab off the ignition cylinder housing and under the dash pull the harness off the �frame� and unplug both the main clock spring harness and the airbag harness. Pull the clock spring off the steering column.
7. Install the new clock spring. Place the new clock spring on the steering column. Don�t plug it into the main harness just yet because you need to do some work down there.
8. Reassemble the steering column and install the new steering wheel. Just go in reverse order of the steps above. Again, no need to plug the clockspring into the main harness just yet. All of the connections to the new wheel are plug and play so this should be easy.
Now the work begins. You will notice that the new clock spring harness has eight wires coming down to the harness where the old one only had six. These two new wires are for the radio control and the EATC control. You will be hooking up the radio wire in this procedure although I added the extra wire for the EATC so I don�t have to get back into the plug later to install it. Here�s a diagram of the connector on the main harness:
Pin position 4 is for the radio control wire. This diagram is of the female end on the main harness. You will notice yours does not have a wire in this position. You will be adding it. Take one of the female connectors and attach it to 30� +/- length of wire. Set it aside.
A note on the type of female connector you get. Make sure it�s about an inch long. You need the length to fit into the harness connector. I bought these at Fry�s Electronics in the computer parts section. Radio Shack didn�t have anything like this. Here are pictures of what I bought:
I opened up the female end a bit with a nail set because these are a little smaller than the male counterpart on the clockspring.
Now, take the Metra harness out. We are going to remove one of the pre-wired pins from the harness to use on the other end of the wire you just started making. Looking at the Metra harness you�ll see that there are two different pin sizes. You need one of the smaller ones. While you are looking at the harness take a close look at pin position 18. This is the position where the control wire comes into the radio. See this diagram:
Here�s the real thing:
With the small screw driver pry that red cap off. Take your time. Here�s what it looks like half done:
When it�s off look inside the end you just pulled the cap off. You�ll see all the pins. Just under each one is little spring retainer holding the pin in the harness.
Use the small screw driver under the pin you want to remove and push the retainer away from the pin. Now you can grab the wire to that pin and gently remove it from the connector. Take note of its orientation in the hole. It goes in one way but it�s easier to put it in right side up the first time.
Now you should have two wires on the work bench: the one you made and the one you pulled out of the Metra harness. Connect them with a butt connector. This is now the wire from the clockspring to the radio. Time to install it.
First thing to do is pull off the dash front. Set the parking brake good and tight. Put the key in the ignition, turn to On and shift the gear lever into 1<sup>st</sup> gear. Tilt the steering wheel all the way down. Just grab the top of the dash front above the gauge cluster and gently pull towards you. It should start to come loose. Work your way around the piece until it is disconnected from the dashboard. Reach behind the dash front and start disconnecting all the connectors to the various dash components. There�s about nine of them. Some are sort of tough and awkward to unplug. I used the trusty screw driver again to coax some of the retaining clips loose. Unplug all of these carefully. If one of them gets damaged then you could have real troubles. They�re not terribly fragile but just go easy and take your time. Take the dash piece and set it aside.
Remove the radio. The four bolts are 7mm. Hopefully the radio you have is not the older version that requires the removal tool. You can tell by looking at the face of the radio for 4 ominous looking holes, two on each side of the radio face. Once the radio is removed disconnect the harness(es). The big one should look familiar to you.
Go get the wire you made. Time to pry off the red cap just as before. Don�t worry about the pins falling out. Remember they are retained by that little spring tab. Time to insert the small pin end of the wire you made. You are going for pin position 18. Take your time and make sure you�re in the right hole. When you insert the pin make sure it goes all the way in and that the spring retainer is engaged. (I didn�t double check that when I did it and I had to take it all apart again.) Here�s what mine looked like with the wire inserted:
It�s the red wire right in the middle. Realize that this picture has the connector flipped over in relation to the other pics posted. Just double check that you are in position 18. Once the pin is seated push the red cap back in. Feed the rest of the wire into the dash and fish it down towards the clockspring connector.
Plug the radio in, reinstall it and reinstall the dash front.
Back under the dash now. Time to install the other end of the wire into the clockspring connector. This pin goes into position 4 (refer to the diagram above). If you look at the side of the connector you�ll see a slot with a small button inside. Like the red cap on the other harness there is a piece to be removed before you install the pin. Push that button and work the spline out of the middle of the connector. Here�s a picture (albeit not very good):
The connector in the foreground is from the clockspring (notice the 8 wires). The one in the background is where we are adding the wire. Pin position 4 is in the upper right corner. The upper left corner is the EATC position (8) where I installed the additional wire as well. The retainer spline is that grey bar in the middle of the connector. Slide the pin into position 4 and reinstall the spline. Double check that the pin is snuggly in the connector. Plug the connector in and reattach it to the �frame�. Also plug in the airbag connector.
At this point everything should be installed and no extra parts should be laying in the driveway. Reconnect the battery(ies) and try it out.
#25
01-02-2012, 12:54 AM

Junior User
Join Date: Mar 2010
Location: So. Cal. 4,000 ft elev.,
Posts: 87
Likes: 0
Received 0 Likes
on
0 Posts
To dougydougy,
Thanks for posting the information on the steering wheel and radio set up in your 2006 Ford. Hope that you had a safe and Happy New Year. I have a 2006 Ford F350 SD, CC, XLT, that had a clarion equalizer, two amplifiers under the back seat and two huge speakers in a case behind the rear seats installed by the previous owner. Because the amplifiers were draining the batteries and the speakers put a strain on the back seats along with an imprint of the speakers. I removed the system.
Ben
#26
01-02-2012, 05:47 PM
Senior User
Join Date: Nov 2010
Location: Tinley Park Il.
Posts: 257
Likes: 0
Received 0 Likes
on
0 Posts
#27
03-19-2016, 09:13 AM

I hate to bump an old thread but I have a 97 Ford Explorer with cruse no radio or temp controls and I am trying to replace the steering wheel with one from a 99 Explorer with cruise, Temp, Fan and radio controls on the wheel.
I want to know if this pinout above is correct or if its not if someone has the correct pinout for the 8 pin connector that goes to the clockspring.
The current steering wheel I have is the four spoke design and the one I am putting in is the two spoke one.
My Existing wheel:

The wheel I am trying to install:
I want to know if this pinout above is correct or if its not if someone has the correct pinout for the 8 pin connector that goes to the clockspring.
The current steering wheel I have is the four spoke design and the one I am putting in is the two spoke one.
My Existing wheel:
The wheel I am trying to install:

#29
09-27-2019, 08:35 PM

Question for dougydougy
dougydougy you seen like you really did your research on this! Here�s my question. Someone stole my 06 Superduty when I got him back they had totally busted the steering column all over. I�m having a hard time finding one with the controls built in. I can only find tilt with key & cruise. If I use my clock spring on the new �salvage yard� column that only has cruise will I be ok or do I need to swap the wiring harnesses out? Please let me know! Thanks,
Jeremy
WatsonInc at icloud dot com
Jeremy
WatsonInc at icloud dot com
#30
02-15-2020, 12:38 PM

Did this swap on my 02 f250. Got a used steering column out of an 06 Lariat and used the wheel and clockspring. Horn works and no airbag light but I�ve lost the cruise control. Did I miss something or is it maybe just a bad clockspring? Getting a new head unit next week and would like to have steering wheel controls for the audio but not at the expense of the cruise control. Any suggestions ?