
Bought a 2000 X in state of disrepair - Just started Driving it Full Time
#1
 11-16-2009, 05:28 PM


Bought a 2000 X in state of disrepair - Just started Driving it Full Time
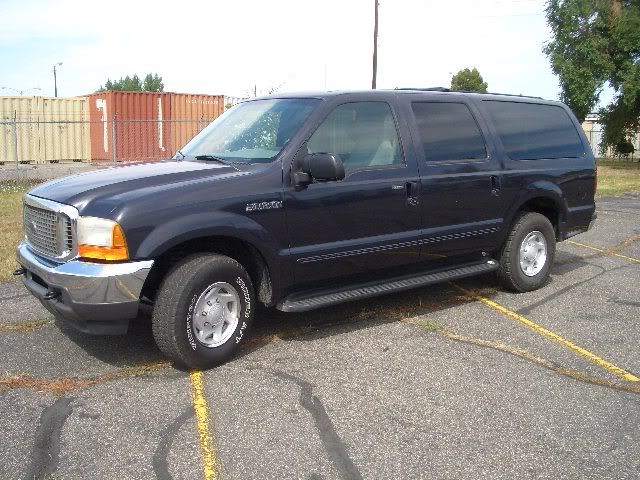
Back in July, I bought a 6.8 V10 2WD X with a sordid past. The CarFAX report showed 5 or 6 owners in three years with less than a few thousand miles on it. I found the truck at a muffler shop where they were going to "fix" it. It had a bad miss, a terrible shake, a broken fuel guage, a broken off oil dipstick tube, but otherwise looked pretty good. It showed $6500 on the windshield. I ended up buying it for $3800 - Not bad for a 77k mile excursursion.
I had hoped that it would just be a couple of COPs or a bad injector or two - wishful thinking. I came to learn the #2 cylinder had no compression. Well, it took me 4 months to rummage up the courage to tear into the head job. This is some of the story of my work:
Months before, I bought a PDF file of the Factory Service Manual so I had an idea of what the job entailed. I ordered up two cam holding tools and a crank holding tool of amazon for about $120. I ordered a couple hundred bucks of gaskets and head bolts off of Rockauto. The first weekend went fine with disassembly revealing a bent exhaust valve on the #2.
I brought the head to a local machine shop and he discovered a cracked bearing cap. He told me he was going out of business in a week so I ran over to pick up my stuff and found a new head guy to help me out. I found a correct replacement head at a local salvage yard and got the surfaces skimmed and my cam and followers installed.
Meanwhile, back at the garage, I discovered a sheared keeper for the driven balance shaft gear on the left side head. This was a result of the misinstallation of a balance shaft bearing cap. The balance shaft was junk and the only way to get a replacement was to buy the mate head at the salvage yard. I do now have a spare good left head (minus the balance shaft). Under further observation, I discovered that the timing chains were off by half a link and one of the chains had damage. Further, the crank index was completely torn up by the timing chain by being installed backwards in an earlier failed attempt to repair the engine.
There was no gasket on the engine front cover, just a lot of form-a-gasket.
After I got it all back together, it ran smooth as glass, but wouldn't gain any power after about half throttle. This turned out to be a shot fuel pump. I ended up replacing the entire module which solved the power problem and the fuel gauge problem.
I am now driving it full-time, but am experiencing intermittent fuel injector misses.
I don't have time to go into as much detail as I would like right now, but I will post back into this thread and flesh out a lot more of the story.
Anyway, thanks for the nice forum and I hope to post more to this thread tonight or tomorrow.
#2
11-16-2009, 05:37 PM
Post Fiend
Join Date: Mar 2009
Location: Chicago and Mt Carroll IL
Posts: 6,243
Likes: 0
Received 2 Likes
on
2 Posts
Glad to see its mostly running good. Didn't you start a thread when you 1st looked at it? I seem to remember the 3800 price and my thinking it was a great deal. Truck looks real nice in the pics and the V10 is a real plus, too bad they trashed it mechanically like that. Sounds like you're getting it all together. Good luck.
#3
11-16-2009, 06:35 PM

#4
11-17-2009, 12:10 AM
I am a big fan of the triton v10. This is the first one I've owned, but I've had about a dozen 4.6s in retired squad cars I've owned over the years. The Ford Modulars (4.6, 5.4 and 6.8) are all pretty similar in design and assembly. I think in this post, I'm just going to review the disassembly process required to pull the right hand head.
The first thing I did was drain and pull the radiator. Then I removed the fan. I didn't realize you screwed the fan off and I fought with those hidden bolts that hold the fan pulley on. This was the first of a few wasted hours due to the typical learning curve. once the fan was off I removed the generator and the water pump. Off came the harmonic balancer with the help of an electric impact and a buddy's puller.
Next it was time to get a little dirty. I climbed underneath and discovered one of the power steering pump bolts was missing. I removed the other two and laid the pump slightly to the side. Next I removed the inner fender on the right front. I kept the right corner on a jack stand for the entire project. I disconnected the exhaust manifold from the crazy Y-pipe and removed the eight nuts holding on the exhaust manifold - two studs were broken. I could not get the exhaust manifold off the head until I climbed under and put a come-along to the y-pipe to gain about a half inch. Once the manifold was removed, there was room on the frame rail for it to just lay down and wait for the refurbed head. While removing the manifold nuts, I also loosened the valve cover bolts that are only accessible through the fender well.
When I got back up to work on the intake and timing cover, there was now room to climb in between the radiator support and the engine. It's a pretty tight squeeze, but well worth the effort to avoid reaching for all those bolt toward the back of the engine.
Removed the throttle body from the intake. Then struggled with the fuel line connections to the fuel rail and regulator. I spent an hour or so trying to use my fancy ford fuel couple removal tools, but all that was necessary was a good tug once the retaining clips were off.
Off came the intake and the valve covers. Next the front timing cover. It was glued on and there were no gaskets. Surprisingly, it had no leaks. It took a little work to break it loose, but not too difficult. Once the front cover came off, previous damage due to poor mechanicing became obvious. The crank index gear had been installed backwards at one point and when they put it back on right, it was all chewed up. It was a grizzly to get it off because of the pipe wrench jaw marks on the crank. I actually had to take a file to the burrs before I could get my crank holder on it.
The left chain tensioner was cracked and one of the chains had a little knick on every link. I installed the OTC cam holder and zip-tied the chain to the crank gear and cam gear and removed the cam gear from the cam.
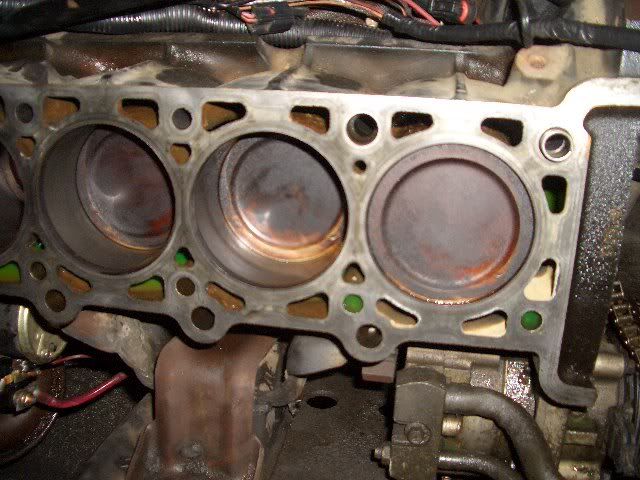
Head removal was no problem, although I did use one little trick to make it easy. The bottom, back 3 headbolts would not come out because of clearance with the AC box. I simply pulled them up out of the block and then zip-tied them to the cam so that they could move if needed. As soon has the head was off, I was surprised to see a little valve dent in all 5 pistons. The bent exhaust valve in #2 was obvious. What wasn't obvious was the crack in the bearing cap. I did take pictures of the head because I figured when I got it back, I'd have to reindex it and set the cam holder.
Like I said earlier, I brought the head to a machine shop that was just about out of business and was relieved when he said he couldn't do anything for me with that bad cap. I rummaged up a salvaged head for $150 and brought it to another engine builder. He cleaned and skimmed it and R/R four exhaust studs for $120.
Meanwhile, back in the garage, I started to notice the damage to the balance shaft driven gear and timing chains. I decided to replace both chains and ordered the gear for the balance shaft. I discovered the gear had sheared its pin because the brainiac that did the head job before put one of the bearing caps on backwards. Luckily, the head was salvageable. There was a little melted metal residue on the bearing, but I took my dremel to it and carefully knocked all protruding debris off the balance shaft bearing.
When the gear arrived, I brought the balance shaft and gear to my machine guy and he said it was no good. I ended up returning the $42 gear to rockauto and buying the mate to the head I previously bought at the salvage yard. I stole the balance shaft out of it and used it as is. I'm going to throw the left head on ebay and try to recover some of my cost.
My next post will outline the reassembly.
The first thing I did was drain and pull the radiator. Then I removed the fan. I didn't realize you screwed the fan off and I fought with those hidden bolts that hold the fan pulley on. This was the first of a few wasted hours due to the typical learning curve. once the fan was off I removed the generator and the water pump. Off came the harmonic balancer with the help of an electric impact and a buddy's puller.
Next it was time to get a little dirty. I climbed underneath and discovered one of the power steering pump bolts was missing. I removed the other two and laid the pump slightly to the side. Next I removed the inner fender on the right front. I kept the right corner on a jack stand for the entire project. I disconnected the exhaust manifold from the crazy Y-pipe and removed the eight nuts holding on the exhaust manifold - two studs were broken. I could not get the exhaust manifold off the head until I climbed under and put a come-along to the y-pipe to gain about a half inch. Once the manifold was removed, there was room on the frame rail for it to just lay down and wait for the refurbed head. While removing the manifold nuts, I also loosened the valve cover bolts that are only accessible through the fender well.
When I got back up to work on the intake and timing cover, there was now room to climb in between the radiator support and the engine. It's a pretty tight squeeze, but well worth the effort to avoid reaching for all those bolt toward the back of the engine.
Removed the throttle body from the intake. Then struggled with the fuel line connections to the fuel rail and regulator. I spent an hour or so trying to use my fancy ford fuel couple removal tools, but all that was necessary was a good tug once the retaining clips were off.
Off came the intake and the valve covers. Next the front timing cover. It was glued on and there were no gaskets. Surprisingly, it had no leaks. It took a little work to break it loose, but not too difficult. Once the front cover came off, previous damage due to poor mechanicing became obvious. The crank index gear had been installed backwards at one point and when they put it back on right, it was all chewed up. It was a grizzly to get it off because of the pipe wrench jaw marks on the crank. I actually had to take a file to the burrs before I could get my crank holder on it.
The left chain tensioner was cracked and one of the chains had a little knick on every link. I installed the OTC cam holder and zip-tied the chain to the crank gear and cam gear and removed the cam gear from the cam.
Head removal was no problem, although I did use one little trick to make it easy. The bottom, back 3 headbolts would not come out because of clearance with the AC box. I simply pulled them up out of the block and then zip-tied them to the cam so that they could move if needed. As soon has the head was off, I was surprised to see a little valve dent in all 5 pistons. The bent exhaust valve in #2 was obvious. What wasn't obvious was the crack in the bearing cap. I did take pictures of the head because I figured when I got it back, I'd have to reindex it and set the cam holder.
Like I said earlier, I brought the head to a machine shop that was just about out of business and was relieved when he said he couldn't do anything for me with that bad cap. I rummaged up a salvaged head for $150 and brought it to another engine builder. He cleaned and skimmed it and R/R four exhaust studs for $120.
Meanwhile, back in the garage, I started to notice the damage to the balance shaft driven gear and timing chains. I decided to replace both chains and ordered the gear for the balance shaft. I discovered the gear had sheared its pin because the brainiac that did the head job before put one of the bearing caps on backwards. Luckily, the head was salvageable. There was a little melted metal residue on the bearing, but I took my dremel to it and carefully knocked all protruding debris off the balance shaft bearing.
When the gear arrived, I brought the balance shaft and gear to my machine guy and he said it was no good. I ended up returning the $42 gear to rockauto and buying the mate to the head I previously bought at the salvage yard. I stole the balance shaft out of it and used it as is. I'm going to throw the left head on ebay and try to recover some of my cost.
My next post will outline the reassembly.

#6
11-29-2009, 12:32 AM
I know it's been a while since my last post, but I just got back from a little 500-miler over the mountains with about a ton of gear on a trailer. No runs, no drips, no errors. I've been suffering a pretty loud ticking on the head I replaced and just today remedied it. I'm not sure if it was a sticky lifter or just an exhaust leak, but while I was changing my oil to Motor-Craft 5W20 semi-synthetic (with a quart of Rislone), I got about another 8th turn on a few manifold nuts. At any rate, the tick has really quieted up.
I know I'm sort of moving in reverse chronology here, but the missing I thought was injectors actually turned out to be a bad COP. I determined this by replacing 8 of the COPS with the ones I knew were good in my squad car. I had a dream before that told me if the miss only happened after the engine compartment would get good and warm, it had to be a coil because the injectors are basically cooled by the fuel that flows through them. The one loose end I have is that I'm missing a vacuum management valve that plugs into the $46 vacuum harness. I'm too cheap to buy the whole harness for that little valve, so I just plugged it up.
Now, let's jump back to some of the fun reassembly tidbits I'm sort of remembering from a couple of weeks ago. Here's what the bent exhaust valve looked like when the head came off:
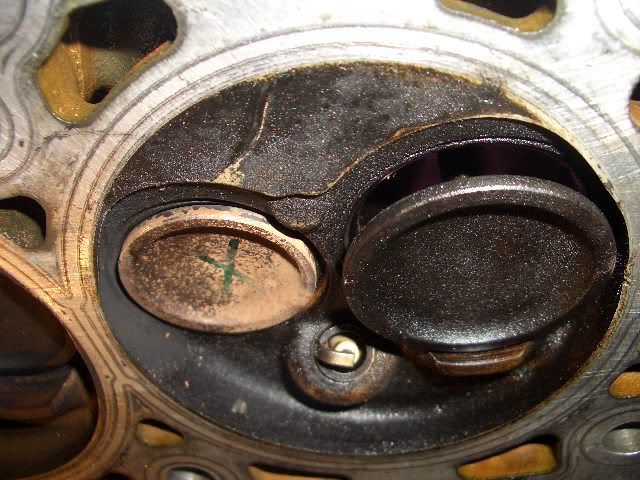
You can also see where all of the pistons had a small dent from making contact with valves at one time or another.
Here's a couple of pictures of what it looked like torn apart:
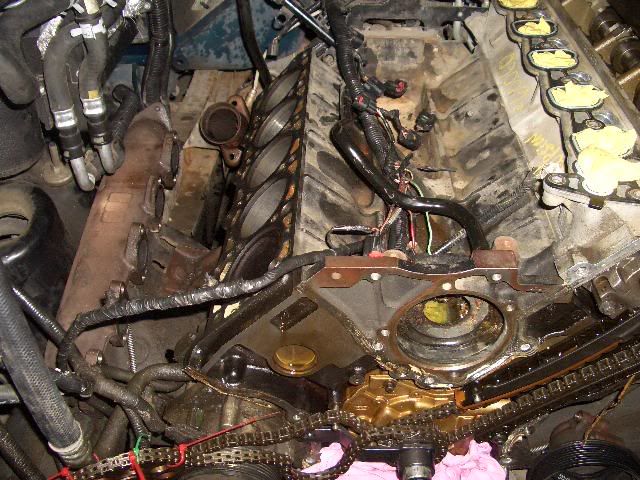
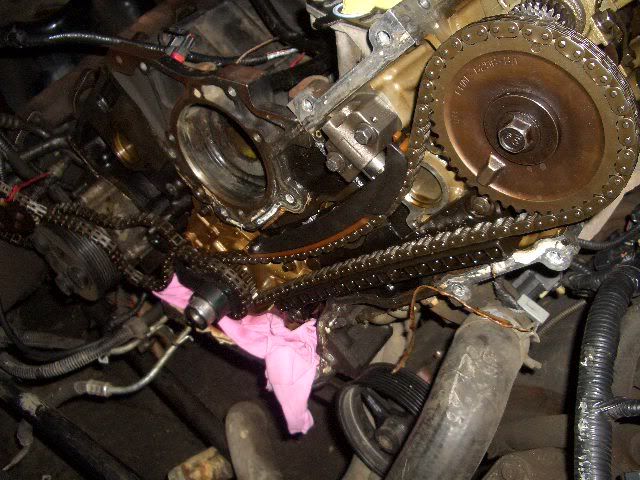
Notice directly above the balance shaft gear and the damage to the timing chain. I didn't really notice these until I started planning the reassembly.
Everything was pretty straight-forward as far as re-assembly went. Probably the most difficult thing was actually setting the head on the alignment studs without scoring up the surface. Luckily, my neighbor came over and helped me for this part. The rest just took some time and 3/8 and 1/2 inch torque wrenches. You certainly need the manual to know how to correctly assemble these modulars. I followed the instructions pretty closely and ended up with no leaks. There are different tightening sequences for the timing cover, intake, throttle body and exhaust manifolds. If you are going to guess on these, be prepared for some stripped threads and leaks I would guess.
One interesting trick was getting the dampner pulley torqued correctly. The manual called for a 4 step process:
1. Torque to 60 lbs.
2. back nut off 1 full turn
3. Torque to 30 lbs.
4. Turn an additional 90 degrees.
Well, it was pretty hard to even get the 60lbs on step one because the engine wanted to turn, but once I did, I got it re-torqued to 30 and then drew a couple of marks on the pulley and my socket and used by electric impact to finish the job. Overall, I think I saved around $2500 doing it myself and I probably spent around 30 hours doing the mechanical work. My cost of parts and materials was around $1060.
The nice thing about doing the work myself is that I didn't give a mechanic the option of screwing me through exorbitant charges or shoddy work. I can just imagine them giving the truck back to me with a broken balance shaft and saying I needed a tune-up to get rid of the shake.
And to think I was going to pay a shop to do it until my neighbor pumped me up and asked why I was going to give all that money to some wrench who won't even care if it's fixed right. In the end, the job was easier than I feared and exposed more damage than I had expected. I would certainly not be afraid to tear into a 6.8 again, but if I knew how badly the previous mechanics had messed it up, I probably would have looked for a 6.8 out of a junk yard and just R&R the whole engine.
I know I'm sort of moving in reverse chronology here, but the missing I thought was injectors actually turned out to be a bad COP. I determined this by replacing 8 of the COPS with the ones I knew were good in my squad car. I had a dream before that told me if the miss only happened after the engine compartment would get good and warm, it had to be a coil because the injectors are basically cooled by the fuel that flows through them. The one loose end I have is that I'm missing a vacuum management valve that plugs into the $46 vacuum harness. I'm too cheap to buy the whole harness for that little valve, so I just plugged it up.
Now, let's jump back to some of the fun reassembly tidbits I'm sort of remembering from a couple of weeks ago. Here's what the bent exhaust valve looked like when the head came off:
You can also see where all of the pistons had a small dent from making contact with valves at one time or another.
Here's a couple of pictures of what it looked like torn apart:
Notice directly above the balance shaft gear and the damage to the timing chain. I didn't really notice these until I started planning the reassembly.
Everything was pretty straight-forward as far as re-assembly went. Probably the most difficult thing was actually setting the head on the alignment studs without scoring up the surface. Luckily, my neighbor came over and helped me for this part. The rest just took some time and 3/8 and 1/2 inch torque wrenches. You certainly need the manual to know how to correctly assemble these modulars. I followed the instructions pretty closely and ended up with no leaks. There are different tightening sequences for the timing cover, intake, throttle body and exhaust manifolds. If you are going to guess on these, be prepared for some stripped threads and leaks I would guess.
One interesting trick was getting the dampner pulley torqued correctly. The manual called for a 4 step process:
1. Torque to 60 lbs.
2. back nut off 1 full turn
3. Torque to 30 lbs.
4. Turn an additional 90 degrees.
Well, it was pretty hard to even get the 60lbs on step one because the engine wanted to turn, but once I did, I got it re-torqued to 30 and then drew a couple of marks on the pulley and my socket and used by electric impact to finish the job. Overall, I think I saved around $2500 doing it myself and I probably spent around 30 hours doing the mechanical work. My cost of parts and materials was around $1060.
The nice thing about doing the work myself is that I didn't give a mechanic the option of screwing me through exorbitant charges or shoddy work. I can just imagine them giving the truck back to me with a broken balance shaft and saying I needed a tune-up to get rid of the shake.
And to think I was going to pay a shop to do it until my neighbor pumped me up and asked why I was going to give all that money to some wrench who won't even care if it's fixed right. In the end, the job was easier than I feared and exposed more damage than I had expected. I would certainly not be afraid to tear into a 6.8 again, but if I knew how badly the previous mechanics had messed it up, I probably would have looked for a 6.8 out of a junk yard and just R&R the whole engine.

Thread
Thread Starter
Forum
Replies
Last Post
nhill2090
1999 - 2003 7.3L Power Stroke Diesel
21
06-30-2021 07:06 PM
macubus
2004 - 2008 F150
8
08-03-2019 01:03 PM
kr98664
1980 - 1986 Bullnose F100, F150 & Larger F-Series Trucks
15
09-27-2016 01:21 PM
stececcato
1997-2006 Expedition & Navigator
9
11-11-2015 09:08 AM