Tru-Cool 4739 Installed w/pics
#1
 07-06-2009, 11:12 AM

Join Date: Jan 2009
Posts: 150
Likes: 0
Received 0 Likes
on
0 Posts
Tru-Cool 4739 Installed w/pics
I finished my 4739 install today and thought I would post a description and pics for anyone that was interested. 

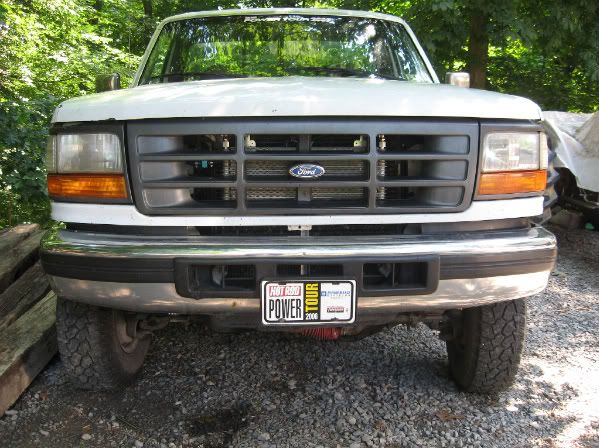
The hood release had to be staightened and rebent to raise it out of the way. On the drivers side there was a protrusion from the back of the header panell that needed to come off. I used the pass side OEM cooler mount with the drivers side cooler clamp to secure the bypass. The top was mounted by using the supplied straps bent 90 degrees, cut and bolted to the header panel with a rubber spacer made from a disassembeld exhaust hanger. The bottom bolted directly with 1" spacers made from some 3/8 tubing I had laying around. The fins are really easy to bend and I bent several. I tried to straighten them, but likely made it worse.
It was more difficult than I would have imagined as there is really very little to bolt to.
I am also quite lousy at fabrication as I lack the imagination necessary to see what the outcome until it is in front of me...
I am happy with the outcome, however.
Aaron
#3
07-06-2009, 11:33 AM
Join Date: Jan 2009
Posts: 150
Likes: 0
Received 0 Likes
on
0 Posts
#4
07-06-2009, 11:49 AM

Senior User
Join Date: Dec 2007
Location: Lizton, IN
Posts: 452
Likes: 0
Received 0 Likes
on
0 Posts
#5
07-06-2009, 12:00 PM
Join Date: Jan 2009
Posts: 150
Likes: 0
Received 0 Likes
on
0 Posts
Oops, I forgot to answer the second part. I bought my gauges from eBay without senders and with a Autometer SD pod. I sold the pod on PSN? and bought a glowshift pod to mount he gauges in. I should have bought an Autometer as there was a lot of work getting the GS to fit. The Autometer gauges installed easily using the radio adapter harness to wire into for switched 12v+, illumination and ground. The map and tranny senders were easy to install, while the pyro was a little more difficult as the manifold had to be drilled. It was in no way hard as the manifold drilled easy and tapped easy, but it did need to be done. I would have saved money if I had bought a new Autometer with the correct pod and senders.
I might have been able to flush my stock cooler and saved some coin, but I poked a hole in it trying to remove it. I like the idea of a cold weather bypass as my commute is short and I think it will help my tranny get up to temp. Before my fluid ran through the cooler 100% of the time and it barely got to 150 before I was at work. I hope it comes up quicker now. The true test will come when I hook up to my trailer and approach warp.
Aaron
#6
07-06-2009, 12:19 PM
Join Date: Jan 2009
Posts: 150
Likes: 0
Received 0 Likes
on
0 Posts

#7
07-06-2009, 12:20 PM

Trending Topics
#8
07-06-2009, 12:23 PM
Pod
Looks good. I am going to order these-
http://www.puredieselpower.com/catal...ice-p-144.html
Thanks fro the pic.
Rocky
#9
07-06-2009, 03:31 PM
Join Date: Jan 2009
Posts: 150
Likes: 0
Received 0 Likes
on
0 Posts

Aaron
#12
07-06-2009, 04:55 PM
If you have any doubt about the flow of the filter you could increase the line size from the trans out to the coolers from 5/16 to 3/8.
I usually put a MagneFine filter in line right after a rebuild. I remove it after the first fluid flush.
I usually put a MagneFine filter in line right after a rebuild. I remove it after the first fluid flush.
#13
07-11-2009, 04:44 PM
Postmaster
#14
07-11-2009, 05:25 PM
Join Date: Jan 2009
Posts: 150
Likes: 0
Received 0 Likes
on
0 Posts