
1986 FSB Restoration Project (56K Warning)
#136
 05-16-2008, 09:11 AM


Posting Guru
Join Date: Mar 2005
Location: western montana
Posts: 2,068
Likes: 0
Received 0 Likes
on
0 Posts
#137
05-16-2008, 11:33 AM

The line that seperates the Rough Black Durabak and the Rust Bullet is where the slip on Rocker panels will be glued in. Once they are in place, I'll spray with a final coat to get everything to seal up good and tight. The Rockers look like this:

#138
05-16-2008, 11:42 AM
By the way...
I got the hitch, access cover and underside of the rockers lined the other day. I hope to put the hitch back on and snap some pictures. Soon I am hoping to take the top off, test fit, and start gluing the rear fenders on as well as the rockers. I was hoping to do some this weekend, but my wife has plans for a garage sale! UGH
Yes Roger...that hitch has seen some abuse prior to me owning it. I drilled some new holes further up on that plate and put in some heavy duty D-rings for the trailer chains. Should do the trick!
Yes Roger...that hitch has seen some abuse prior to me owning it. I drilled some new holes further up on that plate and put in some heavy duty D-rings for the trailer chains. Should do the trick!
#139
05-17-2008, 08:24 AM
Final Hitch pics...
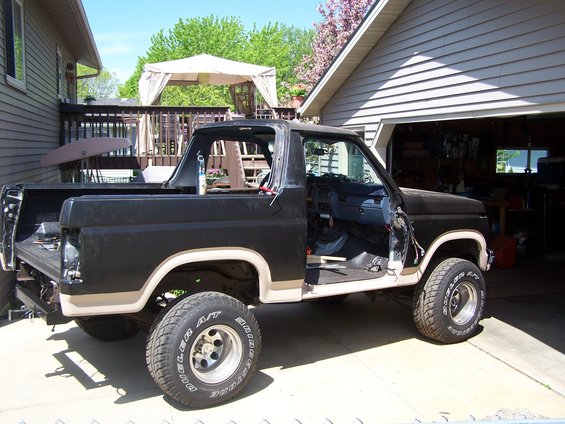
So I got a chance to put the hitch on last night...WOW...it really turned out nice! It's these little things that will make the final product look really good...what sense does it make to have the entire body look good only to have a rusty/crusty hitch...enjoy!


If you look in the back of the truck you can see the finished tailgate access panel. I'll try to snap some pictures of what the underside of the rockers look like. I plan on a few more coats though when I put a final coat on the top.
If you look in the back of the truck you can see the finished tailgate access panel. I'll try to snap some pictures of what the underside of the rockers look like. I plan on a few more coats though when I put a final coat on the top.
#140
05-18-2008, 11:41 AM

#141
05-19-2008, 06:43 AM
camo
Nope! I think there is a guy who did a camo job with the durabak colors though. You might want to check out durabakcompany.com. Also check out the color chart Cote-L Distribution Company
#142
05-23-2008, 04:45 PM
Made real progress today!
Hey everyone...I made some real progress today. I was only supposed to have a 1/2 day off but the bossman let me take the entire day off. Good thing!. First thing I planned on doing was glueing those slip on rockers in. But in order do that, I needed to test fit the rear fenders, determine if there where any gaps as well as any other hacking.
A good friend of mine came over to help me lift the top off as well as take off and fit the fenders multiple times. Thanks Joe A., would'nt have been able to do it without you. Also, big thanks to Sixlitre for his insight and suggestions.
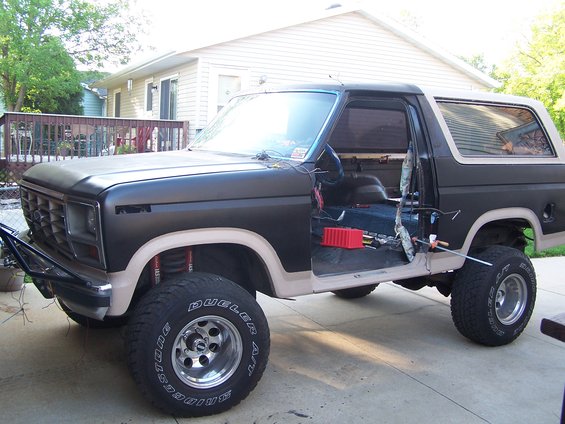
Here is the result...feel free to ask any questions! By the way...I only had enough glue for the rockers and had to order some more. I'd rather fit, and refit the rears as much as possible to get these things hung right.
Drivers Side:

Passenger Side:

This is an area I was really worried about lining up and having gaps. After some trimming and fitting I finally got them to fit nicely. Although they will still need some seem sealer!
A good friend of mine came over to help me lift the top off as well as take off and fit the fenders multiple times. Thanks Joe A., would'nt have been able to do it without you. Also, big thanks to Sixlitre for his insight and suggestions.
Here is the result...feel free to ask any questions! By the way...I only had enough glue for the rockers and had to order some more. I'd rather fit, and refit the rears as much as possible to get these things hung right.
Drivers Side:
Passenger Side:
This is an area I was really worried about lining up and having gaps. After some trimming and fitting I finally got them to fit nicely. Although they will still need some seem sealer!
#143
05-23-2008, 08:50 PM
Posting Guru
Join Date: Mar 2006
Location: Parma, MI
Posts: 1,213
Likes: 0
Received 0 Likes
on
0 Posts
#144
05-24-2008, 07:00 AM
#145
06-08-2008, 09:19 PM
Huge progress made!
Finally got the other tube of glue over the week and some extra tips.
TIP #1 If you do this project do yourself a favor and get extra tips! Otherwise you will end up wasting glue. If you let the gun sit for too long...2-3 minutes the glue will clog the tip. If you try to "push" the gun it will cause the tube to leak out the backside.
Glue = $27.oo a tube
Tips = $0.42
TIP#2 Have a good friend available to help with the gluing process. It is good to have someone help you hold, slide and clamp the fenders in place.
TIP#3 Buy/borrow yourself plenty of clamps. I think I had 25-30 clamps available to hold down specific glue points
TIP#4 Make sure to fit and refit many times until you are happy how everything lines up. I actually fit, clamped, put the top on many times until I was happy with the fit. Also took measurements at key points to make sure both sides were lined up at the correct heights. Must have done this at least 3-4 times.
TIP#5 once I was happy with the fit I drilled pilot holes for rivets...these would serve 2-purposes...alignment and hold until the glue sets up. Afterward the heads can be ground off sanded, seam sealed and painted.
The steps are easy...
Step #1 I glued the bed rail and the inner tailgate rails located on the truck. I then placed glue on the lip of the fender located at the b-pillar as well as the tabs located by the rocker panels. I had twenty minutes until the glue set to make adjustments.
Step #2 - slide the fender into place,set it, rivet and clamp.

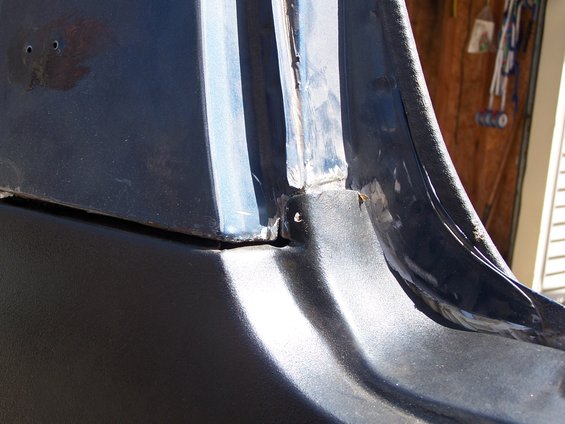
Fill the seam with glue:

This will need to be sanded and filled with seam sealer:

SOME of the clamps:

Clamp the insides of the taillights:

Step#3 - pat yourself on the back...you've glued your first fender...hurry up and do the other side.
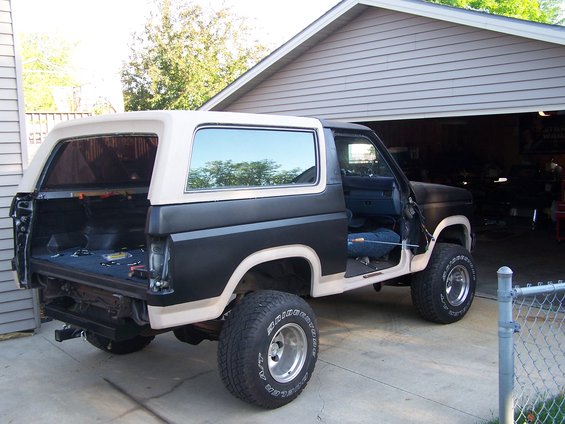
Here are a few pics of the test fit; it gives you a whole lot better look of what the final product will look like:

If you have questions, post up! This is truly the most time intensive as far as planning and preparing to get these babies glued. Think through or write down your process steps before you start this section...it really does help! Of course this thread should also help you as well!
TIP #1 If you do this project do yourself a favor and get extra tips! Otherwise you will end up wasting glue. If you let the gun sit for too long...2-3 minutes the glue will clog the tip. If you try to "push" the gun it will cause the tube to leak out the backside.
Glue = $27.oo a tube
Tips = $0.42
TIP#2 Have a good friend available to help with the gluing process. It is good to have someone help you hold, slide and clamp the fenders in place.
TIP#3 Buy/borrow yourself plenty of clamps. I think I had 25-30 clamps available to hold down specific glue points
TIP#4 Make sure to fit and refit many times until you are happy how everything lines up. I actually fit, clamped, put the top on many times until I was happy with the fit. Also took measurements at key points to make sure both sides were lined up at the correct heights. Must have done this at least 3-4 times.
TIP#5 once I was happy with the fit I drilled pilot holes for rivets...these would serve 2-purposes...alignment and hold until the glue sets up. Afterward the heads can be ground off sanded, seam sealed and painted.
The steps are easy...
Step #1 I glued the bed rail and the inner tailgate rails located on the truck. I then placed glue on the lip of the fender located at the b-pillar as well as the tabs located by the rocker panels. I had twenty minutes until the glue set to make adjustments.
Step #2 - slide the fender into place,set it, rivet and clamp.
Fill the seam with glue:
This will need to be sanded and filled with seam sealer:
SOME of the clamps:
Clamp the insides of the taillights:
Step#3 - pat yourself on the back...you've glued your first fender...hurry up and do the other side.
Here are a few pics of the test fit; it gives you a whole lot better look of what the final product will look like:
If you have questions, post up! This is truly the most time intensive as far as planning and preparing to get these babies glued. Think through or write down your process steps before you start this section...it really does help! Of course this thread should also help you as well!
#146
06-08-2008, 10:38 PM

I like the way it is turning out. I remember this thread from a while back and it looks great.
I have to look back at what you used as the finish coat for the body. I have an 84 Bronco waiting to get worked on after I finish my Ranger project.
Keep up the great work and keep us posted with more pictures.
I have to look back at what you used as the finish coat for the body. I have an 84 Bronco waiting to get worked on after I finish my Ranger project.
Keep up the great work and keep us posted with more pictures.
#147
06-13-2008, 11:23 AM
I like the way it is turning out. I remember this thread from a while back and it looks great.
I have to look back at what you used as the finish coat for the body. I have an 84 Bronco waiting to get worked on after I finish my Ranger project.
Keep up the great work and keep us posted with more pictures.
I have to look back at what you used as the finish coat for the body. I have an 84 Bronco waiting to get worked on after I finish my Ranger project.
Keep up the great work and keep us posted with more pictures.
Peace!

#150
06-14-2008, 02:42 PM
06/14/2008
Thanks man!
To all...I started the E-Fan write up, but won't post it until I am done. Just got a wirelss back-up camera from the family for Father's Day too. I temporarily rigged it up today and it works GREAT! Can't wait until the truck is finished. I wanted this thing so I would'nt back-over one of my kids or smallish Honda's (I've done it...Can't believe I did'nt see that thing...and I even had the top off!)
Well I am of for a week to be a counselor at Kid's Camp. When I get back I plan on taking a full day to do some more damage!