1948 F1 build - Pezsox
#61
 04-07-2016, 12:12 AM

Join Date: Oct 2015
Location: Yakima, WA
Posts: 413
Likes: 0
Received 0 Likes
on
0 Posts
Yes, the long horn on the left side of the grille (right hand as you look at it) is the original. The others were added, And that is not even close to the original paint. The horn was originally black. You're seeing green overspray through the expanded metal grille/grating that was installed later.
The only thing holding the wheel bearings in the hubs is the grease seal. You can knock the entire business out of there with a small block of wood and a hammer. Place the wood block inside the hub from the outside end of the hub opening, where the little bearing goes, and use it as a punch to drive the seal out. The bearing will come with it. I have a handy piece of leftover oak trim about 1"x1"x12" I use for such an occasion. You don't have to get too crazy with beating on it. it should pop right off.
The only thing holding the wheel bearings in the hubs is the grease seal. You can knock the entire business out of there with a small block of wood and a hammer. Place the wood block inside the hub from the outside end of the hub opening, where the little bearing goes, and use it as a punch to drive the seal out. The bearing will come with it. I have a handy piece of leftover oak trim about 1"x1"x12" I use for such an occasion. You don't have to get too crazy with beating on it. it should pop right off.
#63
04-09-2016, 07:45 AM

#64
11-10-2016, 05:46 PM
Join Date: Oct 2015
Location: Yakima, WA
Posts: 413
Likes: 0
Received 0 Likes
on
0 Posts
since I have no posted in a long time, I figured I would update everyone on the status of my build. I like to tell people that I have absolutely zero knowledge of mechanics, but I listen and am never to proud to ask. This board has been amazing. I have finally gotten to a point that I am getting genuinely excited about moving forward. I have not had an physical help from anyone so far, so that is a little tough. I spend more time looking at my old pics I took, looking at this board, typing questions, and comparing old and new parts than I do actually installing. I wish Albuq F-1 was my neighbor!!! so here is where I am at to date. I need to install brake front brake lines, fuel lines, driveline, and transmission but... then I am out of parts until I put the cab on. So I feel good that all the parts I bought have a home on the truck. I had many pieces sandblasted, and powdercoated, and have spent a lot of time wire brushing and painting. I am going with the stock flathead 6, and leaving a patina look. I did have Van Pelt rebuild the transmission so I feel really excited to make it a stock truck. I wanted a cool "dark side" ride but I just couldn't do that to this complete no rust truck. So thanks for looking, and the job isn't done.
#65
11-10-2016, 07:22 PM

Fleet Owner
#66
11-10-2016, 07:56 PM
Join Date: Oct 2015
Location: Yakima, WA
Posts: 413
Likes: 0
Received 0 Likes
on
0 Posts
#67
11-10-2016, 08:13 PM
Cargo Master
Chassis looks excellent!
I painted my 47 caddy leaf springs and used long teflon like plastic spring liners between the main leafs. No squeaking or other issues. My F1s have newer springs with the factory pads between the leafs so they didnt need the liners.
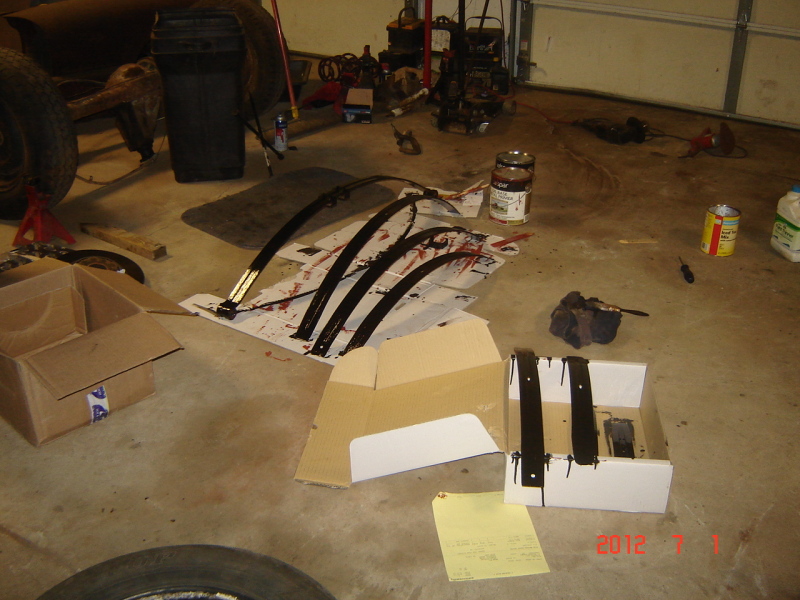
Leaf Spring Liner with Lip, 2 Inch
I painted my 47 caddy leaf springs and used long teflon like plastic spring liners between the main leafs. No squeaking or other issues. My F1s have newer springs with the factory pads between the leafs so they didnt need the liners.

Leaf Spring Liner with Lip, 2 Inch
#68
12-31-2016, 07:10 PM
Senior User
Join Date: Apr 2011
Location: Idaho
Posts: 150
Likes: 0
Received 0 Likes
on
0 Posts
#69
03-01-2017, 01:18 PM
Join Date: Oct 2015
Location: Yakima, WA
Posts: 413
Likes: 0
Received 0 Likes
on
0 Posts
slowly slowly slowly
well another post after a long lay off. I finally am to the point of getting the bottom of the cab cleaned up, and covered either with a rhino lining type material, or open to suggestions. Since I am doing this by myself, and have little or no room to work, I had to get inventive. I guess this was a good use for my heavy punching bag. I was shocked to see how clean it was on the underneath. The only issues are the bent sheet metal on the sides, and that is what I did when I strapped an engine puller around it to lift it off. I am not going to paint the truck, but I do want to cover everything that is exposed on the underside of the truck. Eventually under the wheel wells, and bed, etc.. I would love suggestions of the best material to use. Also, do these sandblasted leaf springs need to be painted? If so do you think just a clear coat would be fine, I kind of like the way they look in the natural state. Thanks
#70
03-01-2017, 05:00 PM
Cargo Master
If you dont want to spray the rhino liner you can use herculiner with a textured roller. Not as durable but looks nice and works fine, comes in a gallon container. Springs will need something, you could wipe them down with oil to stop rust but it will attract dirt. I would paint them or clear them. Cab lift arms I would replace the the cast iron version.
#71
03-01-2017, 05:17 PM
Cargo Master
Nice looking project
I just discovered your project thread, you are doing a great job for what you stated "limited experience. That truck is amazingly solid, can't believe the condition of your under bed floor. Hopefully you will give the underside a good buff with flapper wheels, prime it and then hit it with Rhino skin or similar.
Going to be keeping an eye on your project, glad you are going stock. I did not have that option. Envious
Note. I would take on a flathead rebuild....if I had Ross as a neighbour !
Going to be keeping an eye on your project, glad you are going stock. I did not have that option. Envious
Note. I would take on a flathead rebuild....if I had Ross as a neighbour !
Last edited by tip49; 03-02-2017 at 05:14 PM. Reason: spell check

#73
03-03-2017, 12:40 PM
Join Date: Oct 2015
Location: Yakima, WA
Posts: 413
Likes: 0
Received 0 Likes
on
0 Posts
we are definitely at about the same spot in the builds. I am going to cleanup the pedal assembly next, then I am going to at least get the cab bottom cleaned up so I can mount the cab. I am sick of having my garage taken up by 2 large items, hopefully pick up some working room once this cab is installed. Then...electrical. That should be a challenge. There is no way in hell I would ever try this again without this forum
#74
05-24-2017, 04:33 PM
Join Date: Oct 2015
Location: Yakima, WA
Posts: 413
Likes: 0
Received 0 Likes
on
0 Posts
Well I am finally moving on this truck again. I wish it was going faster, but I am sure we all have said that at a time or two. I was finally able to get the bottom of my cab cleaned and a few small holes repaired, I ended up painting with just the krylon bed coating paint, and remounted. After I did this, I completely stripped the interior. I removed the hood cowl vent, wipers, handles, glass, gauges, literally everything. I recently have purchased a new ez wiring harness and will be tackling that next. I am going to clean the interior and then decide if I want to paint it or leave it as is. I am leaving the exterior as the original patina. I tell you what, a cowl vent and wiper motor is not an easy job to get out. I was able to read an old post on getting the original door lock assembly out, I never would have found that small hole under the weatherstripping! another forum post that may have saved my marriage. Thanks for following. here are some pics.