
my son's 77 F250 4x4, body and paint
#91
 04-02-2015, 09:01 PM

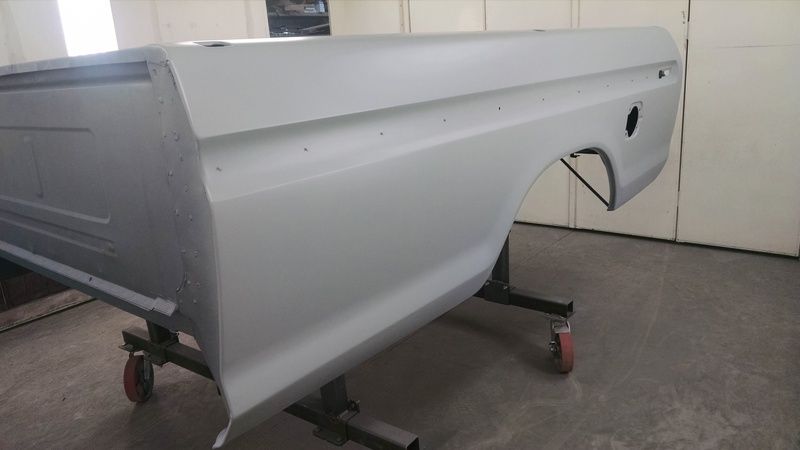
I spent a little time with the blocks on the surfacing primer, on bedsides.
Not too bad, better than I expected actually.
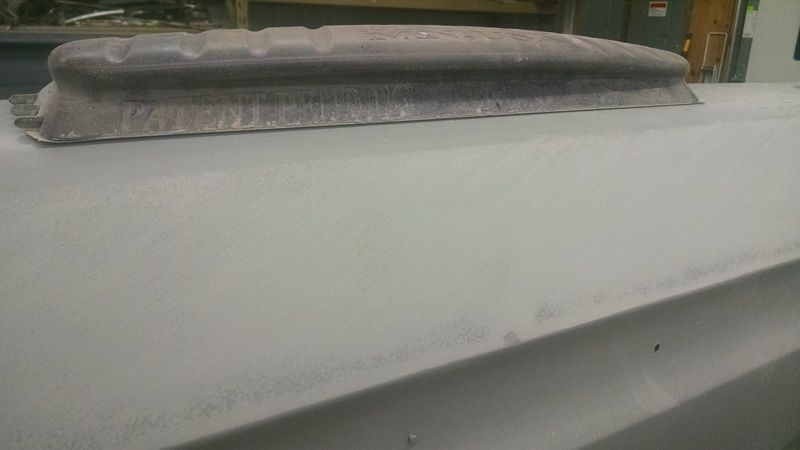
here's a little low spot that looks like it will block out in the primer level.
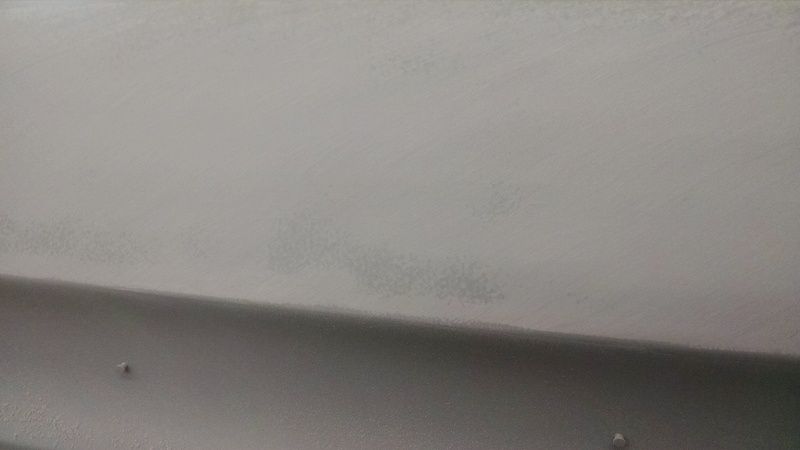
this is why you surface and level new panels (and old ones) with blocks. this is just a couple swipes with the long block, you can see all the highs and lows. that was a new panel, taken to bare metal, epoxy primed and 2 coats of hi build urethane surfacing prime.
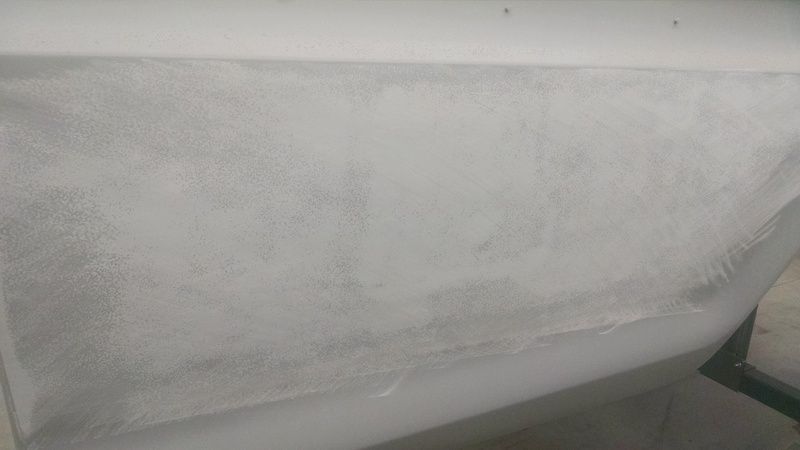
if we would have shot color and clear on this, especially being black.... ripples and waves....
She's leveling out really nice though, should be a nice straight truck.
Not too bad, better than I expected actually.
here's a little low spot that looks like it will block out in the primer level.
this is why you surface and level new panels (and old ones) with blocks. this is just a couple swipes with the long block, you can see all the highs and lows. that was a new panel, taken to bare metal, epoxy primed and 2 coats of hi build urethane surfacing prime.
if we would have shot color and clear on this, especially being black.... ripples and waves....
She's leveling out really nice though, should be a nice straight truck.
#92
04-02-2015, 10:11 PM
#93
04-03-2015, 07:27 PM
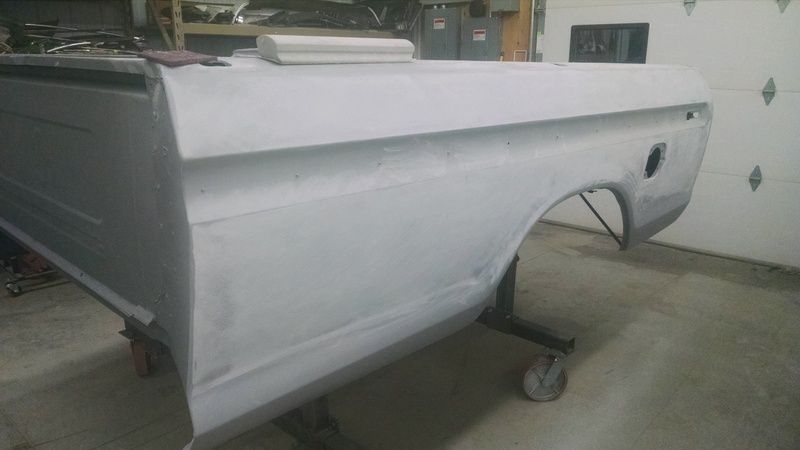
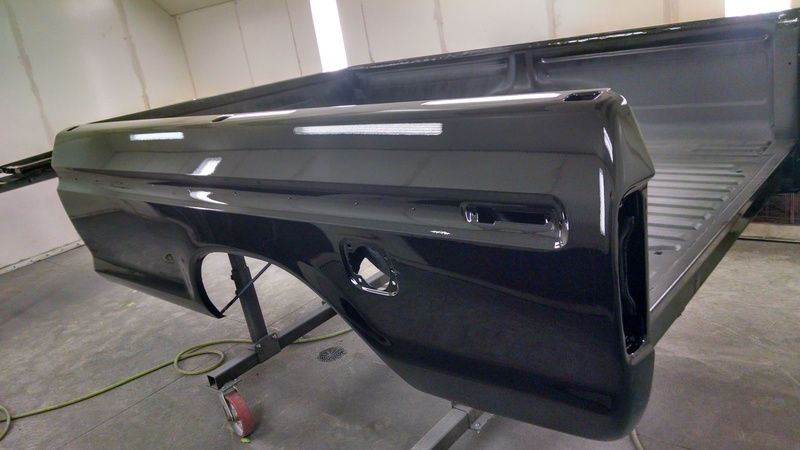
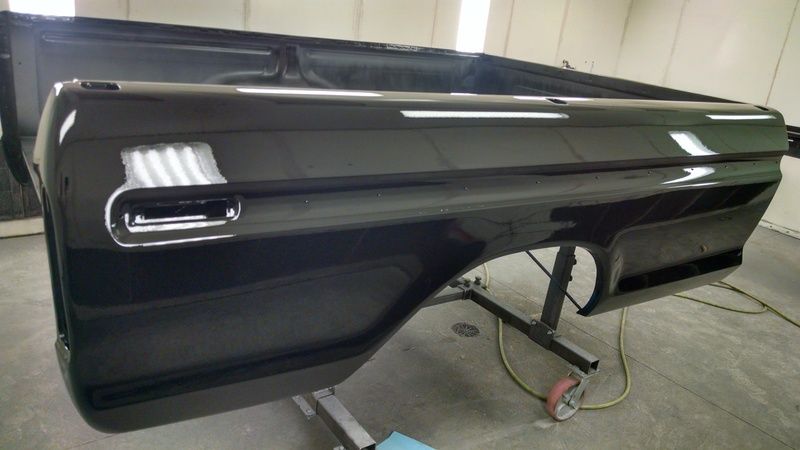
I blocked out the bed sides, they came very close to perfect. I decided to just hit it with another coat of primer and final block it tomorrow.
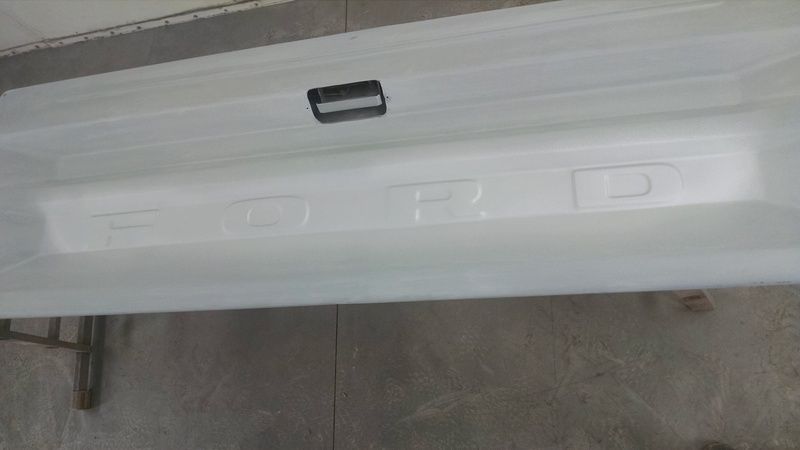
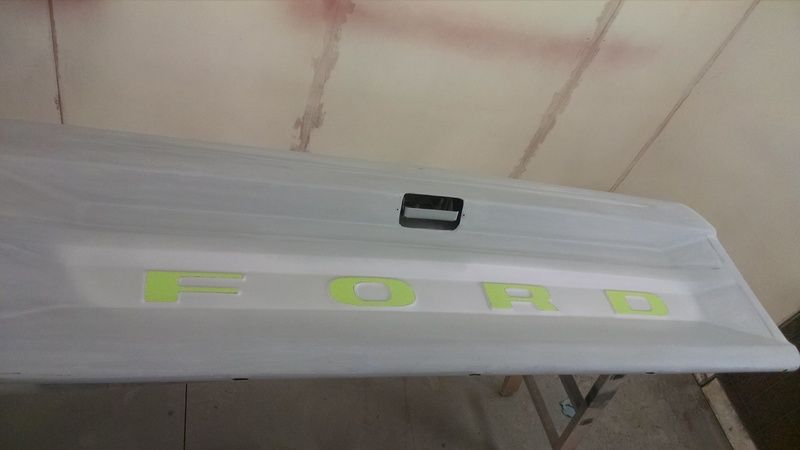
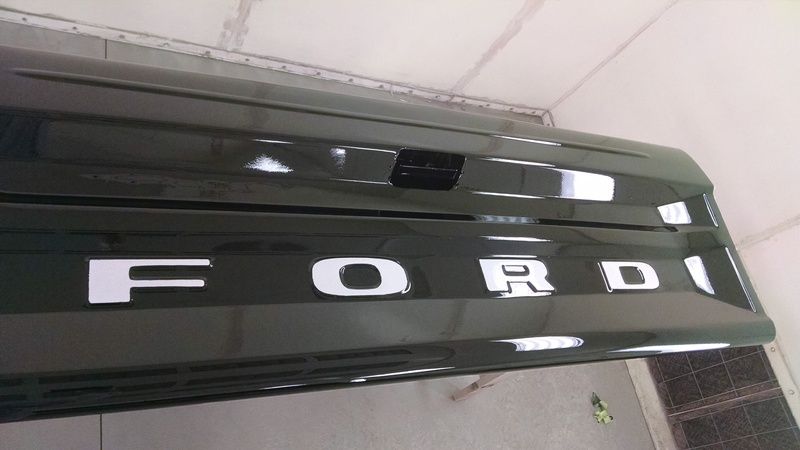
The rest of the cab was sanded to bare metal today, we got the tailgate back in the booth to get some silver base on the raised ford letters and we also refurbished the original dealership tag which was a bit flakey from age. We decided to keep it, clean it up, paint it silver and we will high gloss clear it before putting it back on the tailgate where the dealer had it when they sold the truck new out if Denver.

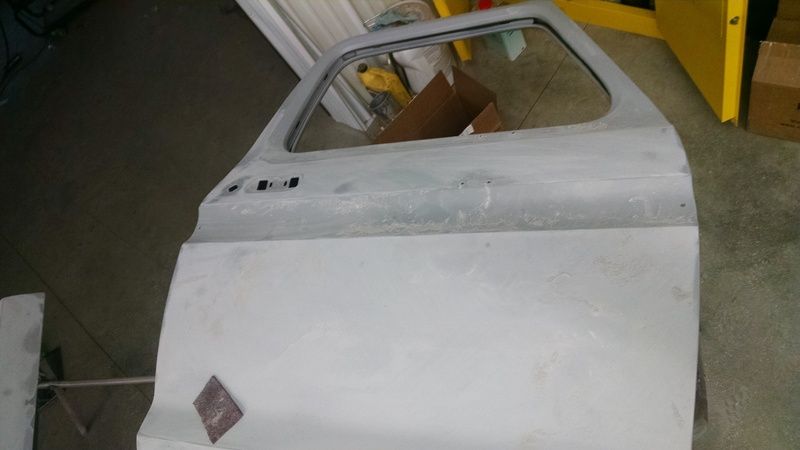
Also got the first round of blocking done on the doors. I will prime these again tomorrow, very shallow low spots, not really worth getting out the glazing filler in my opinion.
The rest of the cab was sanded to bare metal today, we got the tailgate back in the booth to get some silver base on the raised ford letters and we also refurbished the original dealership tag which was a bit flakey from age. We decided to keep it, clean it up, paint it silver and we will high gloss clear it before putting it back on the tailgate where the dealer had it when they sold the truck new out if Denver.
Also got the first round of blocking done on the doors. I will prime these again tomorrow, very shallow low spots, not really worth getting out the glazing filler in my opinion.
#94
04-03-2015, 10:12 PM
Dave, when you take a panel down to bare metal what do you use, flapper discs? I was also wondering if you ever have to contend with panels warping when doing so? I would imagine you wouldn't have to worry due to your experience but is it something to look for with the less experienced, me for example?
#95
04-04-2015, 08:36 AM
We use a low RPM 8" sander. I have a couple but the one I use the most is a big ole sander by hutchins, gear driven motor has lots of torque but it's not high RPM. We use PSA paper in that 8" size, I have various grits. I usually end up choosing either 40, 60 or 80 grit. This truck just had the original paint on it, thinner paint films like this come nice with the 80 grit. Some of my projects are repaints or multiple repaints and I need to start with 40 grit on those.
I don't get the panels hot, it's sort of a slow torqy cheese grader effect, just shaves the paint off.
We follow up with a smaller hutchins DA with lighter paper, in this case the followup was with 120.
In door jams and along edges we use small 90 degree angle die grinders (also air) with various heads, either a rol-lok type or a 3" velcro pad and an assortment of grit including the scuff it type cleaning pads. Some of this stuff is especially helpful in windshield tray areas where we need to clean out old butyl or other sealants and or rust.
this sander on the left is the one we use the most for taking a car or truck down to bare metal. This is an old picture, the sander don't look new like that no more, lol.
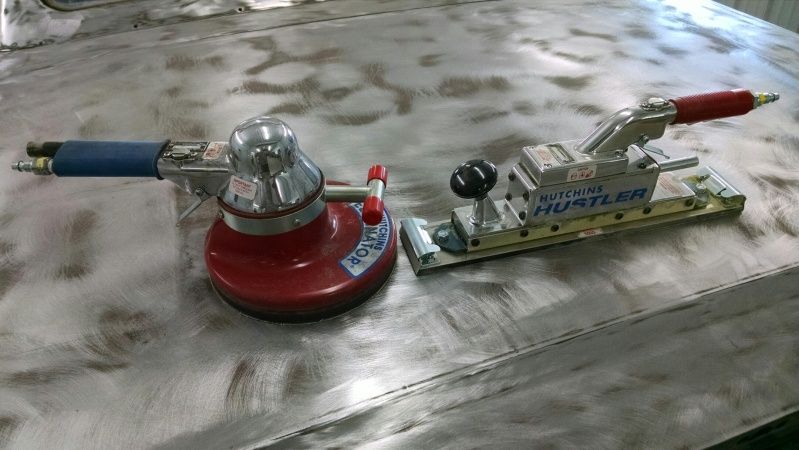
I'm not a huge fan of straightlines but if you have to have one, the hutchins are the way to go. I have an old red ingersol rand, I hate that damn thing, the hutchins is a really nice unit compared to that old red panel humper.
I finish entirely by hand with a variety of blocks and boards. I still have all my old hutchins speed file type boards but I haven't touched any of them for years. I use these new blocks now like the dura-block line, motor guard and the AFS blocks (expensive)
The AFS blocks are great for large flat or crowned panels,super for leveling hoods, roofs, trunk lids and side areas with flat or crowned shapes. These are stupidly expensive blocks though, I wouldn't recommend them to the hobbyist.
Here are a couple pics of an AFS block. I can't remember what size this one is, I think I have 2 of these. Here's the thing with AFS blocks, they have a spring steel face on them for self adhesive type 2-3/4" paper which I purchase on rolls.
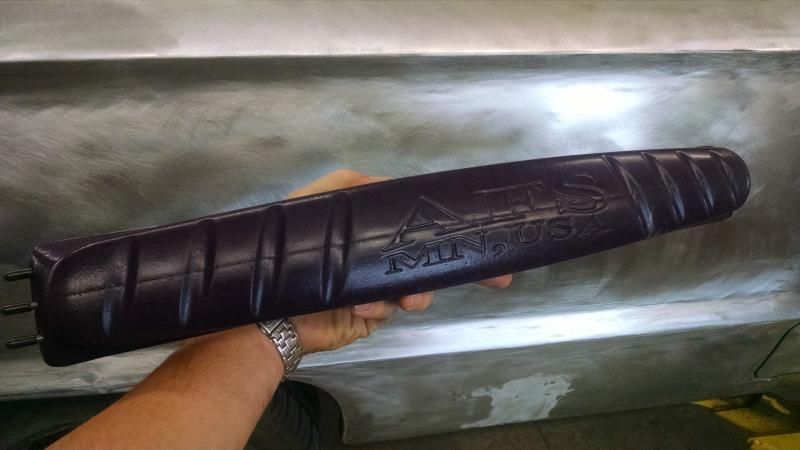
They also have 3 stiff metal rods inside of them that you can remove 1 at a time for different levels of flexibility. If you pull all 3 rods out the block becomes quite flexible, which is nice for older rigs with the big bulging round fenders etc.
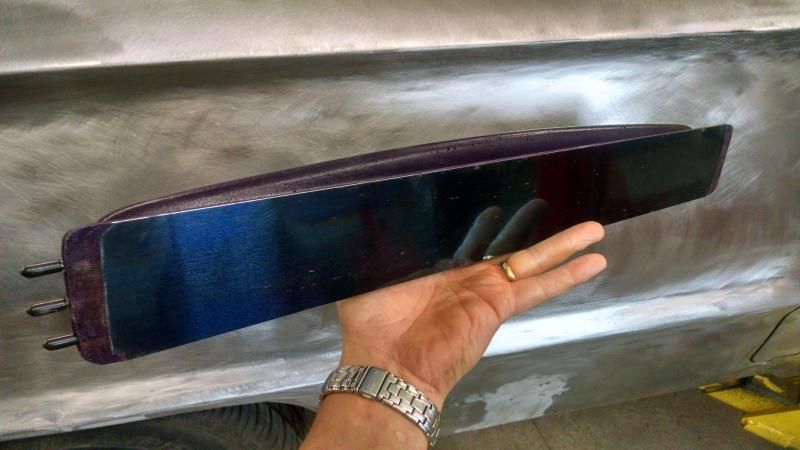
The real benefit I see with the AFS block is that when you bend one to follow an arched panel, the paper doesn't bunch, pucker and wrinkle. The paper stays flat because of the spring steel block face. that is really the only benefit I see with the AFS blocks over something like the foam/rubber dura block line which is much cheaper to buy. If you flex a durablock on an arched panel the paper will pucker on the block's face because the block face itself contracts when you flex it.
That being said, I think my favorite block is still a dura block. They make many, I have a few but this one is my favorite. I can do almost all of my blocking with this one block alone.
It happens to be in this photo by accident.
It's dura block AF4414.
It has a flat face and a round face, it's large, and even on the flat face the edges are radius'd so you can roll this block through a "valley" on a panel without the edge knifing into your primer or body filler. You can't do that with the more expensive AFS block. With an afs block you better stay out on the flats and on the outsides of crowned panels, you don't take an AFS block down into the ditch so to speak, the spring steel edge along the length of the block has no give, it will knife in if you take it into an inside radius.
That AF4414 is currently my favorite block and I think you can get them for around 25 bucks.
Even if I just used it for one paint job and threw it away with the used sandpaper after the job was done, it would be worth buying. (in my opinion)
Sorry, I know you didn't ask all those questions. It's just that years ago when I was on the hobby side of this sort of work I wish I would have known some of this stuff.
And I still try to learn every day out in the shop and also by picking up new tricks and tips where ever I can.

PS, I'm editing to add that you might notice a little piece of scotch brite scuff pad in all of my photos when I am block sanding.
That's because I always have a small piece of scuff pad within reach while I'm blocking. I use the scuff pad to clean the face of my sand paper while I'm blocking. I take a few cross cutting swipes with the block, then I lightly wipe the face of the paper to keep it from loading on me.
You don't want to go scrubbing away like a mad man with paper that is loading with primer/filler. It can gouge, besides that, the loaded spots on the papers face with float the paper off of the surface, you aren't cutting if you aren't contacting with the grit.
It keeps me leveling nicer and it gets me a little more life out of my paper if I clean the little load freckles off my paper with the scuff pad as I go.
I don't get the panels hot, it's sort of a slow torqy cheese grader effect, just shaves the paint off.
We follow up with a smaller hutchins DA with lighter paper, in this case the followup was with 120.
In door jams and along edges we use small 90 degree angle die grinders (also air) with various heads, either a rol-lok type or a 3" velcro pad and an assortment of grit including the scuff it type cleaning pads. Some of this stuff is especially helpful in windshield tray areas where we need to clean out old butyl or other sealants and or rust.
this sander on the left is the one we use the most for taking a car or truck down to bare metal. This is an old picture, the sander don't look new like that no more, lol.
I'm not a huge fan of straightlines but if you have to have one, the hutchins are the way to go. I have an old red ingersol rand, I hate that damn thing, the hutchins is a really nice unit compared to that old red panel humper.
I finish entirely by hand with a variety of blocks and boards. I still have all my old hutchins speed file type boards but I haven't touched any of them for years. I use these new blocks now like the dura-block line, motor guard and the AFS blocks (expensive)
The AFS blocks are great for large flat or crowned panels,super for leveling hoods, roofs, trunk lids and side areas with flat or crowned shapes. These are stupidly expensive blocks though, I wouldn't recommend them to the hobbyist.
Here are a couple pics of an AFS block. I can't remember what size this one is, I think I have 2 of these. Here's the thing with AFS blocks, they have a spring steel face on them for self adhesive type 2-3/4" paper which I purchase on rolls.
They also have 3 stiff metal rods inside of them that you can remove 1 at a time for different levels of flexibility. If you pull all 3 rods out the block becomes quite flexible, which is nice for older rigs with the big bulging round fenders etc.
The real benefit I see with the AFS block is that when you bend one to follow an arched panel, the paper doesn't bunch, pucker and wrinkle. The paper stays flat because of the spring steel block face. that is really the only benefit I see with the AFS blocks over something like the foam/rubber dura block line which is much cheaper to buy. If you flex a durablock on an arched panel the paper will pucker on the block's face because the block face itself contracts when you flex it.
That being said, I think my favorite block is still a dura block. They make many, I have a few but this one is my favorite. I can do almost all of my blocking with this one block alone.
It happens to be in this photo by accident.
It's dura block AF4414.
It has a flat face and a round face, it's large, and even on the flat face the edges are radius'd so you can roll this block through a "valley" on a panel without the edge knifing into your primer or body filler. You can't do that with the more expensive AFS block. With an afs block you better stay out on the flats and on the outsides of crowned panels, you don't take an AFS block down into the ditch so to speak, the spring steel edge along the length of the block has no give, it will knife in if you take it into an inside radius.
That AF4414 is currently my favorite block and I think you can get them for around 25 bucks.
Even if I just used it for one paint job and threw it away with the used sandpaper after the job was done, it would be worth buying. (in my opinion)
Sorry, I know you didn't ask all those questions. It's just that years ago when I was on the hobby side of this sort of work I wish I would have known some of this stuff.
And I still try to learn every day out in the shop and also by picking up new tricks and tips where ever I can.
PS, I'm editing to add that you might notice a little piece of scotch brite scuff pad in all of my photos when I am block sanding.
That's because I always have a small piece of scuff pad within reach while I'm blocking. I use the scuff pad to clean the face of my sand paper while I'm blocking. I take a few cross cutting swipes with the block, then I lightly wipe the face of the paper to keep it from loading on me.
You don't want to go scrubbing away like a mad man with paper that is loading with primer/filler. It can gouge, besides that, the loaded spots on the papers face with float the paper off of the surface, you aren't cutting if you aren't contacting with the grit.
It keeps me leveling nicer and it gets me a little more life out of my paper if I clean the little load freckles off my paper with the scuff pad as I go.
#96
04-04-2015, 09:08 AM
#97
04-04-2015, 09:18 AM
Post Fiend
#98
04-04-2015, 09:50 AM
Thanks.
You know, I really can't complain about the bedsides. I replace a lot of panels on classic cars, muscle cars etc. I've worked with better, but I've also worked with much worse.
The fact that I will bring them level with 2 rounds of surfacing primer and no body filler is kind of nice, I think.
I should have added that there was a planned sequence to my panel hanging. Some of the key things that I should have mentioned.
First off, we took care to level the bed and support it at the frame contact points on a body cart. It's important to be confident that the bed is leveled like it will be sitting on the frame when you do these bed sides. I have seen truck boxes rebuilt off the truck, new bed sides installed, body and paint, they look great, then they bolt the box back onto the frame and the bed sides pucker because the bed wasn't level and straight when they welded new sides on.
secondly, we decided to do bed sides and outer wheel houses. This may have contributed to our successful and happy fit up of these bedsides, I don't know, but I will try to explain.
When you hang new quarters, quarter skins or bed sides with existing outer wheel house lip, you are fitting at the top, and again at the arch and you can run into trouble reaching both areas correctly. I've experienced nice fit up up top on a quarter or bed skin and then have a gap in the wheel arch lip. Needless to say, it sucks when that happens, you can end up forcing the fit to the point of loading the panel with pressure or tension, both of which will throw off the shape of the side of the panel, it just plain sucks for trying to block out a nice straight panel.
A relaxed panel that is simply secured in that shape that it wants to take, is a good thing.
I hope I explained that correctly.
Now, further with my point.
We hung the bed sides from the top edge, the tail light end of the panels really just lock in to one spot, not a lot of adjusting can be had back there. Up front we matched up the front edges of the panels to the front bed panel so that the bottoms and tops measured correctly outside to outside and centered on the bed. This was done with no fighting of the panels, it went very well.
Lastly, we fit the outer wheel houses after the new bed sides were attached at the top, rear and front. I believe this contributed to our success because there is a lot of forgiveness and adjustment available in fitting these outer wheel houses. They are essentially a bridge that fills the gap between the fender lip of the bed side and the wheel hump in the box itself. I was able to lay them in place so that they contacted the bedside fender lip and the inner wheel house with no force or tension. because of this, I experienced no panel bulge or flattening from tension.
So, as for the fit up, I believe the decision to replace outer wheel houses as well as the bed sides, contributed to a nice fit up.
I hope I explained that ok.
As for the stamping quality, I'd rate it as fair.
if you slap these on and paint them, they will be wavy, children will point and laugh, you will curse yourself every time you check your side mirror while driving because you will see the ripples.

But they seem to level out nicely with out an excessive amount of 2k surfacing primer and a little blocking.
You know, I really can't complain about the bedsides. I replace a lot of panels on classic cars, muscle cars etc. I've worked with better, but I've also worked with much worse.
The fact that I will bring them level with 2 rounds of surfacing primer and no body filler is kind of nice, I think.
I should have added that there was a planned sequence to my panel hanging. Some of the key things that I should have mentioned.
First off, we took care to level the bed and support it at the frame contact points on a body cart. It's important to be confident that the bed is leveled like it will be sitting on the frame when you do these bed sides. I have seen truck boxes rebuilt off the truck, new bed sides installed, body and paint, they look great, then they bolt the box back onto the frame and the bed sides pucker because the bed wasn't level and straight when they welded new sides on.
secondly, we decided to do bed sides and outer wheel houses. This may have contributed to our successful and happy fit up of these bedsides, I don't know, but I will try to explain.
When you hang new quarters, quarter skins or bed sides with existing outer wheel house lip, you are fitting at the top, and again at the arch and you can run into trouble reaching both areas correctly. I've experienced nice fit up up top on a quarter or bed skin and then have a gap in the wheel arch lip. Needless to say, it sucks when that happens, you can end up forcing the fit to the point of loading the panel with pressure or tension, both of which will throw off the shape of the side of the panel, it just plain sucks for trying to block out a nice straight panel.
A relaxed panel that is simply secured in that shape that it wants to take, is a good thing.
I hope I explained that correctly.
Now, further with my point.
We hung the bed sides from the top edge, the tail light end of the panels really just lock in to one spot, not a lot of adjusting can be had back there. Up front we matched up the front edges of the panels to the front bed panel so that the bottoms and tops measured correctly outside to outside and centered on the bed. This was done with no fighting of the panels, it went very well.
Lastly, we fit the outer wheel houses after the new bed sides were attached at the top, rear and front. I believe this contributed to our success because there is a lot of forgiveness and adjustment available in fitting these outer wheel houses. They are essentially a bridge that fills the gap between the fender lip of the bed side and the wheel hump in the box itself. I was able to lay them in place so that they contacted the bedside fender lip and the inner wheel house with no force or tension. because of this, I experienced no panel bulge or flattening from tension.
So, as for the fit up, I believe the decision to replace outer wheel houses as well as the bed sides, contributed to a nice fit up.
I hope I explained that ok.
As for the stamping quality, I'd rate it as fair.
if you slap these on and paint them, they will be wavy, children will point and laugh, you will curse yourself every time you check your side mirror while driving because you will see the ripples.
But they seem to level out nicely with out an excessive amount of 2k surfacing primer and a little blocking.
#99
04-05-2015, 01:39 PM
#100
04-05-2015, 01:42 PM
Senior User
#101
04-05-2015, 02:21 PM
Post Fiend
Join Date: Sep 2006
Location: Island Southeast Alaska
Posts: 14,325
Likes: 0
Received 5 Likes
on
5 Posts
I wish I was 20 years younger and you
was needing an apprentice. The only
way to learn this right is with hands on.
I have worked with two masters. Neither
would talk much if any while working. So
I mostly watched and learned and cleaned
and fetched and sanded, and sanded... and
sanded even more. Wear a respirator folks.
Or when ya get to my age ya cant sleep because
ya cant breath. Paint dust builds up like concrete
in your lungs. The same crap that you try to hose
off the shop floor. Even when sweeping up please
wear a mask of some kind.
was needing an apprentice.
The only way to learn this right is with hands on.
I have worked with two masters. Neither
would talk much if any while working. So
I mostly watched and learned and cleaned
and fetched and sanded, and sanded... and
sanded even more. Wear a respirator folks.
Or when ya get to my age ya cant sleep because
ya cant breath. Paint dust builds up like concrete
in your lungs. The same crap that you try to hose
off the shop floor. Even when sweeping up please
wear a mask of some kind.
#102
04-05-2015, 02:43 PM
Amen on that, I'm very protective of my lungs. I wear a respirator even when I'm hand sanding, I use dust filters but its a real mask, not that rubber band and paper jock strap cup bull****, that doesn't seal worth a crap.
My son says his awesome levels are quite high right now.
I'm liking this clear, nason 498-00, digging it just fine. Its still flowing.
I sprayed textured rocker guard along the bottom, that's why the drastic orange peel along the bottom.

My son says his awesome levels are quite high right now.
I'm liking this clear, nason 498-00, digging it just fine. Its still flowing.
I sprayed textured rocker guard along the bottom, that's why the drastic orange peel along the bottom.
#104
04-05-2015, 05:05 PM
Senior User
Join Date: Jun 2006
Location: Wisconsin
Posts: 183
Likes: 0
Received 0 Likes
on
0 Posts
#105
04-05-2015, 08:46 PM
Well thank you, we are doing the best we can on a budget and a timeline.
I am really enjoying this little project for my boy.
This picture below was my first truck build, it was also my first personal truck.
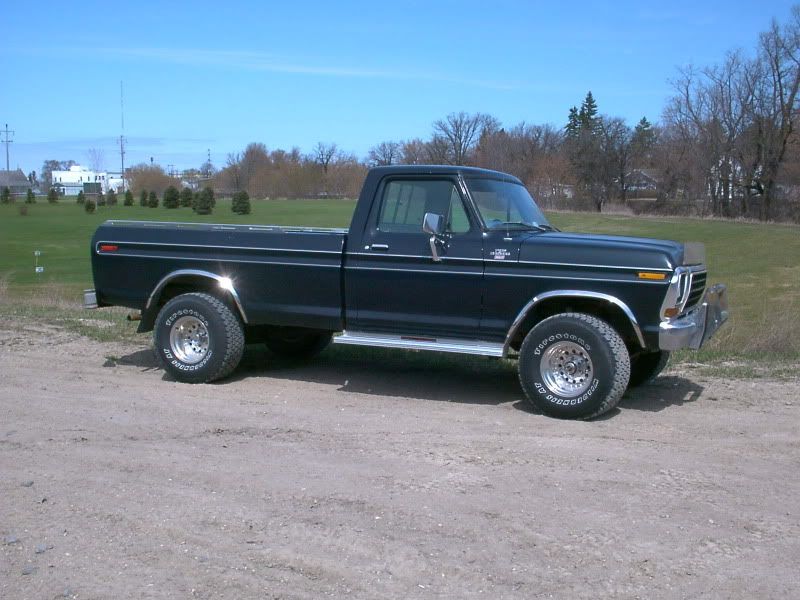
It was a 78 half ton with 400 and auto trans.
It was a heap of crap when I started, I mean just awful. It should have just been crushed, lol. I seriously mean that, it was junk. But I did it out of stubbornness after being laughed at when I said once that I was thinking about fixing it up. Lol
Well, I have pictures of my little boy sitting on the hood of that truck when he was probably only 2 yrs old.
Now all these years later we are doing a truck for him, I have a lot more experience, a little lacking on the energy... Lol, but the products are better, my tools are better, and the damn truck is going to be better than that old 78 half ton I was so proud of.
It's good stuff.
I am really enjoying this little project for my boy.
This picture below was my first truck build, it was also my first personal truck.
It was a 78 half ton with 400 and auto trans.
It was a heap of crap when I started, I mean just awful. It should have just been crushed, lol. I seriously mean that, it was junk. But I did it out of stubbornness after being laughed at when I said once that I was thinking about fixing it up. Lol
Well, I have pictures of my little boy sitting on the hood of that truck when he was probably only 2 yrs old.
Now all these years later we are doing a truck for him, I have a lot more experience, a little lacking on the energy... Lol, but the products are better, my tools are better, and the damn truck is going to be better than that old 78 half ton I was so proud of.
It's good stuff.