Trozei's '69 F100 Build Thread
#1306
 07-28-2016, 11:54 AM

Lead Driver
 Hmmm. Maybe it is a girl Rich. Jackson already bought her jewelry.
#1307
07-28-2016, 01:04 PM
Hotshot

#1308
07-28-2016, 11:35 PM
They only break down if you haven't been paying attention to them....or they found out you are going to switch to a newer model with less miles.


#1310
07-30-2016, 05:41 AM
You guys sure do love to talk when I'm gone!  Yes I am very excited to hear it running. I can't wait. I don't name my vehicles or any piece of machinery for that matter so unfortunately I have not assigned it a gender yet. Perhaps I should name it Target seeing as there is no designated gender.
  Haha.
Haha.
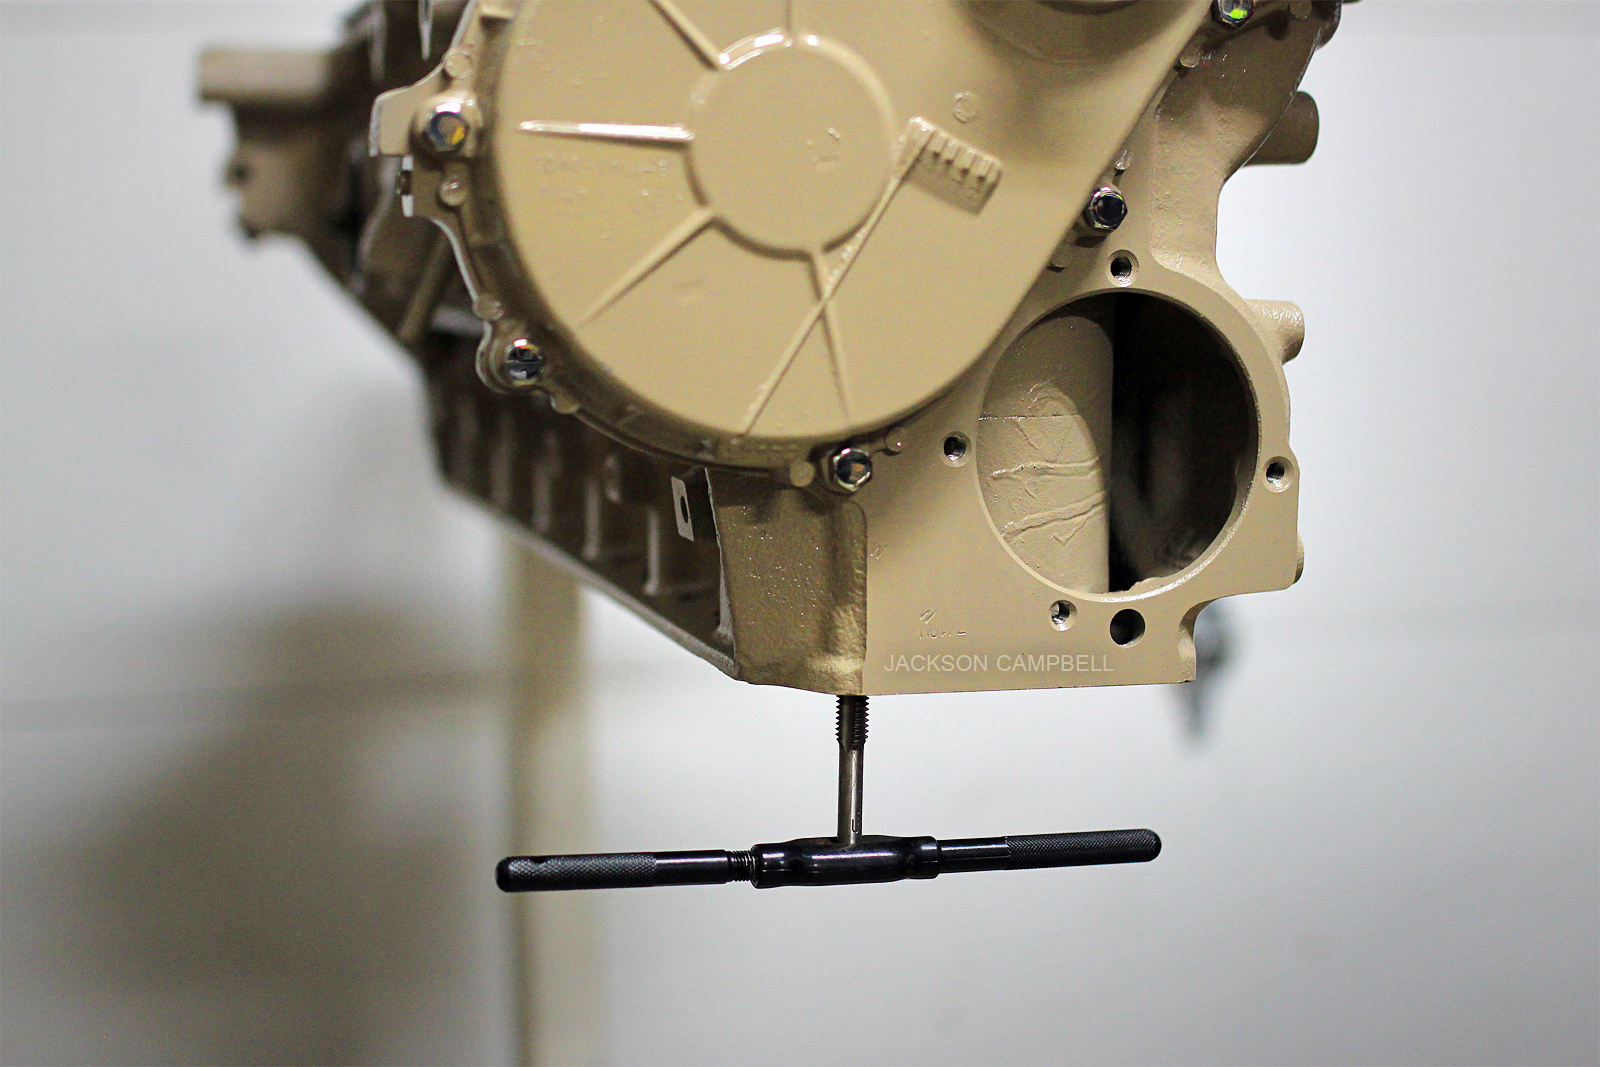
I'm about to clamp down the head, so I started by chasing all the threads. I did it upside down so that any loose debris could fall to the ground. Less chance of it going into the piston rings that way. Safer. Next I sprayed the whole deck down in brake cleaner to remove the WD40 residue that I'd applied to keep it from rusting. And then of course thread in the studs. Seeing the studs in there really motivates me, but it's 3:40am and I need some sleep.

"It's stock."
Yes I am very excited to hear it running. I can't wait. I don't name my vehicles or any piece of machinery for that matter so unfortunately I have not assigned it a gender yet. Perhaps I should name it Target seeing as there is no designated gender. Haha.I'm about to clamp down the head, so I started by chasing all the threads. I did it upside down so that any loose debris could fall to the ground. Less chance of it going into the piston rings that way. Safer. Next I sprayed the whole deck down in brake cleaner to remove the WD40 residue that I'd applied to keep it from rusting. And then of course thread in the studs. Seeing the studs in there really motivates me, but it's 3:40am and I need some sleep.
"It's stock."
#1311
07-31-2016, 06:25 AM
I got the head bolted on today. A friend asked to help me out and he's an experienced aircraft maintenance engineer so I'm not going to deny his assistance. I know how but I've never personally done a head gasket before. Never needed to. Seeing as how the block and head were both milled, the only real cleaning I had to do was getting the various oils off of the surface. After thinking about what to use, I figured that I'd I use the same process I'd use to get a surface contaminant-free prior to painting. I had sprayed WD40 on the bare surfaces for corrosion protection, so to get that off I used brake cleaner. To prep the surface I used a wax and grease remover with a lint-free cloth. Afterward I went over everything with a tack cloth. In theory there should no longer be anything on the surfaces. We put on the head gasket, double checked everything lined up, and then dropped the head onto the block making sure it rested on the dowel pins. Following the ARP instructions, we coated the stud threads and nut threads with the ARP assembly lube, and then tightened down the block in three equal stages up to 80lb-ft. Since my fingers were messy during a lot of this process, I didn't take any pictures. That being said I don't think anyone would have any issue imagining it.
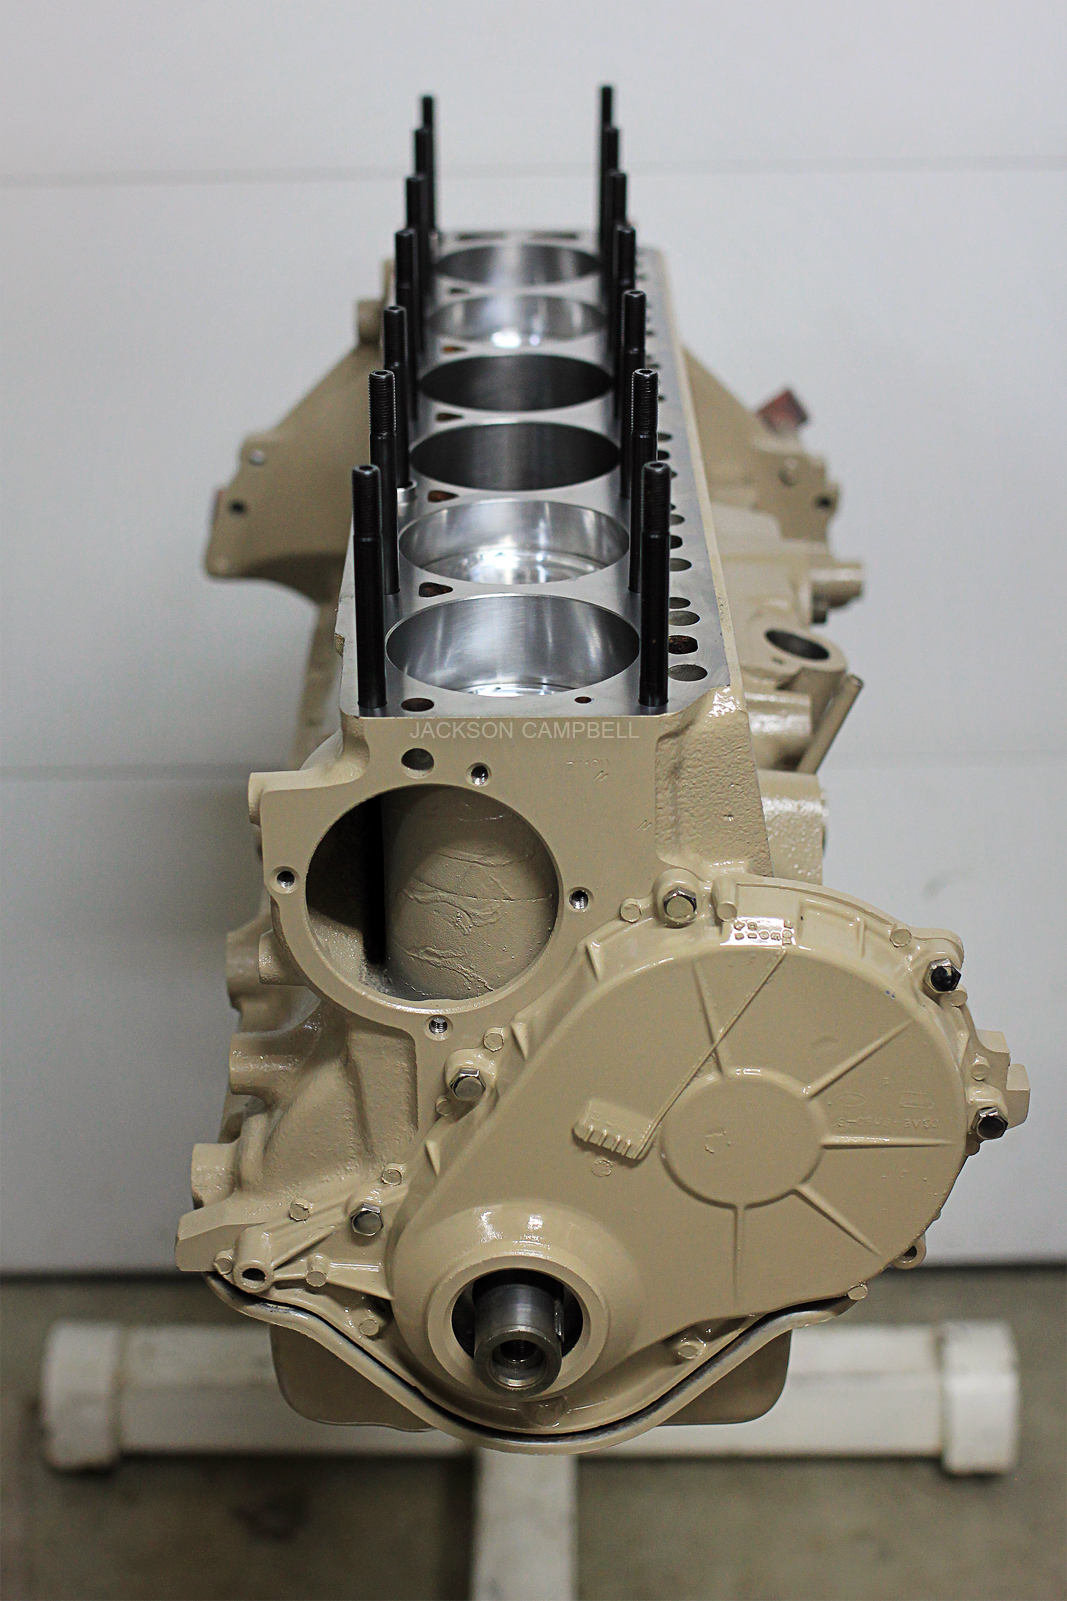
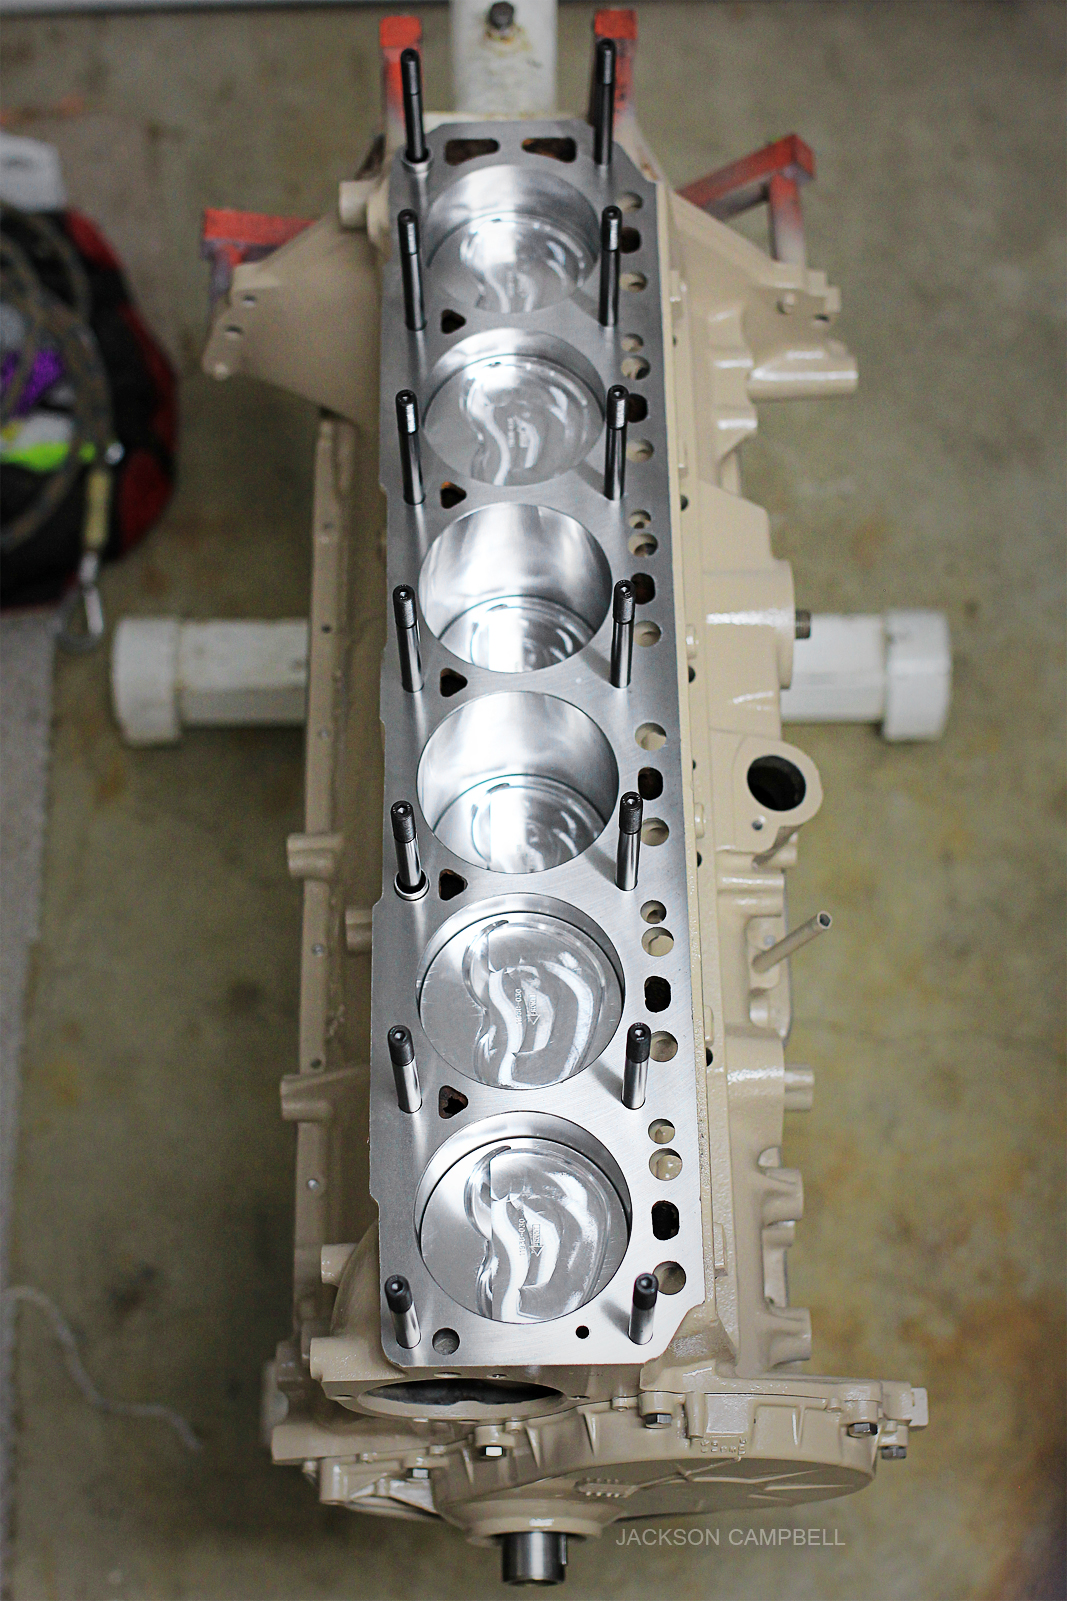
So here's the long block. Nothing new, really, except for the gasket.
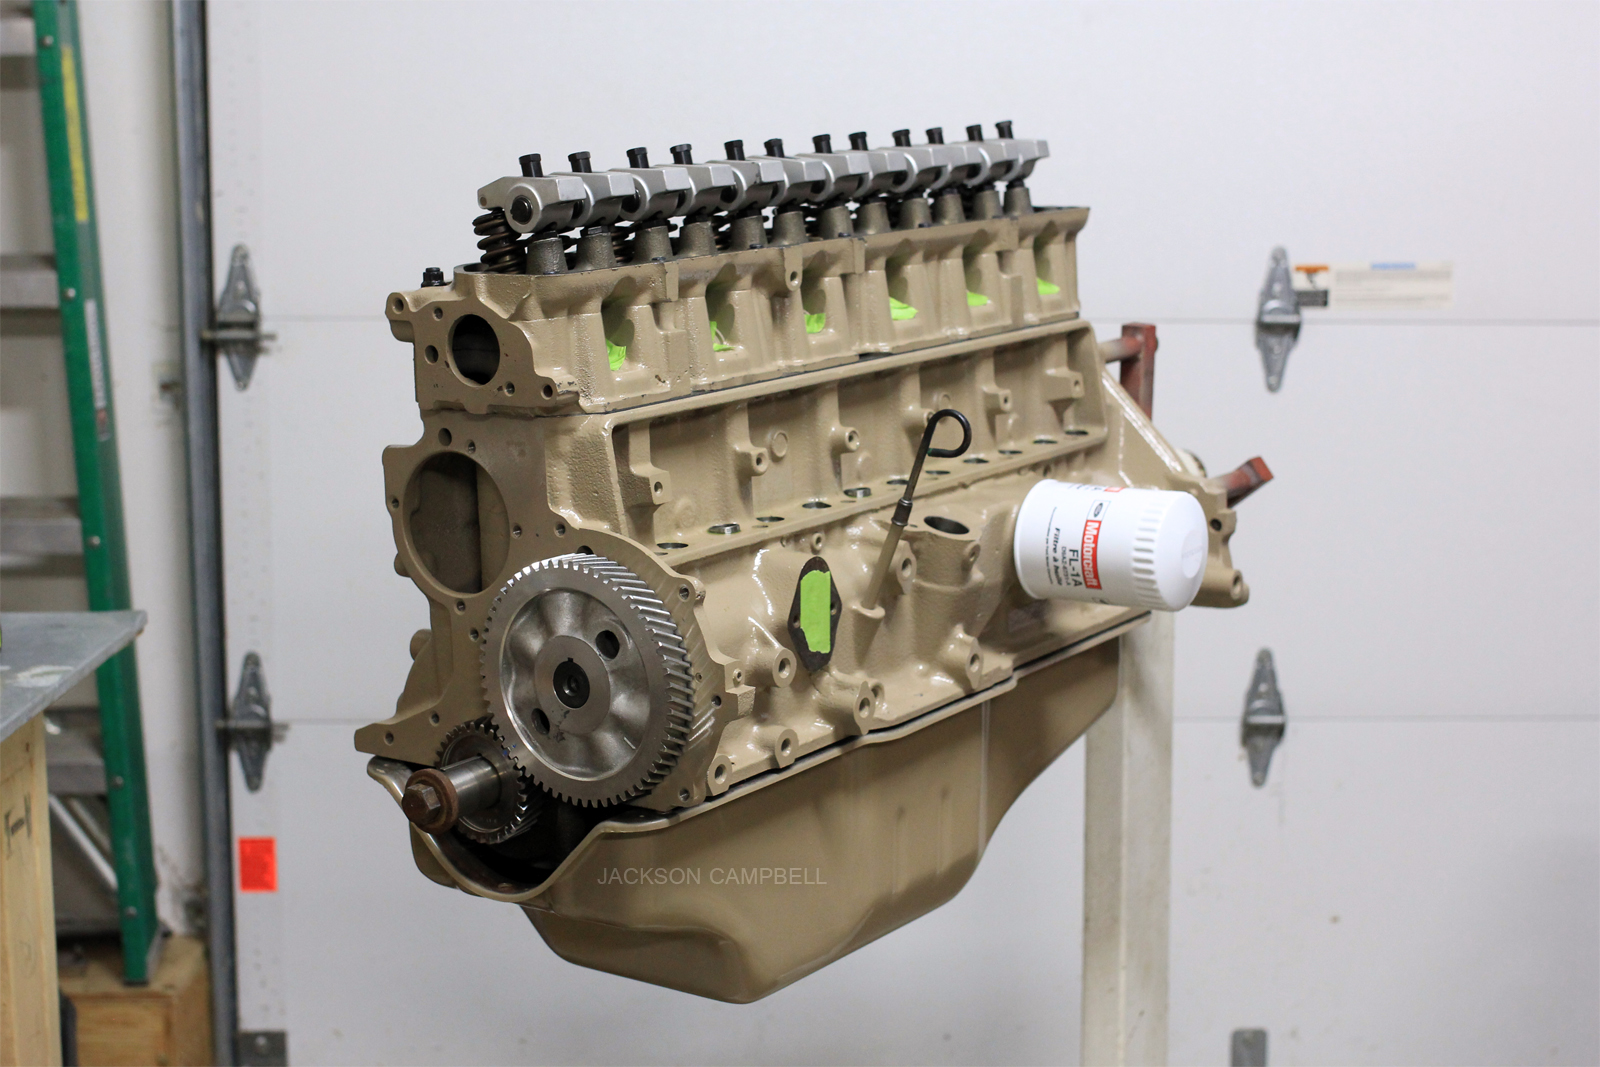
It felt great making progress on this thing and it's put me back into the black and white vibe I had going on when I first started this thread, so I'm going to take the liberty and do just that!
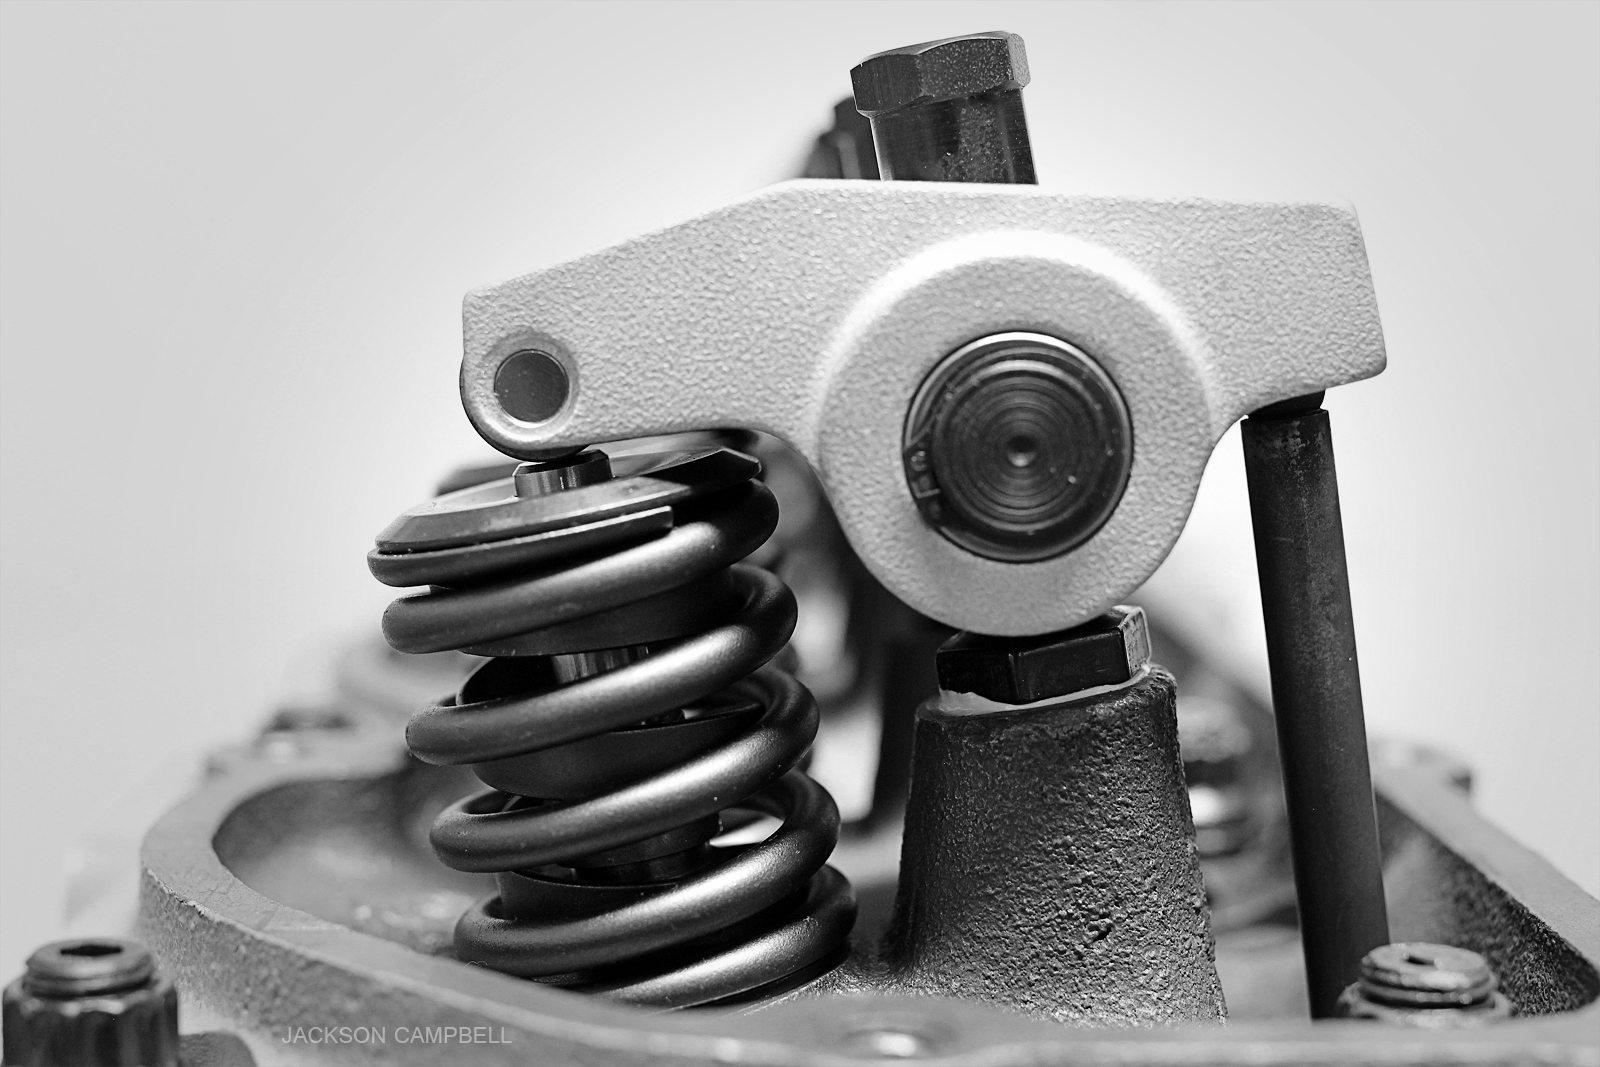
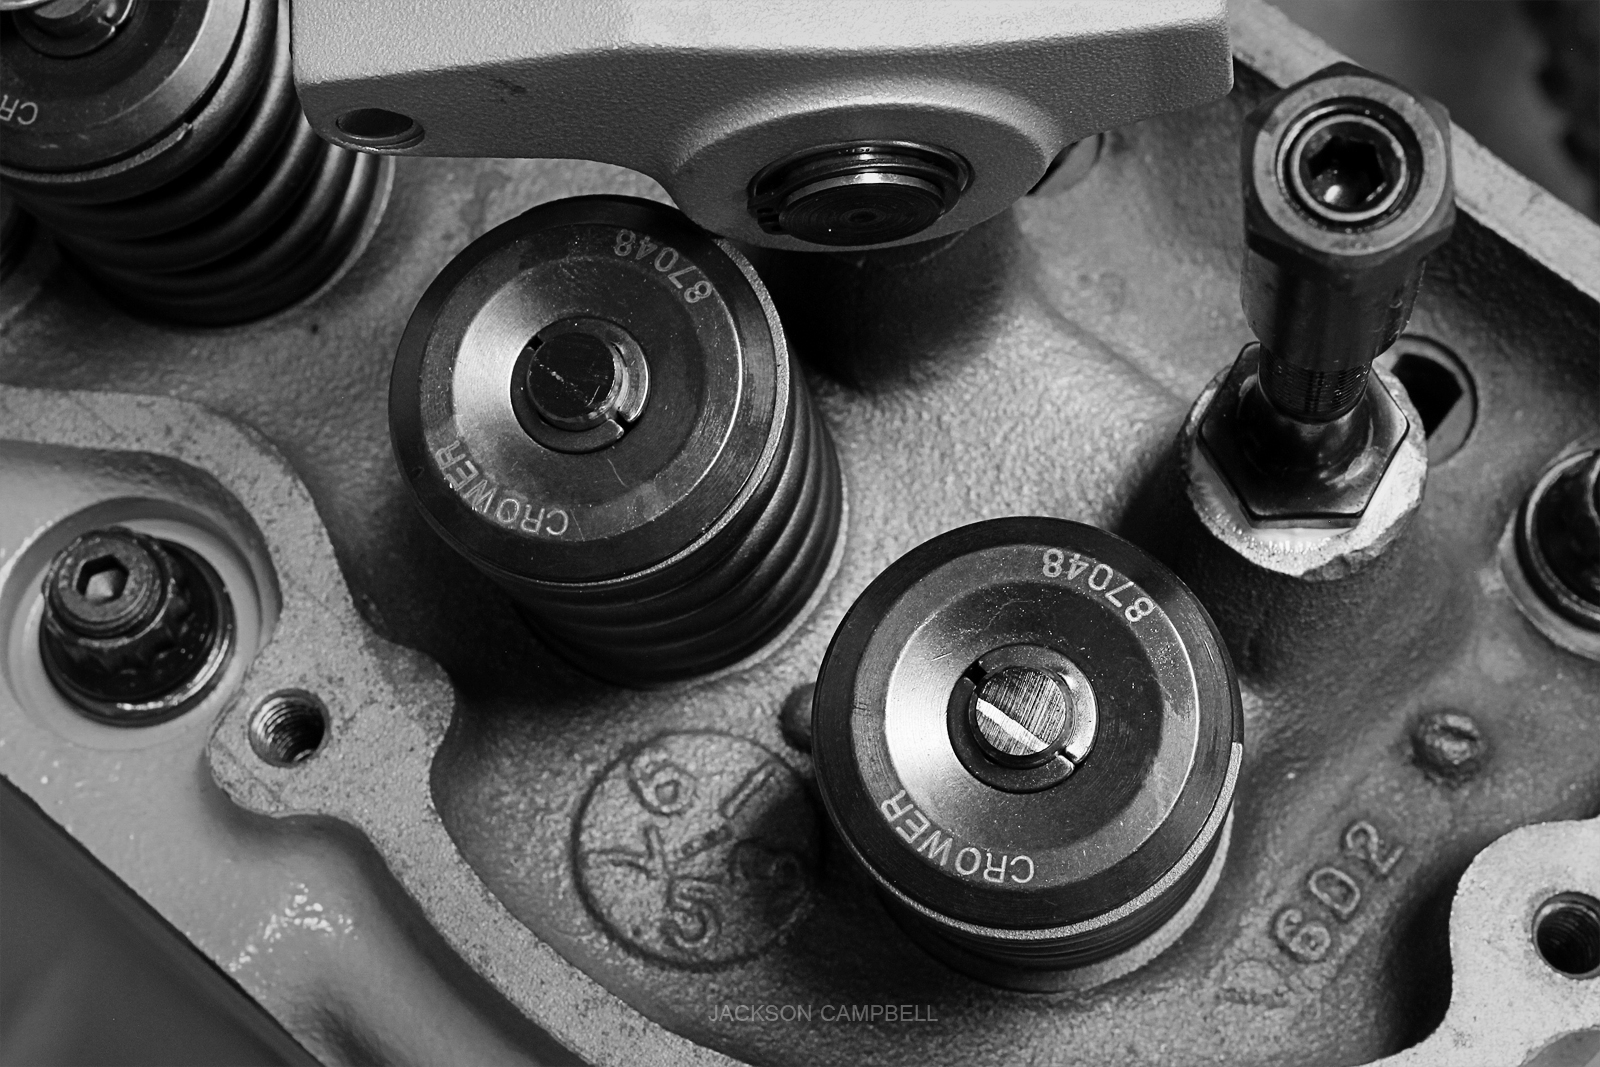
At this point I have to check to see what length pushrod I need to maintain correct valvetrain geometry. My valve length could be off, my Chevrolet 250-spec rockers may not be exactly the same geometry as a Ford 300, my head and block have both been milled, and my head gasket may not be factory thickness. It's worth checking. For that I bought a Comp Cams pushrod length checker. P/N 7706-1 is adjustable between 9.800" and 10.800" which is somewhere that I'll need to be. Fully seated it is at 9.800". There is an alignment line between the pushrod and the threaded end. Every full turn out is 0.050", so even if you don't have a caliper that large you still know what length you need. Pretty cool.
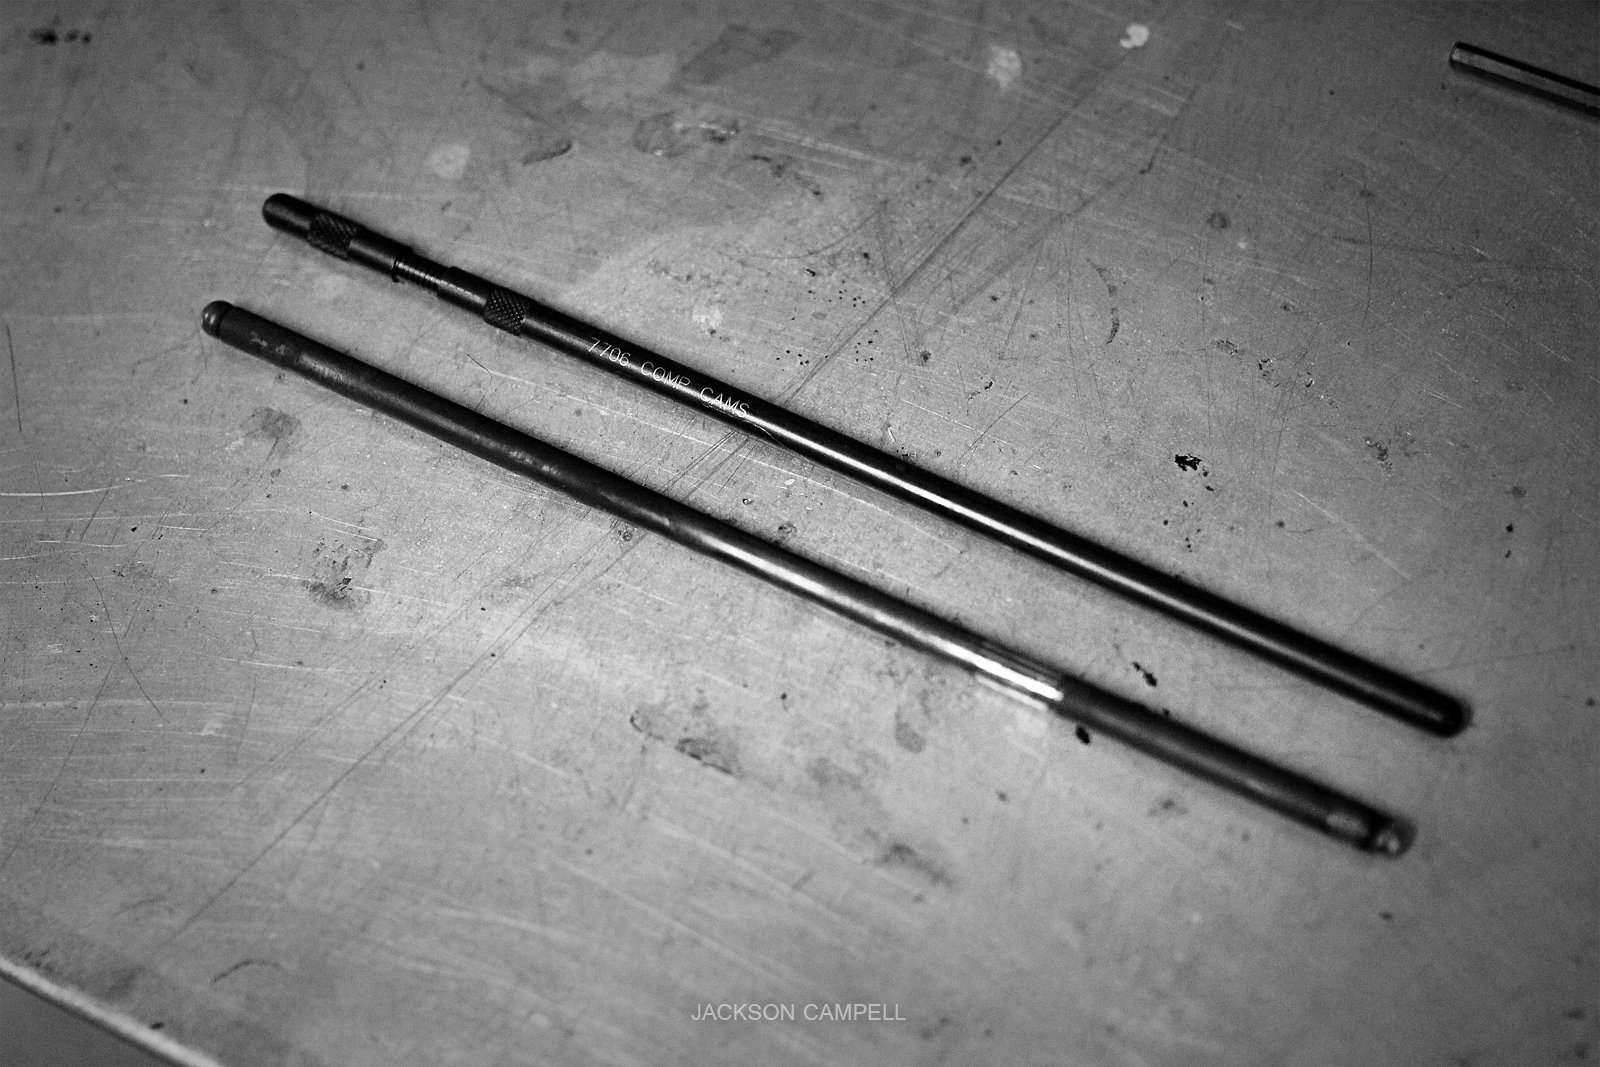
I figured I would start by running my factory 10.136" pushrod as a baseline. Simply slip it in and make sure it's seated in the lifter.

Sharpie the valve stem.
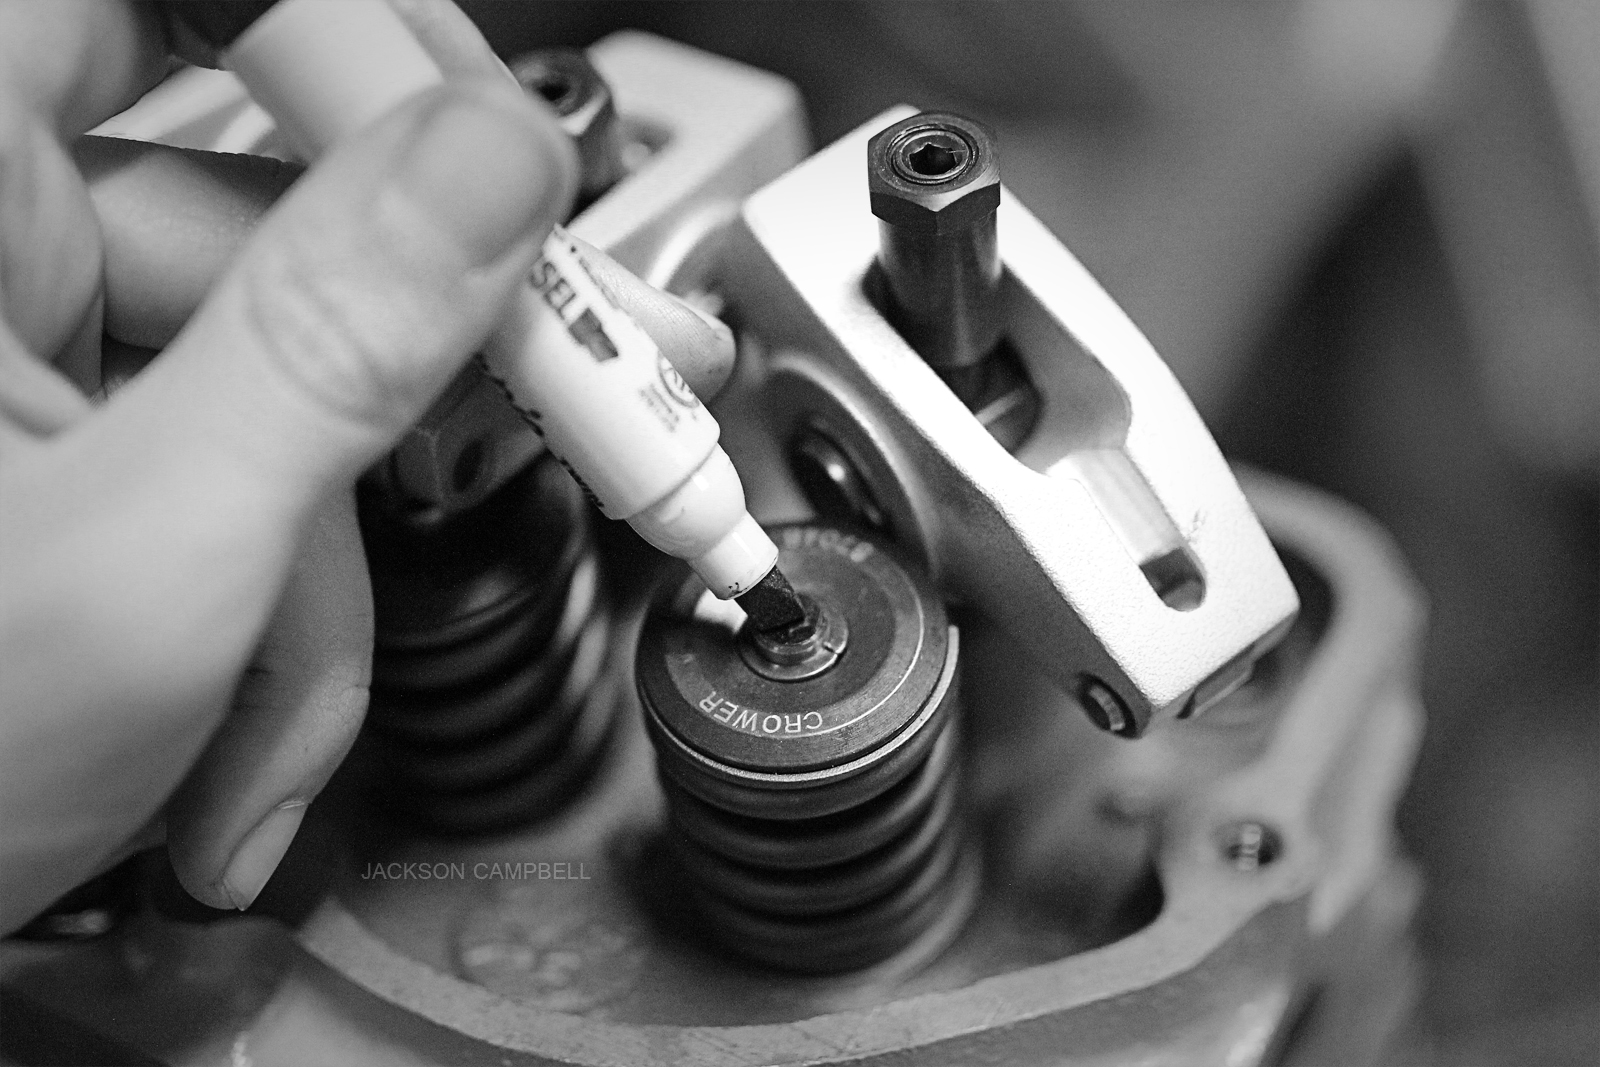
Tighten down the rocker. Finger tight is more than enough. Tightening the center set screw is not necessary but it doesn't hurt either.
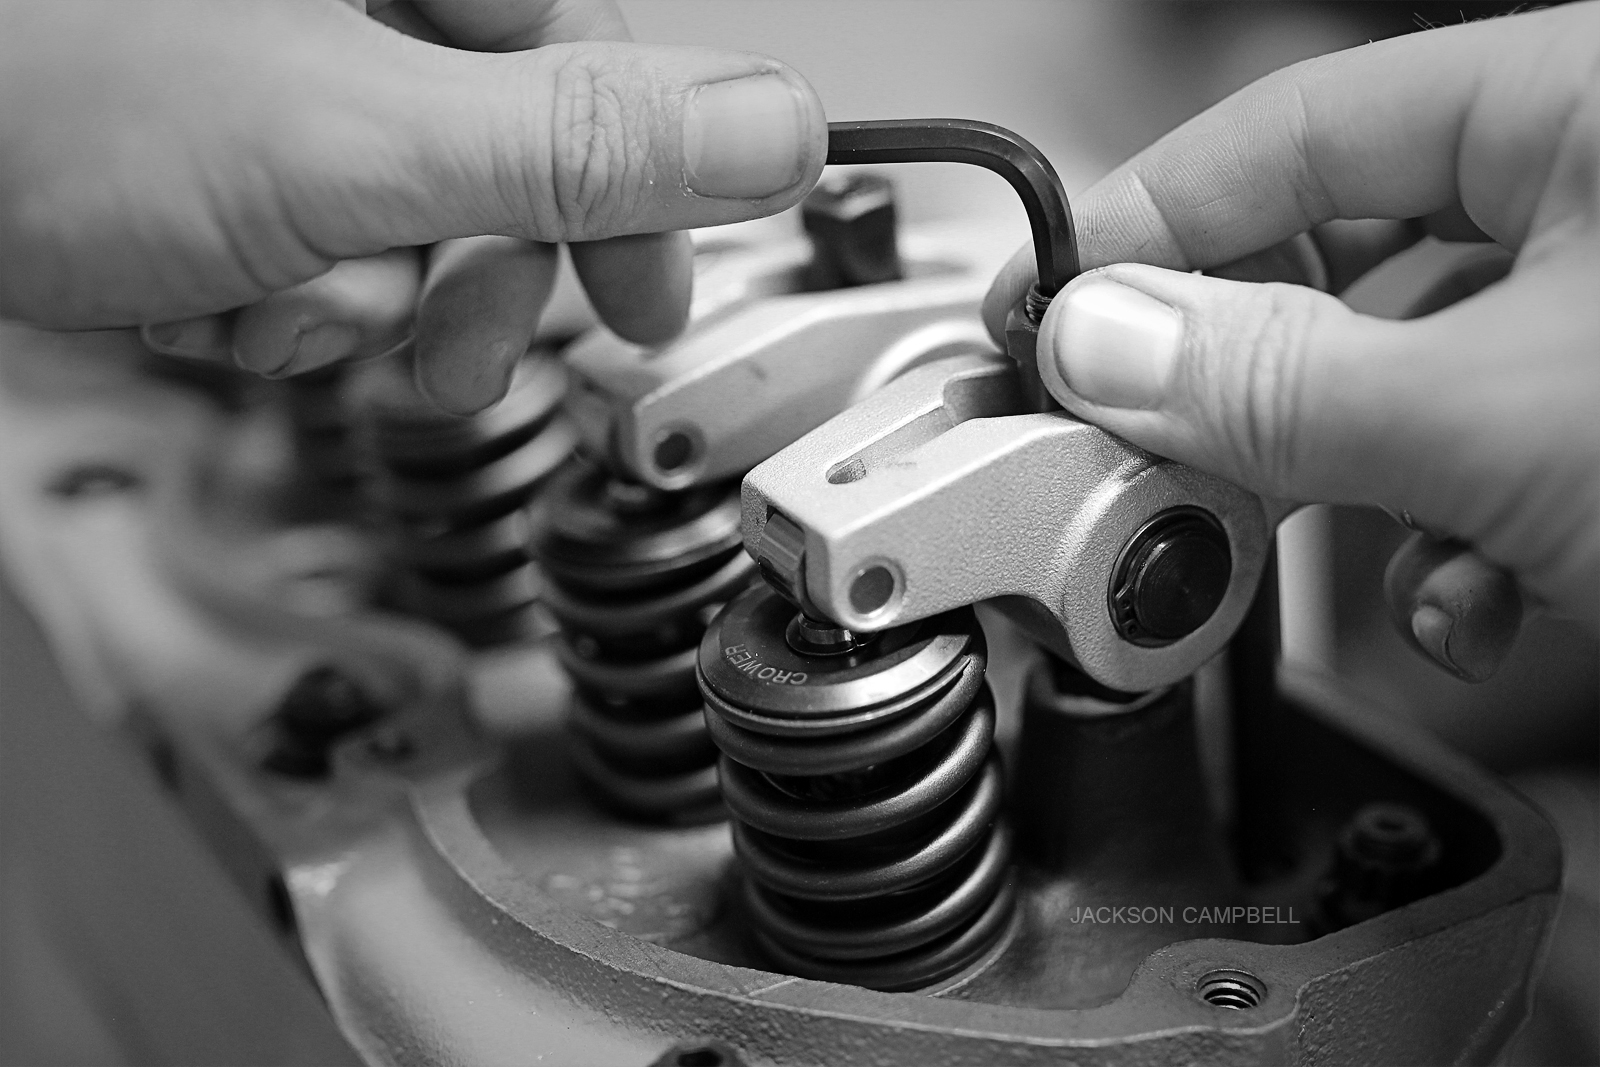
With the rocker tight, the roller ball should rest on the valve stem in the center, slightly inward. As the valve opens, the roller ball will move outward.
Remove the rocker and you will see the wear pattern. You want it as centered as possible, and Comp recommends keeping the width under 0.080" if possible and if it must be offset, have it inward. I know it's hard to see in this photo but it meets that criteria.
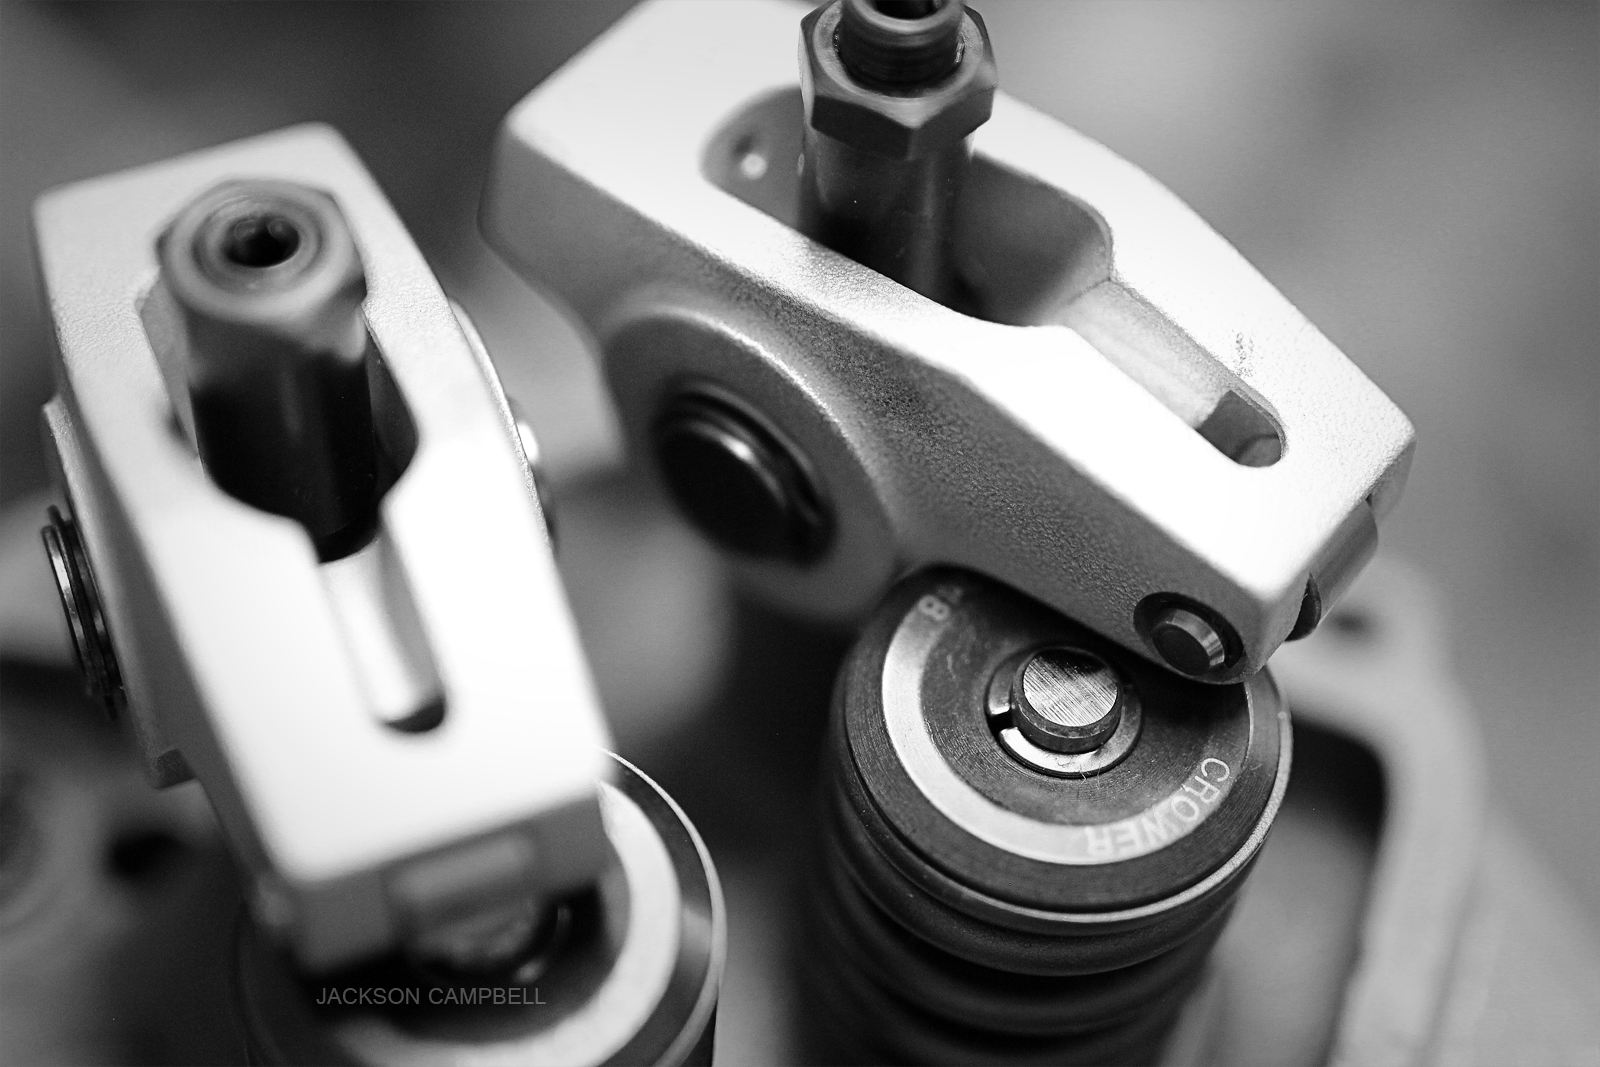
Repeat on intake valve. This one is offset slightly inward.
I'm going to do some more fiddling around when it's not 4:30AM, but I think I may be able to get away with a stock length pushrod. I will not be using my stock pushrods though as I want a one-piece seamless pushrod of at least .080" wall thickness. This may mean ordering custom, but it's worth the guarantee against valve deflection.
So here's the long block. Nothing new, really, except for the gasket.
It felt great making progress on this thing and it's put me back into the black and white vibe I had going on when I first started this thread, so I'm going to take the liberty and do just that!
At this point I have to check to see what length pushrod I need to maintain correct valvetrain geometry. My valve length could be off, my Chevrolet 250-spec rockers may not be exactly the same geometry as a Ford 300, my head and block have both been milled, and my head gasket may not be factory thickness. It's worth checking. For that I bought a Comp Cams pushrod length checker. P/N 7706-1 is adjustable between 9.800" and 10.800" which is somewhere that I'll need to be. Fully seated it is at 9.800". There is an alignment line between the pushrod and the threaded end. Every full turn out is 0.050", so even if you don't have a caliper that large you still know what length you need. Pretty cool.
I figured I would start by running my factory 10.136" pushrod as a baseline. Simply slip it in and make sure it's seated in the lifter.
Sharpie the valve stem.
Tighten down the rocker. Finger tight is more than enough. Tightening the center set screw is not necessary but it doesn't hurt either.
With the rocker tight, the roller ball should rest on the valve stem in the center, slightly inward. As the valve opens, the roller ball will move outward.
Remove the rocker and you will see the wear pattern. You want it as centered as possible, and Comp recommends keeping the width under 0.080" if possible and if it must be offset, have it inward. I know it's hard to see in this photo but it meets that criteria.
Repeat on intake valve. This one is offset slightly inward.
I'm going to do some more fiddling around when it's not 4:30AM, but I think I may be able to get away with a stock length pushrod. I will not be using my stock pushrods though as I want a one-piece seamless pushrod of at least .080" wall thickness. This may mean ordering custom, but it's worth the guarantee against valve deflection.
#1313
07-31-2016, 01:22 PM
#1314
07-31-2016, 03:56 PM
Every magazine article I've read said to do it hand tight but I suppose it won't hurt to torque it down fully and check. I'm going to be playing around with it a lot to confirm my confirmations before I order any pushrods. Probably have to get custom. I don't want to order twice.
#1315
07-31-2016, 04:52 PM
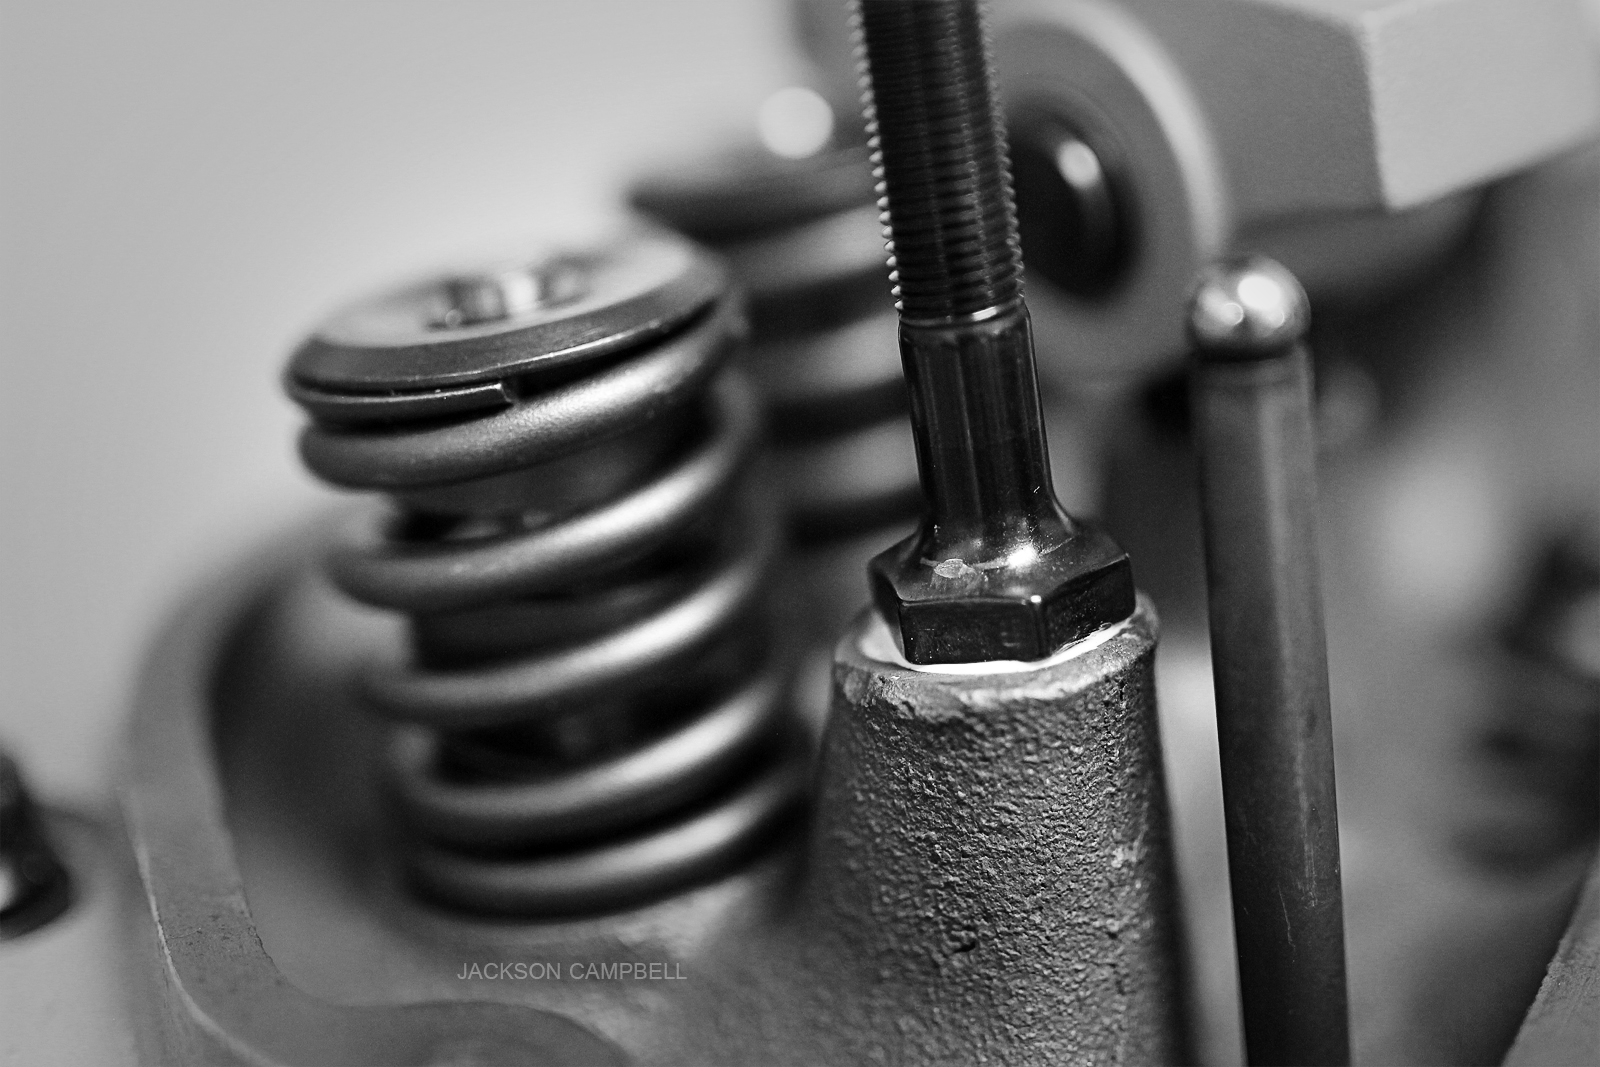
Good thing I checked! Thanks for making me want to torque down the rocker. There was physical contact between the rocker and the stud. I'll see if I can get away with a longer pushrod. Otherwise I'll need to mill down the stud boss, which means new head gasket and new head studs.  At least I found out now rather than later.
Above you can see the contact which is evidenced below in the nick on the black oxide finish on both sides of the stud.
At least I found out now rather than later.Above you can see the contact which is evidenced below in the nick on the black oxide finish on both sides of the stud.
#1316
07-31-2016, 05:23 PM


Trozei,s 69 F100 Build Thread
your truck looks very cool. about your window tint problem where i live in ARK. the driver,s and pass. windows can have tint on them but not really very dark. the other windows can be much darker. However there is a county police car running around town with ALL of the windows tinted so dark you cannot see in. yes that even means the front windshield. what are they hiding.?
#1317
07-31-2016, 05:25 PM
Trozie, as another method of checking with hydraulic lifters, you can use "checking springs". They are just a light weight spring to prevent your hydraulic lifter from collapsing, aiding in a correct reading.
I know with most hydraulic lifters, they can be temporarily converted to a solid lifter to use when checking PR length if you don't have checking springs.
I'll spare you a lot of jibberish from myself and recommend doing a quick search for "pushrod checking springs", and "converting hydraulic lifter to solid"
Hope it helps and hope you're enjoying your weekend.
#1319
07-31-2016, 08:40 PM
Okay so I altered my method. Upon doing more research I remembered having been told that geometry is critical to valvetrain fluidity and wear properties, with ideal valvetrain geometry being having the rocker arm perpendicular to the valve stem at half lift. The common train of thought, and the one I had been practicing earlier, is that pushrod length determines valvetrain geometry when in fact it's the other way around. Valvetrain geometry determines pushrod length.
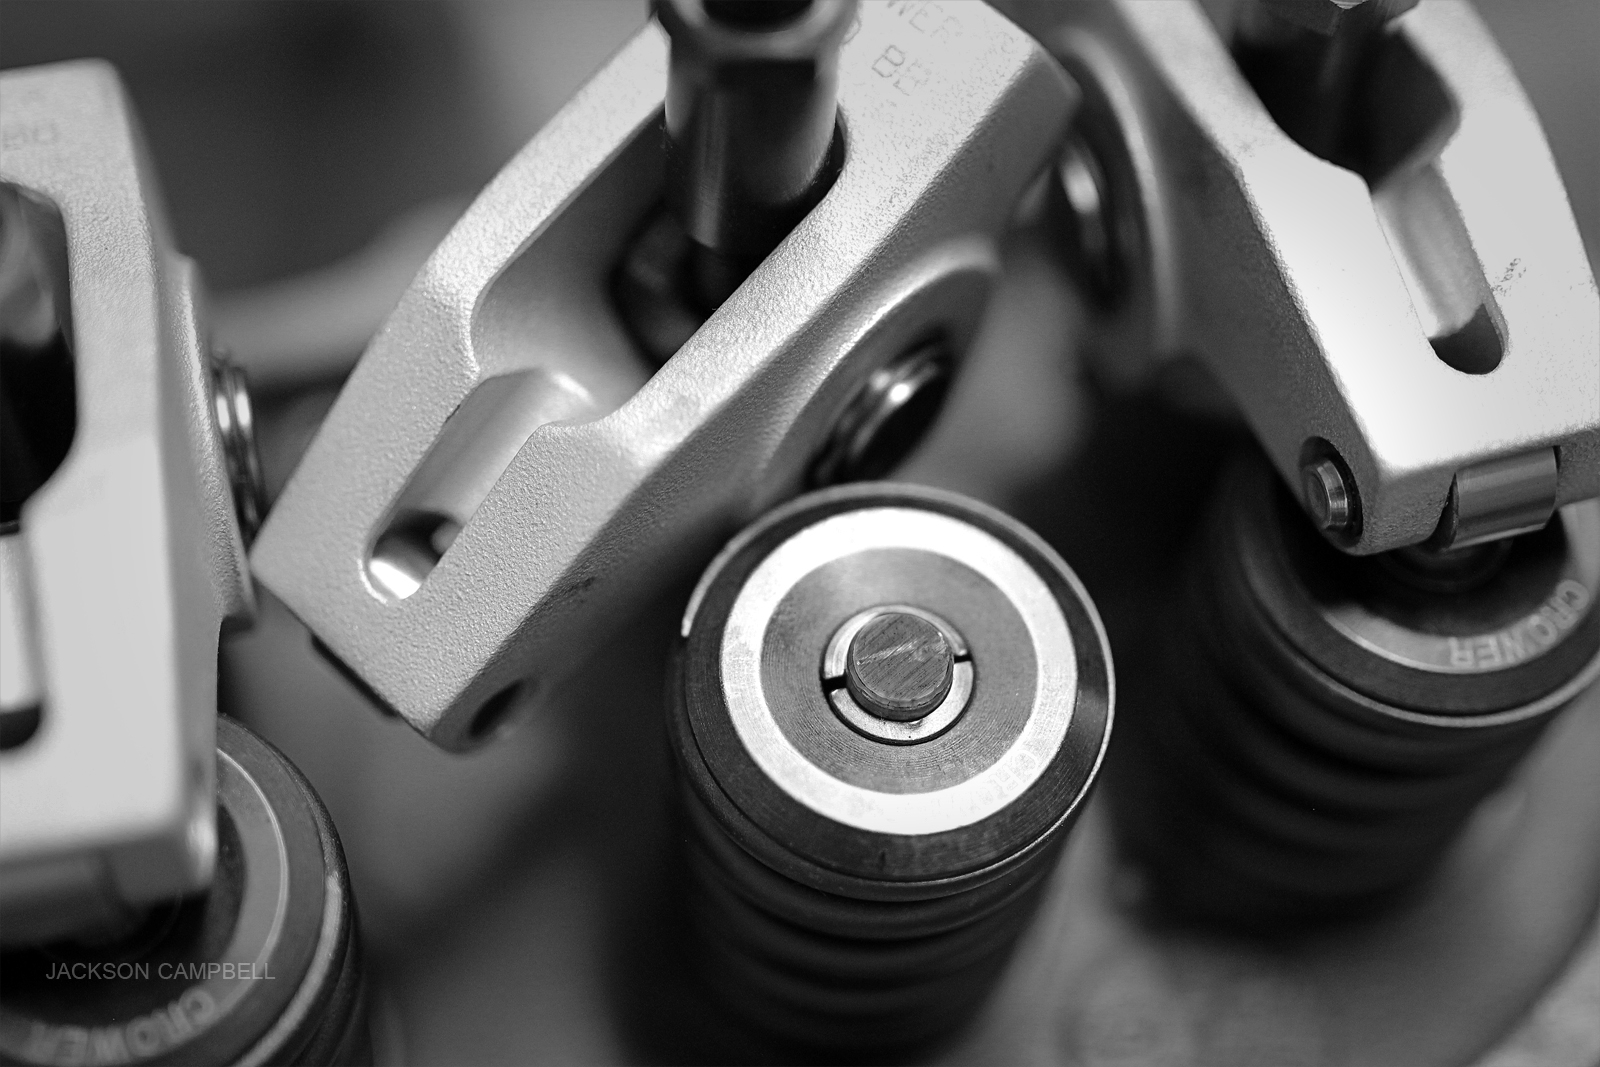
To attain this, I started by drawing a line between the center point of the roller tip and the center point of the trunnion. I discovered that it's rather difficult to draw a straight line on a rocker, so my line is crooked. Instead, I marked the center of the roller tip. The center of the trunnion already has a center point machined into it. Knowing that the top of the valve retainer is perpendicular to the valve stem, I placed an allen key along the retainer and used it as a reference against the rocker. Lifting the rocker up at the rear where the pushrod sits, I tightened down the lock nut until my rocker arm was perpendicular.
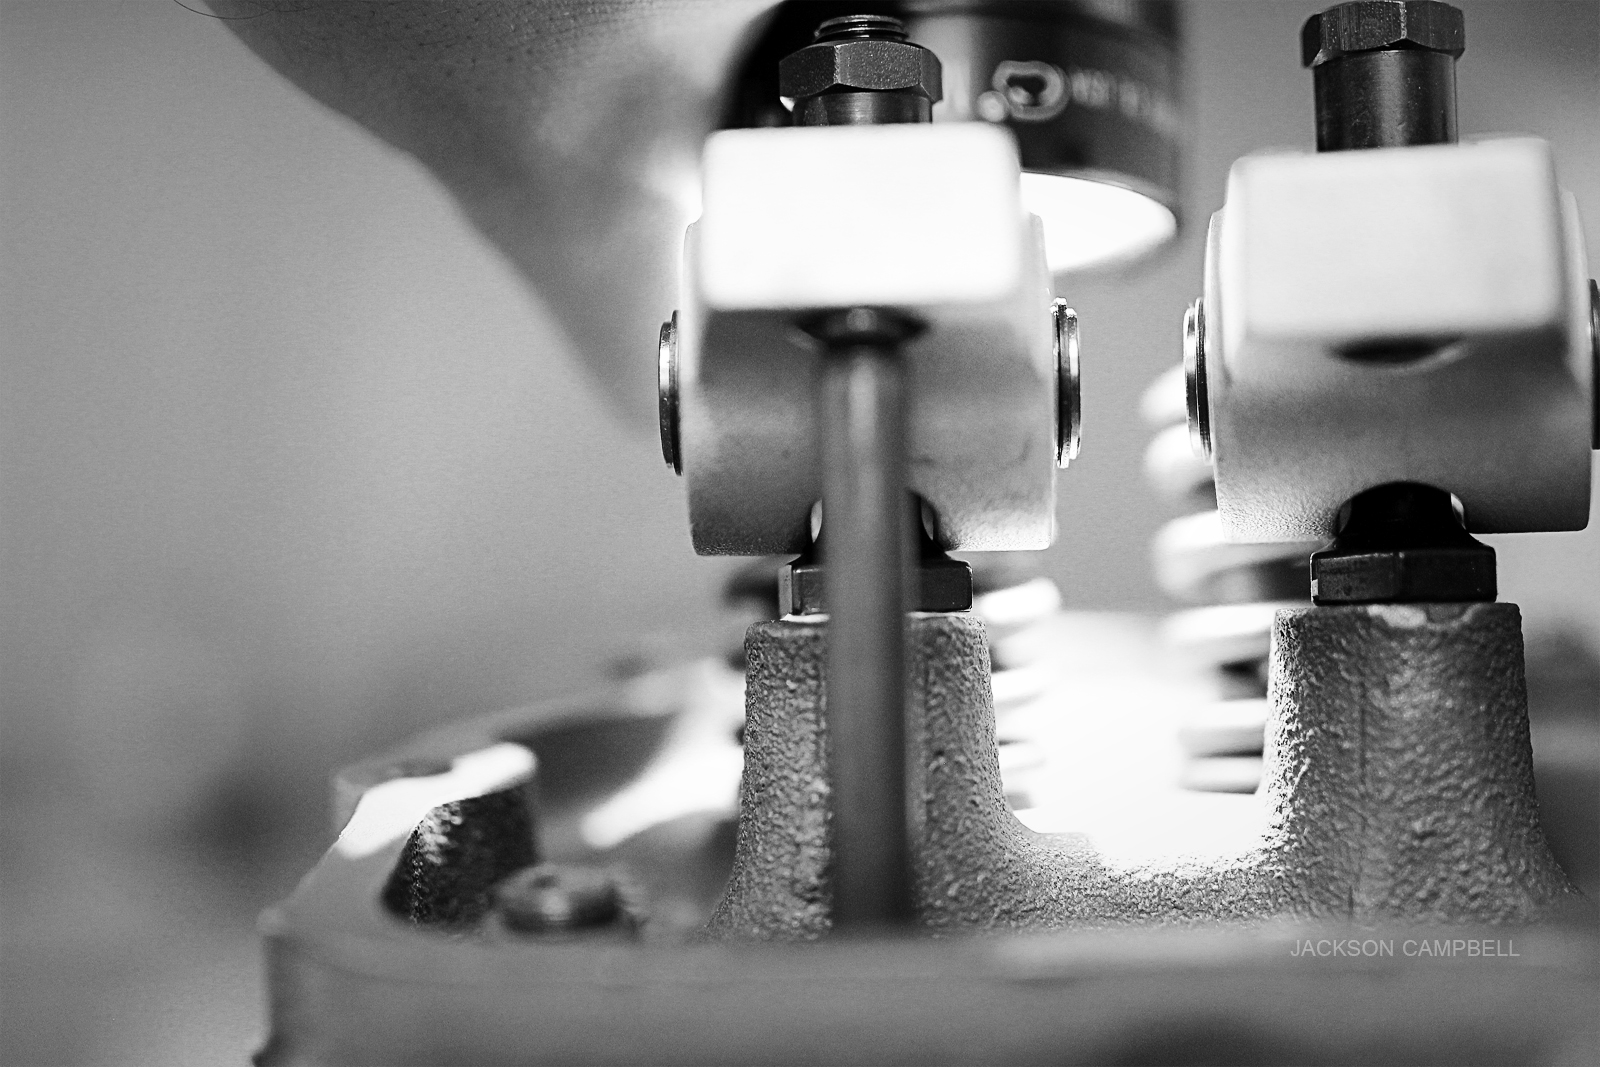
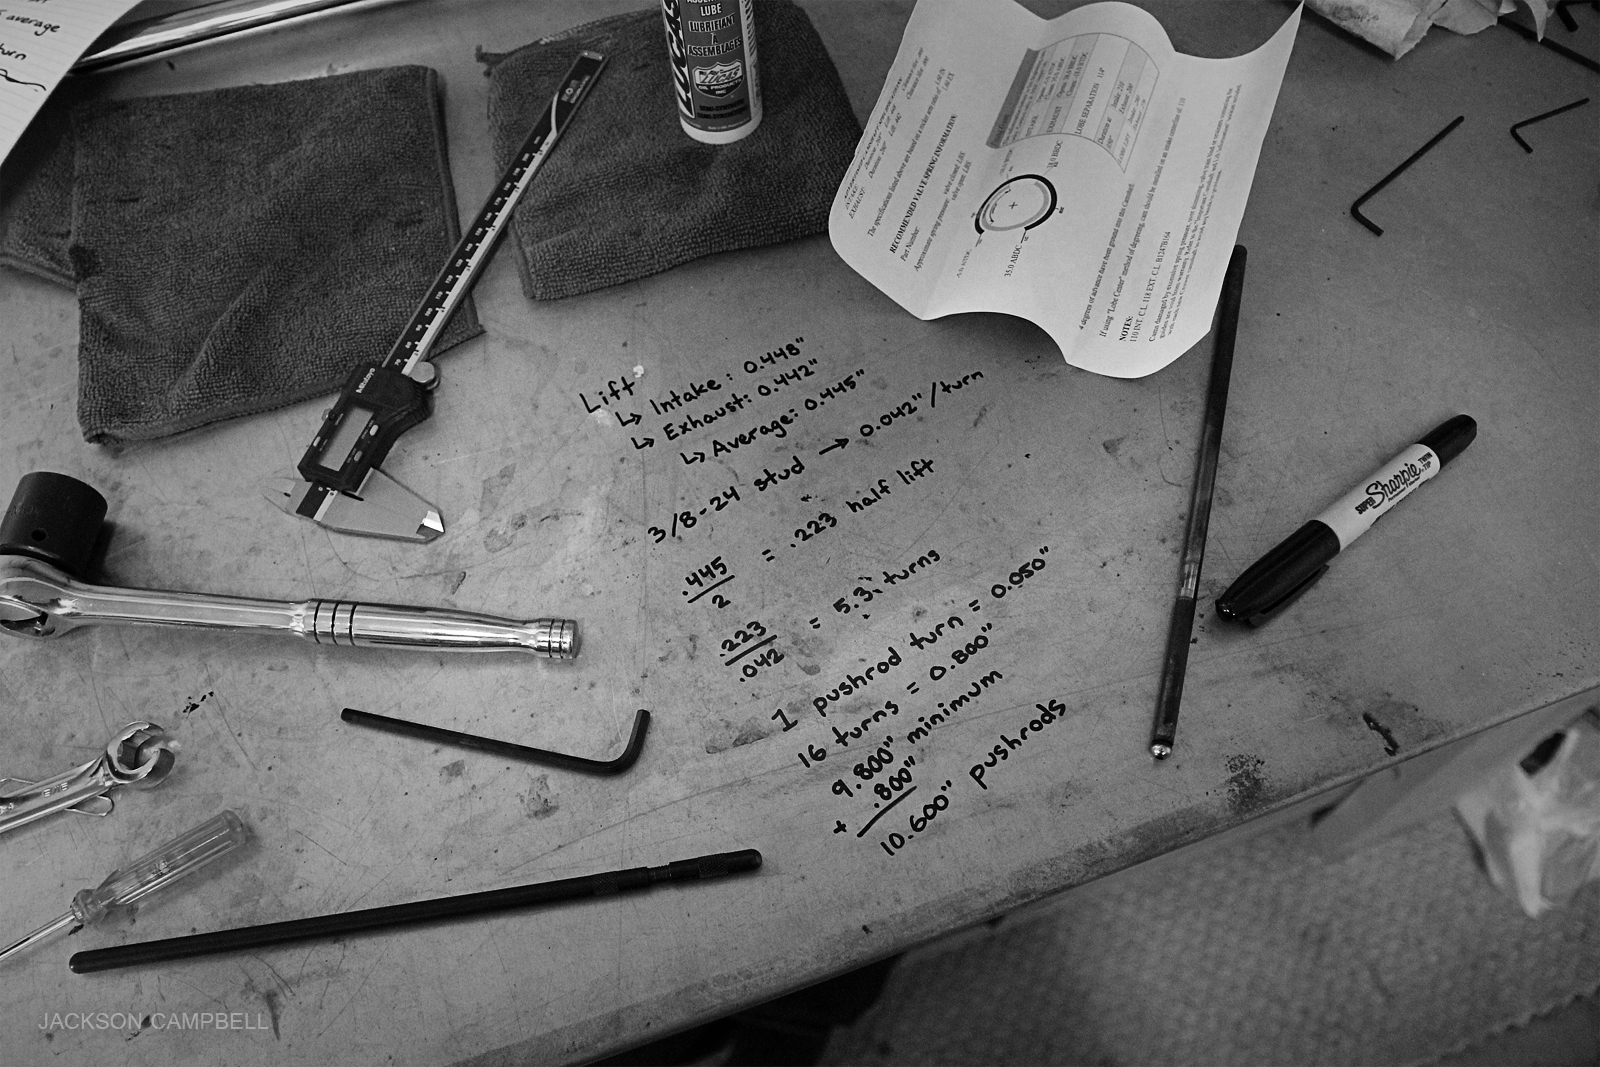
I have 3/8-24 studs, so every complete turn represents 0.042". My gross lift is .448" and 0.442". Seeing that they are only 0.006" apart, I averaged them to 0.445". Half lift would then be 0.223". To lower my rocker at the trunnion 0.223", I turned the lock nut 5.3 turns. At half lift, my rocker will now be 90 degrees to the valve stem. I then adjusted my pushrod tool to zero lash, removed the rocker, and measured. My pushrod tool is adjustable between 9.800" and 10.800". It was 16 turns out, meaning I need 10.600" pushrods. You can see in my photo that the amount that the rocker shifts along the valve stem is minimal. I'd actually erased the sharpie along the top of the one valve stem prior to the photo, so I quickly drew it back on kind of wear it was, but the other valve I did not touch and you can see how small the wear line is. Both valves showed less than 0.040" shift, which is great. A narrow line is said to be more important than having a perfectly centered line, as it results in less lateral movement and therefore less wear on the valvetrain. The only way to get my line centered while maintaining this geometry would be to use a different rocker arm.

To attain this, I started by drawing a line between the center point of the roller tip and the center point of the trunnion. I discovered that it's rather difficult to draw a straight line on a rocker, so my line is crooked. Instead, I marked the center of the roller tip. The center of the trunnion already has a center point machined into it. Knowing that the top of the valve retainer is perpendicular to the valve stem, I placed an allen key along the retainer and used it as a reference against the rocker. Lifting the rocker up at the rear where the pushrod sits, I tightened down the lock nut until my rocker arm was perpendicular.
I have 3/8-24 studs, so every complete turn represents 0.042". My gross lift is .448" and 0.442". Seeing that they are only 0.006" apart, I averaged them to 0.445". Half lift would then be 0.223". To lower my rocker at the trunnion 0.223", I turned the lock nut 5.3 turns. At half lift, my rocker will now be 90 degrees to the valve stem. I then adjusted my pushrod tool to zero lash, removed the rocker, and measured. My pushrod tool is adjustable between 9.800" and 10.800". It was 16 turns out, meaning I need 10.600" pushrods. You can see in my photo that the amount that the rocker shifts along the valve stem is minimal. I'd actually erased the sharpie along the top of the one valve stem prior to the photo, so I quickly drew it back on kind of wear it was, but the other valve I did not touch and you can see how small the wear line is. Both valves showed less than 0.040" shift, which is great. A narrow line is said to be more important than having a perfectly centered line, as it results in less lateral movement and therefore less wear on the valvetrain. The only way to get my line centered while maintaining this geometry would be to use a different rocker arm.