86 f250 running issues, rebuilding carb and replacing vacuum lines
#1
 02-01-2014, 01:32 PM


Join Date: Feb 2014
Location: San Antonio
Posts: 40
Likes: 0
Received 0 Likes
on
0 Posts
86 f250 running issues, rebuilding carb and replacing vacuum lines
hello all first time poster. apologize for the novella but knowledge is power. 
i bought a 1986 f250 for hauling materials that won't fit in my 50mpg+ daily driver putt putt. it supposedly has 57k miles (might be true, it pretty good shape for almost 30 years old) but it also has issues (most of the normal ones).
351w ho 4bbl, c6 auto
the history:
when i went to look at the truck owner couldn't get it started. it would turn over and try to catch but wouldn't. he had replaced the fuel pump, wires, plugs, cap and rotor quite recently. he also said it had been sitting for awhile but ran fine before that. second fuel tank was sitting in bed.
he was originally asking $1100 but said since he couldn't get it started and i had worked hard on getting it started he said he'd cut me a break. we settled on $550. he yanked the battery at the last second but hey for $550 i'd let it slide.
the first fix
$70 for a tow and $80 for a battery later i got it started. it ran rough and backfired. hooked up a unplugged wire or two, couple popped vacuum lines, and a hose on the back of the carb. it ran pretty darn good (80%), no more backfiring. Firing order was already correct and I only had to barely move timing (one, possibly two degrees can't recall exactly). Everything was fine until one night when i swung a corner fast and it died.
couldn't get it started again so had it towed to the house. hilter overbearing a**holes, err harass the owners association, err home owners association gave me grieve about it being on the street with an expired registration so i had to attack it. i knew it needed a carb rebuild as i could see it leaking and the oil reeked of gas.
the second fix
i've never been that good at diagnosing, didn't have the time because of the hoa, and since most of the components were almost 30 years old, what the heck. especially since there was a buzzing when cranking coming from behind the dash, to the left.
i began by going through the electrical because i knew i had air, gas (flooded when cranking it a long time). i went about replacing the common problems with the electrical components.
the solenoid was smoking after cranking for a bit so replaced that. knew it wouldn't make a difference but no fires please. replaced Ignition switch, no difference. pulled connector plugs on ignition module. good grief how did this thing ever start? so much green it looks like spring!

replaced it, truck started but ran like absolute crap but enough to get it into the driveway. will pop the terminals out of receptacle and clean the whole mess later.
grey and white smoke out exhaust man hope it's not a head gasket. doesn't look like it: no oil in coolant, no water in oil. didn't do the hc gasses causing the radiator to bubble over test because can't keep it running decently.
as i'm going through all this i see evidence that someone else has been here before so it's been an issue for awhile it seems.
the current fix
i can hear a vacuum leak when i press on the brake. all vacuum lines are getting replaced.
time to rebuild the carb! first time ever really touching a carb (besides replacing the air filter) but this site has been a wonderful resource.
bought the genuine holley part #3-3146 4180c rebuild kit per this post
https://www.ford-trucks.com/forums/1...l#post11097348
following the instructions below as well as holley's instructions included with the kit
https://www.ford-trucks.com/forums/1...arburetor.html
http://www.holley.com/data/Products/...9R10060rev.pdf
so i've done a "little" bit of research and call myself a reformed perfectionist. so forgive me if some of the questions are a bit picky but a firm believer in an ounce of prevention is worth a pound of cure!
i don't assume anything after what i have ran across with this truck so far. Lol. this includes the two (front only) idle speed plugs being cut underneath and gutted so they can be accessed and an orangle squilly paint line indicative of a junkyard part on the carb.
q1
i've read quite a few places on here that a single backfire can blow the power valve. the below post talks about "power valve protection". what is that?
https://www.ford-trucks.com/forums/6...ml#post5253854
q2
what should i use to lube the o-rings on the transfer tube(s)? petroleum jelly? turbine oil?
https://www.ford-trucks.com/forums/1...l#post11097378
https://www.ford-trucks.com/forums/1...l#post11097357
q3
i am replacing the in carb brass filter mentioned in this post
https://www.ford-trucks.com/forums/1...l#post11096664
but how do i go about easily adding an additional inline filter to catch all the crap that is going to try to violate my freshly rebuilt carb? there's only one fuel inlet line and it's metal.
q4
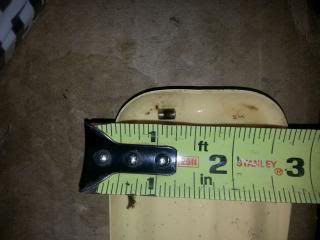
i bent the flat secondary metering plate (aka Plate - Metering Body, item 33 in the above holley instructions) when removing as the gasket was stuck. i smoothed it out as best as i can. is this going to be an issue?
as long as the carb is off i figured change all the stuff that is now easier to get to. This includes the vcg (valve cover gaskets) as they are soaked in oil, egr gasket, all vacuum hose (as some of the colored ones are already breaking), exhaust gaskets and possibly fuel pump. read on here about using harborfreight color coded heat shrink on plain black vacuum lines.
q5
a little post fell out of the main body when i was cleaning it.
i made sure i had the little ball mentioned below, but where did the post come from? below the ball?
https://www.ford-trucks.com/forums/1...l#post12777832
q6
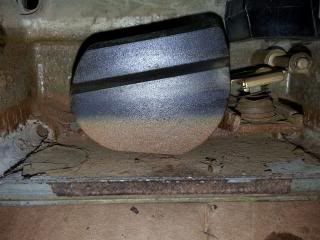
why all this scale in the secondary bowl? was that water or gas? weatherstripping at firewall/hood junction is shot and water regularly sits on top of air cleaner and inside of air cleaner is rusted as well.
q7
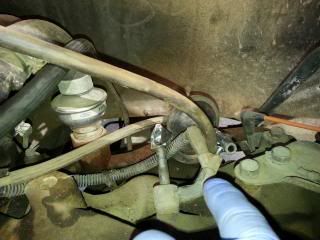
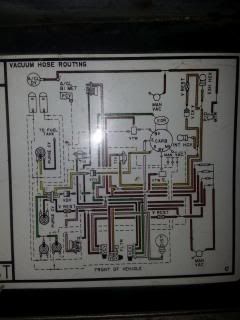
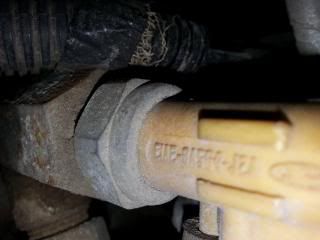
where does the broken y/tee on the right go to? it comes off the rear of intake manifold. it looks like it might be the line that goes to the "p/d mtr" in the right rear of the diagram.
q8
grounding strap from firewall/hood had been twisted together with only a few strands holding it together. bought a new one to replace it. would that strap cause any of the running issues or is it only for the underhood light mounted to the hood?
q9
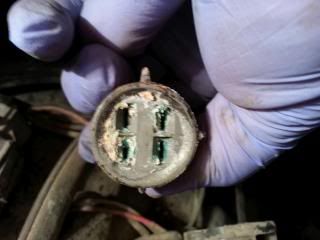
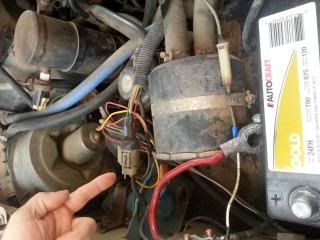
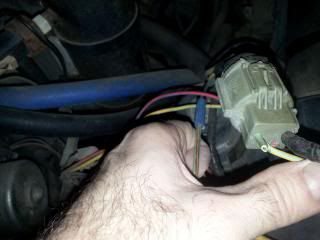
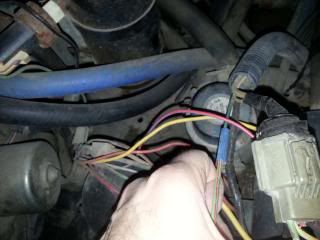
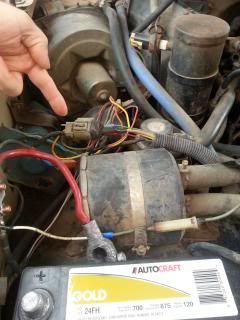
some cut wires. any ideas where they go and why they would bypass them? the plug has been taped so did they bypass just because of that? the green/red that was at bottom left of connector is spliced to green (blue splice by my index finger). blue/red that was at bottom right of connector is cut with a taped end, can't see where that goes at all.
q10 no longer an issue as i found there's a third pvs (gray and four port)
both of my ported vacuum switches are exactly the same e1ae-8a564-j2a (e1ae8a564j2a). is it correct to have two exactly the same? most seem to be two different colors. these are factory, with a letter by each port. i already bought one because it's inevitable one of those little nipples breaks off when replacing the hose.
q11
is there a way to clean the egr "externally" so i don't have to get new gaskets inside? or should i just rebuild it and get it over with?
Cowl seal fix ala Gary:
https://www.ford-trucks.com/forums/1...l#post12814641
MANY thanks,
dirm
i bought a 1986 f250 for hauling materials that won't fit in my 50mpg+ daily driver putt putt. it supposedly has 57k miles (might be true, it pretty good shape for almost 30 years old) but it also has issues (most of the normal ones).
351w ho 4bbl, c6 auto
the history:
when i went to look at the truck owner couldn't get it started. it would turn over and try to catch but wouldn't. he had replaced the fuel pump, wires, plugs, cap and rotor quite recently. he also said it had been sitting for awhile but ran fine before that. second fuel tank was sitting in bed.
he was originally asking $1100 but said since he couldn't get it started and i had worked hard on getting it started he said he'd cut me a break. we settled on $550. he yanked the battery at the last second but hey for $550 i'd let it slide.
the first fix
$70 for a tow and $80 for a battery later i got it started. it ran rough and backfired. hooked up a unplugged wire or two, couple popped vacuum lines, and a hose on the back of the carb. it ran pretty darn good (80%), no more backfiring. Firing order was already correct and I only had to barely move timing (one, possibly two degrees can't recall exactly). Everything was fine until one night when i swung a corner fast and it died.
couldn't get it started again so had it towed to the house. hilter overbearing a**holes, err harass the owners association, err home owners association gave me grieve about it being on the street with an expired registration so i had to attack it. i knew it needed a carb rebuild as i could see it leaking and the oil reeked of gas.
the second fix
i've never been that good at diagnosing, didn't have the time because of the hoa, and since most of the components were almost 30 years old, what the heck.
especially since there was a buzzing when cranking coming from behind the dash, to the left.i began by going through the electrical because i knew i had air, gas (flooded when cranking it a long time). i went about replacing the common problems with the electrical components.
the solenoid was smoking after cranking for a bit so replaced that. knew it wouldn't make a difference but no fires please. replaced Ignition switch, no difference. pulled connector plugs on ignition module. good grief how did this thing ever start? so much green it looks like spring!


replaced it, truck started but ran like absolute crap but enough to get it into the driveway. will pop the terminals out of receptacle and clean the whole mess later.
grey and white smoke out exhaust man hope it's not a head gasket. doesn't look like it: no oil in coolant, no water in oil. didn't do the hc gasses causing the radiator to bubble over test because can't keep it running decently.
as i'm going through all this i see evidence that someone else has been here before so it's been an issue for awhile it seems.
the current fix
i can hear a vacuum leak when i press on the brake. all vacuum lines are getting replaced.
time to rebuild the carb! first time ever really touching a carb (besides replacing the air filter) but this site has been a wonderful resource.
bought the genuine holley part #3-3146 4180c rebuild kit per this post
https://www.ford-trucks.com/forums/1...l#post11097348
following the instructions below as well as holley's instructions included with the kit
https://www.ford-trucks.com/forums/1...arburetor.html
http://www.holley.com/data/Products/...9R10060rev.pdf
so i've done a "little" bit of research and call myself a reformed perfectionist. so forgive me if some of the questions are a bit picky but a firm believer in an ounce of prevention is worth a pound of cure!
i don't assume anything after what i have ran across with this truck so far. Lol. this includes the two (front only) idle speed plugs being cut underneath and gutted so they can be accessed and an orangle squilly paint line indicative of a junkyard part on the carb.
q1
i've read quite a few places on here that a single backfire can blow the power valve. the below post talks about "power valve protection". what is that?
https://www.ford-trucks.com/forums/6...ml#post5253854
q2
what should i use to lube the o-rings on the transfer tube(s)? petroleum jelly? turbine oil?
https://www.ford-trucks.com/forums/1...l#post11097378
https://www.ford-trucks.com/forums/1...l#post11097357
q3
i am replacing the in carb brass filter mentioned in this post
https://www.ford-trucks.com/forums/1...l#post11096664
but how do i go about easily adding an additional inline filter to catch all the crap that is going to try to violate my freshly rebuilt carb? there's only one fuel inlet line and it's metal.
q4
i bent the flat secondary metering plate (aka Plate - Metering Body, item 33 in the above holley instructions) when removing as the gasket was stuck. i smoothed it out as best as i can. is this going to be an issue?
as long as the carb is off i figured change all the stuff that is now easier to get to. This includes the vcg (valve cover gaskets) as they are soaked in oil, egr gasket, all vacuum hose (as some of the colored ones are already breaking), exhaust gaskets and possibly fuel pump. read on here about using harborfreight color coded heat shrink on plain black vacuum lines.
q5
a little post fell out of the main body when i was cleaning it.
i made sure i had the little ball mentioned below, but where did the post come from? below the ball?
https://www.ford-trucks.com/forums/1...l#post12777832

q6
why all this scale in the secondary bowl? was that water or gas? weatherstripping at firewall/hood junction is shot and water regularly sits on top of air cleaner and inside of air cleaner is rusted as well.

q7
where does the broken y/tee on the right go to? it comes off the rear of intake manifold. it looks like it might be the line that goes to the "p/d mtr" in the right rear of the diagram.


q8
grounding strap from firewall/hood had been twisted together with only a few strands holding it together. bought a new one to replace it. would that strap cause any of the running issues or is it only for the underhood light mounted to the hood?
q9
some cut wires. any ideas where they go and why they would bypass them? the plug has been taped so did they bypass just because of that? the green/red that was at bottom left of connector is spliced to green (blue splice by my index finger). blue/red that was at bottom right of connector is cut with a taped end, can't see where that goes at all.


q10 no longer an issue as i found there's a third pvs (gray and four port)
both of my ported vacuum switches are exactly the same e1ae-8a564-j2a (e1ae8a564j2a). is it correct to have two exactly the same? most seem to be two different colors. these are factory, with a letter by each port. i already bought one because it's inevitable one of those little nipples breaks off when replacing the hose.

q11
is there a way to clean the egr "externally" so i don't have to get new gaskets inside? or should i just rebuild it and get it over with?
Cowl seal fix ala Gary:
https://www.ford-trucks.com/forums/1...l#post12814641
MANY thanks,
dirm
Last edited by DoesItReallyMatter?; 02-17-2014 at 08:56 PM. Reason: Added cowl seal link
#2
02-01-2014, 01:49 PM

The crude in the float bowls is rust coming from your old gas tank(s). I removed the brass carb filter on mine and installed an in-line filter as pictured, it will help reduce rust accumulation and offer better filtering. If the idle mixture plugs have been removed, adjust the primaries about 2 1/4 turns out and the secs 1 turn out ONLY.....trust me on this. Lube the transfer O-rings with dielectric grease.

#3
02-01-2014, 03:00 PM
Posting Legend
Holy Cow!! And I get grief for long posts! 
DIRM - For those of us that have ADD, or oldies like me, you are going to have to cut your posts down into bite-sized chunks. Yes, it'll take several of them but I can't get my head around all of that. Normally I would "quote" the other guy's post and work my way through each question, but yours is so long I can't do that given the fairly small window through which I see my post. So this time I'm going to copy/paste some of your questions from a second tab in my browser and try to address them. You'll probably have to ask the others again.
And, just for the record I'm, obviously, THE guy that hates Holleys. In addition, I'm usually a stickler for reasonable punctuation as it really helps me read what's written. Seems to me that the guy asking the questions ought to spend some time making it easy for me to read and understand w/o having to ask questions. So I usually bypass threads/posts that I can't easily read since there are lots of people wanting my time. But, in this case your text wasn't in the usual humongous single paragraph so I was able to read it - sorta.
q1
i've read quite a few places on here that a single backfire can blow the power valve. the below post talks about "power valve protection". what is that? That's one of the many curses of Holley. If Lucas was the Prince of Darkness then Holley is the Prince of Wetness - with some of the leaks being external and some internal. The backfire protection is a check valve that fixes a Holley design flaw that all of the Holleys on these trucks have.
q2
what should i use to lube the o-rings on the transfer tube(s)? petroleum jelly? turbine oil? Beetle answered that, but I've had good luck with just petroleum jelly.
q3
i am replacing the in carb brass filter mentioned in this post but how do i go about easily adding an additional inline filter to catch all the crap that is going to try to violate my freshly rebuilt carb? there's only one fuel inlet line and it's metal. The brass filter is almost good enough to strain out gnats, but little else. Again, Beetle showed how he did it. But I run two of those clear filters - one ahead of the fuel pump and one after.
q4
i bent the flat secondary metering plate (aka Plate - Metering Body, item 32 in the above holley instructions) when removing as the gasket was stuck. i smoothed it out as best as i can. is this going to be an issue? Yes. I haven't looked at the instructions, but the metering plate MUST seal or you have problems. You need to check the plate with a straightedge and see if any light comes through anywhere. If so, it has to be fixed or replaced.
q5
a little post fell out of the main body when i was cleaning it.
i made sure i had the little ball mentioned below, but where did the post come from? below the ball? That's probably the weight that holds the check ball down. It goes above the ball.
q6
why all this scale in the secondary bowl? was that water or gas? Looks like junk from an old tank that sat in an unused secondary bowl. Unless you get into the secondaries the same gas sits in there forever.
q6.5
weatherstripping at firewall/hood junction is shot and water regularly sits on top of air cleaner and inside of air cleaner is rusted as well. Go to Lowes or Home Despot and get the garage door rubber seal to replace the cowl seal. You can search for that and several of us have done it. Look in Dad's Truck Build for pictures of the package and several shots of how I installed it.
q7 Dunno
q8
grounding strap from firewall/hood had been twisted together with only a few strands holding it together. bought a new one to replace it. would that strap cause any of the running issues or is it only for the underhood light mounted to the hood? Just for the under hood light
q9
some cut wires. any ideas where they go and why they would bypass them? the plug has been taped so did they bypass just because of that? the green/red that was at bottom left of connector is spliced to green (blue splice by my index finger). blue/red that was at bottom right of connector is cut with a taped end, can't see where that goes at all. I can't really tell which connector that is. Can you take a wider picture?
q10 Dunno
q11 Dunno
#4
02-01-2014, 03:21 PM
Join Date: Feb 2014
Location: San Antonio
Posts: 40
Likes: 0
Received 0 Likes
on
0 Posts
post 1 of 7
np gary, thanks for the advice. some people like it all in one post so that's the way i did it.
i'll also post it in bite size chunks.
hello all first time poster. apologize for the novella but knowledge is power.
i bought a 1986 f250 for hauling materials that won't fit in my 50mpg+ daily driver putt putt. it supposedly has 57k miles (might be true, it pretty good shape for almost 30 years old) but it also has issues (most of the normal ones).
351w ho 4bbl, c6 auto
the history:
when i went to look at the truck owner couldn't get it started. it would turn over and try to catch but wouldn't. he had replaced the fuel pump, wires, plugs, cap and rotor quite recently. he also said it had been sitting for awhile but ran fine before that. second fuel tank was sitting in bed.
he was originally asking $1100 but said since he couldn't get it started and i had worked hard on getting it started he said he'd cut me a break. we settled on $550. he yanked the battery at the last second but hey for $550 i'd let it slide.
the first fix
$70 for a tow and $80 for a battery later i got it started. it ran rough and backfired. hooked up a unplugged wire or two, couple popped vacuum lines, and a hose on the back of the carb. it ran pretty darn good (80%), no more backfiring and everything was fine until one night when i swung a corner fast and it died.
couldn't get it started again so had it towed to the house. hilter overbearing a**holes, err harass the owners association, err home owners association gave me grieve about it being on the street with an expired registration so i had to attack it. i knew it needed a carb rebuild as i could see it leaking and the oil reeked of gas.
#5
02-01-2014, 03:25 PM
Join Date: Feb 2014
Location: San Antonio
Posts: 40
Likes: 0
Received 0 Likes
on
0 Posts
post 2 of 7
the second fix
i've never been that good at diagnosing, didn't have the time because of the hoa, and since most of the components were almost 30 years old, what the heck. especially since there was a buzzing when cranking coming from behind the dash, to the left.
i began by going through the electrical because i knew i had air, gas (flooded when cranking it a long time). i went about replacing the common problems with the electrical components.
the solenoid was smoking after cranking for a bit so replaced that. knew it wouldn't make a difference but no fires please. replaced Ignition switch, no difference. pulled connector plugs on ignition module. good grief how did this thing ever start? so much green it looks like spring!
replaced it, truck started but ran like absolute crap but enough to get it into the driveway. will pop the terminals out of receptacle and clean the whole mess later.
grey and white smoke out exhaust man hope it's not a head gasket. doesn't look like it: no oil in coolant, no water in oil. didn't do the hc gasses causing the radiator to bubble over test because can't keep it running decently.
as i'm going through all this i see evidence that someone else has been here before so it's been an issue for awhile it seems.
the second fix
i've never been that good at diagnosing, didn't have the time because of the hoa, and since most of the components were almost 30 years old, what the heck.
especially since there was a buzzing when cranking coming from behind the dash, to the left.i began by going through the electrical because i knew i had air, gas (flooded when cranking it a long time). i went about replacing the common problems with the electrical components.
the solenoid was smoking after cranking for a bit so replaced that. knew it wouldn't make a difference but no fires please. replaced Ignition switch, no difference. pulled connector plugs on ignition module. good grief how did this thing ever start? so much green it looks like spring!
replaced it, truck started but ran like absolute crap but enough to get it into the driveway. will pop the terminals out of receptacle and clean the whole mess later.
grey and white smoke out exhaust man hope it's not a head gasket. doesn't look like it: no oil in coolant, no water in oil. didn't do the hc gasses causing the radiator to bubble over test because can't keep it running decently.
as i'm going through all this i see evidence that someone else has been here before so it's been an issue for awhile it seems.
#6
02-01-2014, 03:25 PM
Join Date: Feb 2014
Location: San Antonio
Posts: 40
Likes: 0
Received 0 Likes
on
0 Posts
post 3 of 7
the current fix
i can hear a vacuum leak when i press on the brake. all vacuum lines are getting replaced.
time to rebuild the carb! first time ever really touching a carb (besides replacing the air filter) but this site has been a wonderful resource.
bought the genuine holley part #3-3146 4180c rebuild kit per this post
https://www.ford-trucks.com/forums/1...l#post11097348
following the instructions below as well as holley's instructions included with the kit
https://www.ford-trucks.com/forums/1...arburetor.html
http://www.holley.com/data/Products/...9R10060rev.pdf
so i've done a "little" bit of research and call myself a reformed perfectionist. so forgive me if some of the questions are a bit picky but a firm believer in an ounce of prevention is worth a pound of cure!
#7
02-01-2014, 03:26 PM
Join Date: Feb 2014
Location: San Antonio
Posts: 40
Likes: 0
Received 0 Likes
on
0 Posts
post 4 of 7
i don't assume anything after what i have ran across with this truck so far. Lol. this includes the two (front only) idle speed plugs being gutted and an orangle squilly paint line indicative of a junkyard part on the carb.
q1
i've read quite a few places on here that a single backfire can blow the power valve. the below post talks about "power valve protection". what is that?
https://www.ford-trucks.com/forums/6...ml#post5253854
q2
what should i use to lube the o-rings on the transfer tube(s)? petroleum jelly? turbine oil?
https://www.ford-trucks.com/forums/1...l#post11097378
https://www.ford-trucks.com/forums/1...l#post11097357
q3
i am replacing the in carb brass filter mentioned in this post
https://www.ford-trucks.com/forums/1...l#post11096664
but how do i go about easily adding an additional inline filter to catch all the crap that is going to try to violate my freshly rebuilt carb? there's only one fuel inlet line and it's metal.
Trending Topics
#8
02-01-2014, 03:27 PM
Join Date: Feb 2014
Location: San Antonio
Posts: 40
Likes: 0
Received 0 Likes
on
0 Posts
post 5 of 7
q4
i bent the flat secondary metering plate (aka Plate - Metering Body, item 32 in the above holley instructions) when removing as the gasket was stuck. i smoothed it out as best as i can. is this going to be an issue?
as long as the carb is off i figured change all the stuff that is now easier to get to. This includes the vcg (valve cover gaskets) as they are soaked in oil, egr gasket, all vacuum hose (as some of the colored ones are already breaking), exhaust gaskets and possibly fuel pump. read on here about using harborfreight color coded heat shrink on plain black vacuum lines.
q5
a little post fell out of the main body when i was cleaning it.
i made sure i had the little ball mentioned below, but where did the post come from? below the ball?
https://www.ford-trucks.com/forums/1...l#post12777832
q6
why all this scale in the secondary bowl? was that water or gas? weatherstripping at firewall/hood junction is shot and water regularly sits on top of air cleaner and inside of air cleaner is rusted as well.
#9
02-01-2014, 03:28 PM
Join Date: Feb 2014
Location: San Antonio
Posts: 40
Likes: 0
Received 0 Likes
on
0 Posts
post 6 of 7
q7
where does the broken y/tee on the right go to? it comes off the rear of intake manifold. it looks like it might be the line that goes to the "p/d mtr" in the right rear of the diagram.
q8
grounding strap from firewall/hood had been twisted together with only a few strands holding it together. bought a new one to replace it. would that strap cause any of the running issues or is it only for the underhood light mounted to the hood?
q9
some cut wires. any ideas where they go and why they would bypass them? the plug has been taped so did they bypass just because of that? the green/red that was at bottom left of connector is spliced to green (blue splice by my index finger). blue/red that was at bottom right of connector is cut with a taped end, can't see where that goes at all.

#10
02-01-2014, 03:28 PM
Join Date: Feb 2014
Location: San Antonio
Posts: 40
Likes: 0
Received 0 Likes
on
0 Posts
post 7 of 7
q10
both of my ported vacuum switches are exactly the same e1ae-8a564-j2a (e1ae8a564j2a). is it correct to have two exactly the same? most seem to be two different colors. these are factory, with a letter by each port. i already bought one because it's inevitable one of those little nipples breaks off when replacing the hose.
q11
is there a way to clean the egr "externally" so i don't have to get new gaskets inside? or should i just rebuild it and get it over with?
MANY thanks,
dirm
#11
02-01-2014, 03:34 PM
Join Date: Feb 2014
Location: San Antonio
Posts: 40
Likes: 0
Received 0 Likes
on
0 Posts
thanks beetle and gary, really appreciate it!
gary updated into smaller chunks per your request. i am big on proper grammar and punctuation as well. it makes it much easier to read. i just stopped using capitalization because i got in that habit when texting. :P but you see i still used the "old fashioned" two spaces between sentences.
i've updated to include a picture of where the connector is behind the battery, near the solenoid. it's the first picture in q9 in the below post
https://www.ford-trucks.com/forums/1...l#post14021078
#12
02-01-2014, 04:16 PM
Posting Legend
DIRM - I didn't really mean you needed to break up what you'd already typed into small bites, but future posts. As for the textese, you may have overlooked the very first post in the Stickies: Forum Etiquette.
A couple of other suggestions: First, go to the User Control Panel and add your location since one of us may be close and can help you. Second, while in there add a signature to include a few things about your truck, like engine, driveline, etc so people like me that forget won't have to ask or, worse yet, guess.
Anyway, I don't have that connector and my diagrams don't include it so I can't help you. Sorry.
#13
02-01-2014, 09:40 PM
I recently rebuilt a 4180 and will try to share what I know.
It'll be interesting to see if rebuilding the carb solves your running problems or if there are other issues. If somebody replaced the wires and the truck backfires and doesn't run, check the firing order. It should be cast right onto the intake.
Now about that carb.
When you say metering block do you really mean the thin brass plate (#33) that goes under the metering body (#31) on the secondary side? If it's warped it should flatten out okay once you screw down the metering body. However if it's got a crease or sharp bend that's likely a problem.
If the "rod" fell out of the main body after you removed the squirter (#78) it's a weight to hold the check ball down...I've heard it called a "pill".
IMPORTANT, there's a major typo on your genuine Holley rebuild instructions concerning the secondary throttle stop adjustment screw. It says to crack it open 3-4 turns. It should read 3/4 turn. HUGE difference! LOL.
However, in my case, I noticed the secondary throttle stop screw on both the spare carb I bought at the junkyard AND the unit that came off my rig were both set at 0, as in fully closed. I initially tried mine at 3/4 but it ultimately found it idles best at 0.
Speaking of secondaries I'll second what Gary said about the old gas residue in the secondary bowl. If you set the secondary at 0 you'll want to get into the secondaries periodically to flush fresh gas through it.
As a "reformed" perfectionist (as if there is such a thing) I imagine everything will be nice and clean by re-assembly time. Just make sure you blow all the passages out with compressed air.
The old timer at my local speed shop advised me to "grease all the gaskets (THIN coat) and oil all the (screw) holes". Common wheel bearing grease and motor oil. Grease the transfer tube O rings and oil the holes.
Oh yeah, did you already get the idle mixture anti-tamper plugs out? Drilling them is next to impossible. The old timers cut slots in the bottom of the throttle body just enough to get behind them and drive them out with a flat tip screw driver or drift.
As for the fuel inlet filter here's what I did with mine:
https://www.ford-trucks.com/forums/1...fuel-leak.html
#14
02-01-2014, 10:15 PM
Join Date: Feb 2014
Location: San Antonio
Posts: 40
Likes: 0
Received 0 Likes
on
0 Posts
DIRM - *snip* As for the textese, you may have overlooked the very first post in the Stickies: Forum Etiquette.
A couple of other suggestions: First, go to the User Control Panel and add your location since one of us may be close and can help you. Second, while in there add a signature to include a few things about your truck, like engine, driveline, etc so people like me that forget won't have to ask or, worse yet, guess.
Anyway, I don't have that connector and my diagrams don't include it so I can't help you. Sorry.
I recently rebuilt a 4180 and will try to share what I know.
It'll be interesting to see if rebuilding the carb solves your running problems or if there are other issues. If somebody replaced the wires and the truck backfires and doesn't run, check the firing order. It should be cast right onto the intake.
It'll be interesting to see if rebuilding the carb solves your running problems or if there are other issues. If somebody replaced the wires and the truck backfires and doesn't run, check the firing order. It should be cast right onto the intake.
Now about that carb.
When you say metering block do you really mean the thin brass plate (#33) that goes under the metering body (#31) on the secondary side? If it's warped it should flatten out okay once you screw down the metering body. However if it's got a crease or sharp bend that's likely a problem.
When you say metering block do you really mean the thin brass plate (#33) that goes under the metering body (#31) on the secondary side? If it's warped it should flatten out okay once you screw down the metering body. However if it's got a crease or sharp bend that's likely a problem.
IMPORTANT, there's a major typo on your genuine Holley rebuild instructions concerning the secondary throttle stop adjustment screw. It says to crack it open 3-4 turns. It should read 3/4 turn. HUGE difference! LOL.
However, in my case, I noticed the secondary throttle stop screw on both the spare carb I bought at the junkyard AND the unit that came off my rig were both set at 0, as in fully closed. I initially tried mine at 3/4 but it ultimately found it idles best at 0.
However, in my case, I noticed the secondary throttle stop screw on both the spare carb I bought at the junkyard AND the unit that came off my rig were both set at 0, as in fully closed. I initially tried mine at 3/4 but it ultimately found it idles best at 0.
The old timer at my local speed shop advised me to "grease all the gaskets (THIN coat) and oil all the (screw) holes". Common wheel bearing grease and motor oil. Grease the transfer tube O rings and oil the holes.
Oh yeah, did you already get the idle mixture anti-tamper plugs out? Drilling them is next to impossible. The old timers cut slots in the bottom of the throttle body just enough to get behind them and drive them out with a flat tip screw driver or drift.
Oh yeah, did you already get the idle mixture anti-tamper plugs out? Drilling them is next to impossible. The old timers cut slots in the bottom of the throttle body just enough to get behind them and drive them out with a flat tip screw driver or drift.
As for the fuel inlet filter here's what I did with mine:
https://www.ford-trucks.com/forums/1...fuel-leak.html
https://www.ford-trucks.com/forums/1...fuel-leak.html
#15
02-01-2014, 10:25 PM
Posting Legend
It is probable that carb has been rebuilt several times in its life, and possible the weight was put in before the ball. That would mean the accelerator pump could not work and the engine would not like to make quick RPM changes. Accelerating from a stop would probably have a hesitation before the truck would go, and giving it full throttle while cruising would cause a stumble.
But, without an accelerator pump you may never get it started in cold weather. I know that from experience since I effectively did that in 1975 on my 69 Super Bee. I used a non-Holley kit with which to rebuild the carb, and the gasket between the front bowl and the body only had one hole for the accelerator pump and I put it on backward. The car would NOT start below 32 degrees as no amount of pumping gave it any fuel.
But, without an accelerator pump you may never get it started in cold weather. I know that from experience since I effectively did that in 1975 on my 69 Super Bee. I used a non-Holley kit with which to rebuild the carb, and the gasket between the front bowl and the body only had one hole for the accelerator pump and I put it on backward. The car would NOT start below 32 degrees as no amount of pumping gave it any fuel.