How can I prevent dome light from killing battery
#1
 11-18-2013, 01:18 PM


Join Date: Feb 2007
Posts: 16
Likes: 0
Received 0 Likes
on
0 Posts
How can I prevent dome light from killing battery
I accidently left one of the front-seat-area overhead dome lights on for a few days and it killed my Optima very, very dead. I was able to save the battery but would like to avoid a repeat.
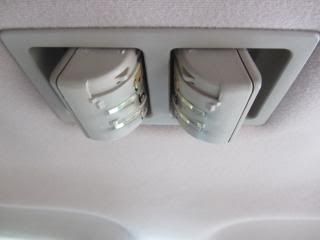
Here's the setup:
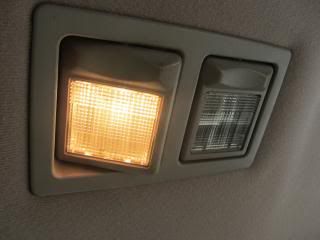
The lights turn on/off by rotation. But they're a bit too sensitive. Even shutting the door sometimes turns one on if I haven't been completely careful to fully rotate the light flat. It may be that I'm fooled when the light turns out but hasn't been fully rotated to flat. Or I may bump one when I reach forward from the rear area. I use the van as a camper and on cold mornings reach forward to start the van or I may bump them when I plug my laptop in to the inverter at the 12V socket.
Any ideas? I want the lights to remain functional, just not so easy to turn on.
#3
11-18-2013, 01:33 PM
Bypass the "rotate-on/off" with a rocker switch next to the fixture. Headliner is fairly easy to get down and there's run up there for a switch.
Here's a thread where I take mine down.


Here's a thread where I take mine down.
#4
11-18-2013, 08:22 PM
#5
11-19-2013, 08:46 AM
Join Date: Feb 2007
Posts: 16
Likes: 0
Received 0 Likes
on
0 Posts
Thanks for the replies, fellas...
maples01- I put the pennies in and that helps. I don't use the lights very often so that may just do it. I pounded around the area after putting them in and the lights don't come on like they do without the pennies.
WVVan- I read your drop-the-headliner thread and that looks fairly easy. But there's a problem in my case....
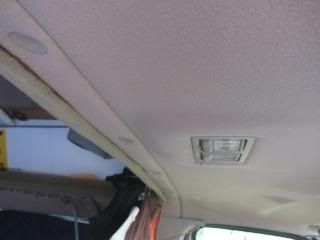
The rear of the headliner is covered by carpet put there by the sport-roof installer. The carpet then rolls up above the original roof and is glued down up there.
maples01- I put the pennies in and that helps. I don't use the lights very often so that may just do it. I pounded around the area after putting them in and the lights don't come on like they do without the pennies.
WVVan- I read your drop-the-headliner thread and that looks fairly easy. But there's a problem in my case....
The rear of the headliner is covered by carpet put there by the sport-roof installer. The carpet then rolls up above the original roof and is glued down up there.
#7
11-19-2013, 10:24 AM
Join Date: Feb 2007
Posts: 16
Likes: 0
Received 0 Likes
on
0 Posts
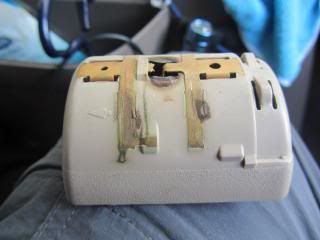
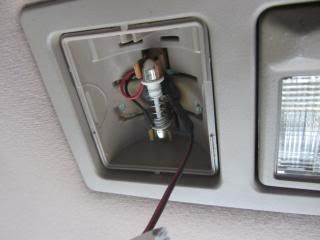
Light innards
WVVan- Hmmm. You may have something there.
I had seen the Haynes manual says you can pop off the cover to change the bulb so thought I'd give it a quick try. Easy-peasy. I then pried carefully on the 'axle' tabs of the rotating shell and it came out fairly easily (thank goodness it flexes a bit)...
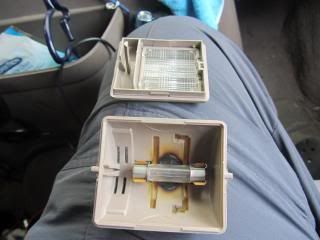
Where they came from:
I see a screw up in there for further exploration but have other priorities today.
Probably the first thing I should do is clean up the contacts and see what that does for me...
I had seen the Haynes manual says you can pop off the cover to change the bulb so thought I'd give it a quick try. Easy-peasy. I then pried carefully on the 'axle' tabs of the rotating shell and it came out fairly easily (thank goodness it flexes a bit)...

Where they came from:

I see a screw up in there for further exploration but have other priorities today.
Probably the first thing I should do is clean up the contacts and see what that does for me...

Trending Topics
#9
11-19-2013, 05:11 PM
Ah yes, the LED upgrade, draws less current, can be left on for days, they are expensive, and they do NOT last, I've been replacing mine for years, different brands, types, etc. My van is loaded with LEDs, I have 118 so far in it, then the exterior ones replacing the turn and tail lights, along with some in the grill that have yet to be hooked up, and wont be since this project is cancelled.
I have to give a big thanks to you, I've been wondering how to get them down, was considering dropping them to run wires for some added lighting.
BTW if you have a shop that rebuilds alternators in your area, the 130 amp can be peaked out to near or over 200 amps, I had mine done 10 years ago by a shop that had been in business 30 years.
#10
11-20-2013, 10:41 AM
Join Date: Feb 2007
Posts: 16
Likes: 0
Received 0 Likes
on
0 Posts
Yeah, I agree on the LED update. Scorch-marks are not good! I had been looking at some LED panels with wires to a festoon adapter, thinking I might be able to connect in a switch (if I can find a small, shallow one). I may not need to do that but nevertheless ordered some 20-LED SMD5050 warm-whites to replace the bulbs.
maples01-thx for the tip!
maples01-thx for the tip!
#11
11-20-2013, 01:37 PM
I have the direct fir ones, has 9 each in it, 39mm I believe, the 2 LED one in the rear is dim, burned out, it lasted 2 days, this vehicle sits and doesn't get used often, so they aren't on much. I installed a switch on my side door to kill it's trigger, I like to leave the barn doors open in the summer, the lift blocks the opening, was pretty easy to do, the plunger in in the door, not body.
As for the scorch marks, pretty normal, anyone realize how hot incandescent bulbs get when they are on.
As for the scorch marks, pretty normal, anyone realize how hot incandescent bulbs get when they are on.
#12
11-21-2013, 01:53 PM
Join Date: Feb 2007
Posts: 16
Likes: 0
Received 0 Likes
on
0 Posts
Just keep rollin'
This morning I found this diagram in a CD-based Ford Econoline service manual I bought on Ebay years ago.
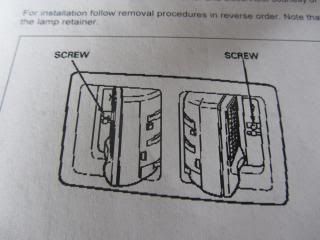
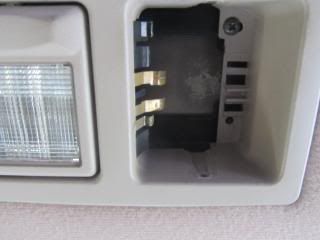
To remove the assembly you roll the lights to their stops-- THEN PUSH PAST THE STOPS to reveal the screws holding it in place. Remove the screws and the unit drops out. That gives access to wiring for a switch installation (since I can't drop my headliner).
On the other hand, I don't think I need the switch!
With the lights rotated up they are disconnected from the switching mechanism, thus avoiding the problem of the switch being sensitive to position. I had been leaving the light rolled slightly so it would not come on when the doors open. But sometimes a bump or door slam would jar the switch and the light would come on. The last time that happened I didn't notice the light had turned on and it killed my battery.
For now, I'm going to go with rolling them fully closed for normal courtesy illumination but then roll them fully open while camping or doing anything else where the doors are open for a long time. If that doesn't pan out, I'll just roll them completely open, knowing I still use them when I need light.

To remove the assembly you roll the lights to their stops-- THEN PUSH PAST THE STOPS to reveal the screws holding it in place. Remove the screws and the unit drops out. That gives access to wiring for a switch installation (since I can't drop my headliner).
On the other hand, I don't think I need the switch!

With the lights rotated up they are disconnected from the switching mechanism, thus avoiding the problem of the switch being sensitive to position. I had been leaving the light rolled slightly so it would not come on when the doors open. But sometimes a bump or door slam would jar the switch and the light would come on. The last time that happened I didn't notice the light had turned on and it killed my battery.
For now, I'm going to go with rolling them fully closed for normal courtesy illumination but then roll them fully open while camping or doing anything else where the doors are open for a long time. If that doesn't pan out, I'll just roll them completely open, knowing I still use them when I need light.
#13
11-26-2013, 01:32 PM
Join Date: Feb 2007
Posts: 16
Likes: 0
Received 0 Likes
on
0 Posts
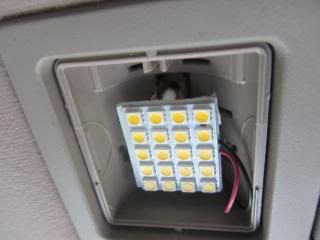
LEDs installed
Just a quick update.... (in response to WVVan's observation that I might want to consider updating from bulbs to LEDs)
The LED panels I ordered off Ebay arrived in today's mail. I bought ten 20-LED SMD5050 units, each with three adapters. They are listed as "10pcs Warm White Light Panel 20 SMD LED Bulb Lamp T10 Dome Bulb BA9S 12V Adapter" by user runber2012 for $16.95, free shipping... (I have other uses for the other eight)...
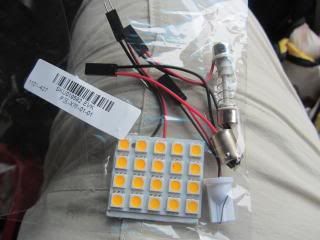
No problems with the ten-minute install. The diameter of the festoon adapter is slightly smaller than the bulb but that's easily remedied by squeezing the bulb mounts a bit. If the light doesn't come on, reverse it at either the adapter or the in-line connector.
Here's the festoon adapter with wire connector behind.
Panel stuck on using the 3M double-sided tape on the back of the panel...
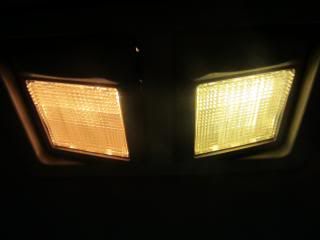
Comparison pic before/after (bulb on left, LED panel on right). (The light fools the camera a bit but this gives a general idea of the difference in color temp and brightness)
I just did these so don't know if they'll last. The stick-on mount seems likely to fail but if so I'll just run a small zip tie around them.
The LED panels I ordered off Ebay arrived in today's mail. I bought ten 20-LED SMD5050 units, each with three adapters. They are listed as "10pcs Warm White Light Panel 20 SMD LED Bulb Lamp T10 Dome Bulb BA9S 12V Adapter" by user runber2012 for $16.95, free shipping... (I have other uses for the other eight)...

No problems with the ten-minute install. The diameter of the festoon adapter is slightly smaller than the bulb but that's easily remedied by squeezing the bulb mounts a bit. If the light doesn't come on, reverse it at either the adapter or the in-line connector.
Here's the festoon adapter with wire connector behind.

Panel stuck on using the 3M double-sided tape on the back of the panel...

Comparison pic before/after (bulb on left, LED panel on right). (The light fools the camera a bit but this gives a general idea of the difference in color temp and brightness)

I just did these so don't know if they'll last. The stick-on mount seems likely to fail but if so I'll just run a small zip tie around them.
#15
01-31-2015, 07:04 PM
Senior User
I know this is an older thread, put it helped me out. I have the same dome light and didn't realize how it worked. I also left the light on without knowing. I have no need to use the light with the door closed and only need it to come on with the door open. However, I'd like it to be able to aim the light towards my tool shelves with the door open and not have to worry about swiveling it back to the position where it only comes on with the door open. There are 3 wires that go to the light. One ground, one that get's constant 12v+ and one that is energized when the door is open. I cut the 2 + wires and hooked the one that is energized by the door button to the wire on the light that was powered by the constant power. Now I can leave the light aimed at my tools and it only comes on when the door is open.