
Installing Recon smoked LED cab lights 2009 f350 crew cab
#1
 01-16-2013, 02:28 PM

Join Date: Sep 2009
Posts: 191
Likes: 0
Received 0 Likes
on
0 Posts
Installing Recon smoked LED cab lights 2009 f350 crew cab
I installed my Recon cab lights on my f350 crew cab that came without any cab lights.
Before I started I washed my truck so I had all clean work surfaces
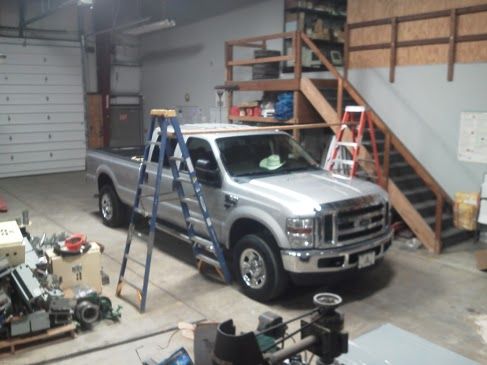
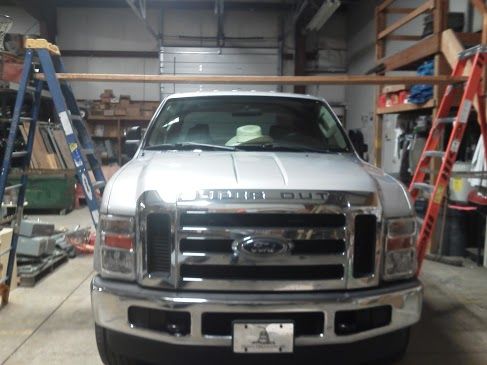
This is my truck before cab lights
I started the install by setting up a board to work on. I weigh 290lbs so I wasn't about to step on my hood or roof for this long.
I used a 10ft 2x12 sitting on 2 8ft ladders across my windshield to stand sit and kneel on to work.
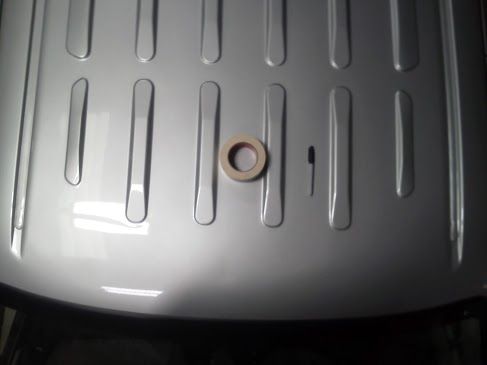
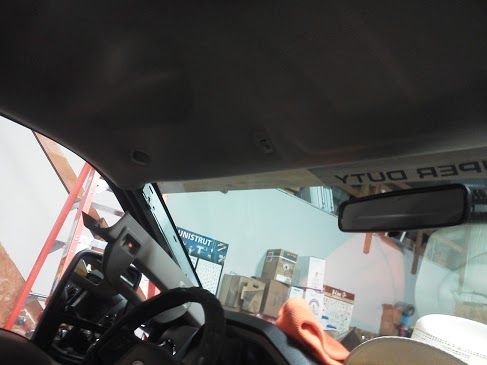
Here is a picture of my roof before anything was done.
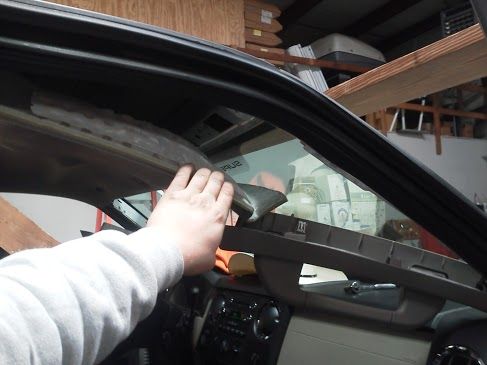
Before climbing up I had some work to do on the interior. I removed both sets of sun visors, and sun visor clips (total of 6 philips screws). I had to tug gently on the arm end of the visor to pop it out of a plastic clip after the screws are removed.
Then I removed both of front grab handles by removing 4 caps (2 on each side) with a flathead screwdriver, and 8 8mm bolts (4 on each side). Again these also have clips holding them in place after the bolts are removed, so they needed pulled on as well.
Now I removed both of the rear grab handles by popping off all 4 caps (2 on each side) with a flathead and used the 8mm socket to remove 4 more bolts (2 on each side).
Then I used my fingers to pop the top of the plastic cover off of the beam the seatbelt is bolted to on each side.
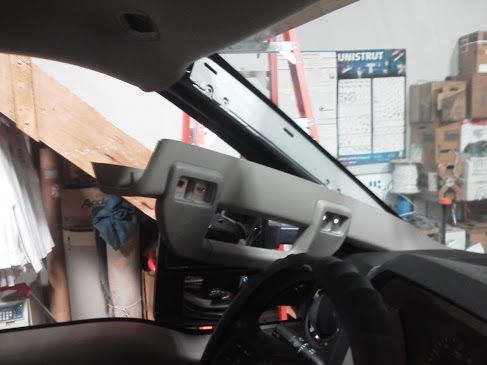
After this I started at the front and worked the headliner out from behind the seal all the way back to the hanger clips on each side.
Now I placed a 2x4 above the headliner right behind the support bar that meets the windshield to prevent damaging the headliner with my drill bits if i slipped through too far.
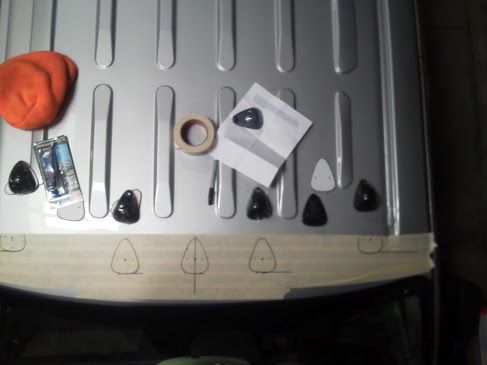
Then I climbed up to start on the roof with a marker and masking tape.
I taped off about 5 or 6 inches of the roof from the window back to make marks on and protect the paint.

I measured straight back from the windshield 3 9/16� where all 5 lights would go and made a horizontal line with my marker. Then I made a vertical line dead center where the middle cab light would go, forming a cross with my horizontal line. (I stayed back just enough to miss the support beam on the underside of the roof).
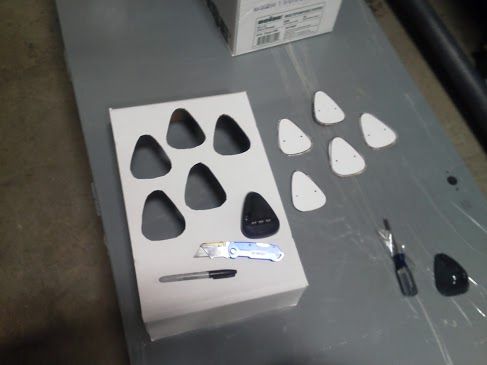
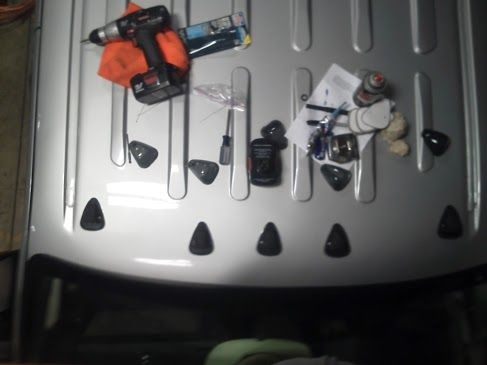
I traced the base of a light and marked where the screw holes were, and cut out 5 of these stencils.
I placed one of these stencils so that the front of the light was centered on the middle cross I marked on my roof, and taped it in place. From the center of this stencil I measured straight over 7 7/8� and made another vertical line to form a cross with that horizontal line. I placed another stencil with the front center of the stencil directly over this cross, and taped it in place. Now from the center of this stencil I measured straight over 12 7/8�and formed another cross with that measurement, and again aligned and taped my third stencil in place. I then worked in the opposite direction with these same measurements to put the 4th and 5th stencils in place. Now I traced all my stencils and marked the hole positions on each one, and removed the stencils to reveal all my markings.
Now the part where my nerves are through the roof�
I used a 5/8� drill bit to drill a hole in the center of each outline directly between the two screw hole marks. I did hit that 2x4 I placed inside a few times, so without it I would have damaged my liner. I also made sure to drill these holes in bursts in order to keep the metal and the bit cool so no hot burs would fall into my truck.
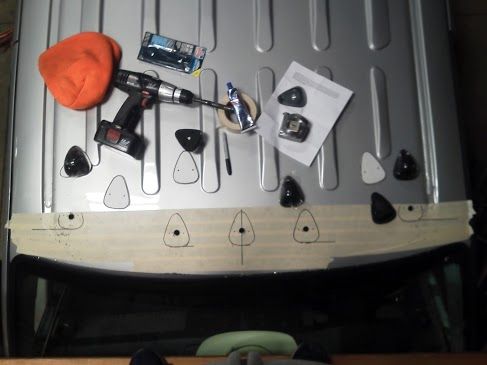
Now I used a tiny drill bit (I forget the size) to drill the holes where the screw marks are just enough to drill a dimple to get the screw started easier and to provide a mark after I remove the tape.
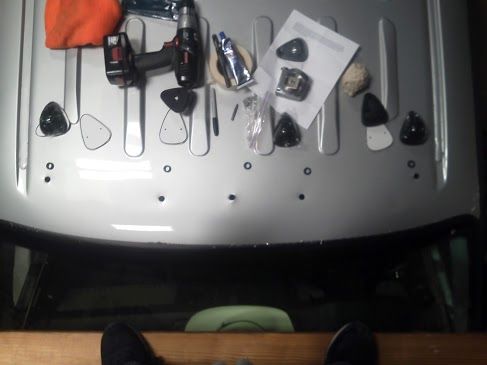
I re-taped just around where all the holes were drilled and then sprayed a coat of general knocker can clear coat to seal up any open metal. After the first coat I popped in my 1/2� rubber grommets to keep from damaging any wires and to help provide a good seal. Then I sprayed another layer of clear coat over the holes and grommets for extra measure, let this coat dry and removed the tape.
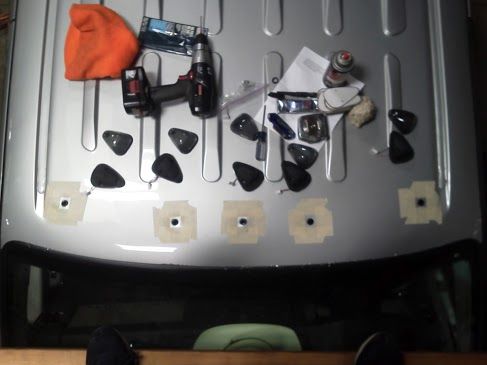
After all this, I cleaned the area around the holes again, and picked up my silicone tube, and center cab light base(I had already removed the lens� of all the lights). I put a small bead of silicone on the base of the light going around all of the holes. Then for extra measure I put a thick bead of silicone around the 1/2� hole. Now I dropped the wires through the grommet and positioned the screw holes over the marks I had drilled while the silicone was wet. I immediately screwed the screws in just enough to put a little pressure on the base and keep it aligned. Then I repeated this process for all the other cab light bases. I let each base set snug for about 45 minutes before I went back and tightened them down tight in order to let the silicone set up good.
In this picture the middle light looks a little funny, but I think it is because I wasn�t directly over it, because it really is straight in person haha
Now I went back to the interior, where I had the wire harness Recon supplied. I plugged in the light closest to the drivers door first, then went to the other side and plugged in the closest to the passenger door. Now the other three were already help up closer to where they plug in. I plugged the remaining 3 lights in trying not to bend the liner down any more than necessary to avoid creasing it. I used electrical tape to tape all 5 of these connections as I went because they didn�t seem to hold together as well as I would have liked. I also used duct tape to tape the little bits of sagging wire to the roof so it was out of the way of trying to reinstall the liner.
I connected all of these with the long power lead on the driver�s side, so now I ran the green power wire down the edge of the windshield where my grab handle will cover. Where the base of the handle assembly pops in, there is a crack I fed the green wire through and pulled it the rest of the way through from under the dash.
I cut off the ground wire�s connector on the wire harness Recon supplied and crimped on another couple feet of wire and fed it down the same way as I did with the green power wire. This way I won�t have to take the liner down again to get to the ground if I decided to add a flasher kit or anything else.
Now after trimming off the extra length on the green power wire and the ground wire, I crawled under the dash on the driver side. Mounted directly above the emergency brake is a gray 4 pin connector not plugged into anything with a violet/white stripe wire, and a black wire going into it. After poking around with my test light I verified that the black wire was indeed a good ground wire as I guessed, and the violet wire only had power if the running lights, and/or headlights were on which I also guessed (I remembered dealing with the violet/white stripe wires in the front of the truck when I installed my Big Rig kit). At this point I probably could have bought a factory connector to plug my two wires in, but I didn�t want to take the time or money to go get one. Instead, I cut the connector off, stripped both the wires and twisted together my connections with some wire nuts and taped them up. If this connection was in a place where they could be exposed to more elements I would have used a connector.
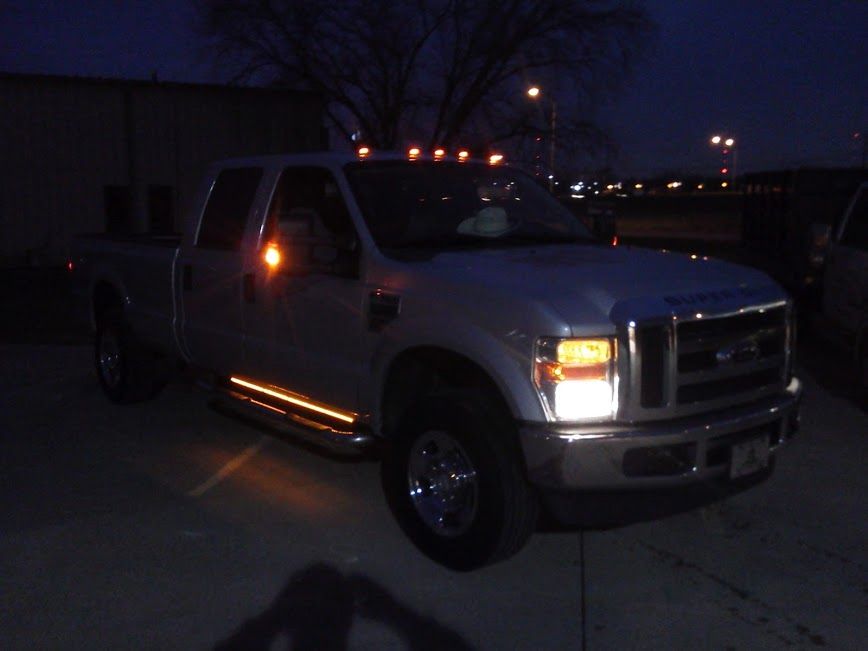
So it was the moment of truth, I flipped the headlights on, and BAM smoked LED cab lights popped on too.

So Now all that was left was to put the interior back together in reverse order of disassembling it, and clean everything up.
I know people have posted other ways of doing these installs, and probably faster ways too, but I like taking my time, making sure it�s done right, and knowing it will never leak. Hopefully this is helpful to anyone thinking about installing cab lights on a truck that doesn�t have any. Sorry it�s as long as a book, but I didn�t want to leave anything important out. And I could have taken more pics, but I was kind of in the zone and forgot to on some of the steps.
Before I started I washed my truck so I had all clean work surfaces
This is my truck before cab lights
I started the install by setting up a board to work on. I weigh 290lbs so I wasn't about to step on my hood or roof for this long.
I used a 10ft 2x12 sitting on 2 8ft ladders across my windshield to stand sit and kneel on to work.
Here is a picture of my roof before anything was done.
Before climbing up I had some work to do on the interior. I removed both sets of sun visors, and sun visor clips (total of 6 philips screws). I had to tug gently on the arm end of the visor to pop it out of a plastic clip after the screws are removed.
Then I removed both of front grab handles by removing 4 caps (2 on each side) with a flathead screwdriver, and 8 8mm bolts (4 on each side). Again these also have clips holding them in place after the bolts are removed, so they needed pulled on as well.
Now I removed both of the rear grab handles by popping off all 4 caps (2 on each side) with a flathead and used the 8mm socket to remove 4 more bolts (2 on each side).
Then I used my fingers to pop the top of the plastic cover off of the beam the seatbelt is bolted to on each side.
After this I started at the front and worked the headliner out from behind the seal all the way back to the hanger clips on each side.
Now I placed a 2x4 above the headliner right behind the support bar that meets the windshield to prevent damaging the headliner with my drill bits if i slipped through too far.
Then I climbed up to start on the roof with a marker and masking tape.
I taped off about 5 or 6 inches of the roof from the window back to make marks on and protect the paint.
I measured straight back from the windshield 3 9/16� where all 5 lights would go and made a horizontal line with my marker. Then I made a vertical line dead center where the middle cab light would go, forming a cross with my horizontal line. (I stayed back just enough to miss the support beam on the underside of the roof).
I traced the base of a light and marked where the screw holes were, and cut out 5 of these stencils.
I placed one of these stencils so that the front of the light was centered on the middle cross I marked on my roof, and taped it in place. From the center of this stencil I measured straight over 7 7/8� and made another vertical line to form a cross with that horizontal line. I placed another stencil with the front center of the stencil directly over this cross, and taped it in place. Now from the center of this stencil I measured straight over 12 7/8�and formed another cross with that measurement, and again aligned and taped my third stencil in place. I then worked in the opposite direction with these same measurements to put the 4th and 5th stencils in place. Now I traced all my stencils and marked the hole positions on each one, and removed the stencils to reveal all my markings.
Now the part where my nerves are through the roof�
I used a 5/8� drill bit to drill a hole in the center of each outline directly between the two screw hole marks. I did hit that 2x4 I placed inside a few times, so without it I would have damaged my liner. I also made sure to drill these holes in bursts in order to keep the metal and the bit cool so no hot burs would fall into my truck.
Now I used a tiny drill bit (I forget the size) to drill the holes where the screw marks are just enough to drill a dimple to get the screw started easier and to provide a mark after I remove the tape.
I re-taped just around where all the holes were drilled and then sprayed a coat of general knocker can clear coat to seal up any open metal. After the first coat I popped in my 1/2� rubber grommets to keep from damaging any wires and to help provide a good seal. Then I sprayed another layer of clear coat over the holes and grommets for extra measure, let this coat dry and removed the tape.
After all this, I cleaned the area around the holes again, and picked up my silicone tube, and center cab light base(I had already removed the lens� of all the lights). I put a small bead of silicone on the base of the light going around all of the holes. Then for extra measure I put a thick bead of silicone around the 1/2� hole. Now I dropped the wires through the grommet and positioned the screw holes over the marks I had drilled while the silicone was wet. I immediately screwed the screws in just enough to put a little pressure on the base and keep it aligned. Then I repeated this process for all the other cab light bases. I let each base set snug for about 45 minutes before I went back and tightened them down tight in order to let the silicone set up good.
In this picture the middle light looks a little funny, but I think it is because I wasn�t directly over it, because it really is straight in person haha
Now I went back to the interior, where I had the wire harness Recon supplied. I plugged in the light closest to the drivers door first, then went to the other side and plugged in the closest to the passenger door. Now the other three were already help up closer to where they plug in. I plugged the remaining 3 lights in trying not to bend the liner down any more than necessary to avoid creasing it. I used electrical tape to tape all 5 of these connections as I went because they didn�t seem to hold together as well as I would have liked. I also used duct tape to tape the little bits of sagging wire to the roof so it was out of the way of trying to reinstall the liner.
I connected all of these with the long power lead on the driver�s side, so now I ran the green power wire down the edge of the windshield where my grab handle will cover. Where the base of the handle assembly pops in, there is a crack I fed the green wire through and pulled it the rest of the way through from under the dash.
I cut off the ground wire�s connector on the wire harness Recon supplied and crimped on another couple feet of wire and fed it down the same way as I did with the green power wire. This way I won�t have to take the liner down again to get to the ground if I decided to add a flasher kit or anything else.
Now after trimming off the extra length on the green power wire and the ground wire, I crawled under the dash on the driver side. Mounted directly above the emergency brake is a gray 4 pin connector not plugged into anything with a violet/white stripe wire, and a black wire going into it. After poking around with my test light I verified that the black wire was indeed a good ground wire as I guessed, and the violet wire only had power if the running lights, and/or headlights were on which I also guessed (I remembered dealing with the violet/white stripe wires in the front of the truck when I installed my Big Rig kit). At this point I probably could have bought a factory connector to plug my two wires in, but I didn�t want to take the time or money to go get one. Instead, I cut the connector off, stripped both the wires and twisted together my connections with some wire nuts and taped them up. If this connection was in a place where they could be exposed to more elements I would have used a connector.
So it was the moment of truth, I flipped the headlights on, and BAM smoked LED cab lights popped on too.
So Now all that was left was to put the interior back together in reverse order of disassembling it, and clean everything up.
I know people have posted other ways of doing these installs, and probably faster ways too, but I like taking my time, making sure it�s done right, and knowing it will never leak. Hopefully this is helpful to anyone thinking about installing cab lights on a truck that doesn�t have any. Sorry it�s as long as a book, but I didn�t want to leave anything important out. And I could have taken more pics, but I was kind of in the zone and forgot to on some of the steps.
#2
01-16-2013, 02:29 PM

Former Vendor
Join Date: Nov 2012
Posts: 162
Likes: 0
Received 0 Likes
on
0 Posts
#3
01-16-2013, 02:39 PM
Join Date: Sep 2009
Posts: 191
Likes: 0
Received 0 Likes
on
0 Posts
#4
01-16-2013, 02:43 PM
Former Vendor
Join Date: Nov 2012
Posts: 162
Likes: 0
Received 0 Likes
on
0 Posts
#5
01-16-2013, 02:54 PM
 They look like they came that way from the factory.
#7
01-16-2013, 05:03 PM
Postmaster
Join Date: Apr 2005
Location: round rock, tx
Posts: 2,759
Likes: 0
Received 0 Likes
on
0 Posts
Trending Topics
#8
01-16-2013, 06:47 PM
Join Date: Sep 2009
Posts: 191
Likes: 0
Received 0 Likes
on
0 Posts
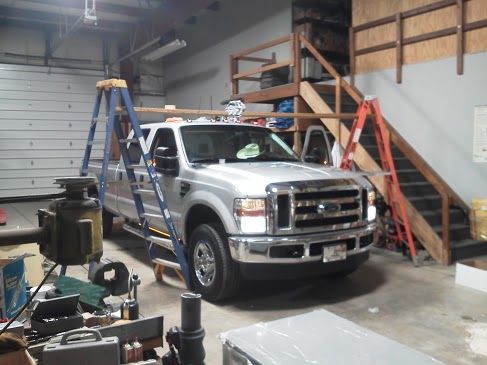
haha yeah it is. I actually did it at work. I had the day off because we had got a bunch of rain and it all froze up (im a commercial roofer). So i took the liberty of using the shops garage to install them. Luckily I have a cool boss, because my truck is too tall and too long to fit in the garage at home

#10
03-28-2013, 05:59 PM


#13
03-28-2013, 06:37 PM
Join Date: Sep 2009
Posts: 191
Likes: 0
Received 0 Likes
on
0 Posts
it goes about half way back on the rear door. There were two sizes, 62 and 48 I think. I got the larger one. Super easy install, I just had to play with the angle a little. I ended up positioning them so that the led's are at about a 45 degree angle down and out. I have seen people put 2 sets on back to back and it goes wheel well to wheel well
#14
03-28-2013, 07:15 PM
Elder User

#15
03-28-2013, 08:03 PM
Join Date: Sep 2009
Posts: 191
Likes: 0
Received 0 Likes
on
0 Posts
It is funny that this thread popped back up today because today is the first time i had the nerves to go through an automatic carwash since the install. I was worried about fitting because it was tight without the lights. Also I didnt know how my makeshift seals would work against high pressure water jets. Both were a success 