
SROD to NP435 ; Mechanical to Hydraulic Clutch
#1
 10-04-2012, 06:03 PM


SROD to NP435 ; Mechanical to Hydraulic Clutch
Hi all,
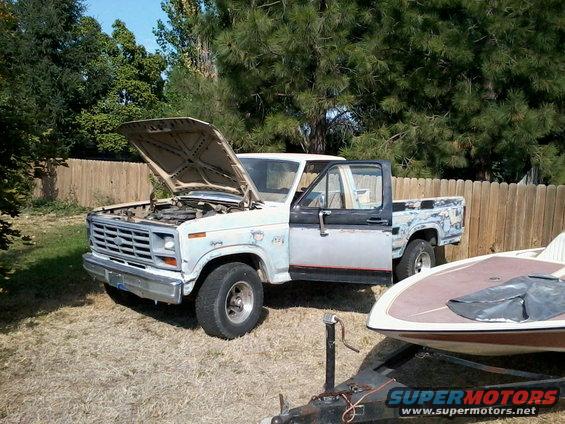
Just finished swapping out my SROD transmission for the venerable NP435.
For those that don't know, the SROD was an aluminum overdrive transmission offered in the Broncos from '80 to '83. It was Ford's temporary solution to the gas mileage issues of the early 80s (and yes, I used to get 21mpg with the stock tires and 1bbl carb). It was an upgraded version of the Mustang transmission with larger bearings and such for the trucks. However, because of the chintsy aluminum casing, the transmission mounts are prone to breaking off, which mine had, twice (I had had them welded back on at one point). Not a bad transmission, but not meant for a 4x4 truck.
SROD:
1st: 3.25
2nd: 1.92
3rd: 1.00
4th: 0.71
(That gap between 2nd and 3rd was nasty)
NP435:
Low: 6.69
1st: 3.34
2nd: 1.79
3rd: 1.00
Despite how much I disliked the broken mounts, the transmission was lightweight (probably around 60lbs total), so just being bolted to the engine was generally enough. I've put it through quite the rigors and have never had an issue. It's taken my Bronco a lot of places through some tough terrain.
My main reason for the swap was because 2 years ago, I upgraded from 215 75R15 tires (28") to 31" tires. With a 3.00 rear end, the overdrive quickly became useless since I was now at 1750RPMs @ 75. It was just ******* too much to be able to handle anything more than perfectly flat highway (which is rarely the case around here). So, 99% of the time, I'd drive in 3rd gear anyway. No real point in having a weak 3 speed and not have a granny or a useable overdrive.
I'd also been having issues with a strange whine in my transfer case, as well as the chain slipping in 4WD.
So, a few weeks ago, while looking for a rebuildable 300 six, I found a complete '86 truck for sale with a running engine, NP435, hydraulic clutch, etc. for $300. I scooped it up and drove it home. It came with some super nice rims, as well as a few carburetors, so I should be able to sell even those for enough to recoup my losses. (And will part the rest of it out later).
First things first, I disconnected the engine, and then removed the bell housing, transmission, transfer case, and drive lines. I purchased a $75 transmission jack from Harbor Freight just for the job. I knew it wasn't going to be the best, but enough to get the job done.
Working out in the dirt and dry grass sucked...


When I removed the bell housing, I didn't want to mess with any of the hydraulic stuff, so I left it all connected. Just unbolted the master cylinder from the firewall, dropped it out through the bottom, and left it and the hose attached to the slave.
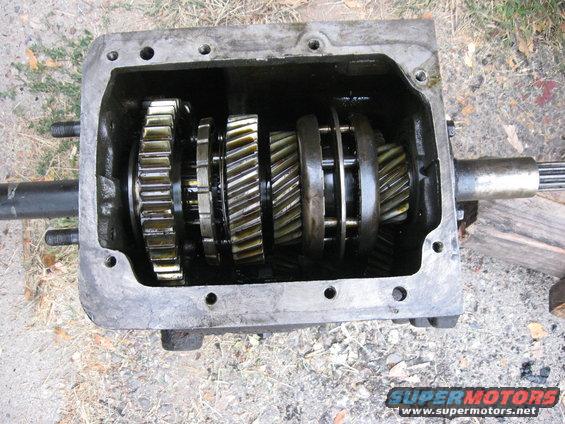
After removing the transmission, I opened it up to inspect the internals. It shifted nicely on the drive, but made an odd rattle when the engine was idling too low. Turns out both motor mounts were broken off on the engine, so the rattle was most likely caused by teeth chattering from slop in the system. All the teeth looked good and everything moved smoothly, so I was pleased.


The truck was at my brother's house since I didn't have a place for it, so I had to head drive over there to get everything. A fifteen minute drive one way, which can be a pain. I wish it'd been parked out front so I could just walk back and forth between the truck and my Bronco. But... can't have everything.
The project fully stared on Friday night (Sept. 20th) when I went over and finished pulling the engine. It was quite a chore moving an engine hoist with the engine on it by myself in the dirt but I managed to get it done. Lowered the engine onto the radiator support, moved the hoist, lifted it back up, swung the engine, dropped it to the ground, moved the hoist, lifted, swung, dropped, moved, repeat, repeat, until it was out in the open enough for me to back my Bronco under the engine. Fun stuff!

It was dark by the time I got it in the Bronco.

Next morning, I took the engine out of the back of the Bronco, along with the hoist. There wasn't enough room for the engine and the hoist in the vehicle along with the trans and all the parts. Plus, I knew I had to have the hoist to take it back out of the Bronco.

Once it was out, I set it on the ground and headed over to my brother's again and gathered up the rest of the components for the swap. I realized I hadn't pulled the floor pan, so I grabbed that too. I also realized the truck had a hydraulic clutch, so I figured I might as well swap it in too. I don't have a lot of complaints about the mechanical clutch, but I'd always wanted a ZF5 some time in the future, and this was a big first step in the process. Might as well do it now while I have the parts on hand.
The floor pan was easy enough to remove. Just a series of screws and some very strong sealant holding it in place. A wrench and a good BIG flat bladed screwdriver and it was out.
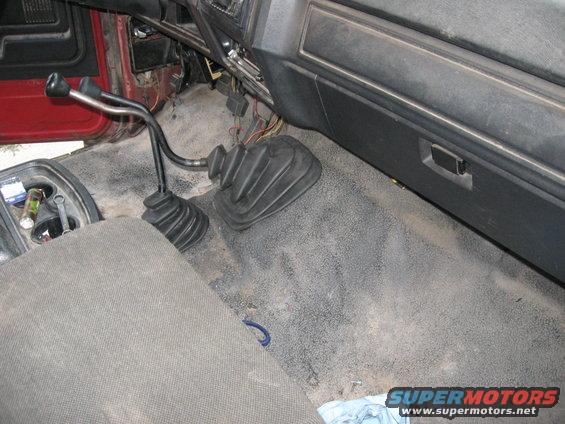
Another thing I realized is that the holes in the floor for the NP435 and the SROD were VERY different. The SROD has both shifters right next to each other on the flat of the floor whereas the NP435 shifter comes out much higher on the hump. Not only would I need the floor pan, but the mat as well. Fortunately, this truck had a black floor mat, just like mine, and it was in much better shape, so I took it out, rolled it up, and brought it with me.
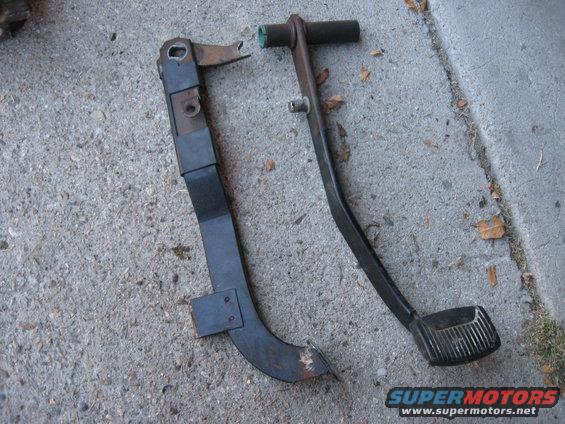
The pedals were a bit more of a chore, but I learned a few things while under there. First, you don't need the bracket, just the large rod that the pedals swing on. To remove it, it was two large 18mm bolts on each end of it. Pry the clutch arm off, and slide it out. This is one of the few instances where an engineer was really thinking, because there's a nice big hole in the nearby frame that the rod can slide through while you're removing it. Made it much easier.
The mechanical clutch has a boxed end to fit into a slot on the clutch arm. The hydraulic setup has a splined end. They're not compatible at all, and neither are the arms on the end. The mechanical clutch arm is designed to push on a long rod that comes out of the floor, so it's motion of swing is completely in the wrong direction. The hydraulic clutch arm is designed to press on the plunger for the hydraulic clutch master cylinder.
A passerby decided to check out my rig. He seemed pleased enough.

Just finished swapping out my SROD transmission for the venerable NP435.
For those that don't know, the SROD was an aluminum overdrive transmission offered in the Broncos from '80 to '83. It was Ford's temporary solution to the gas mileage issues of the early 80s (and yes, I used to get 21mpg with the stock tires and 1bbl carb). It was an upgraded version of the Mustang transmission with larger bearings and such for the trucks. However, because of the chintsy aluminum casing, the transmission mounts are prone to breaking off, which mine had, twice (I had had them welded back on at one point). Not a bad transmission, but not meant for a 4x4 truck.
SROD:
1st: 3.25
2nd: 1.92
3rd: 1.00
4th: 0.71
(That gap between 2nd and 3rd was nasty)
NP435:
Low: 6.69
1st: 3.34
2nd: 1.79
3rd: 1.00
Despite how much I disliked the broken mounts, the transmission was lightweight (probably around 60lbs total), so just being bolted to the engine was generally enough. I've put it through quite the rigors and have never had an issue. It's taken my Bronco a lot of places through some tough terrain.
My main reason for the swap was because 2 years ago, I upgraded from 215 75R15 tires (28") to 31" tires. With a 3.00 rear end, the overdrive quickly became useless since I was now at 1750RPMs @ 75. It was just ******* too much to be able to handle anything more than perfectly flat highway (which is rarely the case around here). So, 99% of the time, I'd drive in 3rd gear anyway. No real point in having a weak 3 speed and not have a granny or a useable overdrive.
I'd also been having issues with a strange whine in my transfer case, as well as the chain slipping in 4WD.
So, a few weeks ago, while looking for a rebuildable 300 six, I found a complete '86 truck for sale with a running engine, NP435, hydraulic clutch, etc. for $300. I scooped it up and drove it home. It came with some super nice rims, as well as a few carburetors, so I should be able to sell even those for enough to recoup my losses. (And will part the rest of it out later).
First things first, I disconnected the engine, and then removed the bell housing, transmission, transfer case, and drive lines. I purchased a $75 transmission jack from Harbor Freight just for the job. I knew it wasn't going to be the best, but enough to get the job done.
Working out in the dirt and dry grass sucked...
When I removed the bell housing, I didn't want to mess with any of the hydraulic stuff, so I left it all connected. Just unbolted the master cylinder from the firewall, dropped it out through the bottom, and left it and the hose attached to the slave.
After removing the transmission, I opened it up to inspect the internals. It shifted nicely on the drive, but made an odd rattle when the engine was idling too low. Turns out both motor mounts were broken off on the engine, so the rattle was most likely caused by teeth chattering from slop in the system. All the teeth looked good and everything moved smoothly, so I was pleased.
The truck was at my brother's house since I didn't have a place for it, so I had to head drive over there to get everything. A fifteen minute drive one way, which can be a pain. I wish it'd been parked out front so I could just walk back and forth between the truck and my Bronco. But... can't have everything.
The project fully stared on Friday night (Sept. 20th) when I went over and finished pulling the engine. It was quite a chore moving an engine hoist with the engine on it by myself in the dirt but I managed to get it done. Lowered the engine onto the radiator support, moved the hoist, lifted it back up, swung the engine, dropped it to the ground, moved the hoist, lifted, swung, dropped, moved, repeat, repeat, until it was out in the open enough for me to back my Bronco under the engine. Fun stuff!
It was dark by the time I got it in the Bronco.
Next morning, I took the engine out of the back of the Bronco, along with the hoist. There wasn't enough room for the engine and the hoist in the vehicle along with the trans and all the parts. Plus, I knew I had to have the hoist to take it back out of the Bronco.
Once it was out, I set it on the ground and headed over to my brother's again and gathered up the rest of the components for the swap. I realized I hadn't pulled the floor pan, so I grabbed that too. I also realized the truck had a hydraulic clutch, so I figured I might as well swap it in too. I don't have a lot of complaints about the mechanical clutch, but I'd always wanted a ZF5 some time in the future, and this was a big first step in the process. Might as well do it now while I have the parts on hand.
The floor pan was easy enough to remove. Just a series of screws and some very strong sealant holding it in place. A wrench and a good BIG flat bladed screwdriver and it was out.
Another thing I realized is that the holes in the floor for the NP435 and the SROD were VERY different. The SROD has both shifters right next to each other on the flat of the floor whereas the NP435 shifter comes out much higher on the hump. Not only would I need the floor pan, but the mat as well. Fortunately, this truck had a black floor mat, just like mine, and it was in much better shape, so I took it out, rolled it up, and brought it with me.
The pedals were a bit more of a chore, but I learned a few things while under there. First, you don't need the bracket, just the large rod that the pedals swing on. To remove it, it was two large 18mm bolts on each end of it. Pry the clutch arm off, and slide it out. This is one of the few instances where an engineer was really thinking, because there's a nice big hole in the nearby frame that the rod can slide through while you're removing it. Made it much easier.
The mechanical clutch has a boxed end to fit into a slot on the clutch arm. The hydraulic setup has a splined end. They're not compatible at all, and neither are the arms on the end. The mechanical clutch arm is designed to push on a long rod that comes out of the floor, so it's motion of swing is completely in the wrong direction. The hydraulic clutch arm is designed to press on the plunger for the hydraulic clutch master cylinder.
A passerby decided to check out my rig. He seemed pleased enough.
#2
10-04-2012, 06:05 PM
Once I got home, I dived into removing my drive train. First off, I started out by draining the oil from the engine, transmission, and transfer case. I also knew I'd be out here a while (little did I know just HOW long I was going to be out here) so I set up a table for tools (and beer).

I knew I couldn't take out the engine first because of the fact that the mounts on the transmission were broken. The only thing holding the transmission on the vehicle was the engine itself, so the transfer case and the transmission had to come out first.
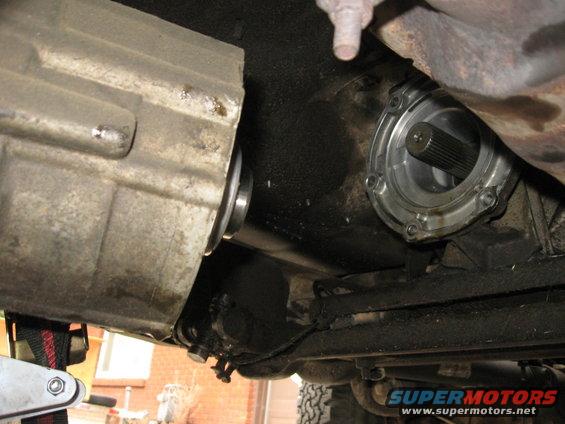
After I removed the drivelines, it dawned on me that the transfer case had a yolk on it that I was going to need. The transfer case output is a lot different between the Bronco and the truck. I also knew there was simply no way I was going to be able to undo the nut while it was out of the vehicle, so I put the vehicle in gear, put on the parking brakes, and broke out the breaker bar. None of the sockets I had fit, so I had to go buy a new one. Figures I'd have a 1 1/16", 1 1/4", and a 28mm (1 3/32), and none of them fit. The 28mm almost fit, so I did some quick math and figured the next size up was a 1 1/8" (28.6mm). Went and bought one and it fit perfectly.
It was quite an eye opener how much broken transmission mounts were putting strain on my system, not to mention how much power I must've been losing. When I was unbolting the transfer case from the transmission, the transmission and transfer case were twisting in place from me pulling on the wrench. I can't imagine how much they must've been twisting under the vehicle every time I accelerated.
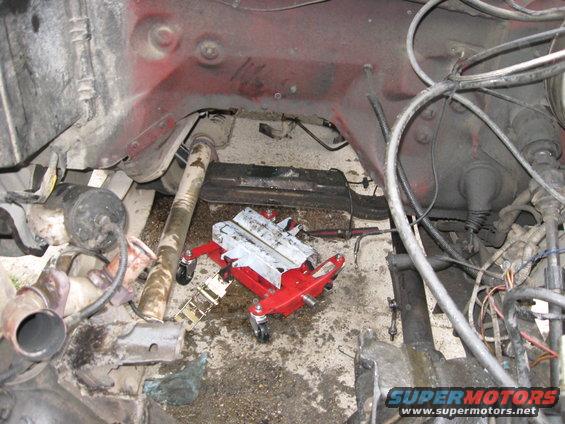
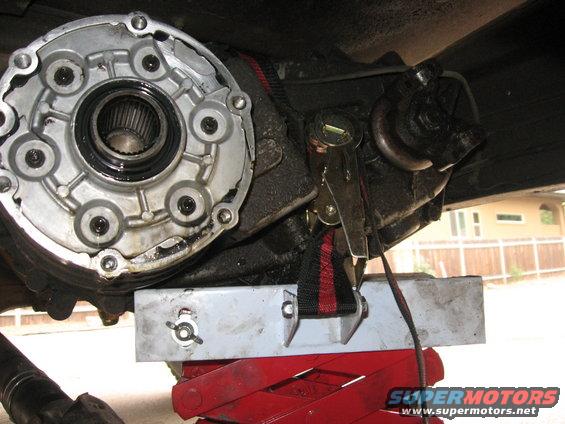
Disconnected transfer case:
A dark picture, but lowering the transfer case down.
After the transfer case was out, I disconnected the shifters and pulled them up and out from in the cab.
This shot also shows how both of the shifters of the SROD are next door to each other.
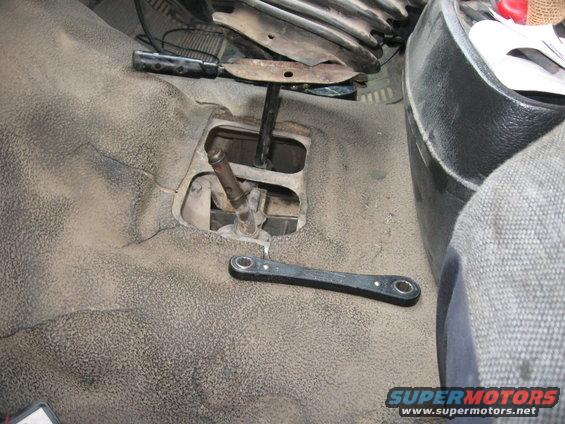
Then unbolted the transfer case linkage from the SROD (it has two bolts, unlike the NP435, one on each side, and a large arm that goes over the top). Once the trans was free, I unbolted it from the bellhousing and dropped it down. Since it's shifter is in the tailhousing, they don't easily separate, so I had to take them out together. No big deal since they're small and don't weigh a whole lot. I could have easily taken it out without the trans jack.


During this procedure, I found out just how sharp every single darn corner of that transmission jack was. I kept hitting arms, legs, and shoulders on it while moving around under the vehicle and whoever made it simply could not have been bothered to round off any corners. It was sharp, sharp. Finally, it culminated when I hit my head on it in full force and ripped my scalp open. Spent about twenty minutes getting the blood to stop flowing (sorry, no pics!) and went back out to my task with my hair matted down in red. Fortunately, it wasn't bad enough for stitches, but it was close.
Onward.
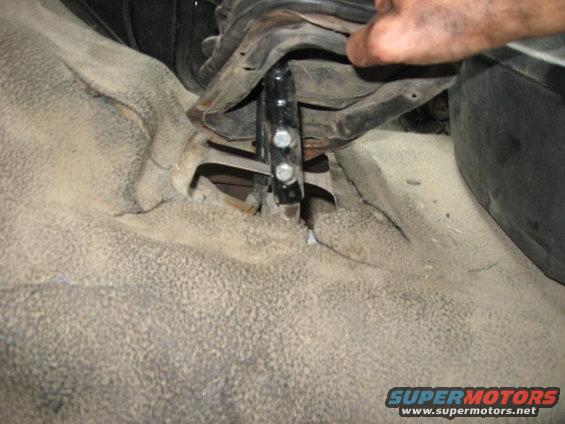
Broken transmission mounts.

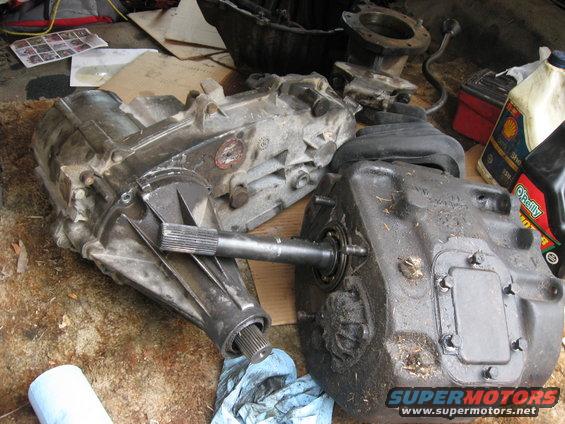
Took the bell housing off and compared it to the old one. They were virtually identical except that the SROD had a larger throwout bearing on the clutch fork. Not sure why. In all reality, I could saved myself a lot of work and just bolted the SROD bellhousing to the NP435, kept my mechanical clutch, and been on my way.
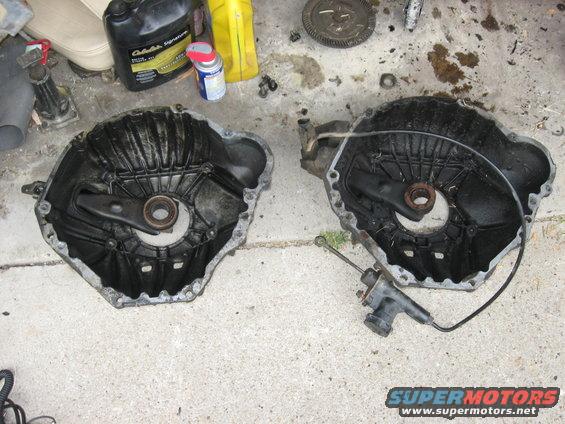
SROD (left) NP435 (right)
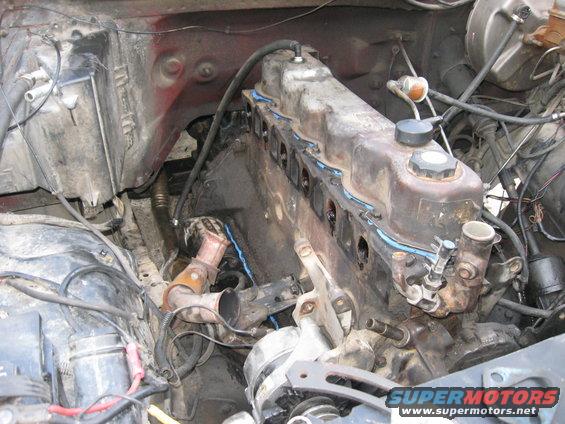
Next was the engine. Disconnected everything and pulled it out. It was the second time I'd done it, so it was much easier this go around and really didn't take too long. Just disconnect everything that's attaching it to the frame, such as exhaust, fuel lines, and ignition. Remove the radiator and engine lid. Hook an engine hoist to it, put some tension on it, and then undo the motor mounts, and hoist it out.

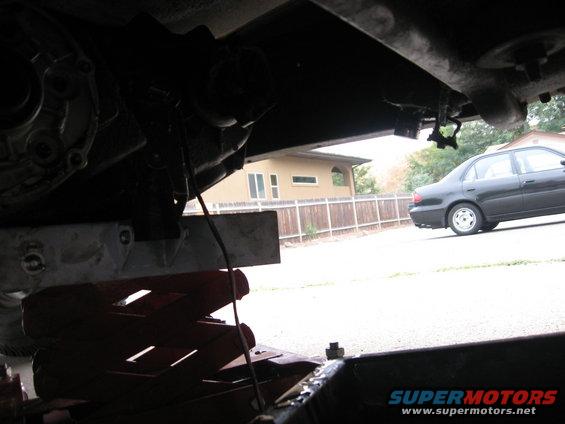
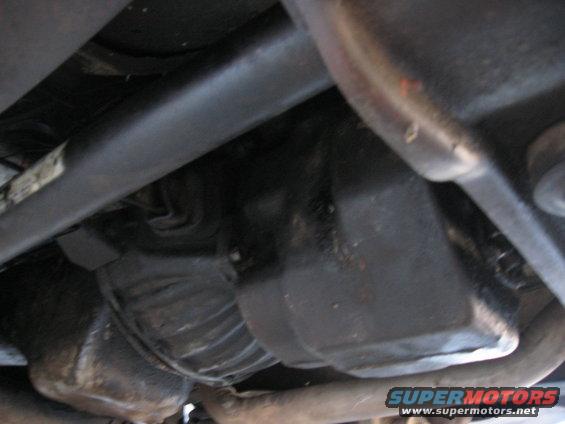
I thought this was a fun view under the vehicle.

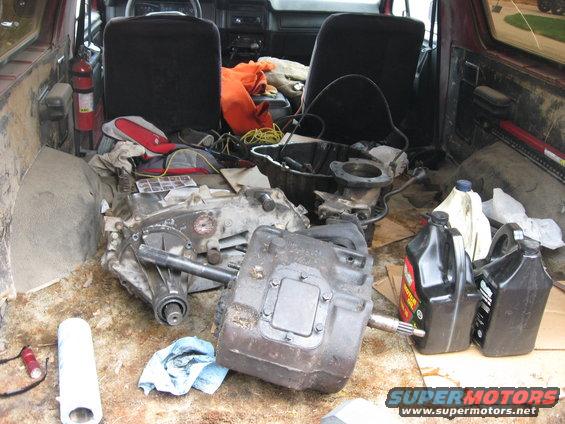
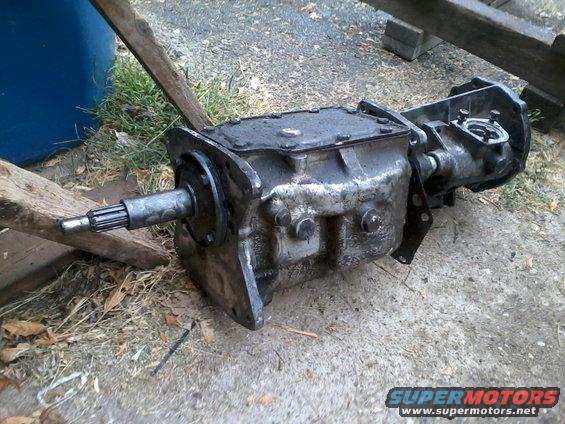
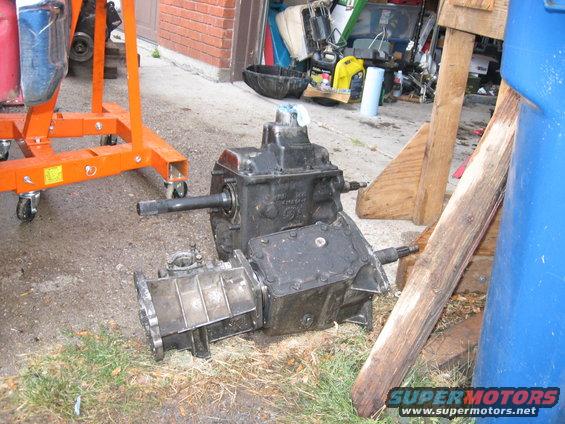
Also, it was quickly visible just how much BIGGER the NP435 is than the SROD. Granted, I'm sure that's because the NP435 has to have a granny gear in it, which simply demands a larger diameter gear, and therefore a larger casing. But still, this thing is a monster in comparison.
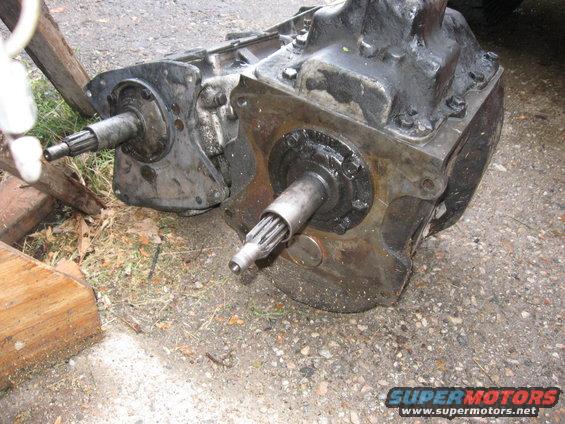
The easy part is over. Now to reverse the process.
First things first, I needed to patch everything up and put it together. The engine got a fresh set of gaskets.

Secondly, the NP435 cover gasket was torn up when I removed it, so I created a new one out of some gasket maker that I had. Worked really well.
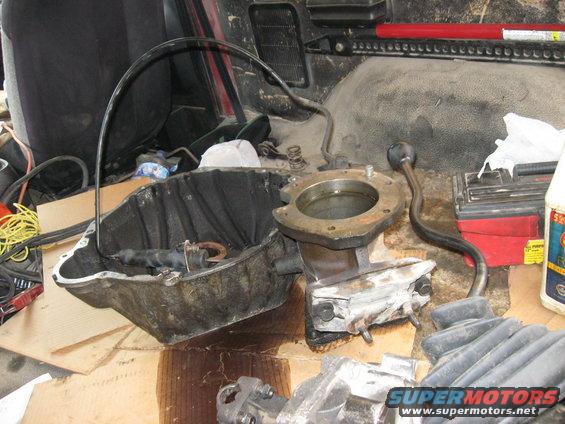
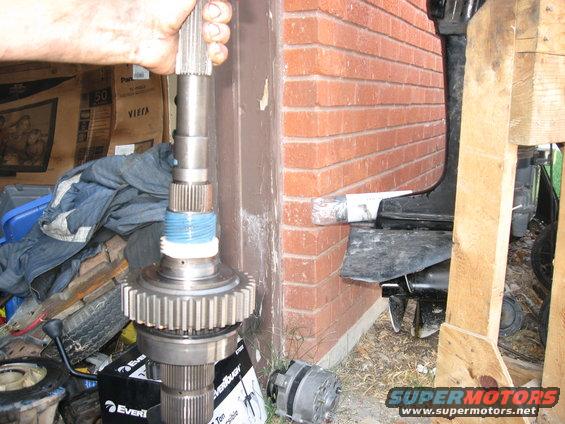
Then, I hadn't paid enough attention to the NP208 that I removed and thought all I had to do was swap the housing on the end to swap it over. The tailshaft is much longer and very different, so I quickly realized I had to open up the casing and swap internals for them to work.
If I needed to change the internal speedometer gear, this'd be a great time to do it.

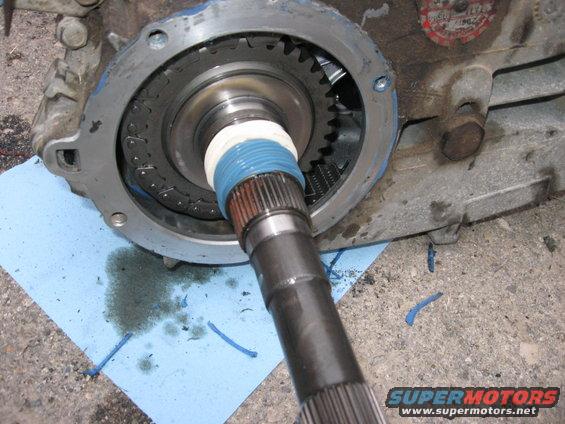


I'd never had an NP208 apart before, but fortunately what I had ahead of me was very easy.
This snap ring is the only thing that held the gear in place. I didn't have the necessary tool to remove it, so I used two flat bladed screwdrivers and was very careful not to break it. I had to, obviously, work it off both transfer cases.
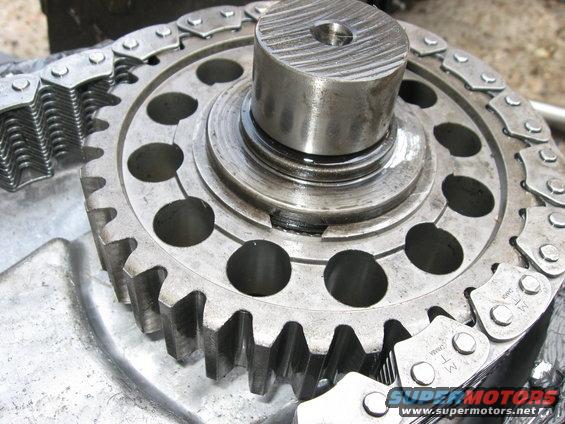
The chain has virtually no lateral movement, so you have to lift both sides at the exact same time. In fact, the gear with the snap ring is all that's holding it in place. The output shaft/gear is free to move up and down once the chain is gone. But, since the chain doesn't move that way, it's held in place. You lift them all together, and then can remove the gears from the chain.

This whole assembly needed to be swapped. Fortunately, it came in one big piece.
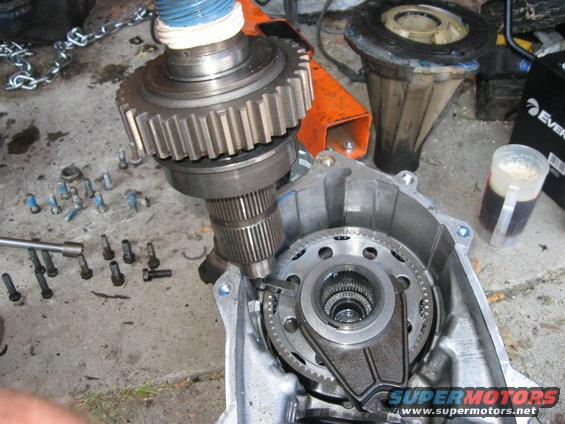
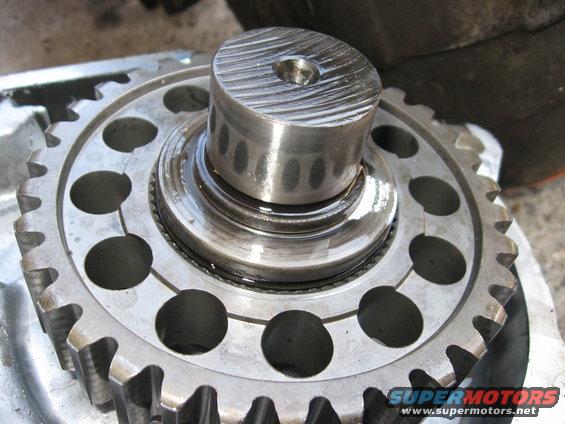
One thing I noticed was that my old case had a magnet in it to catch any metal flake, whereas the new one had the slot for it, but the magnet was missing. Considering that the magnet had metal flakes on it, it was obviously something useful, so I cleaned it off and swapped it over.


Interestingly, the transfer case on the '81 was an NP208 and the one on the '86 was an NP208F. I'm not sure of all the differences, but the internals looked noticeably different.


Tailshaft removed from my old transfer case and put into the new one.

Cleaned both sides super well with a wire wheel, siliconed them up, put some blue loc-tite on the bolts, and put it all back together.
Put the Bronco-specific yolk back in place. Waiting to tighten the nut until it's on the vehicle.

Ready to go in.
I knew I couldn't take out the engine first because of the fact that the mounts on the transmission were broken. The only thing holding the transmission on the vehicle was the engine itself, so the transfer case and the transmission had to come out first.
After I removed the drivelines, it dawned on me that the transfer case had a yolk on it that I was going to need. The transfer case output is a lot different between the Bronco and the truck. I also knew there was simply no way I was going to be able to undo the nut while it was out of the vehicle, so I put the vehicle in gear, put on the parking brakes, and broke out the breaker bar. None of the sockets I had fit, so I had to go buy a new one. Figures I'd have a 1 1/16", 1 1/4", and a 28mm (1 3/32), and none of them fit. The 28mm almost fit, so I did some quick math and figured the next size up was a 1 1/8" (28.6mm). Went and bought one and it fit perfectly.
It was quite an eye opener how much broken transmission mounts were putting strain on my system, not to mention how much power I must've been losing. When I was unbolting the transfer case from the transmission, the transmission and transfer case were twisting in place from me pulling on the wrench. I can't imagine how much they must've been twisting under the vehicle every time I accelerated.
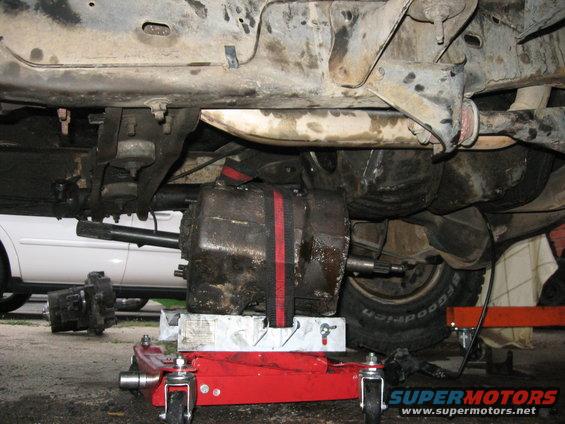
Disconnected transfer case:
A dark picture, but lowering the transfer case down.
After the transfer case was out, I disconnected the shifters and pulled them up and out from in the cab.
This shot also shows how both of the shifters of the SROD are next door to each other.
Then unbolted the transfer case linkage from the SROD (it has two bolts, unlike the NP435, one on each side, and a large arm that goes over the top). Once the trans was free, I unbolted it from the bellhousing and dropped it down. Since it's shifter is in the tailhousing, they don't easily separate, so I had to take them out together. No big deal since they're small and don't weigh a whole lot. I could have easily taken it out without the trans jack.
During this procedure, I found out just how sharp every single darn corner of that transmission jack was. I kept hitting arms, legs, and shoulders on it while moving around under the vehicle and whoever made it simply could not have been bothered to round off any corners. It was sharp, sharp. Finally, it culminated when I hit my head on it in full force and ripped my scalp open. Spent about twenty minutes getting the blood to stop flowing (sorry, no pics!) and went back out to my task with my hair matted down in red. Fortunately, it wasn't bad enough for stitches, but it was close.
Onward.
Broken transmission mounts.
Took the bell housing off and compared it to the old one. They were virtually identical except that the SROD had a larger throwout bearing on the clutch fork. Not sure why. In all reality, I could saved myself a lot of work and just bolted the SROD bellhousing to the NP435, kept my mechanical clutch, and been on my way.
SROD (left) NP435 (right)
Next was the engine. Disconnected everything and pulled it out. It was the second time I'd done it, so it was much easier this go around and really didn't take too long. Just disconnect everything that's attaching it to the frame, such as exhaust, fuel lines, and ignition. Remove the radiator and engine lid. Hook an engine hoist to it, put some tension on it, and then undo the motor mounts, and hoist it out.
I thought this was a fun view under the vehicle.
Also, it was quickly visible just how much BIGGER the NP435 is than the SROD. Granted, I'm sure that's because the NP435 has to have a granny gear in it, which simply demands a larger diameter gear, and therefore a larger casing. But still, this thing is a monster in comparison.
The easy part is over. Now to reverse the process.
First things first, I needed to patch everything up and put it together. The engine got a fresh set of gaskets.
Secondly, the NP435 cover gasket was torn up when I removed it, so I created a new one out of some gasket maker that I had. Worked really well.
Then, I hadn't paid enough attention to the NP208 that I removed and thought all I had to do was swap the housing on the end to swap it over. The tailshaft is much longer and very different, so I quickly realized I had to open up the casing and swap internals for them to work.
If I needed to change the internal speedometer gear, this'd be a great time to do it.
I'd never had an NP208 apart before, but fortunately what I had ahead of me was very easy.
This snap ring is the only thing that held the gear in place. I didn't have the necessary tool to remove it, so I used two flat bladed screwdrivers and was very careful not to break it. I had to, obviously, work it off both transfer cases.
The chain has virtually no lateral movement, so you have to lift both sides at the exact same time. In fact, the gear with the snap ring is all that's holding it in place. The output shaft/gear is free to move up and down once the chain is gone. But, since the chain doesn't move that way, it's held in place. You lift them all together, and then can remove the gears from the chain.
This whole assembly needed to be swapped. Fortunately, it came in one big piece.
One thing I noticed was that my old case had a magnet in it to catch any metal flake, whereas the new one had the slot for it, but the magnet was missing. Considering that the magnet had metal flakes on it, it was obviously something useful, so I cleaned it off and swapped it over.
Interestingly, the transfer case on the '81 was an NP208 and the one on the '86 was an NP208F. I'm not sure of all the differences, but the internals looked noticeably different.
Tailshaft removed from my old transfer case and put into the new one.
Cleaned both sides super well with a wire wheel, siliconed them up, put some blue loc-tite on the bolts, and put it all back together.
Put the Bronco-specific yolk back in place. Waiting to tighten the nut until it's on the vehicle.
Ready to go in.
#3
10-04-2012, 06:06 PM
After getting the "new" engine back in and getting the other one set up to be rebuilt, I started getting the drive line in place.

The NP435 is much taller, so I found it beneficial to jack the vehicle up.
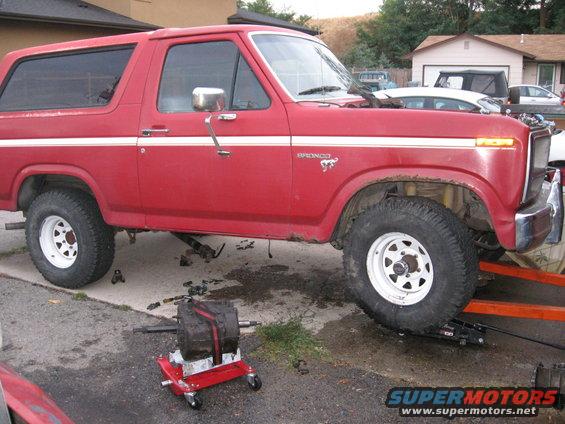
I couldn't get the transmission under the vehicle standing up, so I had to lay it on its side. I figured I'd roll it up once under. A feat quite a bit easier said than done.
As you can see, the transmission cross member is still in place. This led to a long night of frustration. Considering how well bolted in the transmission mount is, I really wanted to avoid removing it. And, if I had known what was ahead of me, I could have done so by putting the transmission in first before putting the engine in place. I fought with the transmission for a good two to three hours, trying to get it up over the cross member AND into the engine. Finally, after I was frustrated to the point of having to hold back man-tears, the transmission wedged itself in place and I couldn't get it free, I called it quits for the night and went inside. It was getting dark and I certainly wasn't getting anywhere.
The next morning, I refreshed and came up with a plan. Either disconnect and pull the engine out of the way again, or unbolt the cross member. I finally freed the cross member (really not too easy) and pulled it back out of the way. Fun part was, once it popped free, it flew back and hit me in the forehead. I enjoyed that and had a good bump for a few days.
Once the cross member was out of the way, things went much more smoothly. I was able to line the transmission up and just jack it up into place. Good lesson in NOT avoiding steps to save some time, because it doesn't work!! Quickly found that the SROD floor pan was in the way, since the NP435's shifter had to go through the hole. I had to pull the floor pan out to make room for the transmission. Twenty minutes of lining up the engine and transmission and it slid right into place.

(Note that this picture is deceiving. The wood blocks are on a floor jack underneath the engine to help align it. They're not under the transmission on the trans jack. The trans jack has been lowered and the transmission is hanging off the engine.)

I'm not much one for cleaning things before they go in. They're just going to get dirty anyway.


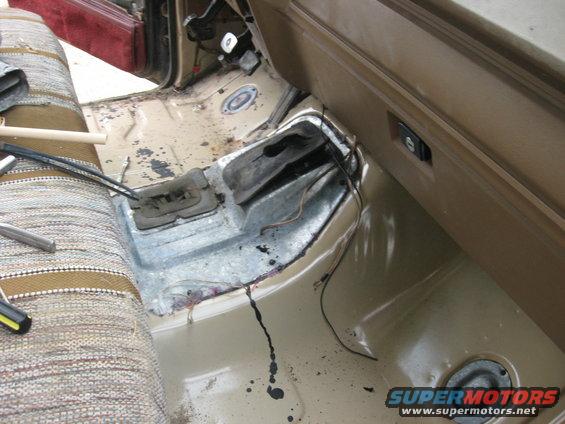
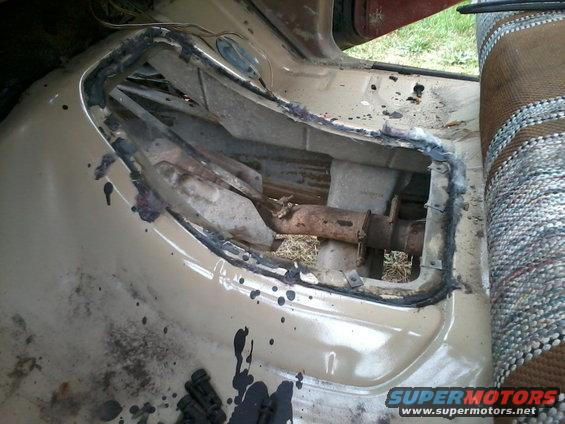
Once in place, I put the new floor pan in. I also knew I was going to have to use the mat from the truck, so I removed the seats and center console, grabbed some shears, and trimmed off all the matting in front of the seats.

I also noticed that the passenger side floor was getting a bit rusty and even had a hole through it in one spot.
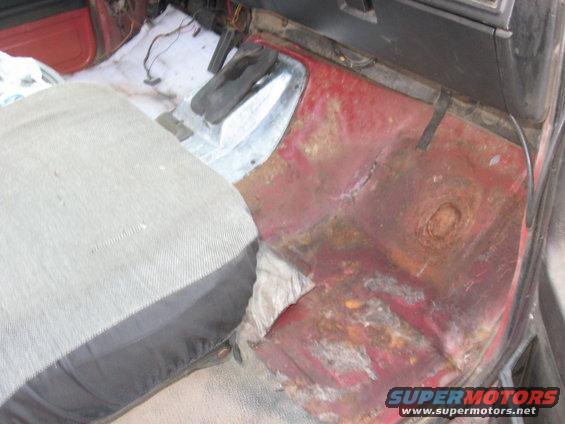
I'll definitely need to deal with that soon, as, after last year's project, I certainly don't want it to get anywhere near as bad as the driver's side was!
Afterwards, I trimmed the back end of the truck's floor mat, laid them over each other, and got everything back in place. There's a slight seam under the front seats, but nothing anyone would notice without looking. Besides, the floor mat is 100x nicer than the one I ripped out. Also, for what it's worth, that GreenWorks cleaner stuff did an amazing job getting of the cigarette buildup that was on the floor shifter boots. (The truck had obviously been smoked in. Fortunately, smell doesn't stick with rubber floor mats).
They almost look new!

Next, I swapped out the pedal setup. I removed the two 18mm bolts on each end and then slid the rod out. The clutch pedal, clutch pedal spring, and brake pedal came off and the rod slid out.

Here's the boxed end, as the mechanical clutch setup has 0 adjustment in it.

I reversed the process with the new pedal rod and then went to put everything together. I quickly realized that the clutch spring was not going to go back in easily. It was a very large, strong spring that was compressed into an area much smaller than itself. I finally realized I had to compress the spring in a vice and wrap it in wire to keep it shortened. Worked to put it in place (fun stuff when you're laying on your back, reaching up under the dash with very limited space). Once the pedals were in place and tightened down, I cut the wire and let the spring extend. It worked well.
Finally, the part I was most nervous about and had been dreading. Also, quite some time has passed. This was a very time consuming project. I started Friday night, worked 9 hours on Saturday, Sunday, Monday, and Tuesday (used vacation time to stay home), and it's Wednesday night.
Time to cut the hole for the hydraulic booster. This is one of those projects where I knew that everything else I did was just wrenching, or moving big stuff. If it didn't work the first time, I could try, try again. With this, if I screwed up drilling this hole, or if it was misaligned, I had a real mess ahead of me.
I measured the circumference of the master cylinder (then divided by pi) to come up with a diameter of 1.4", so I bought myself a 1.5" sheet metal drill saw from Home Depot for around $15.

Fortunately, even though the truck was at my brother's house, my '84 Bronco has a hydraulic clutch so I was able to measure where its hole was and line mine up accordingly.
The gasket for the master cylinder was a great template.

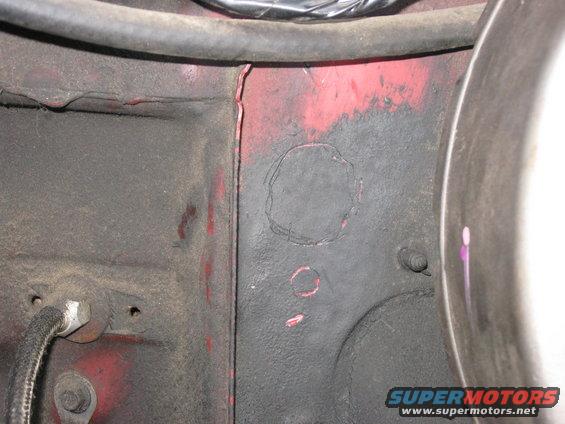
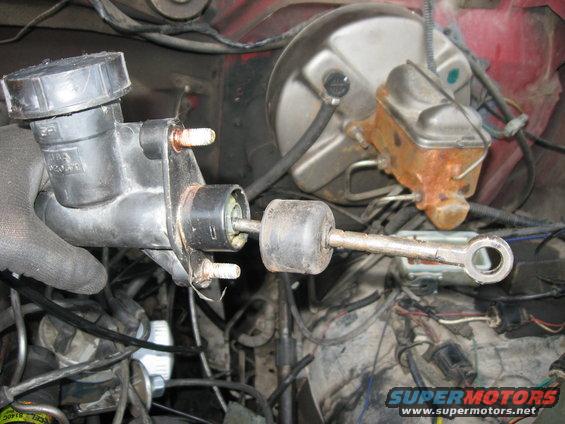
I quickly found I had to remove the brake booster to get the drill where I needed it and then the saw did great work of cutting through the firewall. Drilling the bolt holes was much more of a chore. I started with the smallest drillbit I had and once that was through, I went to the next size up, and up, and up, and up, and up, until I reached a size big enough for the bolt. Once drilled, the master cylinder slid right in. I checked it on the inside and it lined right up with the clutch arm. Awesome.
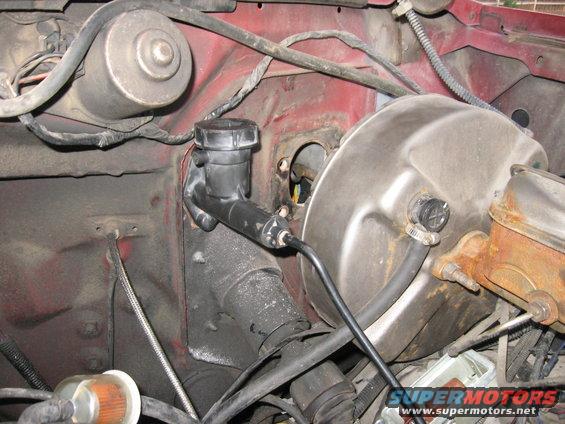
The next hard part was that the reinforcement plate for the steering column in the '81 does not take the master cylinder into account. I checked the '84 I have and it has curves in it to make way for the bolts. I had to use some pliers to pull the metal down a little bit and use a hammer to tap it out of the way. Not too much, so it shouldn't affect any structural integrity. That and it looked ugly, but it's up and out of sight, so no biggie.
I've heard that there is also a reinforcement plate for the clutch master cylinder but my '84 doesn't have it and neither did the '86 I pulled this from and neither have cracks or issues. However, since I drilled through the metal, I'll see if I can track one down.
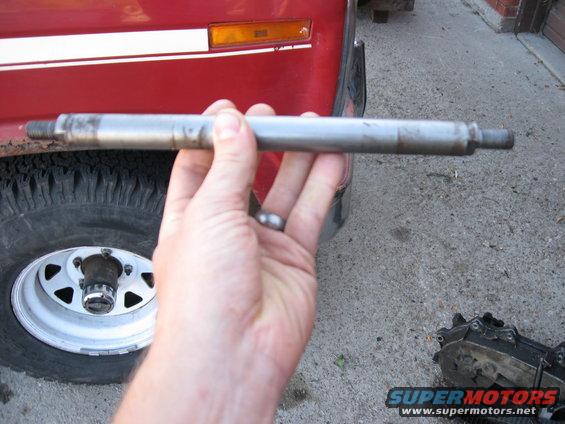
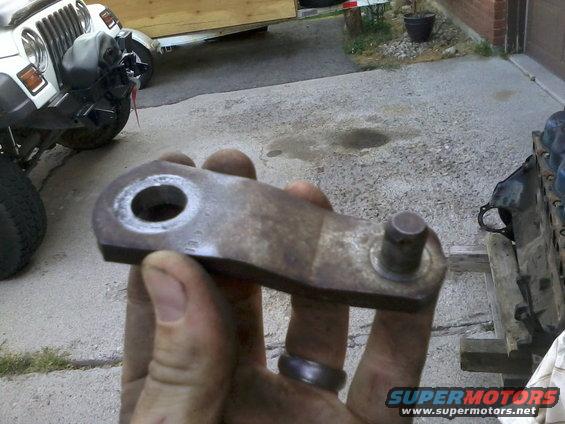
Last part was fitting the clutch arm onto the splines of the pedal rod.
Unfortunately, this is quickly where I ran into a big problem. I worked the arm so that the existing grooves in it lined up with the splines on the end of the rod. It seated really well and then I tightened it down with the nut. When I moved the pedal with my hand, it chewed the splines right out of the arm like they were made out of butter. There was literally no resistance. I felt inside the hole on the arm and it was smoothed out.
I called around and NO ONE sells them. Ford has discontinued them and, despite the fact that I read that service manuals say to replace these every time they're removed, no parts stores or transmission shops carry them either! I checked on Ebay and there were none for sale.
So, Saturday (over a week after I started this project) I headed to the junk yard to get another one (forty mile round trip). After going through about ten trucks where the bushing between the arm and the master cylinder rod had gone out, causing the arm and rod to completely chew each other up, I found a good one, carefully worked it off, and brought it home. I took great care in lining up the grooves, worked it on some so I knew they were lined up, and tightened down the arm. Gave the clutch pedal one press and VOILA! The splines on the pedal rod chewed the teeth right out of this one too. Pulled it back off and it was glass smooth inside.
The only thing I could think of was to weld the arm onto the end of the rod. I didn't like the idea, but I couldn't think of anything else. The only other option was to go to the junk yard again and try, try again, but for 40 miles a trip, no thanks.
It took some work considering how hard the rod is, and how difficult it was to reach, but I finally got it welded together.

I was really unhappy about doing this because it'll cause some real problems disassembling it in the future if I ever need to, but I didn't know what else to do.
However, since then, I have found the arm for sale. It's about $50+ online. Not too cheap. I may save up some and buy one and then go to the JY and get myself another rod. Slide this one about half way out and cut the end off with a saw and then slide it out. Put the new rod in place and put a fresh arm on it. I'd feel much better about that.
At least it works.
Tightened down the yolk on the transfer case, put the drive shafts on, and it was finally time to go. I started it up and gave it a test drive.
Immediately, I very much liked the NP435 over the SROD. The reverse is much lower gearing so instead of having to feather the clutch to back up, it snapped out of its parking spot like it was in low range. I liked it. Plus, unlike with my wife's '84, the granny gear is much more useable in normal driving with the 3.00 rear end vs. her 3.55. The transmission also shifted like butter and was ultra smooth and the clutch was much easier to press.
The other thing I like about the NP over the SROD is 2nd gear. The NP has a 1.79 and the SROD has a 1.92. Going from a 1.92 to a 1.00 is a really big gap. You'd wind up 2nd, and then shift to 3rd and it'd be *******. The 1.79 is a much nicer 2nd (technically third when the granny is considered 1st). It makes for much easier daily driving and cruising around town. Overall, the NP435 with the 3.00 is an AWESOME combination. Plus, the highway RPMs are still very reasonable with the 3.00. I'm at 2500 RPMs at 75mph vs. the 2950 the '84 is at, which is much too high for a 300.
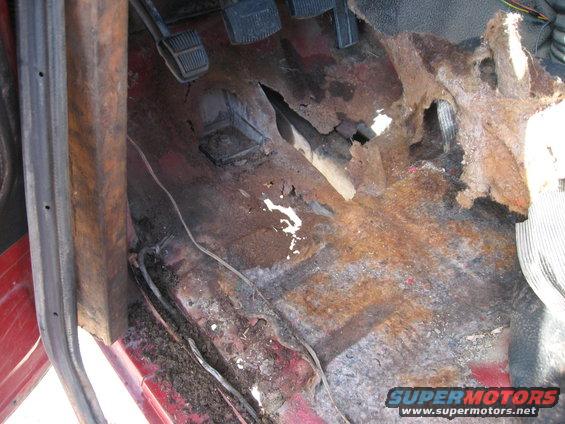
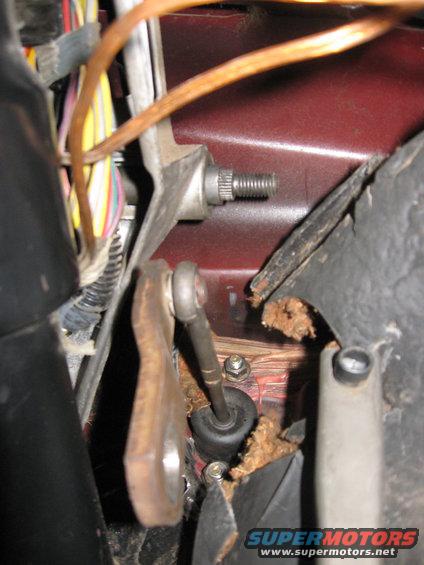
The only thing I'm not pleased with is the clutch pedal. There's not a whole lot of travel to it. As you can see in this pic, it's rather recessed and is about an inch or two further back than the brake.

From what I later found out, the mechanical clutch pedal and hydraulic clutch pedal are different. The hydraulic comes forward further and I reused my mechanical pedal. I may try taking the nut off the end, sliding the pedal off, and putting the hydraulic version on. It should bring it forward some.
Even though, it shifts really nice, so it's not like I don't have enough pedal travel. The only times I'm noticing that I don't quite have enough is when I shift into 1st (technically 2nd). It doesn't always slide right in and I have to give it a little extra oomph. The other is when I really rev up the granny gear, say to 3000 to 4000 RPMs and then shift up, it grinds before it goes in. Lower RPMs aren't a problem at all. I feel that if I could just push the pedal a little further (as of now it hits the firewall), it'd cure these issues.
Overall I'm super happy with it. The hydraulic clutch is much easier to press, it shifts smoother, the gearing is so much better, and I have a robust cast iron transmission that's firmly bolted to the frame instead of a light duty aluminum transmission that torques and twists because it couldn't take the stress and broke its mounts.
I've also changed my crawl ratio from a 25.4:1 to a 52.4:1.
The SROD also always felt like the weak link of my Bronco. It's just one of those things that always made me feel that it wasn't as tough as a Bronco should be. The 300 is a strong, robust engine, I have the highly praised 9" rear, and then a weak little aluminum transmission to tie them together. I just never liked that it felt like it was a weaker Bronco than everyone else's. Now, that's gone. :rockon
It took way longer than expected (I originally figured on a Sat/Sun/Mon job and it ended up taking 5 more days). My hands were bruised, sore, and cut up by the time I was done, and I was mentally and physically exhausted. It was a butt load of work. It's always something I've wanted to do though, so I'm glad I did it, and I'm very pleased with the results. Once I get the kinks worked out (namely the welded arm and short clutch travel) I'll be even more so.
Next is my engine rebuild! :thumbup
The NP435 is much taller, so I found it beneficial to jack the vehicle up.
I couldn't get the transmission under the vehicle standing up, so I had to lay it on its side. I figured I'd roll it up once under. A feat quite a bit easier said than done.
As you can see, the transmission cross member is still in place. This led to a long night of frustration. Considering how well bolted in the transmission mount is, I really wanted to avoid removing it. And, if I had known what was ahead of me, I could have done so by putting the transmission in first before putting the engine in place. I fought with the transmission for a good two to three hours, trying to get it up over the cross member AND into the engine. Finally, after I was frustrated to the point of having to hold back man-tears, the transmission wedged itself in place and I couldn't get it free, I called it quits for the night and went inside. It was getting dark and I certainly wasn't getting anywhere.
The next morning, I refreshed and came up with a plan. Either disconnect and pull the engine out of the way again, or unbolt the cross member. I finally freed the cross member (really not too easy) and pulled it back out of the way. Fun part was, once it popped free, it flew back and hit me in the forehead. I enjoyed that and had a good bump for a few days.
Once the cross member was out of the way, things went much more smoothly. I was able to line the transmission up and just jack it up into place. Good lesson in NOT avoiding steps to save some time, because it doesn't work!! Quickly found that the SROD floor pan was in the way, since the NP435's shifter had to go through the hole. I had to pull the floor pan out to make room for the transmission. Twenty minutes of lining up the engine and transmission and it slid right into place.
(Note that this picture is deceiving. The wood blocks are on a floor jack underneath the engine to help align it. They're not under the transmission on the trans jack. The trans jack has been lowered and the transmission is hanging off the engine.)
I'm not much one for cleaning things before they go in. They're just going to get dirty anyway.
Once in place, I put the new floor pan in. I also knew I was going to have to use the mat from the truck, so I removed the seats and center console, grabbed some shears, and trimmed off all the matting in front of the seats.
I also noticed that the passenger side floor was getting a bit rusty and even had a hole through it in one spot.
I'll definitely need to deal with that soon, as, after last year's project, I certainly don't want it to get anywhere near as bad as the driver's side was!
Afterwards, I trimmed the back end of the truck's floor mat, laid them over each other, and got everything back in place. There's a slight seam under the front seats, but nothing anyone would notice without looking. Besides, the floor mat is 100x nicer than the one I ripped out. Also, for what it's worth, that GreenWorks cleaner stuff did an amazing job getting of the cigarette buildup that was on the floor shifter boots. (The truck had obviously been smoked in. Fortunately, smell doesn't stick with rubber floor mats).
They almost look new!
Next, I swapped out the pedal setup. I removed the two 18mm bolts on each end and then slid the rod out. The clutch pedal, clutch pedal spring, and brake pedal came off and the rod slid out.
Here's the boxed end, as the mechanical clutch setup has 0 adjustment in it.
I reversed the process with the new pedal rod and then went to put everything together. I quickly realized that the clutch spring was not going to go back in easily. It was a very large, strong spring that was compressed into an area much smaller than itself. I finally realized I had to compress the spring in a vice and wrap it in wire to keep it shortened. Worked to put it in place (fun stuff when you're laying on your back, reaching up under the dash with very limited space). Once the pedals were in place and tightened down, I cut the wire and let the spring extend. It worked well.
Finally, the part I was most nervous about and had been dreading. Also, quite some time has passed. This was a very time consuming project. I started Friday night, worked 9 hours on Saturday, Sunday, Monday, and Tuesday (used vacation time to stay home), and it's Wednesday night.
Time to cut the hole for the hydraulic booster. This is one of those projects where I knew that everything else I did was just wrenching, or moving big stuff. If it didn't work the first time, I could try, try again. With this, if I screwed up drilling this hole, or if it was misaligned, I had a real mess ahead of me.
I measured the circumference of the master cylinder (then divided by pi) to come up with a diameter of 1.4", so I bought myself a 1.5" sheet metal drill saw from Home Depot for around $15.
Fortunately, even though the truck was at my brother's house, my '84 Bronco has a hydraulic clutch so I was able to measure where its hole was and line mine up accordingly.
The gasket for the master cylinder was a great template.
I quickly found I had to remove the brake booster to get the drill where I needed it and then the saw did great work of cutting through the firewall. Drilling the bolt holes was much more of a chore. I started with the smallest drillbit I had and once that was through, I went to the next size up, and up, and up, and up, and up, until I reached a size big enough for the bolt. Once drilled, the master cylinder slid right in. I checked it on the inside and it lined right up with the clutch arm. Awesome.
The next hard part was that the reinforcement plate for the steering column in the '81 does not take the master cylinder into account. I checked the '84 I have and it has curves in it to make way for the bolts. I had to use some pliers to pull the metal down a little bit and use a hammer to tap it out of the way. Not too much, so it shouldn't affect any structural integrity. That and it looked ugly, but it's up and out of sight, so no biggie.
I've heard that there is also a reinforcement plate for the clutch master cylinder but my '84 doesn't have it and neither did the '86 I pulled this from and neither have cracks or issues. However, since I drilled through the metal, I'll see if I can track one down.
Last part was fitting the clutch arm onto the splines of the pedal rod.
Unfortunately, this is quickly where I ran into a big problem. I worked the arm so that the existing grooves in it lined up with the splines on the end of the rod. It seated really well and then I tightened it down with the nut. When I moved the pedal with my hand, it chewed the splines right out of the arm like they were made out of butter. There was literally no resistance. I felt inside the hole on the arm and it was smoothed out.
I called around and NO ONE sells them. Ford has discontinued them and, despite the fact that I read that service manuals say to replace these every time they're removed, no parts stores or transmission shops carry them either! I checked on Ebay and there were none for sale.
So, Saturday (over a week after I started this project) I headed to the junk yard to get another one (forty mile round trip). After going through about ten trucks where the bushing between the arm and the master cylinder rod had gone out, causing the arm and rod to completely chew each other up, I found a good one, carefully worked it off, and brought it home. I took great care in lining up the grooves, worked it on some so I knew they were lined up, and tightened down the arm. Gave the clutch pedal one press and VOILA! The splines on the pedal rod chewed the teeth right out of this one too. Pulled it back off and it was glass smooth inside.
The only thing I could think of was to weld the arm onto the end of the rod. I didn't like the idea, but I couldn't think of anything else. The only other option was to go to the junk yard again and try, try again, but for 40 miles a trip, no thanks.
It took some work considering how hard the rod is, and how difficult it was to reach, but I finally got it welded together.
I was really unhappy about doing this because it'll cause some real problems disassembling it in the future if I ever need to, but I didn't know what else to do.
However, since then, I have found the arm for sale. It's about $50+ online. Not too cheap. I may save up some and buy one and then go to the JY and get myself another rod. Slide this one about half way out and cut the end off with a saw and then slide it out. Put the new rod in place and put a fresh arm on it. I'd feel much better about that.
At least it works.
Tightened down the yolk on the transfer case, put the drive shafts on, and it was finally time to go. I started it up and gave it a test drive.
Immediately, I very much liked the NP435 over the SROD. The reverse is much lower gearing so instead of having to feather the clutch to back up, it snapped out of its parking spot like it was in low range. I liked it. Plus, unlike with my wife's '84, the granny gear is much more useable in normal driving with the 3.00 rear end vs. her 3.55. The transmission also shifted like butter and was ultra smooth and the clutch was much easier to press.
The other thing I like about the NP over the SROD is 2nd gear. The NP has a 1.79 and the SROD has a 1.92. Going from a 1.92 to a 1.00 is a really big gap. You'd wind up 2nd, and then shift to 3rd and it'd be *******. The 1.79 is a much nicer 2nd (technically third when the granny is considered 1st). It makes for much easier daily driving and cruising around town. Overall, the NP435 with the 3.00 is an AWESOME combination. Plus, the highway RPMs are still very reasonable with the 3.00. I'm at 2500 RPMs at 75mph vs. the 2950 the '84 is at, which is much too high for a 300.
The only thing I'm not pleased with is the clutch pedal. There's not a whole lot of travel to it. As you can see in this pic, it's rather recessed and is about an inch or two further back than the brake.
From what I later found out, the mechanical clutch pedal and hydraulic clutch pedal are different. The hydraulic comes forward further and I reused my mechanical pedal. I may try taking the nut off the end, sliding the pedal off, and putting the hydraulic version on. It should bring it forward some.
Even though, it shifts really nice, so it's not like I don't have enough pedal travel. The only times I'm noticing that I don't quite have enough is when I shift into 1st (technically 2nd). It doesn't always slide right in and I have to give it a little extra oomph. The other is when I really rev up the granny gear, say to 3000 to 4000 RPMs and then shift up, it grinds before it goes in. Lower RPMs aren't a problem at all. I feel that if I could just push the pedal a little further (as of now it hits the firewall), it'd cure these issues.
Overall I'm super happy with it. The hydraulic clutch is much easier to press, it shifts smoother, the gearing is so much better, and I have a robust cast iron transmission that's firmly bolted to the frame instead of a light duty aluminum transmission that torques and twists because it couldn't take the stress and broke its mounts.
I've also changed my crawl ratio from a 25.4:1 to a 52.4:1.
The SROD also always felt like the weak link of my Bronco. It's just one of those things that always made me feel that it wasn't as tough as a Bronco should be. The 300 is a strong, robust engine, I have the highly praised 9" rear, and then a weak little aluminum transmission to tie them together. I just never liked that it felt like it was a weaker Bronco than everyone else's. Now, that's gone. :rockon
It took way longer than expected (I originally figured on a Sat/Sun/Mon job and it ended up taking 5 more days). My hands were bruised, sore, and cut up by the time I was done, and I was mentally and physically exhausted. It was a butt load of work. It's always something I've wanted to do though, so I'm glad I did it, and I'm very pleased with the results. Once I get the kinks worked out (namely the welded arm and short clutch travel) I'll be even more so.
Next is my engine rebuild! :thumbup
#4
10-04-2012, 08:12 PM
Fleet Mechanic
Awesome write up, that's not an easy job you did! I pulled the c6 out of my truck and put in an np435 a couple years ago and I love it, especially reverse gear! But my back still hurts whenever I think about trying to lift it up to get it bolted to the motor. That thing is a heavy beast!
Be careful with the clutch adjustment though, if it isn't releasing all the way you can chew up your clutch and the syncros in your transmission. I would go ahead and put the right petal on there.
Sam
Be careful with the clutch adjustment though, if it isn't releasing all the way you can chew up your clutch and the syncros in your transmission. I would go ahead and put the right petal on there.
Sam
#5
10-05-2012, 11:02 AM
I'll be sure to get the pedal swapped out for some more movement. But, if it was wearing on the clutch, wouldn't I be able to hear it? Or at least get some grinding? (Besides the shifting out of high RPM with the granny gear).
As it is now, I don't like the short pedal, but there's no noise, and it shifts very smooth and effortless.
And yes, it's almost been a week now, and my lower back is still sore! What a tank.
As it is now, I don't like the short pedal, but there's no noise, and it shifts very smooth and effortless.
And yes, it's almost been a week now, and my lower back is still sore! What a tank.
#6
10-05-2012, 06:03 PM

#7
10-05-2012, 06:42 PM
Yeah, in the end I realized I could have saved a lot of hassle, but after unbolting it and dropping the steering column, I realized I wasn't going to be able to get it out without dismantling the entire dash (unless I was missing something) so once I realized I could just pull the whole pin out, I went that route.
In hindsight, I wish I would have left it on there and pulled it out together, but I had no idea this issue was going to come up.
But I'm already in love with the NP435.
In hindsight, I wish I would have left it on there and pulled it out together, but I had no idea this issue was going to come up.
But I'm already in love with the NP435.
Trending Topics
#8
10-05-2012, 06:53 PM
Fleet Mechanic
Welcome to the club! 
Every once in a while I look at other transmissions, but nothing else has a reverse that low, and few have a granny that low. I love it! An overdrive would be great for the freeway, but hey, that's why they make brownie boxes!
Sam
Every once in a while I look at other transmissions, but nothing else has a reverse that low, and few have a granny that low. I love it! An overdrive would be great for the freeway, but hey, that's why they make brownie boxes!
Sam

#10
10-06-2012, 11:53 AM
Fleet Mechanic
#11
10-06-2012, 10:12 PM
Elder User
Join Date: Sep 2010
Location: Small acerage in Nebraska
Posts: 667
Likes: 0
Received 0 Likes
on
0 Posts
Looks like a good project. I like the granny 1st in the NP435 and the 208 box seems plenty strong as well. I had done some research on the SROD trans when I found one in an 82 F150 x cab I parted out awhile back. Managed to sell the tranny and the t-case for as much as I'd paid for the truck, someone really wanted that for his truck and I was happy to exchange it for some cash!
post a link for where you found that replacement arm, just in case I need to do this someday.

post a link for where you found that replacement arm, just in case I need to do this someday.
#12
10-07-2012, 10:00 PM
#13
10-07-2012, 11:22 PM

#14
10-07-2012, 11:36 PM
Slightly different pedal assembly. The arm on the clutch pedal pushes down instead of forward. And the firewall has some obstacles to work around.
Nothing major but more difficult then the 80+ trucks.
#15
10-08-2012, 08:58 AM