
HPOP Swap "Nightmare"
#1
 10-01-2011, 06:30 PM

I won a Terminator Engineering Modded 17° HPOP in the raffle at RRE 2010 and had never installed it. I met Joey from TE earlier this year at a GTG at Andy's (Fat Diesel). I asked if, and he said he would, upgrade the modded HPOP to a T500. When I got back home I sent it to him and he sent it back as a T500. Since I had a small HPOP leak since mid 2009 that was startng to get worse I decided now was the time to swap in the T500. I know what you're thinking. How could I put up with an HPOP leak for 2 years. Hey, it only leaked about a tablespoon of oil in abut 2,000 miles. I'd just clean it out of the valley periodically. It never got past that first depression in the valley, until lately, and that is when I decided to do something about it. The leake turned out to be a blown "non- serviceable" plug o-ring.
Now for the "Nightmare". As I was torqueing the driver side HPOP mounting bolt all of a sudden no resistance. Yep, you guessed it. I had stripped out the mounting bolt hole threads in the front cover. I thought I would have to replace the front cover, hence the term "Nightmare". I knew I wasn't the only dummy to have ever done this so I called Clay for some advise. He said that this was not all that uncommon and to contact Joey.
I contacted Joey and he got right back to me. He sent me a link to a thread on Forddieselpower.com. Thank you much Joey. The link is Bomb Proof Hpop Install Parts. And another thank you to Steve at Magicsmokeperformance.com for the Bomb Proof thread. You can click on the Bomb Proof link for some background and then follow this thread. I have some pics!!!
Below is the info about the EZ Lok inserts available through Fastenal. There were none readily avalable in the Phoenix area but the Scottsdale store ordered them for me and I had them in four days.
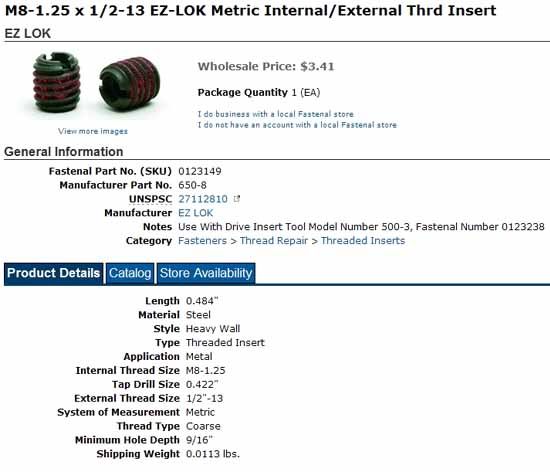
To install the inserts you have to drill a 27/64" hole and tap it for 1/2" x 13 threads. The 8MM x 1.25 pitch threads inside the insert of course match those of the HOP mounting bolts.
The insert only needs a 9/16" deep hole but you have to account for the tapered end of the tap. To determine the depth of the hole I lined up the bit, tap and insert. Collar on drill and tape on the tap were to gauge the depth. If you don't allow for the extra length of the tapered end of the tap the insert will bottom out before it is flush with the surface of the front cover, and being flush is a must. I don't give any exact measurements because taps can differ. This method worked just fine.

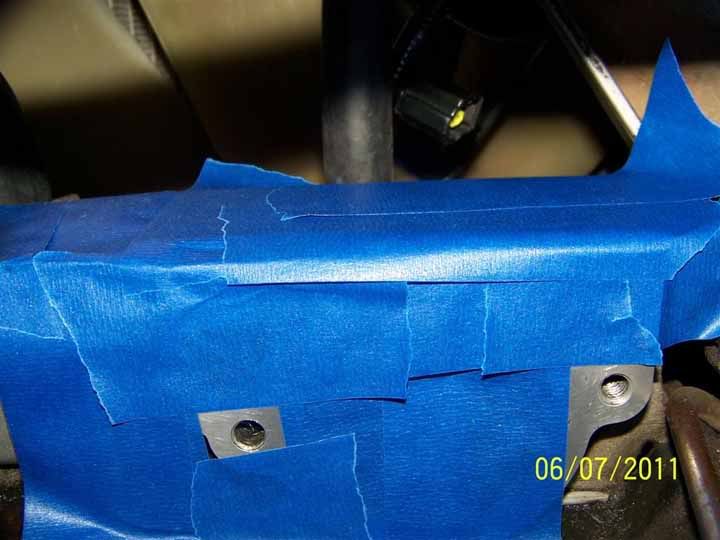
I masked off the back of the front cover so the drill and tap shavings would not get into the front cover oil passages.
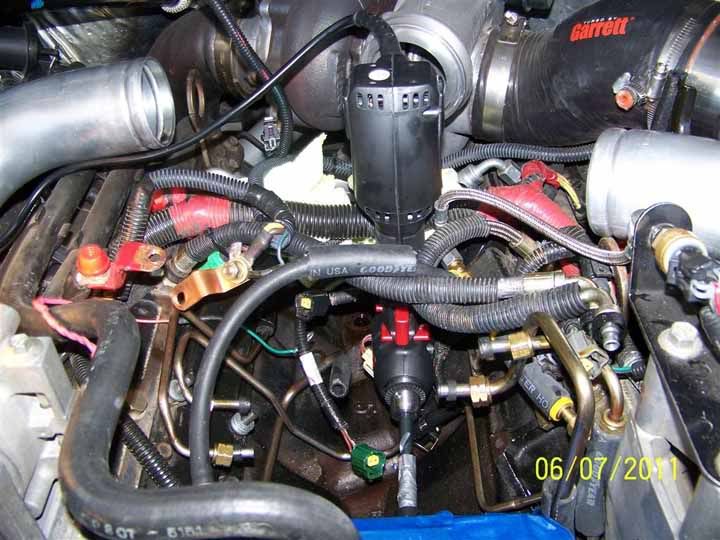
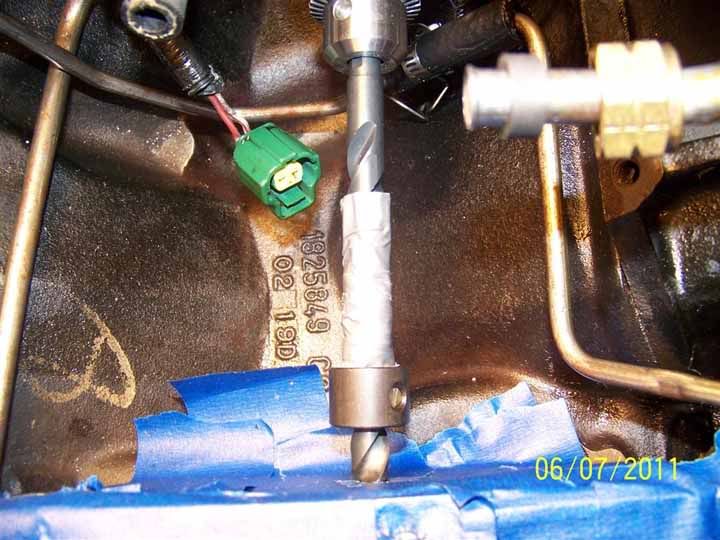
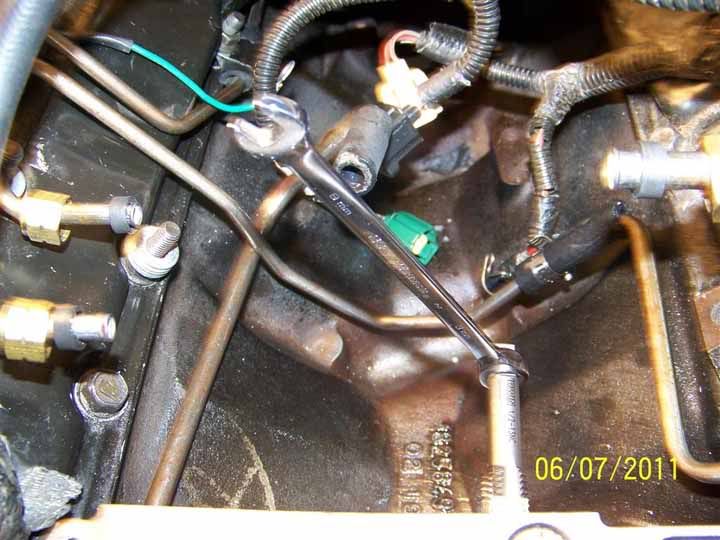
The below pic using the right angle drill illustrates how little room there is. I was using a regular length drill bit. I you can find a stubby drill bit you may not have to remove the spider. A stubby drill bit would also give you more control. There is even less room on the passenger side.
I backed up the collar with some duct tape. I have had these collars slip before and didn't want to chance it. If you don't have a collar you can just put a thick wrap of tape around the bit. Use some lubricant when drilling.
There is no room to use a t-handle on the tap. I found that a 12-point 8MM ratcheting box end wrench was a perfect fit and worked great. A 12- point 8MM socket and ratchet would work just as well, but I didn't even think of it. A regular box end or open end would work, but it would have to be taken off and put back on repeatedly. I would do 2 complete turns and then back it out and clean the shavings off the tap and then go again. Use some lube while tapping as well.
Since there was not enough room on the passenger side to use the long bit (the intake plenum was in the way and I didn't want to remove it) I did not put an an insert on that side. I hope I don't regret it later, but I managed NOT to strip out that hole when I mounted the HPOP.
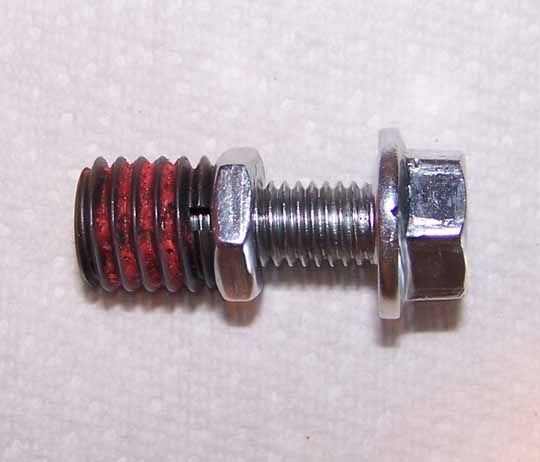
EZ Lok does have an inserting tool but you can just lock nut the insert to a bolt as pictured below. Just pick up an 8M x 1.25 bolt and nut. I was leary about using one of the stock bolts. I may have gone into dummy mode again and somehow screw up a stock bolt. I got a flange head bolt because it is easier to control with a socket. Remember, the insert must be installed so it is flush with the surface of the front cover.
The "Nightmare" turned out to be only a bad dream. But I didn't know that when the mounting hole first stripped.
Be careful with those HPOP mounting bolts. You should be able to hand tighten them with an extension and socket until the HPOP is snugged up against the front cover. Then and only then should you put a wrench to them. And I knew this. It wasn't like my first HPOP R&R. It was like my fourth.
Clay, although not on his website, does now carry the EZ Lok inserts. If you ever need them, and I hope you never do, give him a call.
PDF Version:
Now for the "Nightmare". As I was torqueing the driver side HPOP mounting bolt all of a sudden no resistance. Yep, you guessed it. I had stripped out the mounting bolt hole threads in the front cover. I thought I would have to replace the front cover, hence the term "Nightmare". I knew I wasn't the only dummy to have ever done this so I called Clay for some advise. He said that this was not all that uncommon and to contact Joey.
I contacted Joey and he got right back to me. He sent me a link to a thread on Forddieselpower.com. Thank you much Joey. The link is Bomb Proof Hpop Install Parts. And another thank you to Steve at Magicsmokeperformance.com for the Bomb Proof thread. You can click on the Bomb Proof link for some background and then follow this thread. I have some pics!!!
Below is the info about the EZ Lok inserts available through Fastenal. There were none readily avalable in the Phoenix area but the Scottsdale store ordered them for me and I had them in four days.
To install the inserts you have to drill a 27/64" hole and tap it for 1/2" x 13 threads. The 8MM x 1.25 pitch threads inside the insert of course match those of the HOP mounting bolts.
The insert only needs a 9/16" deep hole but you have to account for the tapered end of the tap. To determine the depth of the hole I lined up the bit, tap and insert. Collar on drill and tape on the tap were to gauge the depth. If you don't allow for the extra length of the tapered end of the tap the insert will bottom out before it is flush with the surface of the front cover, and being flush is a must. I don't give any exact measurements because taps can differ. This method worked just fine.
I masked off the back of the front cover so the drill and tap shavings would not get into the front cover oil passages.
The below pic using the right angle drill illustrates how little room there is. I was using a regular length drill bit. I you can find a stubby drill bit you may not have to remove the spider. A stubby drill bit would also give you more control. There is even less room on the passenger side.
I backed up the collar with some duct tape. I have had these collars slip before and didn't want to chance it. If you don't have a collar you can just put a thick wrap of tape around the bit. Use some lubricant when drilling.
There is no room to use a t-handle on the tap. I found that a 12-point 8MM ratcheting box end wrench was a perfect fit and worked great. A 12- point 8MM socket and ratchet would work just as well, but I didn't even think of it. A regular box end or open end would work, but it would have to be taken off and put back on repeatedly. I would do 2 complete turns and then back it out and clean the shavings off the tap and then go again. Use some lube while tapping as well.
Since there was not enough room on the passenger side to use the long bit (the intake plenum was in the way and I didn't want to remove it) I did not put an an insert on that side. I hope I don't regret it later, but I managed NOT to strip out that hole when I mounted the HPOP.
EZ Lok does have an inserting tool but you can just lock nut the insert to a bolt as pictured below. Just pick up an 8M x 1.25 bolt and nut. I was leary about using one of the stock bolts. I may have gone into dummy mode again and somehow screw up a stock bolt. I got a flange head bolt because it is easier to control with a socket. Remember, the insert must be installed so it is flush with the surface of the front cover.
The "Nightmare" turned out to be only a bad dream. But I didn't know that when the mounting hole first stripped.
Be careful with those HPOP mounting bolts. You should be able to hand tighten them with an extension and socket until the HPOP is snugged up against the front cover. Then and only then should you put a wrench to them. And I knew this. It wasn't like my first HPOP R&R. It was like my fourth.
Clay, although not on his website, does now carry the EZ Lok inserts. If you ever need them, and I hope you never do, give him a call.
PDF Version:
#2
10-01-2011, 06:41 PM

#3
10-01-2011, 07:07 PM
"Heli-coil on steroids" is what Steve called them in his thread.
#4
10-01-2011, 07:30 PM


#6
10-01-2011, 07:33 PM

#7
10-01-2011, 07:36 PM

Trending Topics

#10
10-01-2011, 07:39 PM
I was more concerned with lining up the drill bit. Because of the angle the engine sits you need to have the rear of the bit just slightly lower then the front. If you don't push on the drill to hard the bit will follow the original hole.
#11
10-01-2011, 09:26 PM

#12
10-01-2011, 09:26 PM
If you are going to go with dual HPOPs the EZ Loks should be a must.
PLUS : Thanks to all for the compliments on the write-up.
#13
10-01-2011, 09:37 PM
Is Monty in lieu of a security deposit. He's like the tool crib watch dog, eh.
#14
10-01-2011, 10:03 PM
Elder User
