1970 Ford F250 4x4 dealer A/C pics and information??
#1
 08-16-2011, 08:27 PM


Join Date: Jan 2011
Posts: 28
Likes: 0
Received 0 Likes
on
0 Posts
1970 Ford F250 4x4 dealer A/C pics and information??
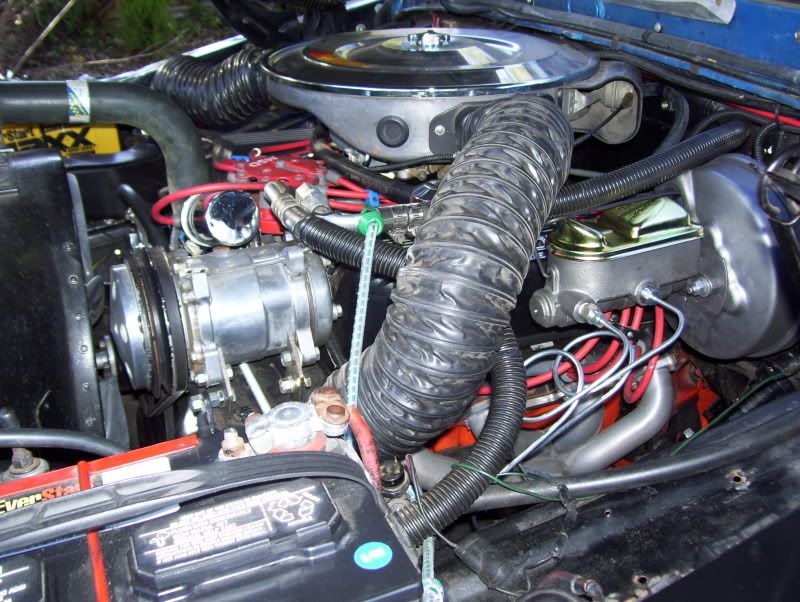
Here is what I have the truck is a 1970 F250 4x4 factory Hiboy. I never had air conditioning so I found a dealer installed system on another truck that was missing some parts it has been installed inside for years with just never had the parts out front to hook up the A/C. This is the unit that bolts under the dash with the glove box at the bottom of it since the expansion valve, lines and clutch cycle switch are where the original glove box is. I finally set out on getting up and running this last weekend. Has fresh compressor, dryer, vintage air condensor, expansion valve and lines. Everthing except for the evaperator is switched to o-ring fittings. Now we know what we are working with
Does anyone have any pictures of where the A/C clutch cycle switch probe is suposed to be on the evaperator?? My box did not have one on it and I have not been able to find pictures of where the probe is suposed to be on the evaperator if it is suposed to be in the stuck in the fins of it is suposed to be up where the expansion valve probe is on the low side evaperator outlet.
The second question is what is the refrigerant capacity of the dealer installed systems. If there is not a set spec what is a good starting point I guessed about 3 pounds but if someone had the factory spec that would be great.
Third what are you guys seeing for low side and highside pressures with your systems. The pressures along with the ambient temp at the time would be some great info. Just to give me an idea where these old systems like to run on R134A. I have worked on a pile of the newer systems which seem to be a lot more efficent then this stuff is.
Any help would be great.
Thanks,
Kris
#2
08-17-2011, 02:09 AM

Welcome to FTE
What you found is Factory installed Integral A/C, not dealer A/C. Integral refers to the fact that the A/C is combined with the heater. Dealer A/C isn't.
On 1968/72's with factory A/C, the expansion valve mounts where the glove box liner would be, necessitating the separate glove box built into the bezel.
With factory A/C, the A/C controls are within the heater control panel. Dealer installed A/C has the A/C controls (2 switches w/*****) in the bezel.
Both these units are "hang-ons," bolt to the bottom of the dash. This unit takes 2 1/2 lbs. of R-12 freon.
IMO, you need to see the parts catalogs pics, there are so many individual parts, the catalog I'm using is on microfiche, having 67 year old eyes is no picnic either.
The Integral A/C parts are illustrated here:
1964/72 Ford Truck Parts Catalog / Illustration Section: 195, Page 5 (Passenger Compartment Parts) / Section 197: Page 6 (240/300) or Page 7 (360/390) = (Engine Compartment Parts), Page 8 (Underhood A/C Hoses/Routing).
This catalog is available on a CD from hipoparts.com for 22 bucks. Green Sales Co. (greensalescompany.com -sells NOS parts) is located in Cincinnati OH .. has a help line (513-731-3304), will scan and email pics.
This was a free service at one time, dunno about today.
Note: Basic part numbers only shown in illustrations. The text section of the catalog is needed to get the complete part number.
For example, the passenger compartment illustration shows basic number 19849 for the expansion valve. The text sez: 1968/72 F100/350: C8TZ-19849-A .. Expansion Valve-Use with Integral A/C (Motorcraft YG-63).
If you list the basic numbers you need, I'll give you the part numbers, search for the parts (all are obsolete), post what I find.
#3
08-17-2011, 08:55 AM
Join Date: Jan 2011
Posts: 28
Likes: 0
Received 0 Likes
on
0 Posts
Thanks for the info. I guess I got it a little over charged then that might explain why it is acting a little wierd. I will have to give Green Sales a call and see if they can email me a page of or two. Really I dont need any more parts for it. I have all the parts installed and it is up and running. My main question was where is the temp probe for the clutch cycle switch suposed to read from. The best I can tell from the pics I have seen is it is suposed to be stuck in the fins of the evaperator.
#5
08-17-2011, 11:20 PM
I hope you've upgraded the compressor to a sanden compressor for the r134.
If not it's a matter on time that the york compressor will die from the high pressure. Plus the low side runs to high as you may have found out. My system holds 30oz. of r12 with a sanden 5cyl. compressor. I just charged mind back up last week after replacing the exp-valve. I Don't have the warm air blowing in the stop & go driving like r134. But maybe you know moving your condenser as close as you can to the radiator helps with this problem. my 2cents..
orich
#6
08-19-2011, 09:07 AM
Join Date: Jan 2011
Posts: 28
Likes: 0
Received 0 Likes
on
0 Posts
I hope you've upgraded the compressor to a sanden compressor for the r134.
If not it's a matter on time that the york compressor will die from the high pressure. Plus the low side runs to high as you may have found out. My system holds 30oz. of r12 with a sanden 5cyl. compressor. I just charged mind back up last week after replacing the exp-valve. I Don't have the warm air blowing in the stop & go driving like r134. But maybe you know moving your condenser as close as you can to the radiator helps with this problem. my 2cents..
orich
If not it's a matter on time that the york compressor will die from the high pressure. Plus the low side runs to high as you may have found out. My system holds 30oz. of r12 with a sanden 5cyl. compressor. I just charged mind back up last week after replacing the exp-valve. I Don't have the warm air blowing in the stop & go driving like r134. But maybe you know moving your condenser as close as you can to the radiator helps with this problem. my 2cents..
orich
Thanks,
Kris
#7
08-19-2011, 10:22 AM
No, I have just an older style hang on unit that is just AC. Most ac units I've seen the Thermostat temp probe is siting in front of fins or stuck between them if fins are spaced wide enough apart. The air temp coming out of my unit is 35*degrees... I think you should just stop fighting it and go to the Sanden compressor. Not only for a better cooling system AND to end your headaches. You also will get better gas mileage to, which is really a needed thing with these old classic gas guzzles-ers. Having that fan setup will really help with the stop & go driving with r134 system in eliminating the warm air blowing in this type of driving..My 2 cents
orich
orich
Trending Topics
#8
08-19-2011, 07:30 PM
Join Date: Jan 2011
Posts: 28
Likes: 0
Received 0 Likes
on
0 Posts
I was down at the pull apart today and ran acorss a few 70s fords that had the A/C on them and that is where the probe is stuck right in the evaperator fins. That is where I have it and it seems to be working better.
I am working on getting the right combo of pulleys on the front of the motor right now. Maybe Number dummy can chime in and help me out.
I have two A/C pulleys they are:
Mapco DP-501 standard steel
Mapco C-277 which is cast and pretty heavy.
Both are the same size both are the same height. I have the steel one on there right now as it is lighter what is idea of the cast one.
Crank pulleys
D3TE-6312-AB
C8AE-6312-D
I have the D3TE pulley on there right now as it is lightly larger then the other one figured it would spin the alternator and the A/C pump faster.
Water pump pulleys
C6AE-8509-A
C4AE-8509-A
I have the C6AE pulley on there since it is the smaller of the two figureing it will spin the water pump a little faster for better cooling.
I have two diffrent A/C clutches. One is a twin rib pulley that is 7 inches diameter. This clutch came with the DP-501 pulley and A/C bracket that I bought as a set that was said to have came off of a 68 big block mustang. From what I can gather the set was from a dealer installed A/C system from on a big block mustang. Which is the combo I have mounted on the motor right now.
The other clutch I have is a single rib pulley that is 6.25 in diameter with a 8.25 by 1.25 flywheel right behind it. This clutch came off of a 73 modle F-150 with what looked to be factory A/C as it had an idler on one side and tensioner on the other side of the water pump bolted to a cast L bracket on the head and another piece that bolted to the water pump.
I have the integral A/C system inside is it ok to run the dealer installed brackets, clutch, and crank pulley out front or do I need to try to put the other set of brackets and twin idler system out front that I am guesing would have came with the integral A/C system from the factory??? I know this is a lot of info and questions but the help would be greatly apriciated
#9
08-19-2011, 11:12 PM
The water pump pulley i'm running is C6AE is like 6.3/16'' and was running the lower crank pulley C8AE which runs just fine for my setup, But I do have the extra large radiator plus running a clutch fan with a 18" fan oe D3TE and a shroud with a 180*temp-stat. These pulleys came off a 1974 f250 that had ac that, I bagged along with the 501 mirror eng. block that i'm now running from a build up my son an, I did a few yrs ago..''
ps..I hate to see you waste so much time or maybe you have nothing better to do then put in lots of time on this york compressor that will never work for long. You'll just end up like all the rest who have tried using the York Compressor just blowing the seals out from the high pressure of the r134.. my 2cents
ps..I hate to see you waste so much time or maybe you have nothing better to do then put in lots of time on this york compressor that will never work for long. You'll just end up like all the rest who have tried using the York Compressor just blowing the seals out from the high pressure of the r134.. my 2cents
#10
08-20-2011, 09:53 AM
Join Date: Jan 2011
Posts: 28
Likes: 0
Received 0 Likes
on
0 Posts
ps..I hate to see you waste so much time or maybe you have nothing better to do then put in lots of time on this york compressor that will never work for long. You'll just end up like all the rest who have tried using the York Compressor just blowing the seals out from the high pressure of the r134.. my 2cents
Which compressor are you using?? Part number? Is it mounted in the same spot at the york was? Where or what did it come off of??
Thanks,
Kris
#11
08-20-2011, 11:18 AM
I'm using the sanden r12 model #508 that was used by many dealers as a add on air units.Got mind off a early model Toyota's. You'll want to use the sanden 505 model which is for r134 it is o-ringed for the higher psi. They come with a single or dual rib belt pulley.You'll need the mounting adapter plate with the belt adjuster if you don't use the idler pulley adjuster this mounts it into the old york base plate block mount. . Where as my 508 is for flared pipe tubing ends. So yes it mounts in the same place as the york. These sanden are also used on all the hot rod after market ac air add ons. The sanden 505 comes with the add on ford truck kits..
orich
orich
#12
08-20-2011, 06:22 PM
Join Date: Jan 2011
Posts: 28
Likes: 0
Received 0 Likes
on
0 Posts
Thanks for the info I might do a little looking around for one while I am scroungeing the pull a part tomarrow. I have seen them before my friend has one on his dealer installed on a chevy. Think one of my other friends has one on junk big block chevy sitting on the floor of his shop.
Did you fab your own adapter plate or did you buy one?? If so where did you get it from??
Just an update on my system though it is amazing how well everything works when you get the right combo of pulleys and clutch and all together on the motor. Turns out the diffrence between the cast A/C pulley and the steal one is that the steel one will only fit in the middle of certain sized crank pulleys. The single ribbed A/C clutch with the flywheel behind the pulley is the one that lines up right with the dealer installed bracket. I had to space out my tensioner to make it line up I am guessing there is a tensioner out there that has the right stand off to line up the dealer installed bracket clutch and fourth rib pulley.
Orich, you are right about the not wanting to cool at an idle but it still blows out 70 degree air while it is 93 down here at an idle. I am guessing that is the good condenser I have installed helping that out. Running down the road it blows out a constant 59 degrees even with the heater valve leaking a little bit. I am going to install a vacume controled heater valve to take care of that problem this next week. I need to get the clutch cycle switch adjusted right because it is trying to freeze the condenser running down the road. It is getting ever closer and closer.
#13
08-20-2011, 07:59 PM
If your evaporator is starting to get freeze ups you may have some AIR still in your system. When you pull a vacuum you should be pulling it form both the high and low sides to get all the air out for a good 20-30 minutes. Your expansion valve may not be working right. It may have some crap in it if you didn't may sure having the lines clean and blown out before installing them.
Also a some guys don't think to bleed the air from the yellow charging hose once a can of freon is attached to the end, they just attach to compressor then push the air with in hose into the system with bleeding air out. The sanden mounting brackets are sold at most classic ac hot rod supply online places. I've gotten many items at a good price from Nostalgic Air Parts in Florida. I got my mounting bracket from TX. about 5 yrs ago, don't remember the vendor. But Nostalgic Air Parts has everything you need. PS the thermostat switch is for setting how cool you want your cab to be not to cycle off the the compressor from freezing up. That's the what the expansion valves is for. the sensing bulb should be clamp to expansion inlet tube and rapped with the cork tape to get a good reading so it don't freeze up letting in to much freon in making the evaporator colder & colder until it all iced up the fins..
For better city stop & go driving you can place some foam rubber strips like 1"x1"x12"? size of your condenser all around the condenser edge between it an radiator so there is no open air gaps. You want full flow of air getting pulled through the condenser.This helps get full pull through the fins gets better cooling stop & go traffic driving..
my 2cents
orich
#14
08-22-2011, 09:52 AM
Join Date: Jan 2011
Posts: 28
Likes: 0
Received 0 Likes
on
0 Posts
After driving it more this weekend. The evaperator is not freeze up just the lines lines where sticking out of the top of the evaperator are getting frost on them as they dont dont have fins or get any air flow across them in the glove box. The rest of the evaperator is sweating just like it is suposed to. I could problalby put some insulation on them and they would not frost up like that.
We charged the system on a brand new robinair machine it has been evacuated for prolbalby a total of about 45 minutes and recovered a couple times since we thought we were going to have to open the system back up and change expansion valves (we did not have the cork tape covering the expansion valve bulb). I had never worked on a system that had that sort of exapansion valve most of the systems I have worked on have block style expansion valves or orfice tubes. Imagine that they had all that black nasty goo on there from the factory for a reason.
Orich, you are right that the clutch cycle switch adjust how cold the cab is. The problem comes in if the clutch dosent cycle when you drop the fan speeds down or the air in the cab gets cold enough it will freeze the evaperator right up weather the expansion valve is working problerly or not. This is why newer cars run a clutch cycle switch on the high pressure line to normally cycle the clutch and also have a evaperator sensor to cycle the clutch to keep the evaperator from freezing up. This situation is easier to make happen the better you make the system, better condensers, bigger cooling fans, better compressors....ect.
#15
08-22-2011, 11:34 AM
Well it's sounds like you've done it all right! My old 90 bronco ll had the timed cycling high pressure switch with orifice tube system that was r12. Anyway as you may know it's not used on this older r12 system. I've heard that the reed valves in the york compressor are to weak and just can't handle the high psi of the r134 which causes all the problems your having. But like, I said it's hear say..
orich..
Ps QUESTION-?????
Just a Thought??
Since this is your first older system your working on, hope you know that these are charged with FREON GAS. Not like the newer systems that fill with liquid freon..
orich..
Ps QUESTION-?????
Just a Thought??
Since this is your first older system your working on, hope you know that these are charged with FREON GAS. Not like the newer systems that fill with liquid freon..
Last edited by orich; 08-22-2011 at 06:13 PM. Reason: QUESTION