
1973 F350 Ranger Restoration

#18
 08-21-2011, 12:08 PM
Elder User
#19
08-21-2011, 12:56 PM

Join Date: Oct 2010
Posts: 69
Likes: 0
Received 0 Likes
on
0 Posts
It is a MegaSquirt 3 DIY set up. I had to do a bit of fab work on the engine (crank and cam signals) to do sequential.fuel and spark.
Look at the following link for info.
MegaSquirt-3 Engine Management System
I have lots of pictures. I did it in stages...
Look at the following link for info.
MegaSquirt-3 Engine Management System
I have lots of pictures. I did it in stages...
#21
08-21-2011, 01:16 PM
Join Date: Oct 2010
Posts: 69
Likes: 0
Received 0 Likes
on
0 Posts
MegaSquirt is very flexible. It can be using on almost anything from a V12 to even a 1 cyl lawnmower engine.
There is a company that makes a plug and play set up ( DIYAutoTune.com Megasquirt Kits / Assembled Engine Management Systems, Wideband o2 Sensor Systems and tuning products ) for some popular applications.
There is nothing MegaSquirt wise for a FE plug and play wise. It requires a lot of DIY work.
I had good success with it, I drove with it for about a year in various modes and found it to be reliable.Even more fantastic was how well my FE ran under all conditions.
#22
08-21-2011, 01:28 PM

#23
08-21-2011, 01:33 PM
Elder User
#24
08-21-2011, 02:12 PM
Senior User
Join Date: Sep 2006
Location: West Point, UT
Posts: 146
Likes: 0
Received 0 Likes
on
0 Posts
Edelbrock has a bolt on intake manifold with the injector holes in it for multiple applications.
Edelbrock 29365 - Edelbrock Victor EFI Intake Manifolds - Overview - SummitRacing.com
-Destin
Edelbrock 29365 - Edelbrock Victor EFI Intake Manifolds - Overview - SummitRacing.com
-Destin
#25
08-21-2011, 02:16 PM
Elder User
#26
08-21-2011, 05:13 PM
Join Date: Oct 2010
Posts: 69
Likes: 0
Received 0 Likes
on
0 Posts
First... I spent quite a lot of money doing that. It is a hobby! ?
The intake manifold is a EFI Edelbrock, with Edelbrock fuel rails. The injectors are Delphi 30 Lb/Hr. The cam sensor is from a 2005 Impala, The coils are from a 2004 Taho, The throttle body is from a 2002 Ford V10 (out of a F250) The intake to throttle body plenum is from a 94 Fold 7.5L the crank trigger is DIY with the tooth wheel from a place in the UK. Some machine work was involved in mounting the crank trigger wheel mounted to the sleeve on the crank shaft behind the damper. There are a number of temp sensors for air and coolant, they are all GM. Each header collector has a O2 sensor. The system currently runs closed loop (last September when it last ran). I have a MAF sensor from a 2002 Ford F250, but I have not hooked it up yet. The MS software allows for a number of modes, and some modes can be mixed (blended) depending on rpm and/or load..
The intake manifold is a EFI Edelbrock, with Edelbrock fuel rails. The injectors are Delphi 30 Lb/Hr. The cam sensor is from a 2005 Impala, The coils are from a 2004 Taho, The throttle body is from a 2002 Ford V10 (out of a F250) The intake to throttle body plenum is from a 94 Fold 7.5L the crank trigger is DIY with the tooth wheel from a place in the UK. Some machine work was involved in mounting the crank trigger wheel mounted to the sleeve on the crank shaft behind the damper. There are a number of temp sensors for air and coolant, they are all GM. Each header collector has a O2 sensor. The system currently runs closed loop (last September when it last ran). I have a MAF sensor from a 2002 Ford F250, but I have not hooked it up yet. The MS software allows for a number of modes, and some modes can be mixed (blended) depending on rpm and/or load..
#28
08-21-2011, 07:24 PM
Join Date: Oct 2010
Posts: 69
Likes: 0
Received 0 Likes
on
0 Posts

#29
08-21-2011, 07:29 PM
Join Date: Oct 2010
Posts: 69
Likes: 0
Received 0 Likes
on
0 Posts

#30
08-21-2011, 07:36 PM
Join Date: Oct 2010
Posts: 69
Likes: 0
Received 0 Likes
on
0 Posts
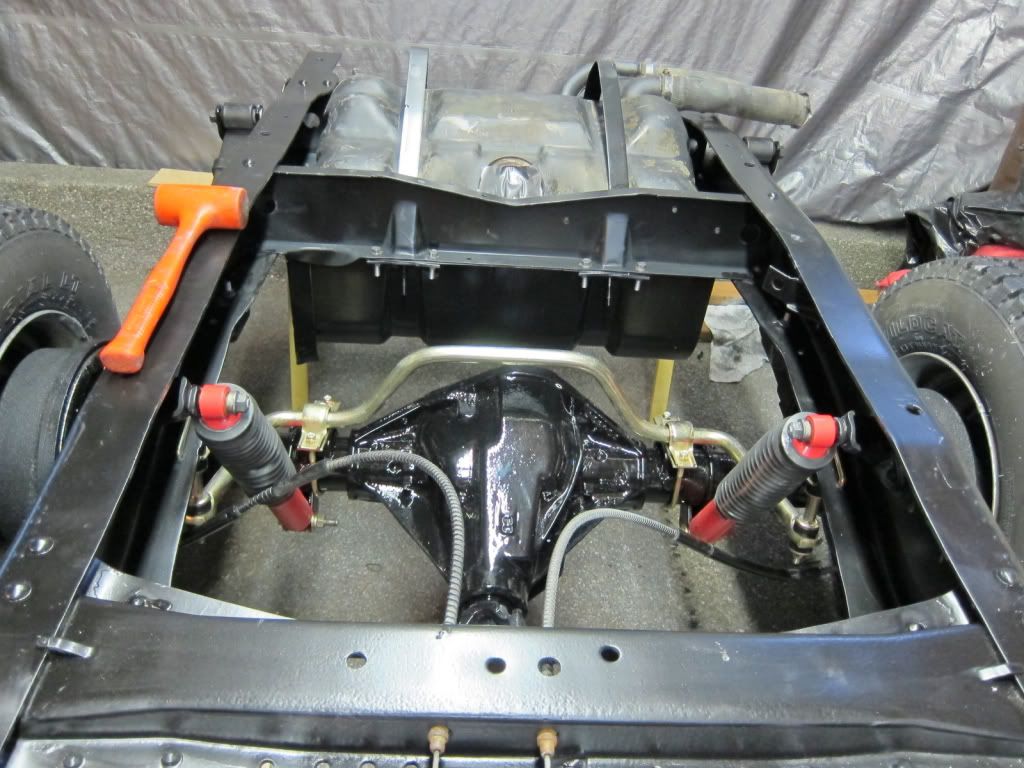
Here is the rear assembled. I bought front and rear Addo sway bars about 12 years ago. The front was easy to install, the rear bar sat in the box as I found it impossible to install. Just before removing the rear springs and axle, I found it quite easy to install, I installed it drilled the holes and welded the brackets to the axle. Then removed it all stand blasted everything then painted it. The axle has a very nice finish, unfortunately I had a little accident with a can of antiseeze which spattered all over. Before I get the cab and bed back on I will do some wash up.