Installing a Cam: How To...
#76
 11-20-2010, 09:27 AM

Post Fiend
#77
11-21-2010, 09:50 AM

Thanks for all the tips on tapping it. I really hope it's an easy job or I'm kinda in trouble. =P
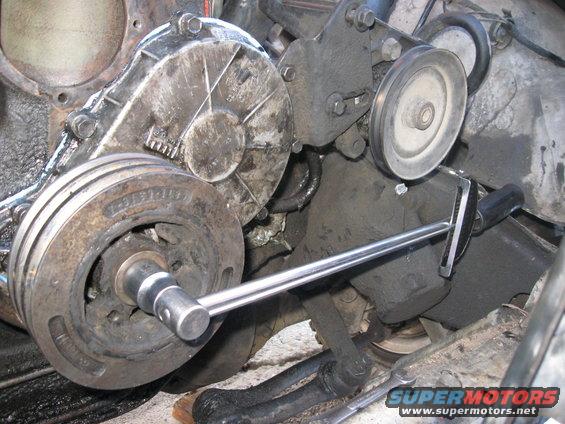
Got a bit more done yesterday. A bit more slow going with a lot of cleaning of gaskets, etc. It was also a cold, rainy / snowy / wet day, so that didn't make matters better. Then, the crank timing gear took most of my day, and seriously (almost) had me in tears. Spent about two hours on it! Ugh. The puller I rented stripped about right away, and the space behind it was so narrow (about 1/16" - 1/8") that I couldn't get anything behind it. Luckily, just as I was out of options, my neighbor came home and had a full set of wedges from tiny to large, and I was able to work those behind it and finally pop it off. What a nightmare....
So anyway, on with pics.

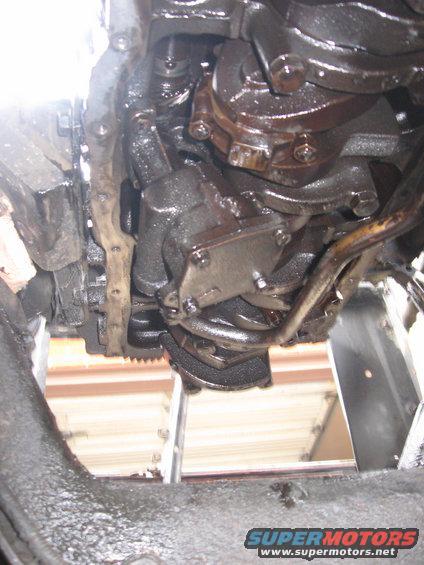
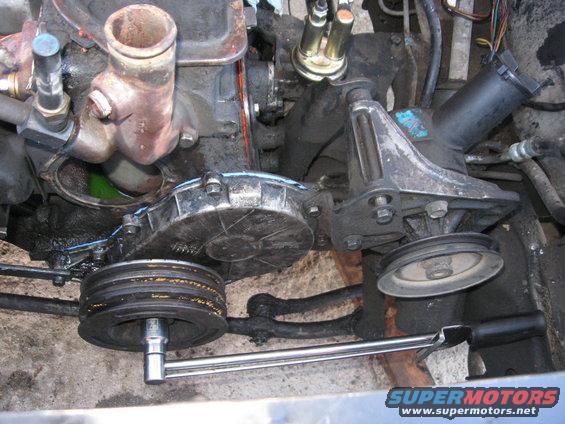
Used a 2x4 on a jack to lift up the engine. Put a groove on the top of the piece of wood so the end of the crank could sit in it without it slipping off.
Unfortunately, ran into trouble almost right away. Before I could get the blocks under it, the jack rolled forward and pushed the engine back. The transmission mounts slid off the back, and I imagine the drive shaft compressed. Not the best way to start the day, but nothing appeared damaged (and it gave me great clearance on the oil pan) so I'll deal with it when I'm putting it back together. My only concern at the moment is possible damage to the clutch linkage, but I guess I'll see when I get it back in place.
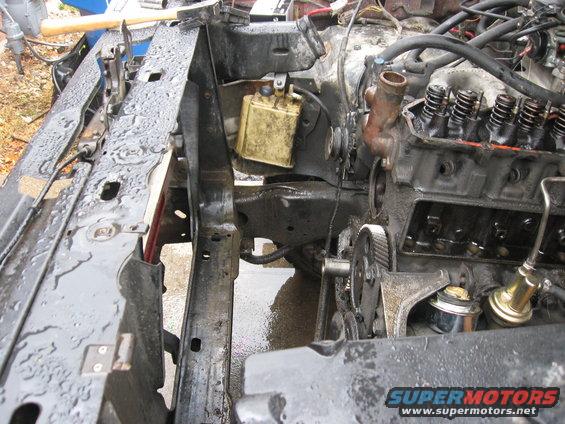
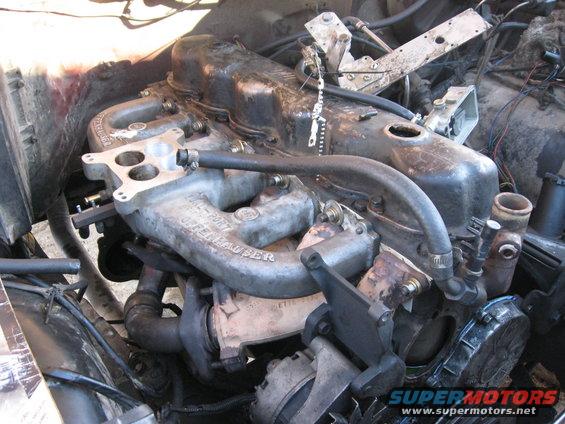
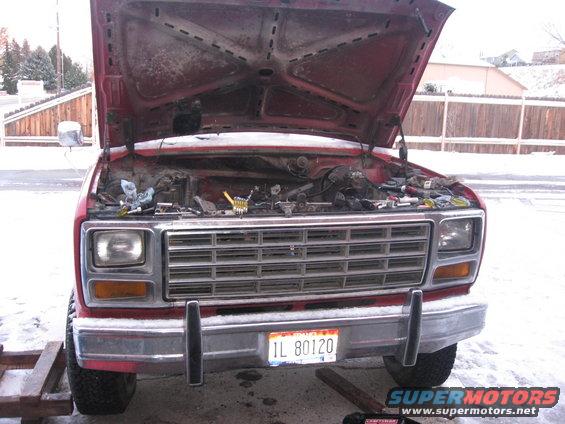
Lots of room up front now...

Engine butted right up to the firewall.
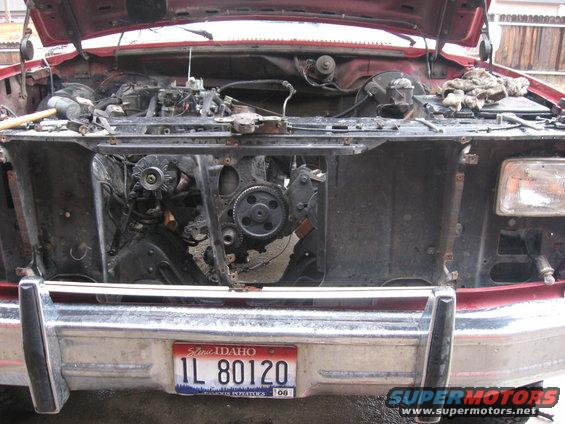
Disconnected the hood latch so I could disconnect the front grill support. Moved it to the side and it gave me a direct shot in getting the cam out.


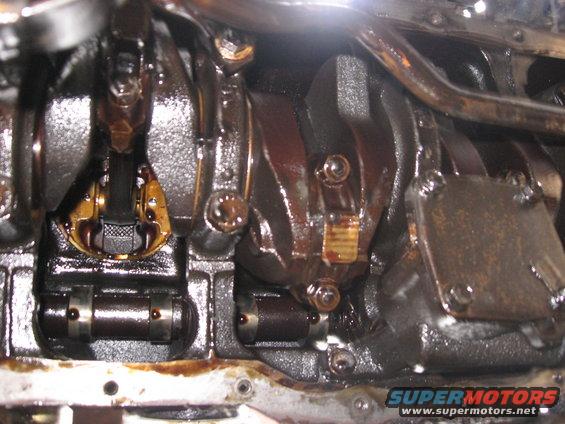
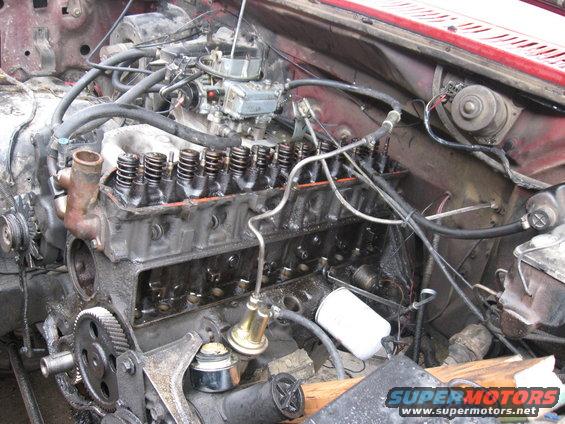
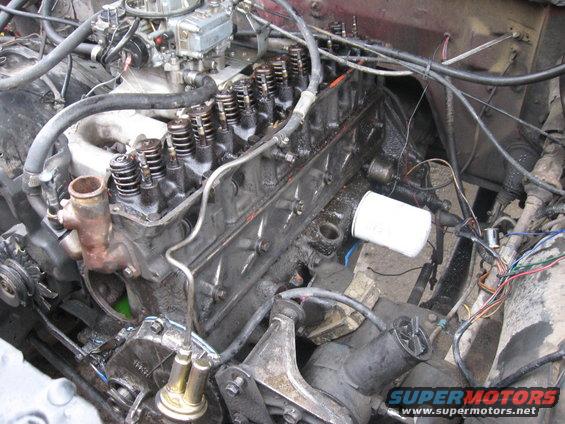
Removed the oil pan and took a look at the internals. Everything looks nice and clean. Can see the camshaft now, which allows me to guide it out. Started sliding it out with my wife's help, and it just wouldn't go.

After a bit of frustration, I realized I left the fuel pump in and the arm on the pump was blocking it. After I took the fuel pump off, it slid right out.
Some fun photography.
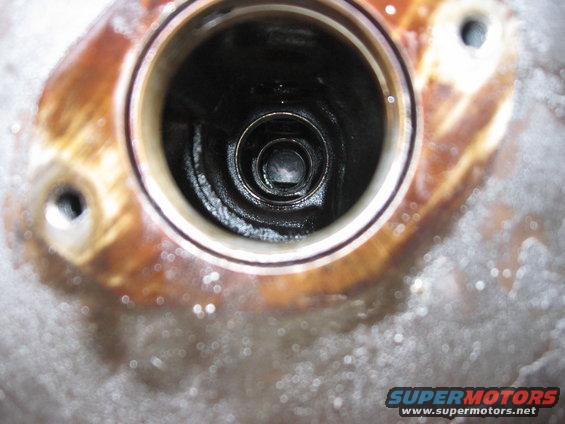
Inspected the cam bearings and they all looked to be in good shape. If I had had a few more days "spare" time and extra money (which I don't) I would have replaced the bearings just because.

The old cam. It looked to be in excellent shape. The lobes looked a bit worn down, but nothing drastic.
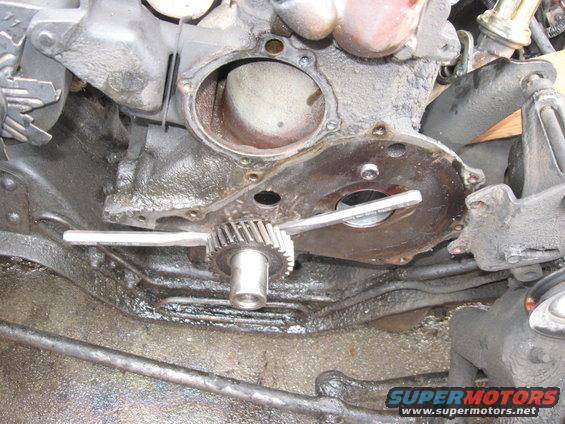
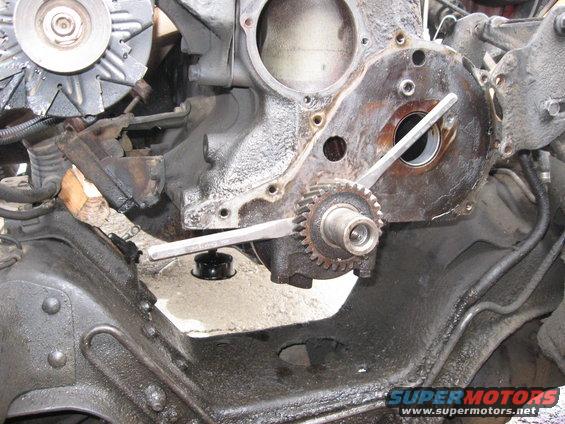
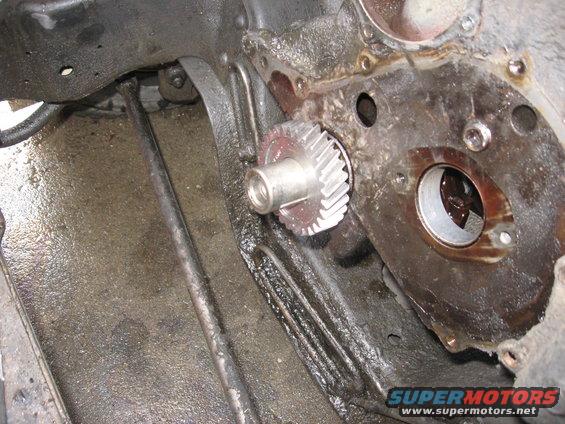
After the previously mentioned hour or two of immense frustration, I got a hold of some wedges and was able to tap them behind the gear. After about twenty minutes with the wedges, I was able to pop it off.

Off!

Was at Home Depot to get a piece of pipe to tap the new gear on, and over in the pipe section, there was a scrap piece just sitting to the side. It was the perfect length and diameter. I asked them what they wanted for it, and they gave it to me for free as scrap. Bonus!
Tried tapping it on with no luck. Repeated the steps with the cam gear and heated it up to 300� and it slid right on.

Used the metal tube to press against the gear. Tapped on it with a hammer and the gear went on the rest of the way.

Success!
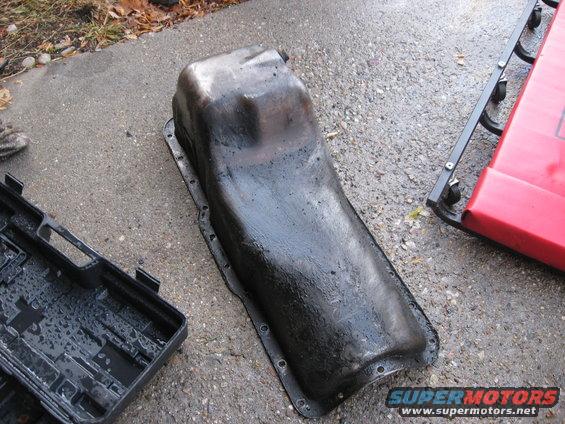


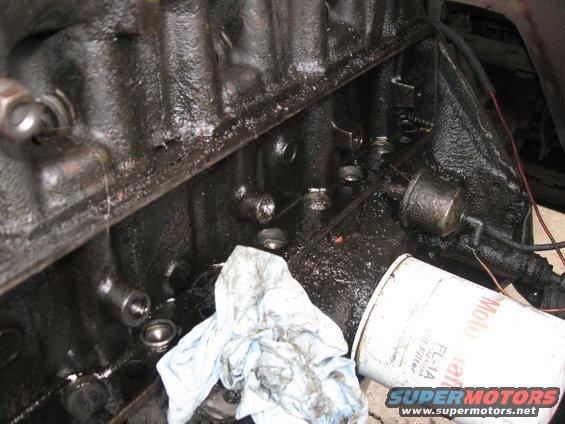
While waiting for the crank gear to cook, I cleaned up the oil pan, ground the ridges off the edge in preparation for the 1 piece gasket, and cleaned up the timing cover. Most everything on this engine was greasy and oily. I've replaced them all before, but hopefully this time they'll actually stop the oil leaks.


The cam is in! A victory for the day. Coated it in break in lube and then put it in. Took only a try or two to get the timing marks lined up but it was easy. Starting to get dark, so that was it for the day.
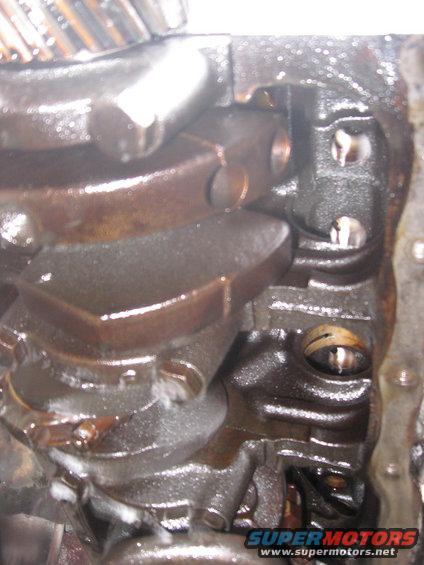
Ok, a question or two, since the oil pan is off. I noticed all six of the piston rod bearings had sliiiight play in them. Just a little tiny bit if side to side motion. Is this normal?
Today, it's buttoning everything up, pulling the engine forward, and getting everything in place. Unfortunately, I won't be able to start it up since about the only place that has the tap and die for the crank shaft is closed. Really bums me out.
Got a bit more done yesterday. A bit more slow going with a lot of cleaning of gaskets, etc. It was also a cold, rainy / snowy / wet day, so that didn't make matters better. Then, the crank timing gear took most of my day, and seriously (almost) had me in tears. Spent about two hours on it! Ugh. The puller I rented stripped about right away, and the space behind it was so narrow (about 1/16" - 1/8") that I couldn't get anything behind it. Luckily, just as I was out of options, my neighbor came home and had a full set of wedges from tiny to large, and I was able to work those behind it and finally pop it off. What a nightmare....
So anyway, on with pics.
Used a 2x4 on a jack to lift up the engine. Put a groove on the top of the piece of wood so the end of the crank could sit in it without it slipping off.
Unfortunately, ran into trouble almost right away. Before I could get the blocks under it, the jack rolled forward and pushed the engine back. The transmission mounts slid off the back, and I imagine the drive shaft compressed. Not the best way to start the day, but nothing appeared damaged (and it gave me great clearance on the oil pan) so I'll deal with it when I'm putting it back together. My only concern at the moment is possible damage to the clutch linkage, but I guess I'll see when I get it back in place.
Lots of room up front now...
Engine butted right up to the firewall.
Disconnected the hood latch so I could disconnect the front grill support. Moved it to the side and it gave me a direct shot in getting the cam out.
Removed the oil pan and took a look at the internals. Everything looks nice and clean. Can see the camshaft now, which allows me to guide it out. Started sliding it out with my wife's help, and it just wouldn't go.
After a bit of frustration, I realized I left the fuel pump in and the arm on the pump was blocking it. After I took the fuel pump off, it slid right out.
Some fun photography.
Inspected the cam bearings and they all looked to be in good shape. If I had had a few more days "spare" time and extra money (which I don't) I would have replaced the bearings just because.
The old cam. It looked to be in excellent shape. The lobes looked a bit worn down, but nothing drastic.
After the previously mentioned hour or two of immense frustration, I got a hold of some wedges and was able to tap them behind the gear. After about twenty minutes with the wedges, I was able to pop it off.
Off!
Was at Home Depot to get a piece of pipe to tap the new gear on, and over in the pipe section, there was a scrap piece just sitting to the side. It was the perfect length and diameter. I asked them what they wanted for it, and they gave it to me for free as scrap. Bonus!
Tried tapping it on with no luck. Repeated the steps with the cam gear and heated it up to 300� and it slid right on.
Used the metal tube to press against the gear. Tapped on it with a hammer and the gear went on the rest of the way.
Success!
While waiting for the crank gear to cook, I cleaned up the oil pan, ground the ridges off the edge in preparation for the 1 piece gasket, and cleaned up the timing cover. Most everything on this engine was greasy and oily. I've replaced them all before, but hopefully this time they'll actually stop the oil leaks.
The cam is in! A victory for the day. Coated it in break in lube and then put it in. Took only a try or two to get the timing marks lined up but it was easy. Starting to get dark, so that was it for the day.
Ok, a question or two, since the oil pan is off. I noticed all six of the piston rod bearings had sliiiight play in them. Just a little tiny bit if side to side motion. Is this normal?
Today, it's buttoning everything up, pulling the engine forward, and getting everything in place. Unfortunately, I won't be able to start it up since about the only place that has the tap and die for the crank shaft is closed. Really bums me out.
#78
11-29-2010, 01:05 PM
Sorry for the delay. This project took significantly longer than I expected. I started Friday afternoon and worked non-stop for six days and finally wrapped up late Wednesday night. Probably put well over 40 hours into it.
About everything that could go wrong seemed to. Thing was, I didn't actually have any problems with the cam install itself. That seemed to go really smoothly. It was all the other stuff. Engine slipped off the jack and took me hours to get back into place, exhaust wouldn't line up, valve fell inside the head, stripped the end of the crank, snapped off a bolt, chewed up the threads on a rocker arm stud, necessary tools weren't in stock, etc. etc. Everything just seemed to take hours and hours to rectify. This is the most frustrated I've ever been doing a job. Blech.
Not only that, but it never got above 20� out.
It'll be a long time before I want to work on another cam swap....
Anyway, enough whining, on with the show.
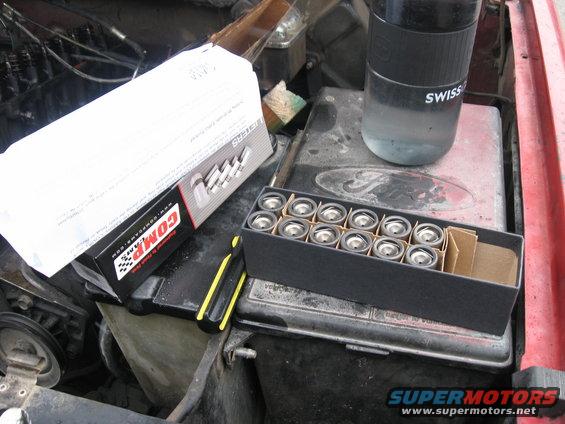
New lifters. Covered them in break-in lube and dropped them in.
Put the lifter cover back on.

This caught me by surprise. Since when does a cleaned up, non-rusty bolt snap off when torquing against a rubber grommet? Especially at 18 out of 26 recommended ft/lbs tq? I couldn't believe it. Spent an hour or two trying to drill it out and it was so seized that it snapped and broke by tools for removing broken bolts. I could see if it was rusted in place, but I had only put it in shortly before.
  Finally had to spend the $30 on a helicoil kit for it. 5/16" course thread for anyone curious.
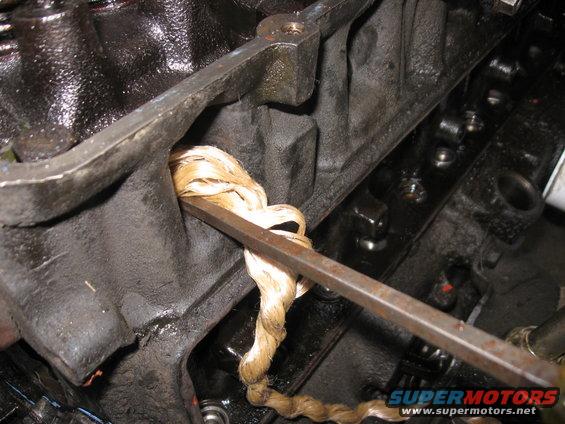
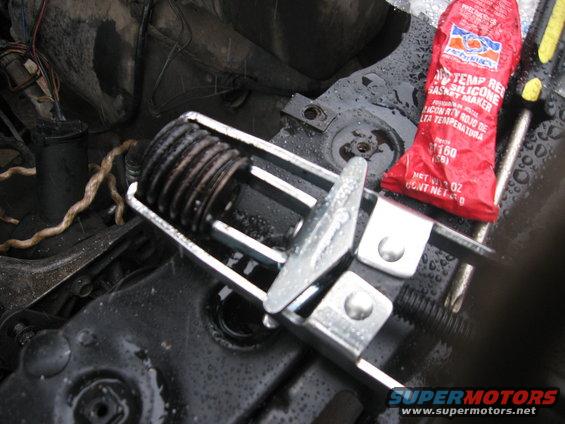
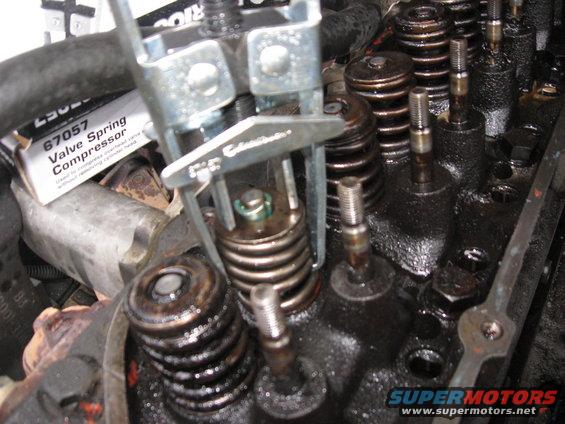
On to removing the valve springs. Used the recommended trick of filling the chambers with rope. I also then used a long screwdriver for a little extra leverage on the valves (since I had to push down on them pretty hard). Made sure to slip the screwdriver underneath the rope before pressing up on the valve to make sure there was no metal on metal contact.

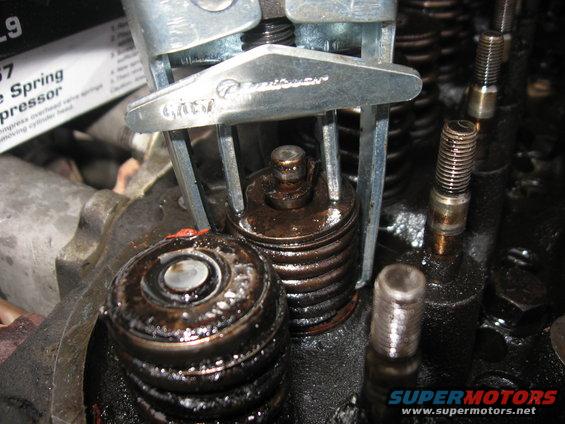
Rented a spring compressor that allowed me to remove the springs without removing the head. Aside from being kinda small (resulting in sore hands), it worked really well. At least, except for that one time when the spring slipped out and hit me in the face (where else?), leaving a good bruise for a few days, but we'll leave that part out.
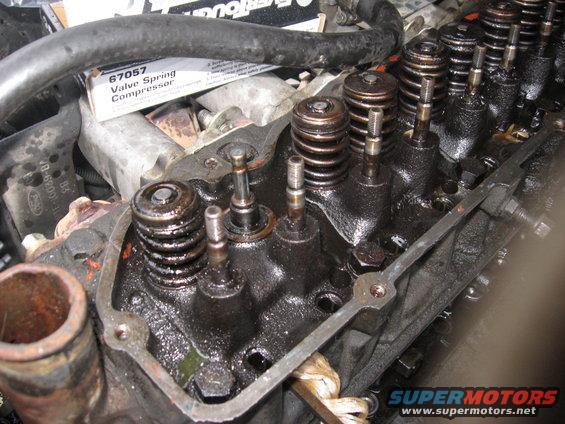
Most, if not all, of the valve keepers were stuck in years of old oil, so I had to tap on them a bit with a rubber hammer to break them free. Once they popped loose, they were easy to remove.
Springs compressed and set aside.

Here's what the vast majority of my old valve seals looked like. Super hard, brittle, cracked 30 year old plastic. Only one of them came off the valve intact. May explain a little of my blowing white smoke on startup.
Spring, keepers, and old seal removed. The valve is sitting on the rope inside the chamber.
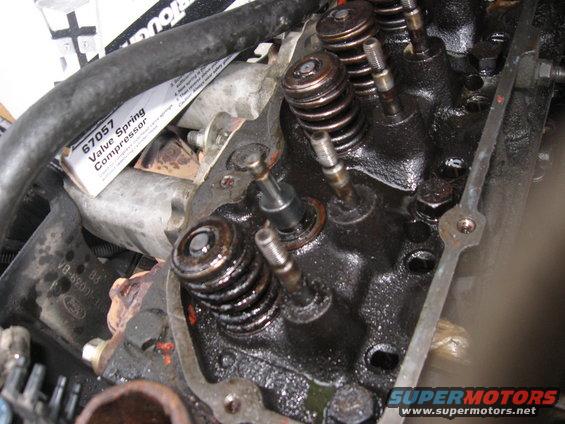
New valve (umbrella) seal. Nice, soft, fresh rubber.
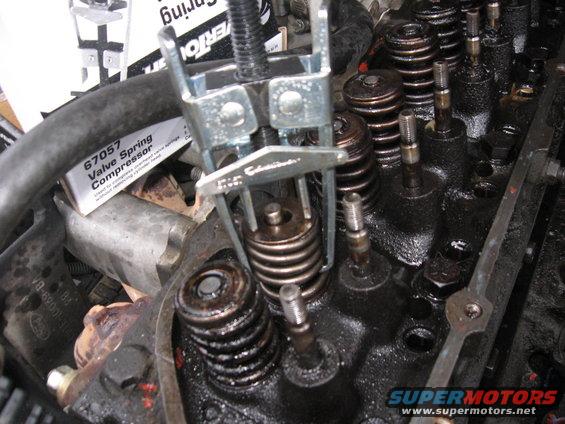
New spring compressed, (reusing the original spring plate), and slid back over the valve stem.

Set the new keepers in place. Took a little wiggling around for them to fall into alignment, but it was immediately apparent when they did. Then, it was just a matter of removing the spring compressor. 1 down, 11 to go.
Really easy to do and very straightforward. Probably one of the easiest parts of the whole project. Just don't get into a groove and forget to put the rope into the cylinder before pulling a spring off. I almost did it a few times.
However, had another setback the next day after I finished (since it was the last project of the day) when I went out and saw that there was still one valve seal in the bag. Crossed my fingers that Comp had been kind enough to supply a 13th courtesy seal in the bag just in case I lost one. Alas no, I missed putting one on and had to drive back to the store to rent the spring compressor again....
Not only did I have to go back and rent the spring compressor again, but despite my best efforts, the valve fell into the head on the one I had to remove again. Not sure why, since I had put the rope and screwdriver into the cylinder. Must've just missed it somehow. Tried a few different things to bring it back up but finally gave up and resigned to having to remove the intake/exhaust. After finally getting them off, it was as simple as reaching through the port with some pliers and lifting it back up. More hours wasted.
I don't have any pictures, but while putting the rocker arms back on, one of nuts bottomed out and stripped the rocker arm nut as I tried to torque it. (Starting sometimes in the late 70s/early 80s, the rocker arms were set by bringing the cylinder to TDC and then just torquing the nut to 20 ft/lbs). When I removed the nut, it buggered up the threads on the rocker arm stud. More time driving to the parts store for a die and a new rocker arm nut. Fixed the threads, put a few washers under the nut to space it, and tightened it back down.
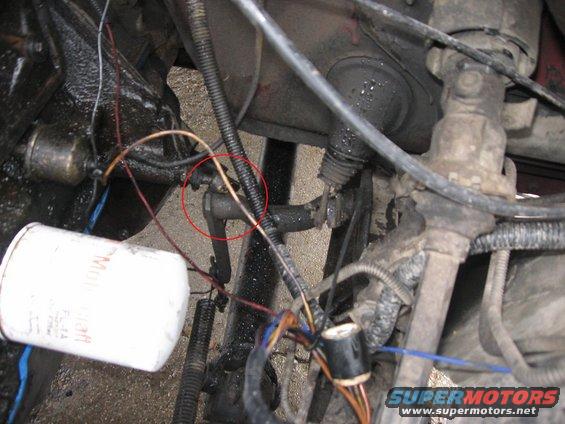
Another one of my very time consuming discoveries. After the engine slipped off the jack, the ball and socket setup that the mechanical clutch uses had popped apart. It took me a good four hours of jacking up the engine and twisting and moving it around to finally get the ball (on the engine side) far enough away from the linkage to pop it back into the socket (on the linkage). Frustrating.
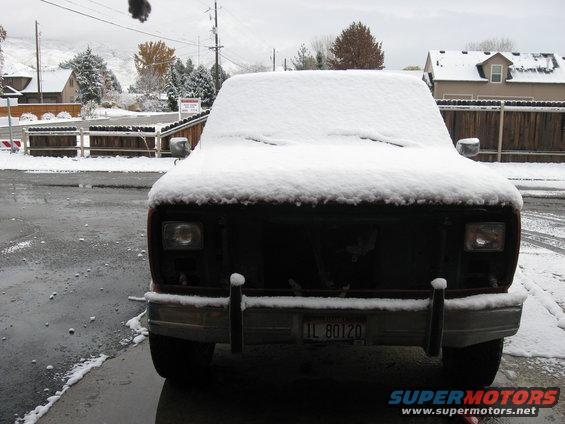
Another day, more snow, and more work to be done.
Finally found a store with a tap large enough for the crank pulley bolt. If anyone's curious, it's a 5/8" fine thread.
Was able to torque it down myself by blocking the rear tires, putting it in reverse, and then pulling the torque wrench until the engine moved the vehicle up against the blocks. After that, it was a matter of just strength. Took a couple goes and it was set at a good 140 ft/lbs. I don't imagine this would be nearly as easy on an automatic...
Wish I had taken the pictures, but more on the timing cover. It seems that there is an alignment tool that's necessary to get the timing cover in place (at least on the older models.) My timing cover had a 1972 model number so I imagine it's the same for a lot of years.
My timing cover gasket set came with an extra seal for the end of the harmonic balancer. It was very easy to install. I thoroughly cleaned the end of the balancer and then used the locktite that came with the gasket kit, and then slipped and tapped the seal over the end of the balancer and into place. It looks like it was to just seal up years and years of wear from the harmonic balancer spinning against the oil seal in the timing cover.
This actually made it really easy to set the timing cover in place.
Coated the timing cover gasket in RTV silicone (supplied in the gasket kit).
I left the oil pan bolts, as well as all the timing cover bolts in place, but very loose, and then fully torqued the harmonic balancer back into place. The seal on the harmonic balancer pressing into the seal in the timing cover put the timing cover perfectly into place. Afterwards, I just torqued down the timing cover bolts (there was only one I couldn't get to and torque properly, but I just got it nice and snug). So far, it's sealed great.
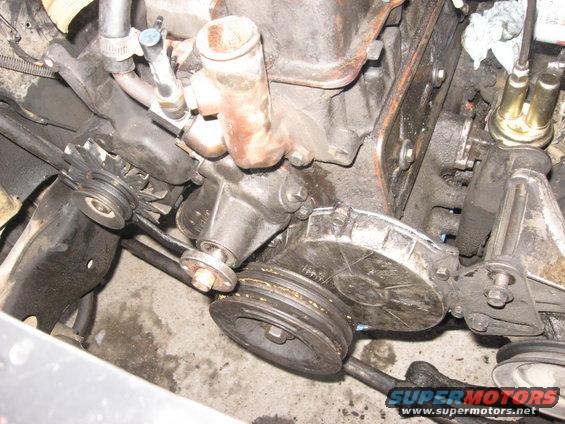
Water pump back in place.
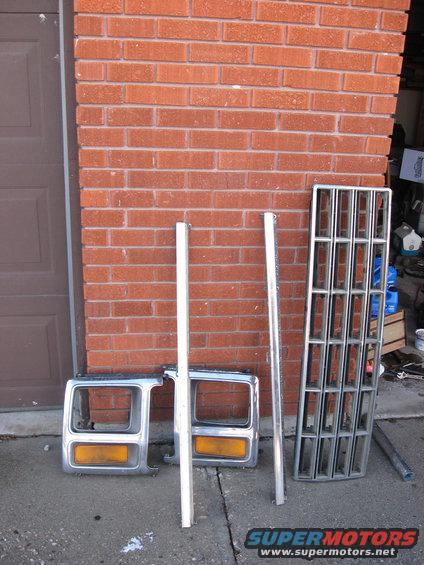
Since I removed the grill with the radiator out, I was sure to put it all back in place before putting the radiator back in.
Finally done.
About everything that could go wrong seemed to. Thing was, I didn't actually have any problems with the cam install itself. That seemed to go really smoothly. It was all the other stuff. Engine slipped off the jack and took me hours to get back into place, exhaust wouldn't line up, valve fell inside the head, stripped the end of the crank, snapped off a bolt, chewed up the threads on a rocker arm stud, necessary tools weren't in stock, etc. etc. Everything just seemed to take hours and hours to rectify. This is the most frustrated I've ever been doing a job. Blech.
Not only that, but it never got above 20� out.
It'll be a long time before I want to work on another cam swap....
Anyway, enough whining, on with the show.
New lifters. Covered them in break-in lube and dropped them in.
Put the lifter cover back on.
This caught me by surprise. Since when does a cleaned up, non-rusty bolt snap off when torquing against a rubber grommet?
Especially at 18 out of 26 recommended ft/lbs tq? I couldn't believe it. Spent an hour or two trying to drill it out and it was so seized that it snapped and broke by tools for removing broken bolts. I could see if it was rusted in place, but I had only put it in shortly before. Finally had to spend the $30 on a helicoil kit for it. 5/16" course thread for anyone curious.On to removing the valve springs. Used the recommended trick of filling the chambers with rope. I also then used a long screwdriver for a little extra leverage on the valves (since I had to push down on them pretty hard). Made sure to slip the screwdriver underneath the rope before pressing up on the valve to make sure there was no metal on metal contact.
Rented a spring compressor that allowed me to remove the springs without removing the head. Aside from being kinda small (resulting in sore hands), it worked really well. At least, except for that one time when the spring slipped out and hit me in the face (where else?), leaving a good bruise for a few days, but we'll leave that part out.
Most, if not all, of the valve keepers were stuck in years of old oil, so I had to tap on them a bit with a rubber hammer to break them free. Once they popped loose, they were easy to remove.
Springs compressed and set aside.
Here's what the vast majority of my old valve seals looked like. Super hard, brittle, cracked 30 year old plastic. Only one of them came off the valve intact. May explain a little of my blowing white smoke on startup.
Spring, keepers, and old seal removed. The valve is sitting on the rope inside the chamber.
New valve (umbrella) seal. Nice, soft, fresh rubber.
New spring compressed, (reusing the original spring plate), and slid back over the valve stem.
Set the new keepers in place. Took a little wiggling around for them to fall into alignment, but it was immediately apparent when they did. Then, it was just a matter of removing the spring compressor. 1 down, 11 to go.
Really easy to do and very straightforward. Probably one of the easiest parts of the whole project. Just don't get into a groove and forget to put the rope into the cylinder before pulling a spring off. I almost did it a few times.
However, had another setback the next day after I finished (since it was the last project of the day) when I went out and saw that there was still one valve seal in the bag. Crossed my fingers that Comp had been kind enough to supply a 13th courtesy seal in the bag just in case I lost one. Alas no, I missed putting one on and had to drive back to the store to rent the spring compressor again....
Not only did I have to go back and rent the spring compressor again, but despite my best efforts, the valve fell into the head on the one I had to remove again. Not sure why, since I had put the rope and screwdriver into the cylinder. Must've just missed it somehow. Tried a few different things to bring it back up but finally gave up and resigned to having to remove the intake/exhaust. After finally getting them off, it was as simple as reaching through the port with some pliers and lifting it back up. More hours wasted.
I don't have any pictures, but while putting the rocker arms back on, one of nuts bottomed out and stripped the rocker arm nut as I tried to torque it. (Starting sometimes in the late 70s/early 80s, the rocker arms were set by bringing the cylinder to TDC and then just torquing the nut to 20 ft/lbs). When I removed the nut, it buggered up the threads on the rocker arm stud. More time driving to the parts store for a die and a new rocker arm nut. Fixed the threads, put a few washers under the nut to space it, and tightened it back down.
Another one of my very time consuming discoveries. After the engine slipped off the jack, the ball and socket setup that the mechanical clutch uses had popped apart. It took me a good four hours of jacking up the engine and twisting and moving it around to finally get the ball (on the engine side) far enough away from the linkage to pop it back into the socket (on the linkage). Frustrating.
Another day, more snow, and more work to be done.
Finally found a store with a tap large enough for the crank pulley bolt. If anyone's curious, it's a 5/8" fine thread.
Was able to torque it down myself by blocking the rear tires, putting it in reverse, and then pulling the torque wrench until the engine moved the vehicle up against the blocks. After that, it was a matter of just strength. Took a couple goes and it was set at a good 140 ft/lbs. I don't imagine this would be nearly as easy on an automatic...
Wish I had taken the pictures, but more on the timing cover. It seems that there is an alignment tool that's necessary to get the timing cover in place (at least on the older models.) My timing cover had a 1972 model number so I imagine it's the same for a lot of years.
My timing cover gasket set came with an extra seal for the end of the harmonic balancer. It was very easy to install. I thoroughly cleaned the end of the balancer and then used the locktite that came with the gasket kit, and then slipped and tapped the seal over the end of the balancer and into place. It looks like it was to just seal up years and years of wear from the harmonic balancer spinning against the oil seal in the timing cover.
This actually made it really easy to set the timing cover in place.
Coated the timing cover gasket in RTV silicone (supplied in the gasket kit).
I left the oil pan bolts, as well as all the timing cover bolts in place, but very loose, and then fully torqued the harmonic balancer back into place. The seal on the harmonic balancer pressing into the seal in the timing cover put the timing cover perfectly into place. Afterwards, I just torqued down the timing cover bolts (there was only one I couldn't get to and torque properly, but I just got it nice and snug). So far, it's sealed great.
Water pump back in place.
Since I removed the grill with the radiator out, I was sure to put it all back in place before putting the radiator back in.
Finally done.
#79
11-29-2010, 07:26 PM
Lead Driver
"Hoorah, AB! Take a bow. Working in that temp must of been torture. I laugh because here in S. Cal. I wait until 10am to start working on the beast, so the temp is up to the mid/high sixties.
Holy cow. What a hassle. I'm glad to see you got it finished. I was hurting with you when you mentioned getting hit in the face by the spring! You fought a valiant fight. I hope that engine kicks butt now.
I don't imagine this would be nearly as easy on an automatic... laying under the truck and trying to hold a screwdriver in the flexplate with your feet, while tugging on the t.wrench with both hands. Repeat 40 times until the screwdriver does not fall out.
Oh yeah, don't leave the t.wrench on the bolt when you start the engine like I did. Yeehaw.
#80
11-30-2010, 10:09 AM
Thanks F-250! Yeah, it was a not-so-fun chore. There's a couple empty cardboard boxes with some good kick holes punched in them somewhere in my garage (didn't see where they landed...)
Haha, wow, I can imagine that woke you up when you started it with the torque wrench on there! That oughta wake you up.
Sounds like at least I had an easier time at one thing though. Torquing that crank bolt on an automatic sounds like a frustrating time.
One thing I loved though was just how clean the engine was inside. When I first got it, everything was filled with caked oil and years of abuse and hardened oil. Through regular oil changes (and some good Gunk cleaner a couple times), everything was clean. Valve cover, oil pan, lifters, and looking up inside the block from underneath, and there was barely a deposit anywhere. Just fresh, clean oil on clean metal. I liked it.
Well, wish I could say the engine's just amazing now, but I still have a few kinks to work out. First is that I can't seem to get rid of a rocker arm tick. I tried several times to adjust the rocker arms and there's still a good obnoxious tick. I'm wondering if my rocker arms are getting worn or something, but I know it wasn't there before I did the install, so who knows. Might just have to work at it some more.
The other is that after I installed it and finished the job, I did a 260 mile round trip to my parents and back for Thanksgiving. I went 65mph the whole way on straight, flat, interstate and I was in the carburetor's powervalve 95% of the time. Normally, engine vacuum is at around 15 or so in 3rd gear at that speed, but I averaged around 5 - 8hg the entire drive and ended up getting 14mpg. I wasn't very pleased with that.
On the way back, I was driving into a horrible headwind and ended up getting 7 - 9 mpg @ 55mph.
I can definitely feel the cam's extra power though, it pulls very hard and smooth, which is great! I'm just wondering if maybe it screwed up the recurve on my distributor? Is that possible? I'll double check it this weekend but was wondering what people think. That low of engine vacuum at 65mph at around 2100 RPMs seems like something's quite amiss. (It idles at around 19hg)
#81
11-30-2010, 08:06 PM

Hey AB
nice thread and info.... does seem something is amiss tho like you say??? into the power valve 95% of the time on flat ground? wow.... I have to work my truck hard to get into mine here
dizzy most likely needs recurved I would think but not sure as had the pro's sort that issue for me when I ordered my D.U.I. dizzy but if you changed the lift shouldn't the spark/vacuum/ect. change as well to match?
thanks for take'n the time to share buddy
dizzy most likely needs recurved I would think but not sure as had the pro's sort that issue for me when I ordered my D.U.I. dizzy
but if you changed the lift shouldn't the spark/vacuum/ect. change as well to match?thanks for take'n the time to share buddy
#82
11-30-2010, 09:11 PM
That's why it had me puzzled. I'll go through my curve this weekend and make sure everything's working right as far as advance goes, I sure hope that's it.
If not, something's definitely wrong at higher speeds. Having to keep it in the powervalve the entire trip to keep it at 65 is not normal. I shouldn't have to be working my engine that hard to maintain speed.
If not, something's definitely wrong at higher speeds. Having to keep it in the powervalve the entire trip to keep it at 65 is not normal. I shouldn't have to be working my engine that hard to maintain speed.
#83
11-30-2010, 10:46 PM
Post Fiend
#84
11-30-2010, 11:30 PM
Lead Driver
You'll get it sorted out, AB. I'm thinking timing too. Are you sure the ticking you mentioned is not an exhaust leak? The dreaded cracked gasket?
That is major good vacuum you have. I know that when setting the timing with a v. gauge, as is common with old vehicles on which the v.dampener might have moved/slipped due to age, you advance to highest vacuum, then back it off a tad. Did you hear any pinging? That would tell you. Advance till it pings, then bump it back just a tad.
Side gap your plugs when you get it sorted out. I want to hear you say, "holy s..t!"
#85
12-01-2010, 11:10 AM
I'll be checking the timing this weekend. That just seems like what it is.
When I put the distributor back in, I set it to around 12� advance (not with a timing light, but by setting the timing mark and putting the engine at TDC). Then, after it was started up, I set the timing using a vacuum gauge. Also checked the vibration dampener when putting it together and it was straight. Timing mark at 0 when #1 at full TDC.
I'm just wondering if maybe it through my distributor recurve out of whack, such as at higher RPMs. Not sure how that would be, but that's what it seems like it is.
Haven't heard any pinging, but then again, it's hard to hear pinging over the rocker arm tick. I used a stethoscope and it was able to pin it down to the rocker arms.
Heh, as for this, I was driving around with my wife yesterday and, while in first, shoved the gas pedal down to the floor. The whole front end felt like it lifted and that baby launched. I've never felt it pull like that! Simply incredible. We were both pretty giddy.
Just need to get the high speed thing taken care of and I'll be happy.
When I put the distributor back in, I set it to around 12� advance (not with a timing light, but by setting the timing mark and putting the engine at TDC). Then, after it was started up, I set the timing using a vacuum gauge. Also checked the vibration dampener when putting it together and it was straight. Timing mark at 0 when #1 at full TDC.
I'm just wondering if maybe it through my distributor recurve out of whack, such as at higher RPMs. Not sure how that would be, but that's what it seems like it is.
Haven't heard any pinging, but then again, it's hard to hear pinging over the rocker arm tick. I used a stethoscope and it was able to pin it down to the rocker arms.
Originally Posted by F-250 Restorer
I want to hear you say, "holy s..t!"
Just need to get the high speed thing taken care of and I'll be happy.
#86
12-01-2010, 07:41 PM
Hrmm.... What affect would a thermostat that's stuck open have on something like this? I'm not saying it IS, but now that I think about it, the temperature gauge was really low the entire trip. Like, instead of it's usual pointing to the O and R on NORMAL, it was a little below the N. Seemed a little odd at the time, but now I'm wondering if it was stuck open and the engine's not coming up to temp. (Would also mean less heat to the heated carb spacer.) Just wondering if it'd be something significant like this.
Still gonna check the timing, but was wondering if my thermostat may have fizzled out from being out of coolant for almost a week during the cam install.
Still gonna check the timing, but was wondering if my thermostat may have fizzled out from being out of coolant for almost a week during the cam install.
#87
12-01-2010, 09:03 PM
Lead Driver
Haven't heard any pinging, but then again, it's hard to hear pinging over the rocker arm tick. I used a stethoscope and it was able to pin it down to the rocker arms.
Did you look through the p.rods? Is oil getting through. I would pull the dizzy if in doubt, and figure out how to get a drill down to you oil pump (I cut the end off of an allen wrench) and take your v.cover off to see if oil is coming out of all p.rods????onto rockers.
<!--[if gte mso 9]><xml> <o:OfficeDocumentSettings> <o:RelyOnVML/> <o:AllowPNG/> </o:OfficeDocumentSettings> </xml><![endif]--><!--[if gte mso 9]><xml> <w:WordDocument> <w:View>Normal</w:View> <w:Zoom>0</w:Zoom> <w:TrackMoves/> <w:TrackFormatting/> <w:PunctuationKerning/> <w:ValidateAgainstSchemas/> <w:SaveIfXMLInvalid>false</w:SaveIfXMLInvalid> <w:IgnoreMixedContent>false</w:IgnoreMixedContent> <w:AlwaysShowPlaceholderText>false</w:AlwaysShowPlaceholderText> <w oNotPromoteQF/> <w:LidThemeOther>EN-US</w:LidThemeOther> <w:LidThemeAsian>X-NONE</w:LidThemeAsian> <w:LidThemeComplexScript>X-NONE</w:LidThemeComplexScript> <w:Compatibility> <w:BreakWrappedTables/> <w:SnapToGridInCell/> <w:WrapTextWithPunct/> <w:UseAsianBreakRules/> <wontGrowAutofit/> <w:SplitPgBreakAndParaMark/> <wontVertAlignCellWithSp/> <wontBreakConstrainedForcedTables/> <wontVertAlignInTxbx/> <w:Word11KerningPairs/> <w:CachedColBalance/> </w:Compatibility> <m:mathPr> <m:mathFont m:val="Cambria Math"/> <m:brkBin m:val="before"/> <m:brkBinSub m:val="--"/> <m:smallFrac m:val="off"/> <m:dispDef/> <m:lMargin m:val="0"/> <m:rMargin m:val="0"/> <m:defJc m:val="centerGroup"/> <m:wrapIndent m:val="1440"/> <m:intLim m:val="subSup"/> <m:naryLim m:val="undOvr"/> </m:mathPr></w:WordDocument> </xml><![endif]--><!--[if gte mso 9]><xml> <w:LatentStyles DefLockedState="false" DefUnhideWhenUsed="true" DefSemiHidden="true" DefQFormat="false" DefPriority="99" LatentStyleCount="267"> <w:LsdException Locked="false" Priority="0" SemiHidden="false" UnhideWhenUsed="false" QFormat="true" Name="Normal"/> <w:LsdException Locked="false" Priority="9" SemiHidden="false" UnhideWhenUsed="false" QFormat="true" Name="heading 1"/> <w:LsdException Locked="false" Priority="9" QFormat="true" Name="heading 2"/> <w:LsdException Locked="false" Priority="9" QFormat="true" Name="heading 3"/> <w:LsdException Locked="false" Priority="9" QFormat="true" Name="heading 4"/> <w:LsdException Locked="false" Priority="9" QFormat="true" Name="heading 5"/> <w:LsdException Locked="false" Priority="9" QFormat="true" Name="heading 6"/> <w:LsdException Locked="false" Priority="9" QFormat="true" Name="heading 7"/> <w:LsdException Locked="false" Priority="9" QFormat="true" Name="heading 8"/> <w:LsdException Locked="false" Priority="9" QFormat="true" Name="heading 9"/> <w:LsdException Locked="false" Priority="39" Name="toc 1"/> <w:LsdException Locked="false" Priority="39" Name="toc 2"/> <w:LsdException Locked="false" Priority="39" Name="toc 3"/> <w:LsdException Locked="false" Priority="39" Name="toc 4"/> <w:LsdException Locked="false" Priority="39" Name="toc 5"/> <w:LsdException Locked="false" Priority="39" Name="toc 6"/> <w:LsdException Locked="false" Priority="39" Name="toc 7"/> <w:LsdException Locked="false" Priority="39" Name="toc 8"/> <w:LsdException Locked="false" Priority="39" Name="toc 9"/> <w:LsdException Locked="false" Priority="35" QFormat="true" Name="caption"/> <w:LsdException Locked="false" Priority="10" SemiHidden="false" UnhideWhenUsed="false" QFormat="true" Name="Title"/> <w:LsdException Locked="false" Priority="1" Name="Default Paragraph Font"/> <w:LsdException Locked="false" Priority="11" SemiHidden="false" UnhideWhenUsed="false" QFormat="true" Name="Subtitle"/> <w:LsdException Locked="false" Priority="22" SemiHidden="false" UnhideWhenUsed="false" QFormat="true" Name="Strong"/> <w:LsdException Locked="false" Priority="20" SemiHidden="false" UnhideWhenUsed="false" QFormat="true" Name="Emphasis"/> <w:LsdException Locked="false" Priority="59" SemiHidden="false" UnhideWhenUsed="false" Name="Table Grid"/> <w:LsdException Locked="false" UnhideWhenUsed="false" Name="Placeholder Text"/> <w:LsdException Locked="false" Priority="1" SemiHidden="false" UnhideWhenUsed="false" QFormat="true" Name="No Spacing"/> <w:LsdException Locked="false" Priority="60" SemiHidden="false" UnhideWhenUsed="false" Name="Light Shading"/> <w:LsdException Locked="false" Priority="61" SemiHidden="false" UnhideWhenUsed="false" Name="Light List"/> <w:LsdException Locked="false" Priority="62" SemiHidden="false" UnhideWhenUsed="false" Name="Light Grid"/> <w:LsdException Locked="false" Priority="63" SemiHidden="false" UnhideWhenUsed="false" Name="Medium Shading 1"/> <w:LsdException Locked="false" Priority="64" SemiHidden="false" UnhideWhenUsed="false" Name="Medium Shading 2"/> <w:LsdException Locked="false" Priority="65" SemiHidden="false" UnhideWhenUsed="false" Name="Medium List 1"/> <w:LsdException Locked="false" Priority="66" SemiHidden="false" UnhideWhenUsed="false" Name="Medium List 2"/> <w:LsdException Locked="false" Priority="67" SemiHidden="false" UnhideWhenUsed="false" Name="Medium Grid 1"/> <w:LsdException Locked="false" Priority="68" SemiHidden="false" UnhideWhenUsed="false" Name="Medium Grid 2"/> <w:LsdException Locked="false" Priority="69" SemiHidden="false" UnhideWhenUsed="false" Name="Medium Grid 3"/> <w:LsdException Locked="false" Priority="70" SemiHidden="false" UnhideWhenUsed="false" Name="Dark List"/> <w:LsdException Locked="false" Priority="71" SemiHidden="false" UnhideWhenUsed="false" Name="Colorful Shading"/> <w:LsdException Locked="false" Priority="72" SemiHidden="false" UnhideWhenUsed="false" Name="Colorful List"/> <w:LsdException Locked="false" Priority="73" SemiHidden="false" UnhideWhenUsed="false" Name="Colorful Grid"/> <w:LsdException Locked="false" Priority="60" SemiHidden="false" UnhideWhenUsed="false" Name="Light Shading Accent 1"/> <w:LsdException Locked="false" Priority="61" SemiHidden="false" UnhideWhenUsed="false" Name="Light List Accent 1"/> <w:LsdException Locked="false" Priority="62" SemiHidden="false" UnhideWhenUsed="false" Name="Light Grid Accent 1"/> <w:LsdException Locked="false" Priority="63" SemiHidden="false" UnhideWhenUsed="false" Name="Medium Shading 1 Accent 1"/> <w:LsdException Locked="false" Priority="64" SemiHidden="false" UnhideWhenUsed="false" Name="Medium Shading 2 Accent 1"/> <w:LsdException Locked="false" Priority="65" SemiHidden="false" UnhideWhenUsed="false" Name="Medium List 1 Accent 1"/> <w:LsdException Locked="false" UnhideWhenUsed="false" Name="Revision"/> <w:LsdException Locked="false" Priority="34" SemiHidden="false" UnhideWhenUsed="false" QFormat="true" Name="List Paragraph"/> <w:LsdException Locked="false" Priority="29" SemiHidden="false" UnhideWhenUsed="false" QFormat="true" Name="Quote"/> <w:LsdException Locked="false" Priority="30" SemiHidden="false" UnhideWhenUsed="false" QFormat="true" Name="Intense Quote"/> <w:LsdException Locked="false" Priority="66" SemiHidden="false" UnhideWhenUsed="false" Name="Medium List 2 Accent 1"/> <w:LsdException Locked="false" Priority="67" SemiHidden="false" UnhideWhenUsed="false" Name="Medium Grid 1 Accent 1"/> <w:LsdException Locked="false" Priority="68" SemiHidden="false" UnhideWhenUsed="false" Name="Medium Grid 2 Accent 1"/> <w:LsdException Locked="false" Priority="69" SemiHidden="false" UnhideWhenUsed="false" Name="Medium Grid 3 Accent 1"/> <w:LsdException Locked="false" Priority="70" SemiHidden="false" UnhideWhenUsed="false" Name="Dark List Accent 1"/> <w:LsdException Locked="false" Priority="71" SemiHidden="false" UnhideWhenUsed="false" Name="Colorful Shading Accent 1"/> <w:LsdException Locked="false" Priority="72" SemiHidden="false" UnhideWhenUsed="false" Name="Colorful List Accent 1"/> <w:LsdException Locked="false" Priority="73" SemiHidden="false" UnhideWhenUsed="false" Name="Colorful Grid Accent 1"/> <w:LsdException Locked="false" Priority="60" SemiHidden="false" UnhideWhenUsed="false" Name="Light Shading Accent 2"/> <w:LsdException Locked="false" Priority="61" SemiHidden="false" UnhideWhenUsed="false" Name="Light List Accent 2"/> <w:LsdException Locked="false" Priority="62" SemiHidden="false" UnhideWhenUsed="false" Name="Light Grid Accent 2"/> <w:LsdException Locked="false" Priority="63" SemiHidden="false" UnhideWhenUsed="false" Name="Medium Shading 1 Accent 2"/> <w:LsdException Locked="false" Priority="64" SemiHidden="false" UnhideWhenUsed="false" Name="Medium Shading 2 Accent 2"/> <w:LsdException Locked="false" Priority="65" SemiHidden="false" UnhideWhenUsed="false" Name="Medium List 1 Accent 2"/> <w:LsdException Locked="false" Priority="66" SemiHidden="false" UnhideWhenUsed="false" Name="Medium List 2 Accent 2"/> <w:LsdException Locked="false" Priority="67" SemiHidden="false" UnhideWhenUsed="false" Name="Medium Grid 1 Accent 2"/> <w:LsdException Locked="false" Priority="68" SemiHidden="false" UnhideWhenUsed="false" Name="Medium Grid 2 Accent 2"/> <w:LsdException Locked="false" Priority="69" SemiHidden="false" UnhideWhenUsed="false" Name="Medium Grid 3 Accent 2"/> <w:LsdException Locked="false" Priority="70" SemiHidden="false" UnhideWhenUsed="false" Name="Dark List Accent 2"/> <w:LsdException Locked="false" Priority="71" SemiHidden="false" UnhideWhenUsed="false" Name="Colorful Shading Accent 2"/> <w:LsdException Locked="false" Priority="72" SemiHidden="false" UnhideWhenUsed="false" Name="Colorful List Accent 2"/> <w:LsdException Locked="false" Priority="73" SemiHidden="false" UnhideWhenUsed="false" Name="Colorful Grid Accent 2"/> <w:LsdException Locked="false" Priority="60" SemiHidden="false" UnhideWhenUsed="false" Name="Light Shading Accent 3"/> <w:LsdException Locked="false" Priority="61" SemiHidden="false" UnhideWhenUsed="false" Name="Light List Accent 3"/> <w:LsdException Locked="false" Priority="62" SemiHidden="false" UnhideWhenUsed="false" Name="Light Grid Accent 3"/> <w:LsdException Locked="false" Priority="63" SemiHidden="false" UnhideWhenUsed="false" Name="Medium Shading 1 Accent 3"/> <w:LsdException Locked="false" Priority="64" SemiHidden="false" UnhideWhenUsed="false" Name="Medium Shading 2 Accent 3"/> <w:LsdException Locked="false" Priority="65" SemiHidden="false" UnhideWhenUsed="false" Name="Medium List 1 Accent 3"/> <w:LsdException Locked="false" Priority="66" SemiHidden="false" UnhideWhenUsed="false" Name="Medium List 2 Accent 3"/> <w:LsdException Locked="false" Priority="67" SemiHidden="false" UnhideWhenUsed="false" Name="Medium Grid 1 Accent 3"/> <w:LsdException Locked="false" Priority="68" SemiHidden="false" UnhideWhenUsed="false" Name="Medium Grid 2 Accent 3"/> <w:LsdException Locked="false" Priority="69" SemiHidden="false" UnhideWhenUsed="false" Name="Medium Grid 3 Accent 3"/> <w:LsdException Locked="false" Priority="70" SemiHidden="false" UnhideWhenUsed="false" Name="Dark List Accent 3"/> <w:LsdException Locked="false" Priority="71" SemiHidden="false" UnhideWhenUsed="false" Name="Colorful Shading Accent 3"/> <w:LsdException Locked="false" Priority="72" SemiHidden="false" UnhideWhenUsed="false" Name="Colorful List Accent 3"/> <w:LsdException Locked="false" Priority="73" SemiHidden="false" UnhideWhenUsed="false" Name="Colorful Grid Accent 3"/> <w:LsdException Locked="false" Priority="60" SemiHidden="false" UnhideWhenUsed="false" Name="Light Shading Accent 4"/> <w:LsdException Locked="false" Priority="61" SemiHidden="false" UnhideWhenUsed="false" Name="Light List Accent 4"/> <w:LsdException Locked="false" Priority="62" SemiHidden="false" UnhideWhenUsed="false" Name="Light Grid Accent 4"/> <w:LsdException Locked="false" Priority="63" SemiHidden="false" UnhideWhenUsed="false" Name="Medium Shading 1 Accent 4"/> <w:LsdException Locked="false" Priority="64" SemiHidden="false" UnhideWhenUsed="false" Name="Medium Shading 2 Accent 4"/> <w:LsdException Locked="false" Priority="65" SemiHidden="false" UnhideWhenUsed="false" Name="Medium List 1 Accent 4"/> <w:LsdException Locked="false" Priority="66" SemiHidden="false" UnhideWhenUsed="false" Name="Medium List 2 Accent 4"/> <w:LsdException Locked="false" Priority="67" SemiHidden="false" UnhideWhenUsed="false" Name="Medium Grid 1 Accent 4"/> <w:LsdException Locked="false" Priority="68" SemiHidden="false" UnhideWhenUsed="false" Name="Medium Grid 2 Accent 4"/> <w:LsdException Locked="false" Priority="69" SemiHidden="false" UnhideWhenUsed="false" Name="Medium Grid 3 Accent 4"/> <w:LsdException Locked="false" Priority="70" SemiHidden="false" UnhideWhenUsed="false" Name="Dark List Accent 4"/> <w:LsdException Locked="false" Priority="71" SemiHidden="false" UnhideWhenUsed="false" Name="Colorful Shading Accent 4"/> <w:LsdException Locked="false" Priority="72" SemiHidden="false" UnhideWhenUsed="false" Name="Colorful List Accent 4"/> <w:LsdException Locked="false" Priority="73" SemiHidden="false" UnhideWhenUsed="false" Name="Colorful Grid Accent 4"/> <w:LsdException Locked="false" Priority="60" SemiHidden="false" UnhideWhenUsed="false" Name="Light Shading Accent 5"/> <w:LsdException Locked="false" Priority="61" SemiHidden="false" UnhideWhenUsed="false" Name="Light List Accent 5"/> <w:LsdException Locked="false" Priority="62" SemiHidden="false" UnhideWhenUsed="false" Name="Light Grid Accent 5"/> <w:LsdException Locked="false" Priority="63" SemiHidden="false" UnhideWhenUsed="false" Name="Medium Shading 1 Accent 5"/> <w:LsdException Locked="false" Priority="64" SemiHidden="false" UnhideWhenUsed="false" Name="Medium Shading 2 Accent 5"/> <w:LsdException Locked="false" Priority="65" SemiHidden="false" UnhideWhenUsed="false" Name="Medium List 1 Accent 5"/> <w:LsdException Locked="false" Priority="66" SemiHidden="false" UnhideWhenUsed="false" Name="Medium List 2 Accent 5"/> <w:LsdException Locked="false" Priority="67" SemiHidden="false" UnhideWhenUsed="false" Name="Medium Grid 1 Accent 5"/> <w:LsdException Locked="false" Priority="68" SemiHidden="false" UnhideWhenUsed="false" Name="Medium Grid 2 Accent 5"/> <w:LsdException Locked="false" Priority="69" SemiHidden="false" UnhideWhenUsed="false" Name="Medium Grid 3 Accent 5"/> <w:LsdException Locked="false" Priority="70" SemiHidden="false" UnhideWhenUsed="false" Name="Dark List Accent 5"/> <w:LsdException Locked="false" Priority="71" SemiHidden="false" UnhideWhenUsed="false" Name="Colorful Shading Accent 5"/> <w:LsdException Locked="false" Priority="72" SemiHidden="false" UnhideWhenUsed="false" Name="Colorful List Accent 5"/> <w:LsdException Locked="false" Priority="73" SemiHidden="false" UnhideWhenUsed="false" Name="Colorful Grid Accent 5"/> <w:LsdException Locked="false" Priority="60" SemiHidden="false" UnhideWhenUsed="false" Name="Light Shading Accent 6"/> <w:LsdException Locked="false" Priority="61" SemiHidden="false" UnhideWhenUsed="false" Name="Light List Accent 6"/> <w:LsdException Locked="false" Priority="62" SemiHidden="false" UnhideWhenUsed="false" Name="Light Grid Accent 6"/> <w:LsdException Locked="false" Priority="63" SemiHidden="false" UnhideWhenUsed="false" Name="Medium Shading 1 Accent 6"/> <w:LsdException Locked="false" Priority="64" SemiHidden="false" UnhideWhenUsed="false" Name="Medium Shading 2 Accent 6"/> <w:LsdException Locked="false" Priority="65" SemiHidden="false" UnhideWhenUsed="false" Name="Medium List 1 Accent 6"/> <w:LsdException Locked="false" Priority="66" SemiHidden="false" UnhideWhenUsed="false" Name="Medium List 2 Accent 6"/> <w:LsdException Locked="false" Priority="67" SemiHidden="false" UnhideWhenUsed="false" Name="Medium Grid 1 Accent 6"/> <w:LsdException Locked="false" Priority="68" SemiHidden="false" UnhideWhenUsed="false" Name="Medium Grid 2 Accent 6"/> <w:LsdException Locked="false" Priority="69" SemiHidden="false" UnhideWhenUsed="false" Name="Medium Grid 3 Accent 6"/> <w:LsdException Locked="false" Priority="70" SemiHidden="false" UnhideWhenUsed="false" Name="Dark List Accent 6"/> <w:LsdException Locked="false" Priority="71" SemiHidden="false" UnhideWhenUsed="false" Name="Colorful Shading Accent 6"/> <w:LsdException Locked="false" Priority="72" SemiHidden="false" UnhideWhenUsed="false" Name="Colorful List Accent 6"/> <w:LsdException Locked="false" Priority="73" SemiHidden="false" UnhideWhenUsed="false" Name="Colorful Grid Accent 6"/> <w:LsdException Locked="false" Priority="19" SemiHidden="false" UnhideWhenUsed="false" QFormat="true" Name="Subtle Emphasis"/> <w:LsdException Locked="false" Priority="21" SemiHidden="false" UnhideWhenUsed="false" QFormat="true" Name="Intense Emphasis"/> <w:LsdException Locked="false" Priority="31" SemiHidden="false" UnhideWhenUsed="false" QFormat="true" Name="Subtle Reference"/> <w:LsdException Locked="false" Priority="32" SemiHidden="false" UnhideWhenUsed="false" QFormat="true" Name="Intense Reference"/> <w:LsdException Locked="false" Priority="33" SemiHidden="false" UnhideWhenUsed="false" QFormat="true" Name="Book Title"/> <w:LsdException Locked="false" Priority="37" Name="Bibliography"/> <w:LsdException Locked="false" Priority="39" QFormat="true" Name="TOC Heading"/> </w:LatentStyles> </xml><![endif]--><!--[if gte mso 10]> <style> /* Style Definitions */ table.MsoNormalTable {mso-style-name:"Table Normal"; mso-tstyle-rowband-size:0; mso-tstyle-colband-size:0; mso-style-noshow:yes; mso-style-priority9; mso-style-qformat:yes; mso-style-parent:""; mso-padding-alt:0in 5.4pt 0in 5.4pt; mso-para-margin-top:0in; mso-para-margin-right:0in; mso-para-margin-bottom:10.0pt; mso-para-margin-left:0in; line-height:115%; mso-pagination:widow-orphan; font-size:11.0pt; font-family:"Calibri","sans-serif"; mso-ascii-font-family:Calibri; mso-ascii-theme-font:minor-latin; mso-fareast-font-family:"Times New Roman"; mso-fareast-theme-font:minor-fareast; mso-hansi-font-family:Calibri; mso-hansi-theme-font:minor-latin;} </style> <![endif]-->1 5 3
6 2 4
With a breaker bar or long handled ratchet and a 15/16 socket rotate the engine damper until the timing mark comes up to top dead center. Watch #6 cyls and #1 cyls rocker arms as you do this. On one of these two cylinders the exhaust will just be closing and the intake will start to open as you approach top dead center. If that happens on #6 then adjust #1. If it happens on #1 then adjust #6, because these two pairs are matched, as in the diagram above (5 & 2 and 3 & 4 are the other two matched pairs). So lets say you just adjusted #6. The next cylinder to adjust in the firing order is #2. Rotate the crank about a third of a rev, watching #2's buddy, #5. The exhaust rocker for #5 will be closing and the intake starting to open as you get to TDC. Adjust #2 when the two #5 rockers are in alignment, one closing and one opening.
Continue this process until you go through all six, then go through it again, to double check. With this method you can adjust all six cylinders with only two revolutions of the crank.
Something is going on with your v.train. The above is in case you want to check your v.adjustment. Me, I can't follow the FTF's above instructions, so I take a felt pen and mark inside the dizzy cap, on the cap, where the rotor is when each p. is at tdc. That way I can just crank and watch. I go front to back. It just is simplier. Any way, I hope that helps.
AB--you're scaring me. If it is clicking so loudly, that means something is amiss! I would not drive it until I got it solved, because every 'click' is two metal parts--v. to rocker, lifter to cam, lifter to p.rod....--hitting...hammering! Plllllllllllllllllllllllllllllllllllllllllllllllll lllllease figure it out before something goes awry.
Did you look through the p.rods? Is oil getting through. I would pull the dizzy if in doubt, and figure out how to get a drill down to you oil pump (I cut the end off of an allen wrench) and take your v.cover off to see if oil is coming out of all p.rods????onto rockers.
<!--[if gte mso 9]><xml> <o:OfficeDocumentSettings> <o:RelyOnVML/> <o:AllowPNG/> </o:OfficeDocumentSettings> </xml><![endif]--><!--[if gte mso 9]><xml> <w:WordDocument> <w:View>Normal</w:View> <w:Zoom>0</w:Zoom> <w:TrackMoves/> <w:TrackFormatting/> <w:PunctuationKerning/> <w:ValidateAgainstSchemas/> <w:SaveIfXMLInvalid>false</w:SaveIfXMLInvalid> <w:IgnoreMixedContent>false</w:IgnoreMixedContent> <w:AlwaysShowPlaceholderText>false</w:AlwaysShowPlaceholderText> <w
oNotPromoteQF/> <w:LidThemeOther>EN-US</w:LidThemeOther> <w:LidThemeAsian>X-NONE</w:LidThemeAsian> <w:LidThemeComplexScript>X-NONE</w:LidThemeComplexScript> <w:Compatibility> <w:BreakWrappedTables/> <w:SnapToGridInCell/> <w:WrapTextWithPunct/> <w:UseAsianBreakRules/> <wontGrowAutofit/> <w:SplitPgBreakAndParaMark/> <wontVertAlignCellWithSp/> <wontBreakConstrainedForcedTables/> <wontVertAlignInTxbx/> <w:Word11KerningPairs/> <w:CachedColBalance/> </w:Compatibility> <m:mathPr> <m:mathFont m:val="Cambria Math"/> <m:brkBin m:val="before"/> <m:brkBinSub m:val="--"/> <m:smallFrac m:val="off"/> <m:dispDef/> <m:lMargin m:val="0"/> <m:rMargin m:val="0"/> <m:defJc m:val="centerGroup"/> <m:wrapIndent m:val="1440"/> <m:intLim m:val="subSup"/> <m:naryLim m:val="undOvr"/> </m:mathPr></w:WordDocument> </xml><![endif]--><!--[if gte mso 9]><xml> <w:LatentStyles DefLockedState="false" DefUnhideWhenUsed="true" DefSemiHidden="true" DefQFormat="false" DefPriority="99" LatentStyleCount="267"> <w:LsdException Locked="false" Priority="0" SemiHidden="false" UnhideWhenUsed="false" QFormat="true" Name="Normal"/> <w:LsdException Locked="false" Priority="9" SemiHidden="false" UnhideWhenUsed="false" QFormat="true" Name="heading 1"/> <w:LsdException Locked="false" Priority="9" QFormat="true" Name="heading 2"/> <w:LsdException Locked="false" Priority="9" QFormat="true" Name="heading 3"/> <w:LsdException Locked="false" Priority="9" QFormat="true" Name="heading 4"/> <w:LsdException Locked="false" Priority="9" QFormat="true" Name="heading 5"/> <w:LsdException Locked="false" Priority="9" QFormat="true" Name="heading 6"/> <w:LsdException Locked="false" Priority="9" QFormat="true" Name="heading 7"/> <w:LsdException Locked="false" Priority="9" QFormat="true" Name="heading 8"/> <w:LsdException Locked="false" Priority="9" QFormat="true" Name="heading 9"/> <w:LsdException Locked="false" Priority="39" Name="toc 1"/> <w:LsdException Locked="false" Priority="39" Name="toc 2"/> <w:LsdException Locked="false" Priority="39" Name="toc 3"/> <w:LsdException Locked="false" Priority="39" Name="toc 4"/> <w:LsdException Locked="false" Priority="39" Name="toc 5"/> <w:LsdException Locked="false" Priority="39" Name="toc 6"/> <w:LsdException Locked="false" Priority="39" Name="toc 7"/> <w:LsdException Locked="false" Priority="39" Name="toc 8"/> <w:LsdException Locked="false" Priority="39" Name="toc 9"/> <w:LsdException Locked="false" Priority="35" QFormat="true" Name="caption"/> <w:LsdException Locked="false" Priority="10" SemiHidden="false" UnhideWhenUsed="false" QFormat="true" Name="Title"/> <w:LsdException Locked="false" Priority="1" Name="Default Paragraph Font"/> <w:LsdException Locked="false" Priority="11" SemiHidden="false" UnhideWhenUsed="false" QFormat="true" Name="Subtitle"/> <w:LsdException Locked="false" Priority="22" SemiHidden="false" UnhideWhenUsed="false" QFormat="true" Name="Strong"/> <w:LsdException Locked="false" Priority="20" SemiHidden="false" UnhideWhenUsed="false" QFormat="true" Name="Emphasis"/> <w:LsdException Locked="false" Priority="59" SemiHidden="false" UnhideWhenUsed="false" Name="Table Grid"/> <w:LsdException Locked="false" UnhideWhenUsed="false" Name="Placeholder Text"/> <w:LsdException Locked="false" Priority="1" SemiHidden="false" UnhideWhenUsed="false" QFormat="true" Name="No Spacing"/> <w:LsdException Locked="false" Priority="60" SemiHidden="false" UnhideWhenUsed="false" Name="Light Shading"/> <w:LsdException Locked="false" Priority="61" SemiHidden="false" UnhideWhenUsed="false" Name="Light List"/> <w:LsdException Locked="false" Priority="62" SemiHidden="false" UnhideWhenUsed="false" Name="Light Grid"/> <w:LsdException Locked="false" Priority="63" SemiHidden="false" UnhideWhenUsed="false" Name="Medium Shading 1"/> <w:LsdException Locked="false" Priority="64" SemiHidden="false" UnhideWhenUsed="false" Name="Medium Shading 2"/> <w:LsdException Locked="false" Priority="65" SemiHidden="false" UnhideWhenUsed="false" Name="Medium List 1"/> <w:LsdException Locked="false" Priority="66" SemiHidden="false" UnhideWhenUsed="false" Name="Medium List 2"/> <w:LsdException Locked="false" Priority="67" SemiHidden="false" UnhideWhenUsed="false" Name="Medium Grid 1"/> <w:LsdException Locked="false" Priority="68" SemiHidden="false" UnhideWhenUsed="false" Name="Medium Grid 2"/> <w:LsdException Locked="false" Priority="69" SemiHidden="false" UnhideWhenUsed="false" Name="Medium Grid 3"/> <w:LsdException Locked="false" Priority="70" SemiHidden="false" UnhideWhenUsed="false" Name="Dark List"/> <w:LsdException Locked="false" Priority="71" SemiHidden="false" UnhideWhenUsed="false" Name="Colorful Shading"/> <w:LsdException Locked="false" Priority="72" SemiHidden="false" UnhideWhenUsed="false" Name="Colorful List"/> <w:LsdException Locked="false" Priority="73" SemiHidden="false" UnhideWhenUsed="false" Name="Colorful Grid"/> <w:LsdException Locked="false" Priority="60" SemiHidden="false" UnhideWhenUsed="false" Name="Light Shading Accent 1"/> <w:LsdException Locked="false" Priority="61" SemiHidden="false" UnhideWhenUsed="false" Name="Light List Accent 1"/> <w:LsdException Locked="false" Priority="62" SemiHidden="false" UnhideWhenUsed="false" Name="Light Grid Accent 1"/> <w:LsdException Locked="false" Priority="63" SemiHidden="false" UnhideWhenUsed="false" Name="Medium Shading 1 Accent 1"/> <w:LsdException Locked="false" Priority="64" SemiHidden="false" UnhideWhenUsed="false" Name="Medium Shading 2 Accent 1"/> <w:LsdException Locked="false" Priority="65" SemiHidden="false" UnhideWhenUsed="false" Name="Medium List 1 Accent 1"/> <w:LsdException Locked="false" UnhideWhenUsed="false" Name="Revision"/> <w:LsdException Locked="false" Priority="34" SemiHidden="false" UnhideWhenUsed="false" QFormat="true" Name="List Paragraph"/> <w:LsdException Locked="false" Priority="29" SemiHidden="false" UnhideWhenUsed="false" QFormat="true" Name="Quote"/> <w:LsdException Locked="false" Priority="30" SemiHidden="false" UnhideWhenUsed="false" QFormat="true" Name="Intense Quote"/> <w:LsdException Locked="false" Priority="66" SemiHidden="false" UnhideWhenUsed="false" Name="Medium List 2 Accent 1"/> <w:LsdException Locked="false" Priority="67" SemiHidden="false" UnhideWhenUsed="false" Name="Medium Grid 1 Accent 1"/> <w:LsdException Locked="false" Priority="68" SemiHidden="false" UnhideWhenUsed="false" Name="Medium Grid 2 Accent 1"/> <w:LsdException Locked="false" Priority="69" SemiHidden="false" UnhideWhenUsed="false" Name="Medium Grid 3 Accent 1"/> <w:LsdException Locked="false" Priority="70" SemiHidden="false" UnhideWhenUsed="false" Name="Dark List Accent 1"/> <w:LsdException Locked="false" Priority="71" SemiHidden="false" UnhideWhenUsed="false" Name="Colorful Shading Accent 1"/> <w:LsdException Locked="false" Priority="72" SemiHidden="false" UnhideWhenUsed="false" Name="Colorful List Accent 1"/> <w:LsdException Locked="false" Priority="73" SemiHidden="false" UnhideWhenUsed="false" Name="Colorful Grid Accent 1"/> <w:LsdException Locked="false" Priority="60" SemiHidden="false" UnhideWhenUsed="false" Name="Light Shading Accent 2"/> <w:LsdException Locked="false" Priority="61" SemiHidden="false" UnhideWhenUsed="false" Name="Light List Accent 2"/> <w:LsdException Locked="false" Priority="62" SemiHidden="false" UnhideWhenUsed="false" Name="Light Grid Accent 2"/> <w:LsdException Locked="false" Priority="63" SemiHidden="false" UnhideWhenUsed="false" Name="Medium Shading 1 Accent 2"/> <w:LsdException Locked="false" Priority="64" SemiHidden="false" UnhideWhenUsed="false" Name="Medium Shading 2 Accent 2"/> <w:LsdException Locked="false" Priority="65" SemiHidden="false" UnhideWhenUsed="false" Name="Medium List 1 Accent 2"/> <w:LsdException Locked="false" Priority="66" SemiHidden="false" UnhideWhenUsed="false" Name="Medium List 2 Accent 2"/> <w:LsdException Locked="false" Priority="67" SemiHidden="false" UnhideWhenUsed="false" Name="Medium Grid 1 Accent 2"/> <w:LsdException Locked="false" Priority="68" SemiHidden="false" UnhideWhenUsed="false" Name="Medium Grid 2 Accent 2"/> <w:LsdException Locked="false" Priority="69" SemiHidden="false" UnhideWhenUsed="false" Name="Medium Grid 3 Accent 2"/> <w:LsdException Locked="false" Priority="70" SemiHidden="false" UnhideWhenUsed="false" Name="Dark List Accent 2"/> <w:LsdException Locked="false" Priority="71" SemiHidden="false" UnhideWhenUsed="false" Name="Colorful Shading Accent 2"/> <w:LsdException Locked="false" Priority="72" SemiHidden="false" UnhideWhenUsed="false" Name="Colorful List Accent 2"/> <w:LsdException Locked="false" Priority="73" SemiHidden="false" UnhideWhenUsed="false" Name="Colorful Grid Accent 2"/> <w:LsdException Locked="false" Priority="60" SemiHidden="false" UnhideWhenUsed="false" Name="Light Shading Accent 3"/> <w:LsdException Locked="false" Priority="61" SemiHidden="false" UnhideWhenUsed="false" Name="Light List Accent 3"/> <w:LsdException Locked="false" Priority="62" SemiHidden="false" UnhideWhenUsed="false" Name="Light Grid Accent 3"/> <w:LsdException Locked="false" Priority="63" SemiHidden="false" UnhideWhenUsed="false" Name="Medium Shading 1 Accent 3"/> <w:LsdException Locked="false" Priority="64" SemiHidden="false" UnhideWhenUsed="false" Name="Medium Shading 2 Accent 3"/> <w:LsdException Locked="false" Priority="65" SemiHidden="false" UnhideWhenUsed="false" Name="Medium List 1 Accent 3"/> <w:LsdException Locked="false" Priority="66" SemiHidden="false" UnhideWhenUsed="false" Name="Medium List 2 Accent 3"/> <w:LsdException Locked="false" Priority="67" SemiHidden="false" UnhideWhenUsed="false" Name="Medium Grid 1 Accent 3"/> <w:LsdException Locked="false" Priority="68" SemiHidden="false" UnhideWhenUsed="false" Name="Medium Grid 2 Accent 3"/> <w:LsdException Locked="false" Priority="69" SemiHidden="false" UnhideWhenUsed="false" Name="Medium Grid 3 Accent 3"/> <w:LsdException Locked="false" Priority="70" SemiHidden="false" UnhideWhenUsed="false" Name="Dark List Accent 3"/> <w:LsdException Locked="false" Priority="71" SemiHidden="false" UnhideWhenUsed="false" Name="Colorful Shading Accent 3"/> <w:LsdException Locked="false" Priority="72" SemiHidden="false" UnhideWhenUsed="false" Name="Colorful List Accent 3"/> <w:LsdException Locked="false" Priority="73" SemiHidden="false" UnhideWhenUsed="false" Name="Colorful Grid Accent 3"/> <w:LsdException Locked="false" Priority="60" SemiHidden="false" UnhideWhenUsed="false" Name="Light Shading Accent 4"/> <w:LsdException Locked="false" Priority="61" SemiHidden="false" UnhideWhenUsed="false" Name="Light List Accent 4"/> <w:LsdException Locked="false" Priority="62" SemiHidden="false" UnhideWhenUsed="false" Name="Light Grid Accent 4"/> <w:LsdException Locked="false" Priority="63" SemiHidden="false" UnhideWhenUsed="false" Name="Medium Shading 1 Accent 4"/> <w:LsdException Locked="false" Priority="64" SemiHidden="false" UnhideWhenUsed="false" Name="Medium Shading 2 Accent 4"/> <w:LsdException Locked="false" Priority="65" SemiHidden="false" UnhideWhenUsed="false" Name="Medium List 1 Accent 4"/> <w:LsdException Locked="false" Priority="66" SemiHidden="false" UnhideWhenUsed="false" Name="Medium List 2 Accent 4"/> <w:LsdException Locked="false" Priority="67" SemiHidden="false" UnhideWhenUsed="false" Name="Medium Grid 1 Accent 4"/> <w:LsdException Locked="false" Priority="68" SemiHidden="false" UnhideWhenUsed="false" Name="Medium Grid 2 Accent 4"/> <w:LsdException Locked="false" Priority="69" SemiHidden="false" UnhideWhenUsed="false" Name="Medium Grid 3 Accent 4"/> <w:LsdException Locked="false" Priority="70" SemiHidden="false" UnhideWhenUsed="false" Name="Dark List Accent 4"/> <w:LsdException Locked="false" Priority="71" SemiHidden="false" UnhideWhenUsed="false" Name="Colorful Shading Accent 4"/> <w:LsdException Locked="false" Priority="72" SemiHidden="false" UnhideWhenUsed="false" Name="Colorful List Accent 4"/> <w:LsdException Locked="false" Priority="73" SemiHidden="false" UnhideWhenUsed="false" Name="Colorful Grid Accent 4"/> <w:LsdException Locked="false" Priority="60" SemiHidden="false" UnhideWhenUsed="false" Name="Light Shading Accent 5"/> <w:LsdException Locked="false" Priority="61" SemiHidden="false" UnhideWhenUsed="false" Name="Light List Accent 5"/> <w:LsdException Locked="false" Priority="62" SemiHidden="false" UnhideWhenUsed="false" Name="Light Grid Accent 5"/> <w:LsdException Locked="false" Priority="63" SemiHidden="false" UnhideWhenUsed="false" Name="Medium Shading 1 Accent 5"/> <w:LsdException Locked="false" Priority="64" SemiHidden="false" UnhideWhenUsed="false" Name="Medium Shading 2 Accent 5"/> <w:LsdException Locked="false" Priority="65" SemiHidden="false" UnhideWhenUsed="false" Name="Medium List 1 Accent 5"/> <w:LsdException Locked="false" Priority="66" SemiHidden="false" UnhideWhenUsed="false" Name="Medium List 2 Accent 5"/> <w:LsdException Locked="false" Priority="67" SemiHidden="false" UnhideWhenUsed="false" Name="Medium Grid 1 Accent 5"/> <w:LsdException Locked="false" Priority="68" SemiHidden="false" UnhideWhenUsed="false" Name="Medium Grid 2 Accent 5"/> <w:LsdException Locked="false" Priority="69" SemiHidden="false" UnhideWhenUsed="false" Name="Medium Grid 3 Accent 5"/> <w:LsdException Locked="false" Priority="70" SemiHidden="false" UnhideWhenUsed="false" Name="Dark List Accent 5"/> <w:LsdException Locked="false" Priority="71" SemiHidden="false" UnhideWhenUsed="false" Name="Colorful Shading Accent 5"/> <w:LsdException Locked="false" Priority="72" SemiHidden="false" UnhideWhenUsed="false" Name="Colorful List Accent 5"/> <w:LsdException Locked="false" Priority="73" SemiHidden="false" UnhideWhenUsed="false" Name="Colorful Grid Accent 5"/> <w:LsdException Locked="false" Priority="60" SemiHidden="false" UnhideWhenUsed="false" Name="Light Shading Accent 6"/> <w:LsdException Locked="false" Priority="61" SemiHidden="false" UnhideWhenUsed="false" Name="Light List Accent 6"/> <w:LsdException Locked="false" Priority="62" SemiHidden="false" UnhideWhenUsed="false" Name="Light Grid Accent 6"/> <w:LsdException Locked="false" Priority="63" SemiHidden="false" UnhideWhenUsed="false" Name="Medium Shading 1 Accent 6"/> <w:LsdException Locked="false" Priority="64" SemiHidden="false" UnhideWhenUsed="false" Name="Medium Shading 2 Accent 6"/> <w:LsdException Locked="false" Priority="65" SemiHidden="false" UnhideWhenUsed="false" Name="Medium List 1 Accent 6"/> <w:LsdException Locked="false" Priority="66" SemiHidden="false" UnhideWhenUsed="false" Name="Medium List 2 Accent 6"/> <w:LsdException Locked="false" Priority="67" SemiHidden="false" UnhideWhenUsed="false" Name="Medium Grid 1 Accent 6"/> <w:LsdException Locked="false" Priority="68" SemiHidden="false" UnhideWhenUsed="false" Name="Medium Grid 2 Accent 6"/> <w:LsdException Locked="false" Priority="69" SemiHidden="false" UnhideWhenUsed="false" Name="Medium Grid 3 Accent 6"/> <w:LsdException Locked="false" Priority="70" SemiHidden="false" UnhideWhenUsed="false" Name="Dark List Accent 6"/> <w:LsdException Locked="false" Priority="71" SemiHidden="false" UnhideWhenUsed="false" Name="Colorful Shading Accent 6"/> <w:LsdException Locked="false" Priority="72" SemiHidden="false" UnhideWhenUsed="false" Name="Colorful List Accent 6"/> <w:LsdException Locked="false" Priority="73" SemiHidden="false" UnhideWhenUsed="false" Name="Colorful Grid Accent 6"/> <w:LsdException Locked="false" Priority="19" SemiHidden="false" UnhideWhenUsed="false" QFormat="true" Name="Subtle Emphasis"/> <w:LsdException Locked="false" Priority="21" SemiHidden="false" UnhideWhenUsed="false" QFormat="true" Name="Intense Emphasis"/> <w:LsdException Locked="false" Priority="31" SemiHidden="false" UnhideWhenUsed="false" QFormat="true" Name="Subtle Reference"/> <w:LsdException Locked="false" Priority="32" SemiHidden="false" UnhideWhenUsed="false" QFormat="true" Name="Intense Reference"/> <w:LsdException Locked="false" Priority="33" SemiHidden="false" UnhideWhenUsed="false" QFormat="true" Name="Book Title"/> <w:LsdException Locked="false" Priority="37" Name="Bibliography"/> <w:LsdException Locked="false" Priority="39" QFormat="true" Name="TOC Heading"/> </w:LatentStyles> </xml><![endif]--><!--[if gte mso 10]> <style> /* Style Definitions */ table.MsoNormalTable {mso-style-name:"Table Normal"; mso-tstyle-rowband-size:0; mso-tstyle-colband-size:0; mso-style-noshow:yes; mso-style-priority9; mso-style-qformat:yes; mso-style-parent:""; mso-padding-alt:0in 5.4pt 0in 5.4pt; mso-para-margin-top:0in; mso-para-margin-right:0in; mso-para-margin-bottom:10.0pt; mso-para-margin-left:0in; line-height:115%; mso-pagination:widow-orphan; font-size:11.0pt; font-family:"Calibri","sans-serif"; mso-ascii-font-family:Calibri; mso-ascii-theme-font:minor-latin; mso-fareast-font-family:"Times New Roman"; mso-fareast-theme-font:minor-fareast; mso-hansi-font-family:Calibri; mso-hansi-theme-font:minor-latin;} </style> <![endif]-->1 5 3 6 2 4
With a breaker bar or long handled ratchet and a 15/16 socket rotate the engine damper until the timing mark comes up to top dead center. Watch #6 cyls and #1 cyls rocker arms as you do this. On one of these two cylinders the exhaust will just be closing and the intake will start to open as you approach top dead center. If that happens on #6 then adjust #1. If it happens on #1 then adjust #6, because these two pairs are matched, as in the diagram above (5 & 2 and 3 & 4 are the other two matched pairs). So lets say you just adjusted #6. The next cylinder to adjust in the firing order is #2. Rotate the crank about a third of a rev, watching #2's buddy, #5. The exhaust rocker for #5 will be closing and the intake starting to open as you get to TDC. Adjust #2 when the two #5 rockers are in alignment, one closing and one opening.
Continue this process until you go through all six, then go through it again, to double check. With this method you can adjust all six cylinders with only two revolutions of the crank.
Something is going on with your v.train. The above is in case you want to check your v.adjustment. Me, I can't follow the FTF's above instructions, so I take a felt pen and mark inside the dizzy cap, on the cap, where the rotor is when each p. is at tdc. That way I can just crank and watch. I go front to back. It just is simplier. Any way, I hope that helps.
AB--you're scaring me. If it is clicking so loudly, that means something is amiss! I would not drive it until I got it solved, because every 'click' is two metal parts--v. to rocker, lifter to cam, lifter to p.rod....--hitting...hammering! Plllllllllllllllllllllllllllllllllllllllllllllllll lllllease figure it out before something goes awry.
#88
12-01-2010, 09:05 PM
Senior User
Join Date: Nov 2009
Location: Rochester
Posts: 406
Likes: 0
Received 0 Likes
on
0 Posts
Hey AB, As for the rocker tick, I have the same problem. Still a slight tick. I had to take washers and put them under the nuts on the rocker arms to help. Never had the tick before but I swapped heads too so my old head had the adjustable rockers. Whis I would have seen that before I did the p&p on the new head!
For your vaccum. Me running 60 down the highway I run about 10-11 on the vaccum gauge. Idle is 20. I can get up to 70-75 and once I start crusing it stays at 10-11 still. I would also say its a timing issue. Good Luck I hope you get it figured out has to be something minor.
For your vaccum. Me running 60 down the highway I run about 10-11 on the vaccum gauge. Idle is 20. I can get up to 70-75 and once I start crusing it stays at 10-11 still. I would also say its a timing issue. Good Luck I hope you get it figured out has to be something minor.
#90
12-02-2010, 04:10 PM
Thanks for all the responses.
If anything's ticking besides the rocker arms, I can't imagine what it would be. The cam went in without a hitch (and is lined up correctly). The lifters on the cam all slid in and out easily (so I can't imagine there being any binding in their holes). Checked all the push rods one by one and ran a pipe cleaner through them until they were as clean as a whistle. Rocker arms were all cleaned. Springs installed correctly and seated fully. Valves were never removed.
Only thing I can think of is a rocker arm that isn't torqued properly, which is leaving a small amount of space between the rocker arm and the top of the valve or the push rod, and when the space connects, there's a little "tick" sound.
From what I read in my engine manual (original '81 Ford manual), it said that if the rocker arms are too loose, it'll be noisy. If they're too tight, it'll cause premature wear. Other sources I read from also listed a rocker arm being too loose as "obnoxious" but never listed as damaging. EITHER WAY though, I'll be tearing into it immediately to figure out why it's making the noise. From my guess, I went through the procedure incorrectly.
I brought #1 to TDC and then torqued the intake and exhaust rocker arms on 1 & 6. Brought #2 to TDC and did I & E on 2 & 5. Brought #3 to TDC and did 3 & 4. So that's only one revolution of the engine. Doesn't match up to what FTF listed above.
And CoolGuy, I think that's what I'm going to have to do. I put some washers on one of them because the nut actually bottomed out and stripped the threads. I had to replace the nut and get a die to fix the threads on the stud. I'm wondering if a few of them are bottoming out on the stud before torquing the rocker arm properly. (I imagine a few of the rocker arms are worn from the years that the engine wasn't in my hands and well taken care of.)
I'll also be checking the timing. Thoughts on the thermostat theory? I know it keeps the computer from fully opening up the engine on an EFI engine, but not sure how drastic an affect there is on a carb'd one, so was wondering what you all think.
Glad you enjoyed the pictures Bill. Looking forward to getting the whole project polished off.
If anything's ticking besides the rocker arms, I can't imagine what it would be. The cam went in without a hitch (and is lined up correctly). The lifters on the cam all slid in and out easily (so I can't imagine there being any binding in their holes). Checked all the push rods one by one and ran a pipe cleaner through them until they were as clean as a whistle. Rocker arms were all cleaned. Springs installed correctly and seated fully. Valves were never removed.
Only thing I can think of is a rocker arm that isn't torqued properly, which is leaving a small amount of space between the rocker arm and the top of the valve or the push rod, and when the space connects, there's a little "tick" sound.
From what I read in my engine manual (original '81 Ford manual), it said that if the rocker arms are too loose, it'll be noisy. If they're too tight, it'll cause premature wear. Other sources I read from also listed a rocker arm being too loose as "obnoxious" but never listed as damaging. EITHER WAY though, I'll be tearing into it immediately to figure out why it's making the noise. From my guess, I went through the procedure incorrectly.
I brought #1 to TDC and then torqued the intake and exhaust rocker arms on 1 & 6. Brought #2 to TDC and did I & E on 2 & 5. Brought #3 to TDC and did 3 & 4. So that's only one revolution of the engine. Doesn't match up to what FTF listed above.
And CoolGuy, I think that's what I'm going to have to do. I put some washers on one of them because the nut actually bottomed out and stripped the threads. I had to replace the nut and get a die to fix the threads on the stud. I'm wondering if a few of them are bottoming out on the stud before torquing the rocker arm properly. (I imagine a few of the rocker arms are worn from the years that the engine wasn't in my hands and well taken care of.)
I'll also be checking the timing. Thoughts on the thermostat theory? I know it keeps the computer from fully opening up the engine on an EFI engine, but not sure how drastic an affect there is on a carb'd one, so was wondering what you all think.
Glad you enjoyed the pictures Bill.
Looking forward to getting the whole project polished off.