1967 – 1972 (with 1973 – 1976 Supplement) 4 X 4 F100 POWER STEERING CONVERSION
HOW I DID IT ….
By Don Alves
These are the parts I gathered together before I began:
- One 1978 – 79 F-150 4×4 Integral Power Steering box in need of a rebuild
- One 1978 – 79 power steering pump (used for core deposit for rebuilt pump.)
- One power steering pump bracket to fit my engine.
- I got the high and low-pressure hoses and oil cooler with the steering box.
- 4′ of new 3/8″ power steering hose and six wide hose clamps
- One new power steering inline filter.
- This next item is needed to clearance the new steering box away from the bottom driver side radiator bolt and allows the box to tilt up a few degrees to give enough clearance between the frame and box for the PS hard lines.
- One 6 �” wide by 5 7/8″ tall piece of 1″ thick steel plate.
- 2 � 3″ allen drive taper head x �” grade 5 bolts and one nut and washer.
- 2 � 3″ hex head �” grade 5 bolts with nuts and loc washers.
- Spray paint (Ford blue is my color).
- You cannot install the new steering box without having it reworked to function on a 71 F-100 4×4.If you don’t have this done and install it anyway your truck will turn left when you turn the steering wheel to the right.
- Pat Chrahn owns a business called; Steering System by Benchworks
6435 E. Thomas Road
Scottsdale, AZ 85251
(480) 946-3992
Pat took my box and completely reworked it and rebuilt the whole thing to function properly for the setup in my truck, I also bought one of Pat’s Trick Dana knuckled telescoping steering shafts to replace my old rattling steering shaft. Both items were back to me within two weeks and ready to install.
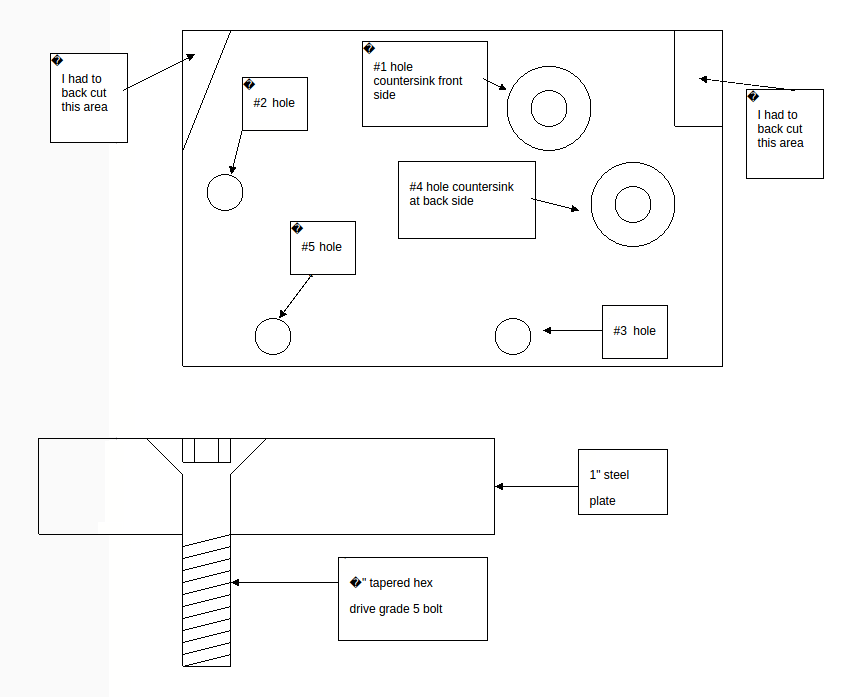
First, I removed the left front tire and put a jack stand under the axle; pulled the pitman arm off leaving it on the tie rod and tied it out of the way, the old pitman arm will bolt right back on to the new steering box. Then, I removed the manual steering box and cleaned up the frame rail area. Next, I installed the PS bracket, rebuilt pump and belt. All three of the original mounting bolt holes for the old manual steering box will be reused and will hereafter be numbered from top to bottom as #1,#2 and #3 at the bottom,(see drawing).Do not drill thru bolt holes #1 and #3 in the frame , they have factory nuts welded to the inside of the frame and you cannot get to them easily. Next, set the steel plate even with the top of the frame and 3/8″ to the left of the left side of hole #2 and clamp it to the frame. The 1″ plate would not fit flat to the frame so it had to be cut to fit the bend line at the frame rail at the top left side and ground on the right topside to go over an existing frame connection, see crude drawing at bottom of this article. I made sure the plate fit flat against the frame and the top of the plate is flush with the top of the frame and 3/8″ past the left side of bolt hole #2 then I marked and drilled the �” holes, #1 #2 and #3, in the steel plate to match the original holes in the frame then I bolted the plate to the frame to make sure everything fit. I then removed the steel plate from the frame and counter sank hole #1from the front .I made my own countersink bit from a 1″drill bit I purchased cheap at a military hardware and bolt store. I just ground it down on my bench grinder until it matched the taper at the back of the taper head bolts. Don’t counter sink the hole too much, you want the top of the taper head bolt to be flush with the front face of the steel plate. Then I tightened the tapered bolt in through the tapered hole #1 in the plate to the frame and installed the old bolt and nut into the left hand hole #2. Next I set the new box up on the plate aligning the bottom right hand hole of the steering box with the bottom right hand hole #3 in the steel plate. At this point, I saw I would need to trim some of the steel inner fender well to fit the box. I used tin snips for this, after a few test fittings I had just enough clear space between the box and fender well. Then I used a new 3″ hex bolt through the bottom right hand of the new box to the bottom right hand bolt hole #3 in the plate and tightened it up just snug, it fit flat and looked good. I still had to trim some of the bottom radiator bracket and mount to get the box to pivot forward enough to clearance the hoses and tilt the box up a few degrees at the steering shaft end, I didn’t have to cut the mounting bolt out at the radiator mount, but just below and to the side a bit. At this point I installed the hard lines to the new steering box and I had to tilt the steering box forward enough to allow the lines to be removed for replacement or service purposes, ( they will be very close to the top of the frame rail). Once I had the clearance I wanted I tightened bolt #3 and then marked the last two holes with a long skinny scratch awl (known as holes #4 being the upper and hole #5 being the lower before I pulled the box back off. Then I pulled the plate back off and drilled the other two new �” holes # 4 and #5. I checked once again that all the holes line up, then I counter sank the top right hole #4 for the new box from the backside of the 1″ plate this time then put the other tapered head �” bolt in from the back side and bolted the 1″ plate to the frame rail with the tapered head bolt #1 on the right and the hex through bolt on the upper left hole #2. This will leave bolt #4 sticking out the front side like a stud bolt. Before I set the new box I had to drill the bottom left hole #5 through the frame, Make sure you put a temporary bolt in hole #3 so you don’t have any alignment problems when you drill this last hole. Now I set the new box up on the tapered bolt #4 sticking out on the upper right and put the other through bolts in and torqued it down making sure everything was setting flat and not hanging up on anything.
I’m almost done; next I centered the movement of the new box, centered the wheels and torqued the pitman arm nut down. Next, I centered the steering wheel and installed the new steering shaft, it was a tight fit but what a difference it makes in turning and overall smoothness of operation. All the hard lines went on followed by the hoses, filter and cooler. I checked all my connections twice!! I put the front wheel back on and lowered the truck off the jack stands. Put the oil in up to the fill cold mark. Pat Chrahn didn’t send directions for bleeding off the air properly so I called him for that information. He is presently working on an instruction sheet on how to bleed the air from the system that will be sent out with future product orders. I got what I needed over the phone and all went as planned. After I bled the oil system as per Benchworks I took her for a spin and YEAH YEAH no more Armstrong steering. I have been planning and collection parts for about a year now and all I can say is that it was more than worth the wait to get it done right. And that’s the way it was!!! I originally wrote this about a year ago and have used this vehicle as a daily driver and off road fun truck since then and have never had one single problem with this setup. I have rewritten this article so it reads and explains a little more of what I have done in hopes that you can understand it and get some ideas from it.
“bowties in the rearview mirror”
1973 – 1979 Power Steering Conversion Supplement
Here are the few differences from the 67-72 and the 73-79 conversions.
First, the area I back cut on the top right hand side of the steel plate for the 71 is not needed on the 76. Second-the area I back cut on the top left hand side for the 71 will have to be back cut, or ground out a bit more to allow the steel plate to set flat against the three original mounting holes.
Third-Holes one and three on my 71 had factory nuts on the inside of the frame rail, making it a snap to re bolt On My Daughters 76 there were no factory nuts on the inside of holes one and three. The manual steering box on the 76 had been replaced by the past owner .He had cut a hole in the front of the boxed cross member at the frame rail to gain access to inside of the frame rail behind the steering box .I don’t know exactly why he had to do this but this is my best guess.
He must have stripped out the factory nuts inside the frame rail and had to gain access to knock off the stripped nuts. Then he bolted the new manual box on using thru bolts. That is how I found the manual box bolted on and had to go thru the hole he made to remove it. Now yours may have the factory nuts inside the frame rail and that is a good thing but I have never done this on a 76 F-100 4×4 before and don’t know for sure what the factory bolting was. I also cut a hole at the bottom of the boxed cross member to access the inside of the frame so I could get a socket on the new nuts as the hole that the previous owner cut was too small for me.
Fourth-I had to buy a new Drag Link, Part Number MOOG DS811, as the original has the large valve for the old power assist on it. I reused the existing power steering pump which is the earlier model with the smaller filler neck and the steel reservoir.
Well the 76 works great with no problems and all I have to do now is install new inner fender well skirts to keep the crud off the engine compartment and find a stock power steering oil cooler. Hope this helps!
![]()