




1981 F250 4WD Front Axle Pivot Point Bushing Replacement

Thread Starter
|
Mountain Pass

Joined: Jul 2007
Posts: 102
Likes: 8
From: Perry, IA
1981 F250 4WD Front Axle Pivot Point Bushing Replacement
Greetings again all!
Just finished my full leaf spring replacement. Due to the huge ride height increase, I opted to get the alignment checked. Drove it the 30 min to the shop at highway speed. Truck felt really good. Right after the shop got the pickup up on the hoist, progress stalled. The shop showed me the worn out axle pivot bushings. Thank goodness they were honest enough to stop the $70 alignment and allow me the opportunity to fix this before we did the alignment.
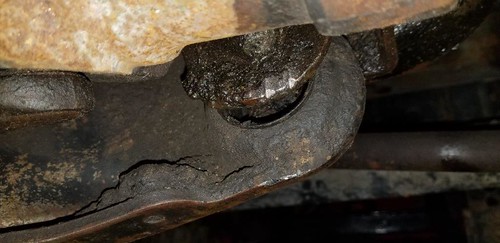
The "front" bushing is WAY worse then the rear one. The front one has NO RUBBER left. The back one is worn out, but still has some rubber left.
This is a picture of the front side of the front bushing:
This is the back side of the "front" bushing. The bolt is just moving around in the metal!
This is the front side of the rear bushing:
This is the back side of the rear bushing:
As it relates to the replacement, I found a YouTube video. The difference being the creator of the video had the whole front axle out of the truck prior to doing the proceedure. However, he made it look simple enough.
Now to my questions:
Thanks again,
Russ
Just finished my full leaf spring replacement. Due to the huge ride height increase, I opted to get the alignment checked. Drove it the 30 min to the shop at highway speed. Truck felt really good. Right after the shop got the pickup up on the hoist, progress stalled. The shop showed me the worn out axle pivot bushings. Thank goodness they were honest enough to stop the $70 alignment and allow me the opportunity to fix this before we did the alignment.
The "front" bushing is WAY worse then the rear one. The front one has NO RUBBER left. The back one is worn out, but still has some rubber left.
This is a picture of the front side of the front bushing:
This is the back side of the "front" bushing. The bolt is just moving around in the metal!
This is the front side of the rear bushing:
This is the back side of the rear bushing:
As it relates to the replacement, I found a YouTube video. The difference being the creator of the video had the whole front axle out of the truck prior to doing the proceedure. However, he made it look simple enough.
- Pry out the rubber portion
- Use a cuttoff wheel to cut the REAR of it flush with the axle housing
- Use a reciprocating saw to cut through the bushing in two places
- Use a chisel to pop out the pieces
Now to my questions:
- With my truck being a 4WD, do I have to remove the axles to accomplish this?
- Or can I drop the pivot points low enough to do this?
- Poly or Rubber? (This truck get about 500-1000 miles/year)
- Should I re-use the bolts? What do I torque the bolts to?
- If I can "borrow" a ball joint press from the local O'reilly tool loaner program, should I use that or cut it with a reciprocating saw?
- Best way to press the new ones in?
- Normally, I'd order from RockAuto, but I didn't see anything and I don't want to wait for it.
- Orielly has MasterPro, MOOG & Energy Suspension available to them. That is the closest parts store. None in stock, but available in 24-48 hours. Do I go middle of the road MOOG?
- Assume I re-torque after it is resting on the ground again?
- ANY other bits of wisdom?
Thanks again,
Russ

Fleet Mechanic


Joined: Jul 2003
Posts: 1,844
Likes: 129
From: Atlantic Canada
Now to my questions:
- With my truck being a 4WD, do I have to remove the axles to accomplish this?
- Or can I drop the pivot points low enough to do this?
- Poly or Rubber? (This truck get about 500-1000 miles/year)
- Should I re-use the bolts? What do I torque the bolts to?
- If I can "borrow" a ball joint press from the local O'reilly tool loaner program, should I use that or cut it with a reciprocating saw?
- Best way to press the new ones in?
- Normally, I'd order from RockAuto, but I didn't see anything and I don't want to wait for it.
- Orielly has MasterPro, MOOG & Energy Suspension available to them. That is the closest parts store. None in stock, but available in 24-48 hours. Do I go middle of the road MOOG?
- Assume I re-torque after it is resting on the ground again?
- ANY other bits of wisdom?
I drilled through the rubber on mine with a 1/4" drill bit. Once you go through in enough spots you can knock the centers out.
I then used a hack saw to cut a slot in the metal sleeve/shell. Take the blade off the handle, feed through the hole and reattach to handle. Once you have a slot cut in the shell, you can peel it out with a hammer and chisel pretty easily.
I installed new Moog bushings. Nothing fancy.
I made a home made press with some fine threaded rod and a couple pipe fittings. I put the impact gun on it, and then smacked the pipe with a hammer every few secs or so. They went in OK.
I sat the truck down with all weight on the wheels before I did the final bolt torque. Pretty sure I bought new bolts locally, and I either reused the old factory flanged nuts or I bought new stover lock nuts and added washers.

Moderator


Joined: Jan 2001
Posts: 56,980
Likes: 2,735
From: Virginia

You are not going to be able to "press" the bushings out. The metal sleeve of the old bushing will be rusted in the arm pretty good. Big hammers, chisels, sawzalls, etc are the best way to get the old ones out. You can do it in the truck, but it can be a little aggravating. You will be fighting the weight of the wheel and the spring pushing down, as well as the driveshaft some. You may be able to wedge some blocks of wood over it to push it down.
I too made my own "press" out of threaded rod and various pieces of pipe, large sockets, washers, etc. You need to make yourself some sort of cup to go on one side to give room for the bushing as it goes in, and you need a thick flat washer on the other side for the threaded nut to press against the bushing and squeeze it in place.
The book I have only spells out the axle to pivot bracket torque for a 2wd, which I would think would be close to the same for the 4x4 also. It says 120-150 ft lbs. You should be seeing a theme here with these torque values, large bolt has large torque value, smaller bolt has smaller torque value. So keep that in mind, and the general size of the bolts you have just done and their torque and the size of these pivot bolts. I am telling you this because there can be mistakes in books.
I too made my own "press" out of threaded rod and various pieces of pipe, large sockets, washers, etc. You need to make yourself some sort of cup to go on one side to give room for the bushing as it goes in, and you need a thick flat washer on the other side for the threaded nut to press against the bushing and squeeze it in place.
The book I have only spells out the axle to pivot bracket torque for a 2wd, which I would think would be close to the same for the 4x4 also. It says 120-150 ft lbs. You should be seeing a theme here with these torque values, large bolt has large torque value, smaller bolt has smaller torque value. So keep that in mind, and the general size of the bolts you have just done and their torque and the size of these pivot bolts. I am telling you this because there can be mistakes in books.
Thread Starter
|
Mountain Pass
Joined: Jul 2007
Posts: 102
Likes: 8
From: Perry, IA
I can only help with a couple questions:
I drilled through the rubber on mine with a 1/4" drill bit. Once you go through in enough spots you can knock the centers out.
I then used a hack saw to cut a slot in the metal sleeve/shell. Take the blade off the handle, feed through the hole and reattach to handle. Once you have a slot cut in the shell, you can peel it out with a hammer and chisel pretty easily.
I installed new Moog bushings. Nothing fancy.
I made a home made press with some fine threaded rod and a couple pipe fittings. I put the impact gun on it, and then smacked the pipe with a hammer every few secs or so. They went in OK.
I sat the truck down with all weight on the wheels before I did the final bolt torque. Pretty sure I bought new bolts locally, and I either reused the old factory flanged nuts or I bought new stover lock nuts and added washers.
I drilled through the rubber on mine with a 1/4" drill bit. Once you go through in enough spots you can knock the centers out.
I then used a hack saw to cut a slot in the metal sleeve/shell. Take the blade off the handle, feed through the hole and reattach to handle. Once you have a slot cut in the shell, you can peel it out with a hammer and chisel pretty easily.
I installed new Moog bushings. Nothing fancy.
I made a home made press with some fine threaded rod and a couple pipe fittings. I put the impact gun on it, and then smacked the pipe with a hammer every few secs or so. They went in OK.
I sat the truck down with all weight on the wheels before I did the final bolt torque. Pretty sure I bought new bolts locally, and I either reused the old factory flanged nuts or I bought new stover lock nuts and added washers.
Did you support each side of the front axle with a jack?
Your mention of the pipe fittings reminded me of something I had to go back into the storage room to find. I built this one when I did a Hotchkis suspension system on my G-body 10 years ago. That should do the trick!
Did you pull the bushings through "dry"?
Do you recall how you "pulled" the front end parts back together to get the bolt started? The link I read, the guy used a come-along. Two person job to line them up after you install the new bushing?
When I crawled under, it LOOKED like I could do this on a 4WD without having to remove the axles. I'll order bushings tomorrow.
I see 2 x MOOG part #s that will work. MOOG K8620 (Problem Solver; Made of high quality elastomer compounds for durability and ride performance) VS MOOG K8292?
The 8292 I can get tomorrow.
Thanks!.
Russ
Thread Starter
|
Mountain Pass
Joined: Jul 2007
Posts: 102
Likes: 8
From: Perry, IA
You can do it in the truck, but it can be a little aggravating. You will be fighting the weight of the wheel and the spring pushing down, as well as the driveshaft some. You may be able to wedge some blocks of wood over it to push it down.
I too made my own "press" out of threaded rod and various pieces of pipe, large sockets, washers, etc. You need to make yourself some sort of cup to go on one side to give room for the bushing as it goes in, and you need a thick flat washer on the other side for the threaded nut to press against the bushing and squeeze it in place.
The book I have only spells out the axle to pivot bracket torque for a 2wd, which I would think would be close to the same for the 4x4 also. It says 120-150 ft lbs. You should be seeing a theme here with these torque values, large bolt has large torque value, smaller bolt has smaller torque value. So keep that in mind, and the general size of the bolts you have just done and their torque and the size of these pivot bolts. I am telling you this because there can be mistakes in books.
I too made my own "press" out of threaded rod and various pieces of pipe, large sockets, washers, etc. You need to make yourself some sort of cup to go on one side to give room for the bushing as it goes in, and you need a thick flat washer on the other side for the threaded nut to press against the bushing and squeeze it in place.
The book I have only spells out the axle to pivot bracket torque for a 2wd, which I would think would be close to the same for the 4x4 also. It says 120-150 ft lbs. You should be seeing a theme here with these torque values, large bolt has large torque value, smaller bolt has smaller torque value. So keep that in mind, and the general size of the bolts you have just done and their torque and the size of these pivot bolts. I am telling you this because there can be mistakes in books.
One piece at a time! I'll take pictures and post 'em!
Thanks again!
Moderator
Joined: Jan 2001
Posts: 56,980
Likes: 2,735
From: Virginia
I'll take the wheels off and maybe even remove the driveshaft. That won't get all the weight off, but should help some. I did see a picture of somebody supporting the bottom of the pumpkin with a chunk of railroad tie. Still, this sounds do-able.
One piece at a time! I'll take pictures and post 'em!
Thanks again!
One piece at a time! I'll take pictures and post 'em!
Thanks again!
Thread Starter
|
Mountain Pass
Joined: Jul 2007
Posts: 102
Likes: 8
From: Perry, IA
Thanks Dave. I'll let folks know how I fare.
Trending Topics
Fleet Mechanic
Joined: Jul 2003
Posts: 1,844
Likes: 129
From: Atlantic Canada
That's why I mentioned that I could only answer a few questions...as the bushing replacement is the same regardless.
Pretty sure I pulled my new bushings through dry, although I may have greased them a bit.
They're really tight going in, so even if they are lubed, I don't think they'd ever fall out.
FTE Stories
Ford Trucks for Ford Truck Enthusiasts

2027 Ford Super Duty Buyer's Guide (Every Model, Engine, & Package)
Brett Foote
Top 10 Ford Truck Tragedies
Joe Kucinski
AEV FXL Super Duty - the Super Duty Raptor Ford Doesn't Make
Brett Foote
Lobo Vs Lobo: Proof the F-150 Lobo Should Be Even Lower!
Michael S. Palmer
Ford's 2001 Explorer Sportsman Concept Looks For a New Home
Verdad Gallardo
10 Best Ford Truck Engines We Miss the Most!
Joe Kucinski
2026 Shelby F-150 Off-Road: Better Than a Raptor R?
Brett Foote
2027 Super Duty Carhartt Package First Look: 12 Things You NEED to Know!
Michael S. Palmer
10 Most Surprising 2026 Ford Truck Features!
Joe Kucinski
Thread Starter
|
Mountain Pass
Joined: Jul 2007
Posts: 102
Likes: 8
From: Perry, IA
I managed to get all of this done on Friday. Just need to torque the bolts down. I took a bunch of pictures. Thought I'd share. While this was not TOO difficult, you will save yourself a LOT of swearing if you have a buddy to help with positioning jacks and helping pry stuff. I did not have this and I'm REALLY glad I live in a VERY Rural area in Iowa. I think I even made the neighbors cattle blush a couple times. That being said, most of this went OK, even flying solo.
I used a combination of two jacks to get things into position. One on the bottom of the caliper bracket and one on the axle.
Using a 1/2 breaker bar (or impact) I was easily able to get the front bolt loose.
The front pivot bushing was the worst. Absolutely NO RUBBER left.
Then, using a reciprocating saw, I cut 3-4 slits in the sleeve. I ended up putting a couple small nicks in the housing, but I didn't get too worked up about it. The worst part about this step was working around my snow plow bracket.
Then using a chisel and a hammer from the back side, the sleeve came out fairly easily.
Now it's time to install the new one in the front:
Years ago I made this simple tool to install a suspension kit in a G-body. It worked VERY well here as well. It is very simple. 2 x galvanized water pipe caps drilled out to fit a 1/2 inch, grade 8, bolt. One cap is bigger that the bushing to allow the bushing to be "drawn through" the axle housing and the other is JUST big enough to make contact with the outside lip of the bushing. I manually set the bushing in there as far as I could and then installed the tool.
Then hit it with the impact
One thing I did do was switch the bolt around. I ended up putting the nut on the side facing the axle as I didn't have room to get the whole bolt out if I did it the way the first photo shows.
Much improved over the original bushing
Now to get it back in place. As you can see in the picture, the bushing didn't want to play nice with the axle housing. For the front one, a nice sized pry bar and positioning the jack at the right height made FAIRLY simple work of this. Again, if you have a 2nd set of hands, this would be easier. I ended up using the factory bolts over again. Just bout new "squish" lock nuts.
Moving to the rear pivot bushing. Again using 2 jacks (I don't know if that was 100% necessary though) I zipped the bolt out and lowered that pivot point. While this one looked worn, it was a LOT better than the front one.
Then I drilled several holes in the rubber with a 1/4 in drill bit
Again, using the reciprocating saw I cut the bushing housing in 3-4 places
Then using the same chisel as before, removed the housing
For whatever reason, I was unable to manually push this bushing in as far before I installed my bushing installation tool. The only difference here was that I had to switch to a shorter bolt halfway through as the bolts were not threaded all the way through.
I was able to get the top side of the bushing flush, but had a TINY gap on the bottom. I actually shattered part of my homemade tool doing this (glad I was wearing safety glasses), so I left it there.
Believe it or not, it was at this point where MOST of my swearing occurred. I could NOT FOR THE LIFE OF ME pry that housing to where I could get the bolt started. I have about 3-4 pictures I took of some "sketchy" ideas I tried. Most of these issues would likely have been fixed by either having a hoist or a 2nd set of hands. What ended up working was to wedge a large chisel in between the pivot point "socket" and the "pivot point." The I raised the jack. The chisel already being there pushed the axle housing into a close enough proximity that I was able to zip it in with my impact.
Then I put the wheels back on and lowered it to the ground where I can now torque the 2 x bolts to 120-150 ft lbs.
Anyway, I got it done. I go back in for alignment Tuesday. Thanks again to everybody here for the help.
In case it matters, I went with the MOOG K8292 as it was in stock locally.
I used a combination of two jacks to get things into position. One on the bottom of the caliper bracket and one on the axle.
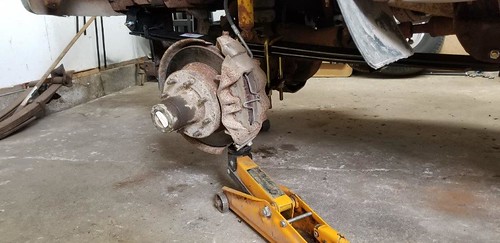

Using a 1/2 breaker bar (or impact) I was easily able to get the front bolt loose.


The front pivot bushing was the worst. Absolutely NO RUBBER left.


Then, using a reciprocating saw, I cut 3-4 slits in the sleeve. I ended up putting a couple small nicks in the housing, but I didn't get too worked up about it. The worst part about this step was working around my snow plow bracket.


Then using a chisel and a hammer from the back side, the sleeve came out fairly easily.


Now it's time to install the new one in the front:


Years ago I made this simple tool to install a suspension kit in a G-body. It worked VERY well here as well. It is very simple. 2 x galvanized water pipe caps drilled out to fit a 1/2 inch, grade 8, bolt. One cap is bigger that the bushing to allow the bushing to be "drawn through" the axle housing and the other is JUST big enough to make contact with the outside lip of the bushing. I manually set the bushing in there as far as I could and then installed the tool.
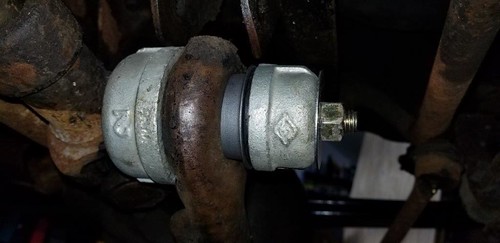
Then hit it with the impact

One thing I did do was switch the bolt around. I ended up putting the nut on the side facing the axle as I didn't have room to get the whole bolt out if I did it the way the first photo shows.
Much improved over the original bushing


Now to get it back in place. As you can see in the picture, the bushing didn't want to play nice with the axle housing. For the front one, a nice sized pry bar and positioning the jack at the right height made FAIRLY simple work of this. Again, if you have a 2nd set of hands, this would be easier. I ended up using the factory bolts over again. Just bout new "squish" lock nuts.

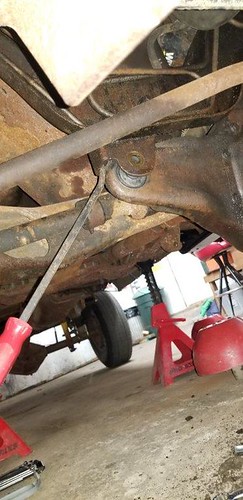
Moving to the rear pivot bushing. Again using 2 jacks (I don't know if that was 100% necessary though) I zipped the bolt out and lowered that pivot point. While this one looked worn, it was a LOT better than the front one.

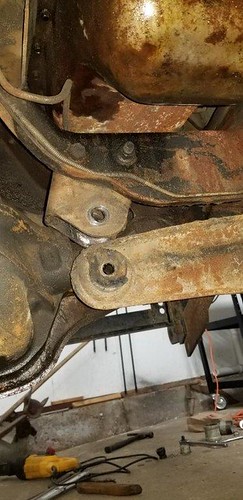

Then I drilled several holes in the rubber with a 1/4 in drill bit

Again, using the reciprocating saw I cut the bushing housing in 3-4 places


Then using the same chisel as before, removed the housing

For whatever reason, I was unable to manually push this bushing in as far before I installed my bushing installation tool. The only difference here was that I had to switch to a shorter bolt halfway through as the bolts were not threaded all the way through.


I was able to get the top side of the bushing flush, but had a TINY gap on the bottom. I actually shattered part of my homemade tool doing this (glad I was wearing safety glasses), so I left it there.


Believe it or not, it was at this point where MOST of my swearing occurred. I could NOT FOR THE LIFE OF ME pry that housing to where I could get the bolt started. I have about 3-4 pictures I took of some "sketchy" ideas I tried. Most of these issues would likely have been fixed by either having a hoist or a 2nd set of hands. What ended up working was to wedge a large chisel in between the pivot point "socket" and the "pivot point." The I raised the jack. The chisel already being there pushed the axle housing into a close enough proximity that I was able to zip it in with my impact.

Then I put the wheels back on and lowered it to the ground where I can now torque the 2 x bolts to 120-150 ft lbs.
Anyway, I got it done. I go back in for alignment Tuesday. Thanks again to everybody here for the help.
In case it matters, I went with the MOOG K8292 as it was in stock locally.


Cargo Master


Joined: Jun 2008
Posts: 2,875
Likes: 30
very nice job man!!
great pics and sweet tool as well.

I did the ones on my 82 F100 like five years ago with my HF 20 ton press but I took the I-beams off (but it was easier...2wd)
man those bushings were really shot....like most probably on every 80s truck out there

great pics and sweet tool as well.
I did the ones on my 82 F100 like five years ago with my HF 20 ton press but I took the I-beams off (but it was easier...2wd)
man those bushings were really shot....like most probably on every 80s truck out there
Thread Starter
|
Mountain Pass
Joined: Jul 2007
Posts: 102
Likes: 8
From: Perry, IA
I THINK most of mine is coming from the Power Steering. I need to fix that........

4wd Low
Joined: Sep 2020
Posts: 14
Likes: 5
Thanks for all the detailed pictures! They were super helpful when I tackled this on my '84 F-150 4x4 a few weeks back, basically everything on my motor was leaking when I got the truck and my bushings were just as bad as yours. The pipe fitting bushing press worked perfectly, great trick!
The biggest difference was my truck has coil springs. I ended up removing the little hook that holds them in place at the top to give me one less thing to fight as I was maneuvering the axle.
My biggest tip for anyone else tacking this on a 4x4 is to leave the first axle you finish hanging down but supported until you finish the second side, rather than bolt the first axle back in right away. This lets the second side hang a bit lower giving you easier access and makes reinstallation easier. I learned this after fighting for a while with the driveshaft trying to get the bushing out of its bracket, ended up biting the bullet and dropping the first side again which made all the difference. When I went to reinstall I used one jack under each axle and lifted both sides simultaneously and both bushings ended up right at their brackets, just needed to tap them home with a hammer.
Cheers!
The biggest difference was my truck has coil springs. I ended up removing the little hook that holds them in place at the top to give me one less thing to fight as I was maneuvering the axle.
My biggest tip for anyone else tacking this on a 4x4 is to leave the first axle you finish hanging down but supported until you finish the second side, rather than bolt the first axle back in right away. This lets the second side hang a bit lower giving you easier access and makes reinstallation easier. I learned this after fighting for a while with the driveshaft trying to get the bushing out of its bracket, ended up biting the bullet and dropping the first side again which made all the difference. When I went to reinstall I used one jack under each axle and lifted both sides simultaneously and both bushings ended up right at their brackets, just needed to tap them home with a hammer.
Cheers!

Laughing Gas

Joined: Nov 2013
Posts: 1,022
Likes: 79
From: A dirty little town in OR

Thread Starter
|
Mountain Pass
Joined: Jul 2007
Posts: 102
Likes: 8
From: Perry, IA
Thanks! This Forum has been SUPER helpful to me and this was one of the few chances I've had to pay a little back.