
Power Door Locks FIXED!!!!
#136
 03-28-2007, 09:17 PM

Senior User
Join Date: Mar 2005
Location: Lake Havasu City, AZ
Posts: 177
Likes: 0
Received 0 Likes
on
0 Posts
Originally Posted by kalsc
No worries, here it is.
WARNING: The following is long winded, but if you want your PDL's to work again WITHOUT spending any $$ read on.
I finally got tired of my non-working PDL's and decided to tear into my truck and find/fix the problem. There has been many discussions about possible issues and I have concluded that the majority of us are seeing actuator motor problems and not relays, switches etc. Ill start by saying the problem I have had is that when I hit the switch, the locks attempt to move and after repeated attempts, the signal appears to get weaker and weaker until nothing....I assumed relay or switch.....NOT THE CASE!
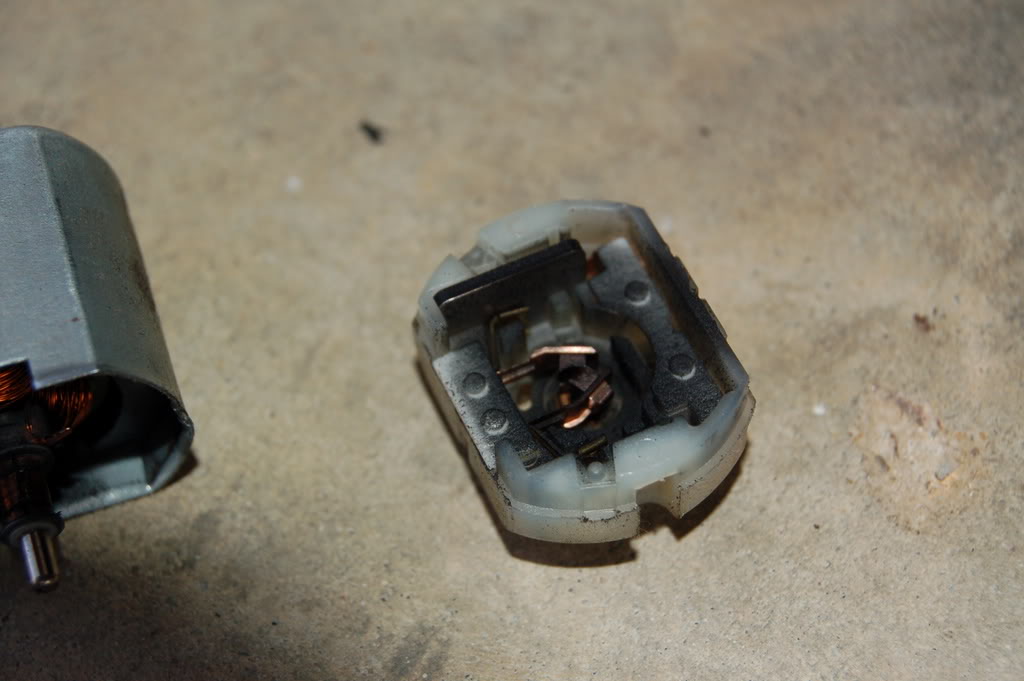
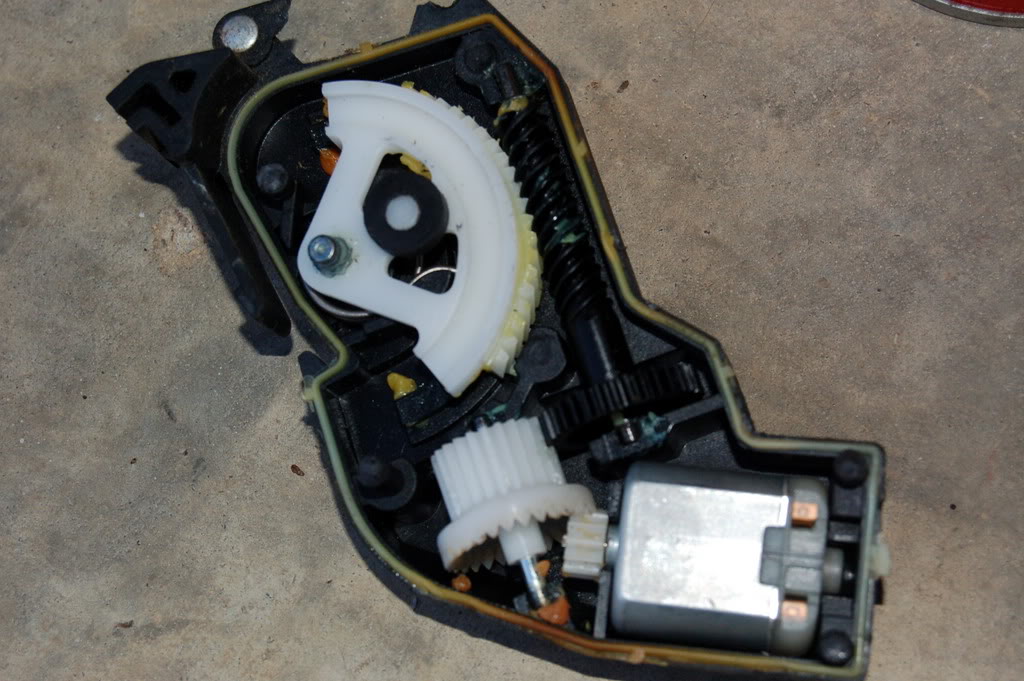
First I started by testing the signal at the harness plug to the actuator. Perfect. No issues here. Next I completely removed the actuator/lock mechanism and bench tested them with 12V..Here lies the problem. The actuator acted the same as when in the truck. First I did a thorough cleaning of all of the mechanism so it works freely and still had the same results. Here's where it get's tricky. These things are built so that they are NOT serviceable. I had already decided that they were going to need to be replaced, so I decided to break them open for closer inspection. It comes apart relatively easily, but appears that It cannot be put back together once apart. I drilled out two small rivets and then pried the case apart. As you pry the case apart you'll notice these small little plastic rods protrude up through the case cover. These rods are then "mushroomed" with heat through the upper case and then sealed with some kind of silicone. When you pry apart the case the "mushroom" head breaks off and the rod remains. You can dig out the silicone and mushroom head with a pick. It comes out very easy. Inside you will find a very small motor and some gear mechanism. I believed the problem at first to be worn brushes or dirty commutator contacts in the motor itself. You'll have to bend two little metal tabs out and pull off the brush housing on the back of the motor. I cleanded the gunk off the brushes and took 1500 grit to the commutator contacts and reassembled the motor. The motor worked, but if you applied even a slight amount of resistance on the armature, it would stop the motor. It should have been WAY stronger than this. I was stumped until I looked a little closer at the inside of the plastic brush housing. Inside you'll find a small, thin rectangular (thermal resistor relay, dodad, thingamabob??) pardon my ingnorance, but I'm not sure what to call it. All I know is that this little part is what keeps you from burning up the motor, should you continue to press the switch once the lock has been actuated. It appears that this thing wears out over time and will not allow enough signal to get through to the motor to make it work. THE FIX. I am cheap. Since I had done so much work up to this point, I decided that I would go a little further and try to make it work without spending the $$. I have better things to spend my money on than actuators. I took a small piece of aluminum foil and wrapped the "thing" voila! Perfectly working motor! I sat there and operated the thing for 10 minutes including one or two times stopping the armature and holding down the switch to see what would happen. The motor builds heat, but not much. Not enough to worry about. Now that I had a good working motor I decided I would try and reassemble the unit. The problem is you cannot glue the unit together as there is a rubber gasket around the perimiter of the case and if you tried to glue the rods into the case, you would not have enough pressure on the two halves of the case to keep the gears in place (these things actually apply a great deal of torque on the case) What I decided to do is completely break off the plastic rods flush with the bottom side of the case and then drill out the bottom case and screw it together. This worked perfectly. You'll need screws that are the same diameter as the holes in the top of the case to keep it from "wandering". Also the screws should not protrude through the back of the unit as some of the mechanism has some pretty close tolerances and a screw sticking through the back would not allow some of the mechanism to work (this can be remedied with a decent set of wire dikes or a hacksaw). I know all of this is hard to picture, but if you do decide to try this fix, you'll see what I am describing here. The locks are back in and working flawlessly.
WARNING: The following is long winded, but if you want your PDL's to work again WITHOUT spending any $$ read on.
I finally got tired of my non-working PDL's and decided to tear into my truck and find/fix the problem. There has been many discussions about possible issues and I have concluded that the majority of us are seeing actuator motor problems and not relays, switches etc. Ill start by saying the problem I have had is that when I hit the switch, the locks attempt to move and after repeated attempts, the signal appears to get weaker and weaker until nothing....I assumed relay or switch.....NOT THE CASE!
First I started by testing the signal at the harness plug to the actuator. Perfect. No issues here. Next I completely removed the actuator/lock mechanism and bench tested them with 12V..Here lies the problem. The actuator acted the same as when in the truck. First I did a thorough cleaning of all of the mechanism so it works freely and still had the same results. Here's where it get's tricky. These things are built so that they are NOT serviceable. I had already decided that they were going to need to be replaced, so I decided to break them open for closer inspection. It comes apart relatively easily, but appears that It cannot be put back together once apart. I drilled out two small rivets and then pried the case apart. As you pry the case apart you'll notice these small little plastic rods protrude up through the case cover. These rods are then "mushroomed" with heat through the upper case and then sealed with some kind of silicone. When you pry apart the case the "mushroom" head breaks off and the rod remains. You can dig out the silicone and mushroom head with a pick. It comes out very easy. Inside you will find a very small motor and some gear mechanism. I believed the problem at first to be worn brushes or dirty commutator contacts in the motor itself. You'll have to bend two little metal tabs out and pull off the brush housing on the back of the motor. I cleanded the gunk off the brushes and took 1500 grit to the commutator contacts and reassembled the motor. The motor worked, but if you applied even a slight amount of resistance on the armature, it would stop the motor. It should have been WAY stronger than this. I was stumped until I looked a little closer at the inside of the plastic brush housing. Inside you'll find a small, thin rectangular (thermal resistor relay, dodad, thingamabob??) pardon my ingnorance, but I'm not sure what to call it. All I know is that this little part is what keeps you from burning up the motor, should you continue to press the switch once the lock has been actuated. It appears that this thing wears out over time and will not allow enough signal to get through to the motor to make it work. THE FIX. I am cheap. Since I had done so much work up to this point, I decided that I would go a little further and try to make it work without spending the $$. I have better things to spend my money on than actuators. I took a small piece of aluminum foil and wrapped the "thing" voila! Perfectly working motor! I sat there and operated the thing for 10 minutes including one or two times stopping the armature and holding down the switch to see what would happen. The motor builds heat, but not much. Not enough to worry about. Now that I had a good working motor I decided I would try and reassemble the unit. The problem is you cannot glue the unit together as there is a rubber gasket around the perimiter of the case and if you tried to glue the rods into the case, you would not have enough pressure on the two halves of the case to keep the gears in place (these things actually apply a great deal of torque on the case) What I decided to do is completely break off the plastic rods flush with the bottom side of the case and then drill out the bottom case and screw it together. This worked perfectly. You'll need screws that are the same diameter as the holes in the top of the case to keep it from "wandering". Also the screws should not protrude through the back of the unit as some of the mechanism has some pretty close tolerances and a screw sticking through the back would not allow some of the mechanism to work (this can be remedied with a decent set of wire dikes or a hacksaw). I know all of this is hard to picture, but if you do decide to try this fix, you'll see what I am describing here. The locks are back in and working flawlessly.
My power door locks on my 1999 V10 F250 are about done. Tonight I took the door panel off and lubed the assembly and that help out some but still after about three times unlocking/locking the actuator just gives out. I'm a little unsure about why you just wrapped foil around the resistor and just didn't remove the resistor or just used a jumper wire. I am going to have to do something about this soon. Also how is the actuator switch supposed to be removed? I looked up in the door and looked quite hard to remove. Any info would be greatly appreciated. Thanks.
#137
03-29-2007, 06:41 AM
Originally Posted by riverratmike
I'm a little unsure about why you just wrapped foil around the resistor and just didn't remove the resistor or just used a jumper wire.
So more than one way, but you must leave something to fit in the space. Not as conventional circuit board. Go to tech files and search for pics on disassembly.
#138
03-31-2007, 05:57 PM

Junior User
Join Date: Nov 2005
Location: Abbotsford BC
Posts: 61
Likes: 0
Received 0 Likes
on
0 Posts


#141
04-05-2007, 03:31 PM

Senior User
Join Date: Mar 2007
Location: McAllen, Texas
Posts: 180
Likes: 0
Received 0 Likes
on
0 Posts
Originally Posted by troyeds1
I have a 2001 F250 FX4 and have the same problem. I'll give it a try.
The removal from the door is little tricky but after you figure out the first one, it is easy. It took about 2,5 hours to do all the four doors.
I drilled the plastic rivets only down to the cover level, so you are able to open the plastic cover and remove the motor. Before I opened the cover, I drilled #42 holes through the plastic pillars (rivets) in the middle, then used 3mm tap to make threads trough. And using 3 x 10mm low head allen screws and washers that covers the hole in the covers to connect the cover back to the base. This way it is as good as new. And pretty fast way to do also.
This guy has the panel removal instructions: http://www.eurekaboy.com/f250/doorremove.htm

#143
05-08-2007, 10:19 PM
Senior User
Join Date: Apr 2007
Location: Memphis
Posts: 252
Likes: 0
Received 0 Likes
on
0 Posts
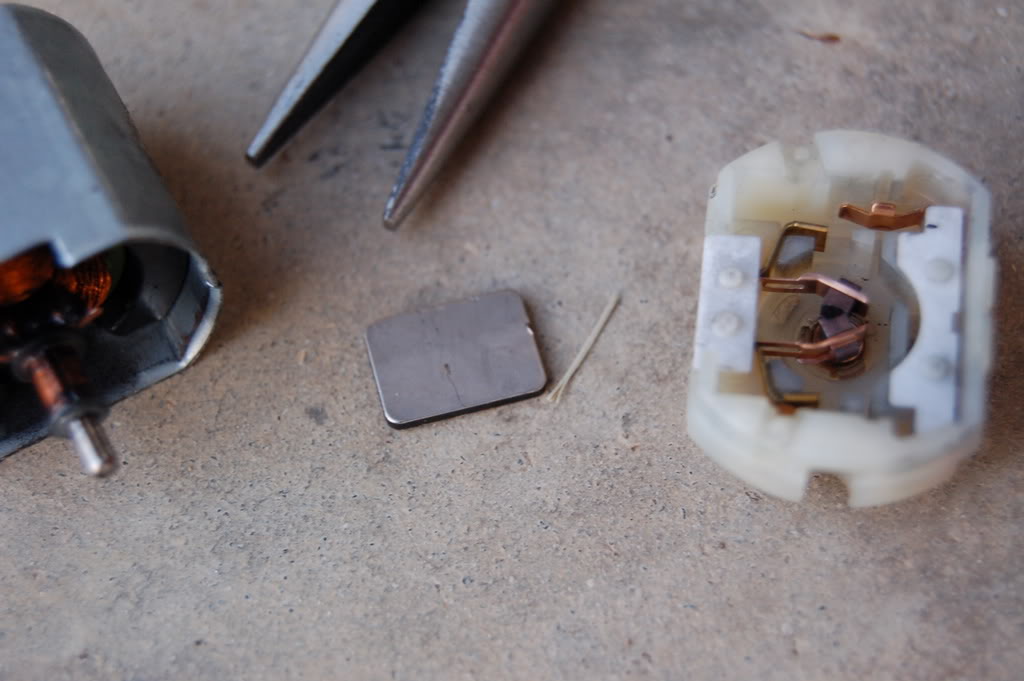
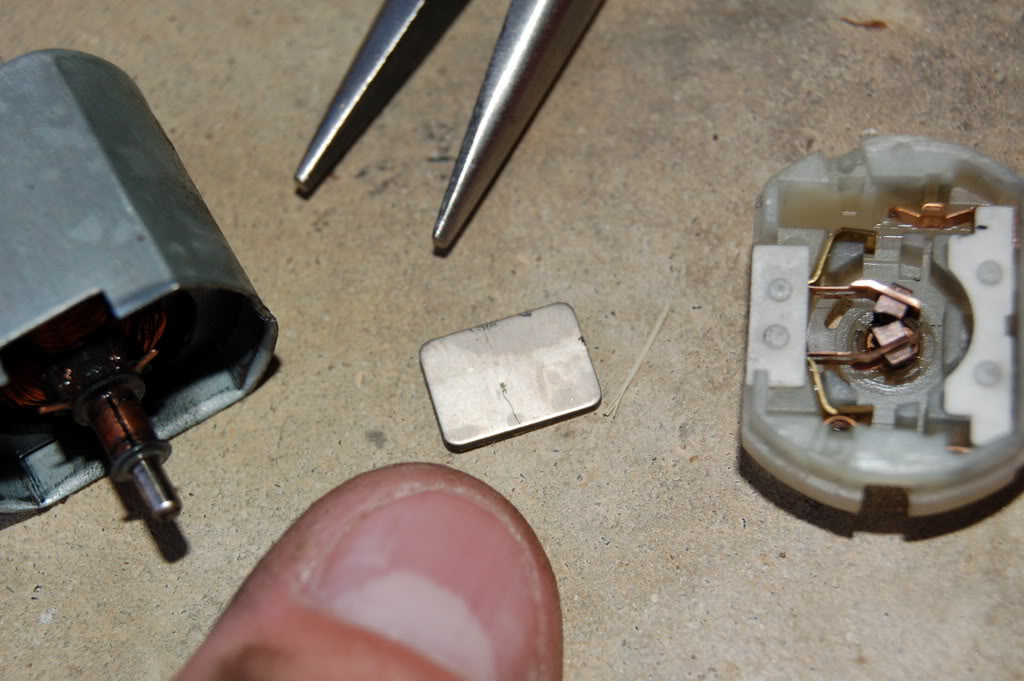
Just bought my 2001 F-250 CC 4wd and 3 of the 4 doors were not working. I have done two of them so far with one to go. The second one that I did today, I accidently pryed it open a little too far and broke the casing where the two metal rivets are. I have used zip ties to hold everything back together.Here are a couple of close up pictures of the prize we are digging for:
Geoff
Geoff
#144
05-09-2007, 07:08 AM

#145
05-09-2007, 07:55 AM

Originally Posted by Trouble1263
Nice pics Geoff, Isn't this fix awesome?
On Geoff's 2nd and 3rd picture you can see a thrust washer on the armature. I slid this washer out to the end of the armature upon reassembly to make it easier to get the brushes in place. It took some wiggling. This was a great fix. Thanks to all that contributed.
I did notice that my brushes were worn considerably so if it should fail again I suppose a new unit would be in order.
Marvin
Last edited by GA_Boy; 05-09-2007 at 07:57 AM. Reason: Spelling
#146
05-09-2007, 09:18 AM
Senior User
Join Date: Mar 2007
Location: McAllen, Texas
Posts: 180
Likes: 0
Received 0 Likes
on
0 Posts
Originally Posted by GA_Boy
X2
On Geoff's 2nd and 3rd picture you can see a thrust washer on the armature. I slid this washer out to the end of the armature upon reassembly to make it easier to get the brushes in place. It took some wiggling. This was a great fix. Thanks to all that contributed.
I did notice that my brushes were worn considerably so if it should fail again I suppose a new unit would be in order.
Marvin
#147
05-09-2007, 10:01 AM
Senior User
Join Date: Apr 2007
Location: Memphis
Posts: 252
Likes: 0
Received 0 Likes
on
0 Posts
Thanks for guys. I just wanted to contribute some close up shots as to what it all looks like. Anytime I can work on my truck AND use my Nikon DSLR at the same time, it is a great day.  This is such a great fix and I actually used the price of new actuators to leverage on the price when I bought it.......I did not know about this fix at that time. My neighbor is a mechanic for one of the local Ford dealerships here in Memphis and he was very impressed with this fix.
I hope to find a lot more great advice here and contribute when I can. I have been a member at 3.8mustang.com for almost 5 years now and great things can be found on forums (as proven by this fix).
Hope those pictures help somebody a little in the future.
Geoff
This is such a great fix and I actually used the price of new actuators to leverage on the price when I bought it.......I did not know about this fix at that time. My neighbor is a mechanic for one of the local Ford dealerships here in Memphis and he was very impressed with this fix. I hope to find a lot more great advice here and contribute when I can. I have been a member at 3.8mustang.com for almost 5 years now and great things can be found on forums (as proven by this fix).
Hope those pictures help somebody a little in the future.
Geoff
#148
05-09-2007, 10:15 AM
Senior User
Join Date: Mar 2007
Location: McAllen, Texas
Posts: 180
Likes: 0
Received 0 Likes
on
0 Posts
Originally Posted by Gcrop
Thanks for guys. I just wanted to contribute some close up shots as to what it all looks like. Anytime I can work on my truck AND use my Nikon DSLR at the same time, it is a great day. This is such a great fix and I actually used the price of new actuators to leverage on the price when I bought it.......I did not know about this fix at that time. My neighbor is a mechanic for one of the local Ford dealerships here in Memphis and he was very impressed with this fix.
I hope to find a lot more great advice here and contribute when I can. I have been a member at 3.8mustang.com for almost 5 years now and great things can be found on forums (as proven by this fix).
Hope those pictures help somebody a little in the future.
Geoff
This is such a great fix and I actually used the price of new actuators to leverage on the price when I bought it.......I did not know about this fix at that time. My neighbor is a mechanic for one of the local Ford dealerships here in Memphis and he was very impressed with this fix. I hope to find a lot more great advice here and contribute when I can. I have been a member at 3.8mustang.com for almost 5 years now and great things can be found on forums (as proven by this fix).
Hope those pictures help somebody a little in the future.
Geoff


#150
05-13-2007, 07:30 AM
Senior User
Join Date: Mar 2007
Location: Montana
Posts: 440
Likes: 0
Received 0 Likes
on
0 Posts