When you click on links to various merchants on this site and make a purchase, this can result in this site earning a commission. Affiliate programs and affiliations include, but are not limited to, the eBay Partner Network.
I've been steadily gathering all of my "Core" parts and getting them in decent condition.
1- I have procured a Dana 60 front and rear axle from the early '90s 3/4 ton dodge pick-up. Was in a fire, axles will do perfectly fine after I'm finished rebuilding. I don't have current pics from these but both have been torn apart and painted/cut down. Working on getting correct rebuild kits and deciding if I want to regear and upgrade Axleshafts and such.
2- Bought a 460 from a man up in Roanoke. Cleaned her up, broke her down, sent her off to the machine man, 1 week later and she looks like this.
Forgive the Chevy Red engine paint. I love the look.
3- The red '64 Long bed has been separated from its frame. I have done a lot more work on prepping this one. Torched the rear cab mounts thinking I could just buy some online. That's not the case apparently. I had to go and steal some from a POS donor that was falling apart. (Not pictured) (This frame has since been "decluttered" and rear cab mounts temp mounted.
4- The engine came with a C-4 460 mount Bell housing with a driver-side drop trans case. I have no idea what the transfer case is. Allegedly from a '70s f250 that had been wrecked. Engine +trans =$400+$900 machine shop bill.
5- Crank tested and polished, New pistons/rod bearings, main bearings. Waiting to purchase Cam for later, got a deal for a set of brand new OEM '68 460 heads for 1K stripped.
6- Wanted to do coil overs at first, wallet doesn't really like that. Thinking that it would be cheaper to go with coil springs and shocks up front. If anyone could give me some specifics on how you've done something similar I'd really appreciate it. I've looked at cutting the shock brackets off and mounting/Welding coil buckets upfront. I don't exactly understand the N's and Out's of suspension geometry but most of It seems like common sense? I've checked Pirate 4x4 but it is a little more difficult to navigate than this forum. Basically, what should I be worried about when I go to put it together in terms of angles and such. (Coil Buckets too far into engine bay? Etc?)
7- Frame has to be cut and welded. The original idea was to cut the frame to a 1964 factory 4x4 short bed length but, my bed is a funky size. I've measured 5 times and don't want to mess this up.
8- I'm looking to put 37's underneath her, how high should I be looking to go to still have enough travel for offroading? Spring sizes are hit or miss in terms of what might look right. Have very little idea of how I should select all these parts to fit together decently.
9- Having a blast on this project. Have a flip I'm working on to get a lump of cash to spend on this one. 84 K10 on boggers and ate up with cancer on the rockers/corners. Otherwise excellent condition. Replaced inner/outer rocker on drivers&Passenger side. She was so cheap it was scary. I've been in the meat and bones of the chevy and it looks good so I reckon I'll make 4-5k after It's painted and sold. That'll give me a cow tongue to throw at my baby.
Hope you guys stay tuned. I'm not great at the documentation but I'm trying to figure this all out slowly but surely. Any tips are GREATLY appreciated.
That is the exact cam I put in when I rebuilt a 360 using 390 crank and rods - 352 block was cracked. Used hyperneutic pistons listed for a late 60s 390 4 barrel car - 9.2:1 compression ratio with the stock 66 352 heads. Edelbrock carb and their performer RPM intake. Mildly aggressive lope at idle, good power, excellent torque, and 17.8 mpg on Highway with 0.68 OD 5th gear in Tremec TKO. 66 F-100 long bed 2WD. Love it.
It's refreshing to see a "Young Gun" actually wanting to do something that is not easy and requires a skill that needs to be learned. I commend for putting the effort forth. Keep it up good progress.
Before you buy your cam you should get a rough idea of what your static compression is going to be. Flat top pistons combined with those pre 72 heads may give you a compression ratio that is too high for pump gas. You can adjust that by picking a cam that closes the intake later to keep the dynamic compression at 8-1 or close to that in order to be able to burn 91 oct. But there is a limit to how high the static can be and still compensate with the cam grind. Anything much over that 8-1 dynamic and you will be burning race fuel @ $8 + gal.
The 68 heads are 74.2-77.2 cc and the 72 heads were 89.9-92.9 cc.
If you get enough information together you can talk to your favorite cam grinder and they can run your numbers and make a recommendation.
Although they are flat tops, the amount they sit down in the bore will determine how much compression they make, and if they sit too far down, they will lose any quench they might have had, which means not only a loss of power, but could lead to detonation.
I had about a 15 min conversation with one of the guys at the machine shop I use.
I told him I was looking to get around 500HP/TQ, run pump gas, and keep it fairly inexpensive. He magnafluxed the block then bored it .10 over and sold me the pistons that I needed to do what I wanted. I talked with him about getting head work done on my stock heads and from what I understand, it would be easier to get a core charge on my stock heads from him and he'd sell me a brand new pair of 68 spec heads for around $900. He said that would get me where I wanted to be.
He also recommended that cam as well. I'll take his word that it will probably be ok.
I know I could have probably gotten away with buying a built 351 or 302 and been better off but I just can't help but love the BBF's.
So is that a 1959 MGA you are using for a parts rack? For 18 you are doing a lot, reminds me of a different time---- kinda like what Christmas said –keep up the good work it is healthy for mind and body.
So is that a 1959 MGA you are using for a parts rack? For 18 you are doing a lot, reminds me of a different time---- kinda like what Christmas said �keep up the good work it is healthy for mind and body.
steve
most definitely- keep up the good work. Take a break if you need to� but keep at it. Only but good can come from accomplishing this.
That is the exact cam I put in when I rebuilt a 360 using 390 crank and rods - 352 block was cracked. Used hyperneutic pistons listed for a late 60s 390 4 barrel car - 9.2:1 compression ratio with the stock 66 352 heads. Edelbrock carb and their performer RPM intake. Mildly aggressive lope at idle, good power, excellent torque, and 17.8 mpg on Highway with 0.68 OD 5th gear in Tremec TKO. 66 F-100 long bed 2WD. Love it.
Gavin, what is your final drive ratio and tire size if you don't mind?
Sorry Zackly, don't mean to hijack your thread.
Gavin, what is your final drive ratio and tire size if you don't mind?
Sorry Zackly, don't mean to hijack your thread.
Tires are 265/70R15. Ford 9�; 3.25:1 ratio; Eaton TruTrac. Speedo and odometer are off because of larger tire diameter. I just go with the traffic flow on Interstate and use Google Maps to determine miles driven to calculate miles driven between fill ups to check mileage
I have come to find out that whatever can go wrong absolutely will.
I won't bore the more ADHD among us at the beginning of this post so if you are interested in my thoughts on the process, not the actual process, I will discuss it at the bottom of the thread.
So first, The RED FORD.
There was a lot of discussion on the viability of the body and frame of old red. I can assure you all that I have made the correct decision not to use the red truck's body. I could do cartwheels in the rotted floorboards and stick my entire head through EVERY SINGLE CAB CORNER. lol.
However, I had no intention of reusing the body and or bed from the red truck. I only needed the front clip, and the frame.
Pulled the cab and bed. (Built a bed and body dolly as well. The first one was wood, second one was 2in angle + trailer hitch for easy moving . )
Ok, so this is the part of the build that needs some preface before I get a lot of pushback. I do NOT know what I am doing at all. I am probably going to reinforce this more in the future and I don't plan on endangering anyone until I'm 100% certain it's safe. With that in mind,
I have a Long bed frame and a Short bed body... here are my measurements, it's been about 2 years since this but if you know what you�re looking at I'm sure you'll get the idea.
Here's the measurements
I pondered a long while and finally built up the courage to cut it out. I can't remember exactly how I did it, but I remember thinking that it could be conceptualized as only moving the rear axle forward to match the wheelbase of the short bed body. That is the amount that has to be removed. Ensure that you only remove from the straight portions of the frame. Keep it simple stupid. I used a 3/8 hardened bed shaper blade on the inside of the frame rails. Stick with 6011 and a couple of 7018 runs hot enough to penetrate but not cause undercut. Welded ALL of it. Threw some Grade 8 3/4 in bolts in there as well bc maybe if it ever does fail, It might stay together.
After doing a bit of stress testing on the frame I feel reasonably confident about it.
At this point, I figured I might as well strip the frame as far down to bare metal as I could.
I used a wire wheel on an angle grinder to strip the frame and attempted to remove as much of the extra hardware on the frame. I got into all the nooks' in-frame rails pretty easily with the body completely removed.
I am looking for longevity with this build, so I was very careful when deciding what to use for rust prevention.
I researched a LOT of options and used experience to guide what I used. I hate Por-15, Rust converters, fluid film, and lanolin-based products. I needed something that I could pressure wash and could be reapplied whenever scratched. This leaves me with few options. After a few tests and hours of YouTube, I settled on RP342 (Black) by Cosmoline Direct. It's an oil-based product and once dry has a hard wax finish. After 2 years of putting on the frame, there is NO rust where applied to this day.
This is the finished product. Btw if you decide to use this product, I used 6 cans for the frame while waiting for 24 hours between coats in 97F and 80% humidity with a fan running. It will NOT come out of clothes. if it gets on your skin, remove it with paint thinner or mineral spirits.
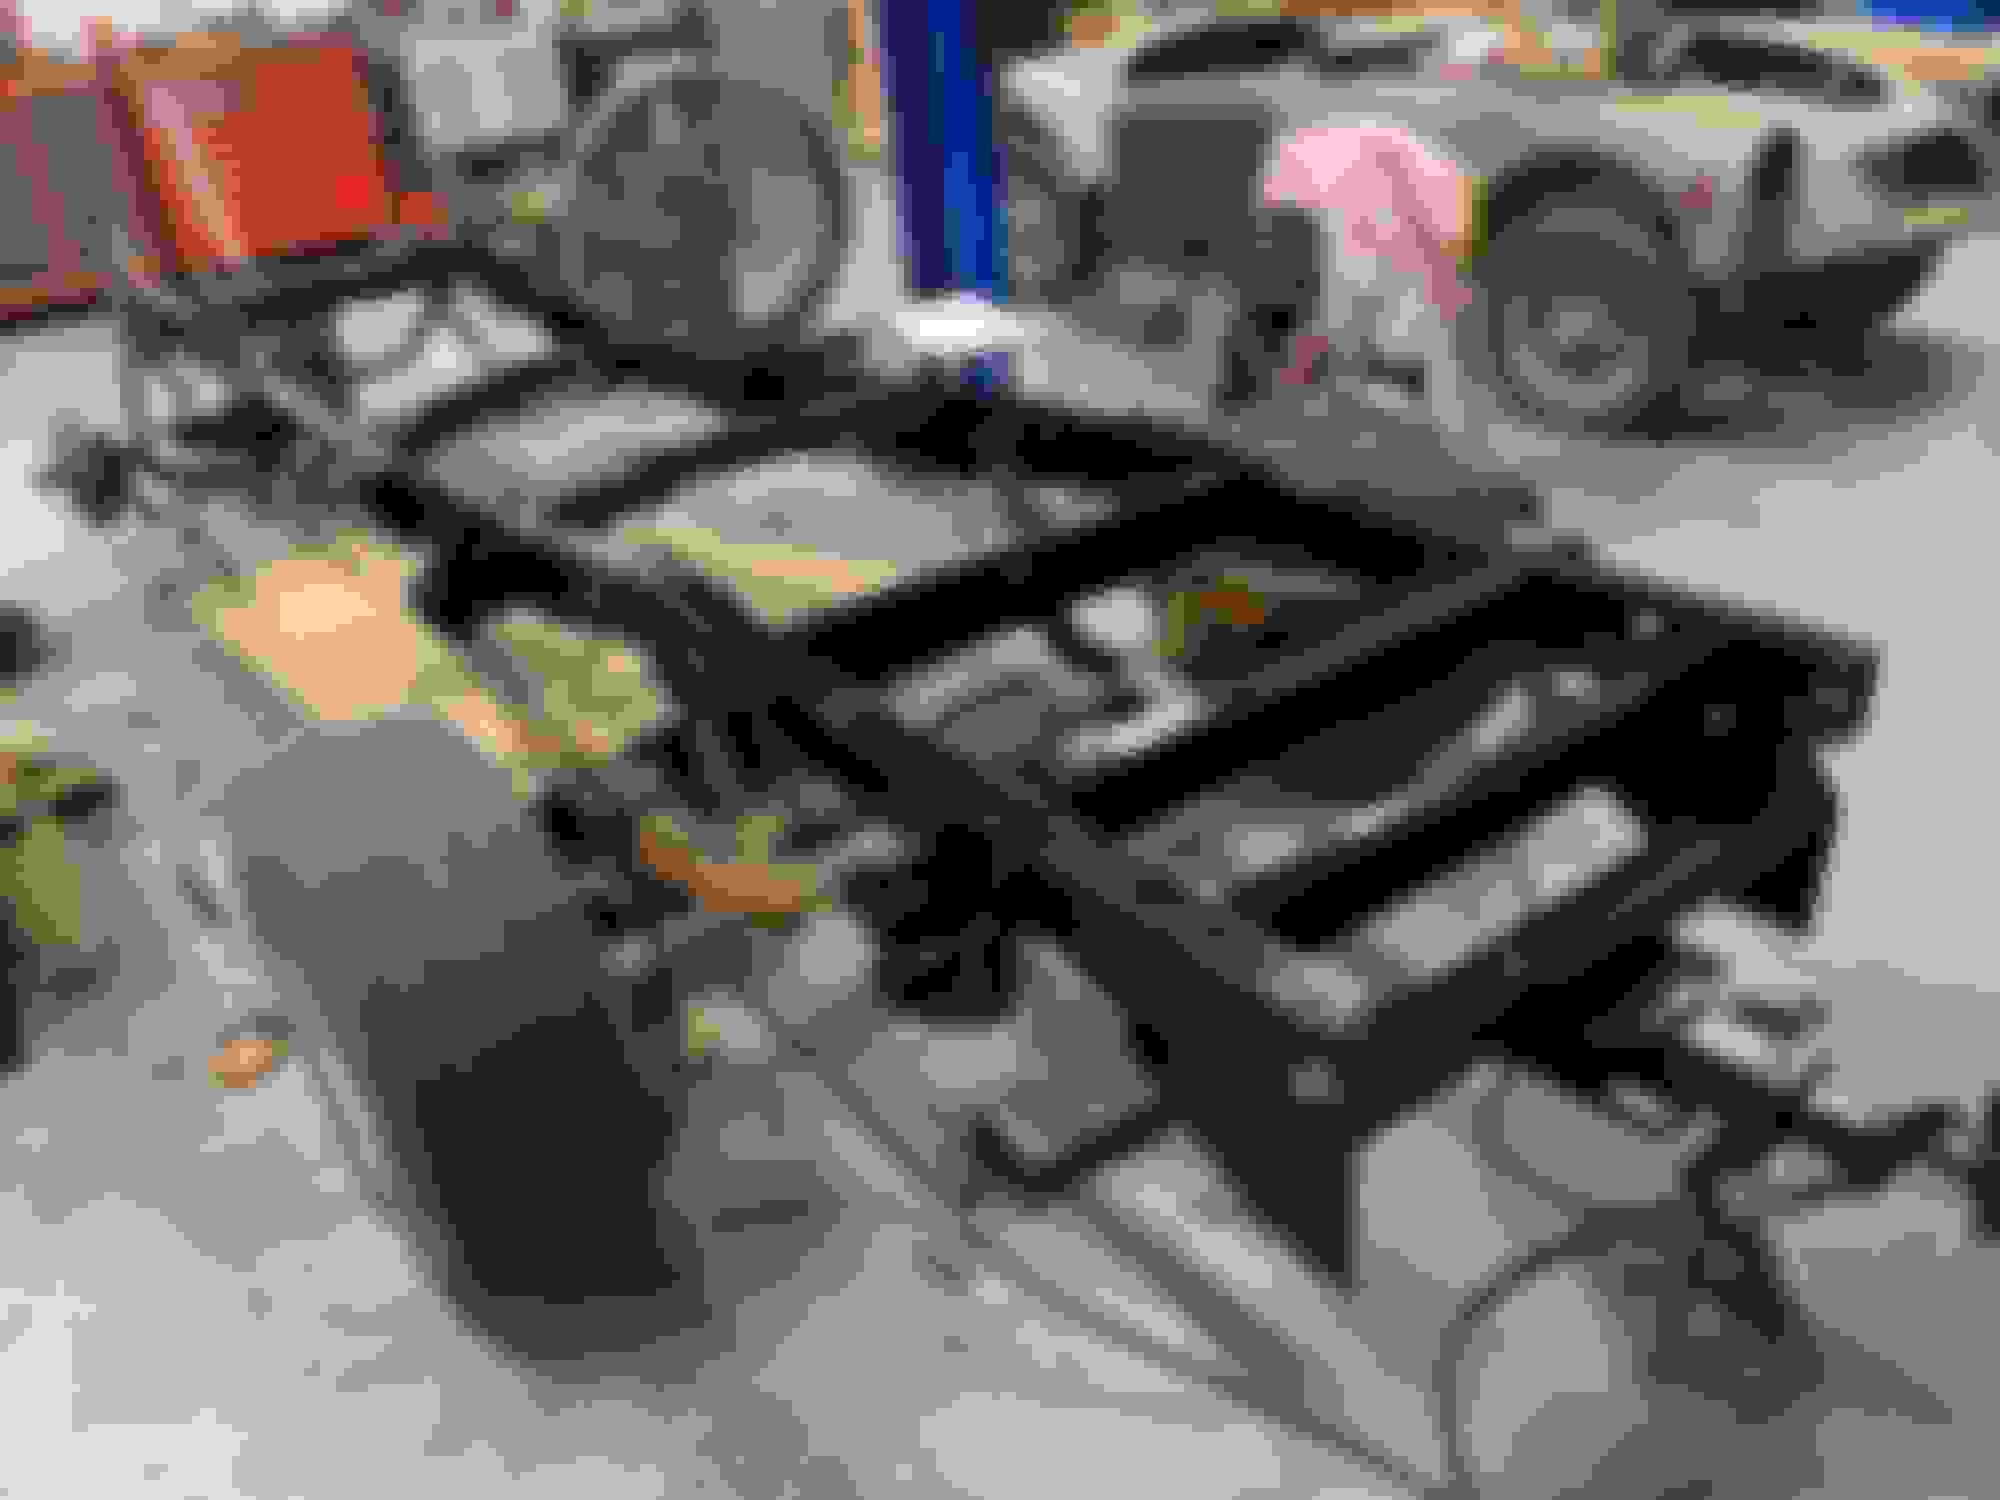
I decided to move down wards in the frame off resto process.
Axles and suspension.
So the Dodge Dana 60s got put on hold. I stripped them completely and they cleaned up well. The reason I have decided to discontinue their use in this build at the moment is strictly a skill issue. Along with the fact that I don't like the 2pc 4wd disconnect front axle shaft. in disassembly, I also managed to torch off the carrier bearing shims making them unrecognizable while trying the remove and install new carrier bearings and gear ratio. I do not know how to shim the new set correctly and I'm terrified to go any further at the moment. I'm sure I'll use these later on another project.
Regardless, we move forward.
I was in the junkyard for another build and saw this Ranger that caught my eye. Destined for the crusher, I did some cursory research and found this axle set would be a better fit for the truck. I got this set for 100$ and the guys at the junkyard even put it on the rack, cut them down for me, and loaded them on my trailer.
I think the front axle is an 8-lug D44 but I'm not 100% on that. Someone will let me know.
Cleaned the hell out of them. Removed what I thought I didn't need, got them centered on the perches, and squared up as best I knew how. Snugged them up with 1/2 impact evenly the leaves. Front rigged up front Best pic I have of installing the rear.
For anyone else who doesn't know what u bolt size you need, U bolts are measured by how far apart the bolt heads are, the diameter of the rod, and the length of the U. Never had to buy those for an unknown dimension. Anyways,
At least she rolls now. I transitioned my focus now to the body.
Metalwork.
In between getting my axle situation sorted I did some intensive bodywork as you can see. The red truck comes in handy AGAIN. Fortunately, I was able to purchase both cab corners and the pass floorplan from a mfg in western NC who is big into these fords. He's probably lurking somewhere on this forum lol.
I'm decent at fabbing panels but I'm not good enough to make grooves and stiffen floorplans like that. Expensive but worth it.
In total, the areas that needed work are
Driver and pass inner fender due to rust.
Driver and pass cab corners
10% of the driver floor, Super easy
25% of the pass floor is not so easy.
The entire driver's side near the gas tank needed some MAJOR, panel-beating skills that I just didn't have. What I do have is a Mig welder and a dream.
SO ESSENTIALLY EVERYTHING. The roof is good so there's that.
The hidden rust on the inside of the inner fenders is the bane of my existence.
I can't describe the amount of hours I could have saved by finding a better cab.
At the same time, I've learned more than I could have possibly imagined in the process of getting this cab correct.
The real rust-free cab was the friends we made along the way
I did a decent job while documenting the driver's inner fender. Heres some pics of that. Weld through primer btw Treated with RP342 Bottom of this piece's cab corner was cancer ridden and the top of the original cabs metal was so incredibly mangled that I decide to do the hardest thing possible and use the pre fab cab corner and the entire driverside metal from red truck. Fun.
Some of the astute amount you may say "Why has this process taken so long".
College, work, women.
I will upload more pics of the current state of the metal later. These pics are about 1 year old.
Engine/ Trans
What I'm currently doing is building the engine and driveline/ steering. I finally got around to assembling my short block. Heres the pics of all the parts used so far. Timing set eventually Main bearings Rod Bearings Rings Main bolts
Torqed right and checked twice, a bucket of gasoline to clean everything in, and then used Royal Purple engine lube excessively during assembly. The main seals went in well. Fel-Pro Everything.
I've been typing a while but I'd love to hear y'all's thoughts so far.
My questions are:
I have no idea how to get my steering situation sorted. I don't know what I need and where to put it on the frame. I'd love to see how you folks have managed to sort this out.
I have the original steering column from the red truck but don't have the manual steering box.
I want power steering and to go with a redhead box but I don't exactly know what to order or how to make everything fit as this is a Frankenstein build.
I think I counted - and I can’t believe I’m actually admitting this - almost seventy (70) photos in this single thread posting. That’s most likely some kind of record.
I'll take a stab at your steering situation. First let's address the lift blocks on the front axle, highly suggest you don't use them. Think of them a 12" inch cheater pipe slid on a 3/8 drive ratchet, lots of stress on leaves not made for it. Suggest new springs with the Arch you need for the same lift.
Second if you use the inline steering set up native to this frame, you will have bump steer. The more up down angle between pitman and knuckle, the worse it gets... Not saying it can't be done, angle of drag link is highly important.
Three, cross steer can be a better option. But you don't have enough completed to lay out a plan for either. Ride height, motor placement, suspension travel, shock placement. All of these will change where you want (can fit without interference)steering linkage.
Side note, your options are as I see them.
Original side steer. Quickest of all your options, alignment is crucial to minimize bump steer.
Cross steer, 1. To a high steer knuckle. 2. Cross steer to a low steer knuckle. 3 cross steer to a mid point on existing drag link. Each has benefits ( bump steer quality, ability to clear obstacles during travel. Etc.
Good luck, two years into deciding what I want on my conversion. Currently I have the original steering set up with huge bump steer... But I can drive my project...
 08-17-2021, 12:03 AM


 . )
. )