
1987 F250 4x4 Build Thread
#1
 04-09-2015, 11:46 AM

Join Date: Apr 2015
Location: Boston, KY
Posts: 613
Likes: 0
Received 0 Likes
on
0 Posts
1987 F250 4x4 Build Thread

Picked up a 1987 F250, 4x4, non-original 460 carbureted, ZF 5-speed.
To Do List:
Replace broken steps - Old ones removed
Replace front & rear glass
Set Timing - Done
Replace serpentine belts -
Replace coil - Done, but need to replace wire connectors
Replace ignition switch - Done
New Spark Plugs - Done
Add PCV valve/breather - Done
Fix fender rust, add flares
Replace doors with non-rusty ones
Fix rust on bed
Repaint
Replace/rebuild steering box
Fluids:
-Oil
-Trans
-Differentials
New wheels & Tires (thinking 9.00/16 bias ply)
Fix wiring issues to gauge cluster
New speed sensor
Add horn pad to steering wheel - Done
Replace carburetor Ordered
Replace fuel filter - Done
Replace/paint bumpers
Remove bed insert and diamond plate top rails - This weekend?
Spray in bed liner
Replace all window rubber
Re-key door locks
Replace headlights
Fix non-working reverse lights
Add rubber pads to e-brake and dimmer switch
New floor mat
New shift boots (tranny and transfer case)
Re-install air conditioning
Fix any/all fluid leaks (mainly oil)
Replace rear parking brake cables - Left done, right is next
Replace headers
Add HEI ignition
Hook up rear gas tank (wiring and plumbing)
New shocks - Up next
New steering components
Reupholster bench seat
Probably much more.
#2
04-09-2015, 03:25 PM

#3
04-09-2015, 07:53 PM
Join Date: Apr 2015
Location: Boston, KY
Posts: 613
Likes: 0
Received 0 Likes
on
0 Posts

Ugly engine bay (carb out at the moment)

Stock interior with new horn pad, needs a good wash but is otherwise good to go


Lots of non-original body parts, including red front clip and silver bed. Everything was sprayed blue at some point to match

Rust isn't bad but it is there


Diamond plate is beat up and needs to go

New driver parking brake cable. Passenger is this weekend

Shocks look like swiss cheese

Frame is solid. Body was lifted approx. 4". Bed needs middle supports

Old horn pad out, new one in.

Bed was silver at one point

...and the hood was red

Yellow wire goes to distributor. Any guesses on the two that were clipped? I think this may be a newer EFI engine that was converted to carb

Spark plugs look pretty good given their age...

#4
04-09-2015, 07:57 PM
Join Date: Apr 2015
Location: Boston, KY
Posts: 613
Likes: 0
Received 0 Likes
on
0 Posts
#6
04-13-2015, 09:02 AM
Join Date: Apr 2015
Location: Boston, KY
Posts: 613
Likes: 0
Received 0 Likes
on
0 Posts
This weekend I removed the bed liner (it had a big hole cut where a tool box went so water would sit underneath the liner). The bed underneath looks really good, not even any surface rust! Also finished the parking brake, adding passenger side cable and cleaned/repainted the adjusting bracket that both cables connect to. Pictures are at home so I'll post them tonight.
#7
04-13-2015, 08:56 PM
Join Date: Apr 2015
Location: Boston, KY
Posts: 613
Likes: 0
Received 0 Likes
on
0 Posts

Before: not crazy about water getting trapped under the liner

Fortunately, this bed is almost completely rust free aside from a few bubbles around the fender (typical ford!)

After getting her road worthy (i.e. very soon...just needs carb and shocks) the bed is coming off and getting a new paint job. The bed is lifted, but only at the corners. I will be adding mounts to support the middle of the bed before putting anything too heavy in there.

Currently accepting any offers that are more than $0
Trending Topics
#8
04-16-2015, 10:22 PM
Join Date: Apr 2015
Location: Boston, KY
Posts: 613
Likes: 0
Received 0 Likes
on
0 Posts
I think I am dealing with vapor lock. After running the engine up to temperature, if I shut it off and wait 10 minutes, the truck will not start again. I replaced the coil to rule that out, and rebuilt the carb as well. There is an aluminum spacer between the carb and the intake. I think where I'm getting in trouble is that there is a section of rubber fuel line that lies over the valve cover. I have a clear inline fuel filter and can see that there is no fuel flowing through it. Once the engine is completely cold, the fuel flows freely and fills the carb again. Are there any tricks beyond the obvious that I can try? I am going to re-route the fuel line along the firewall and insulate the metal sections. I am also going to check the line from the tank to the engine bay and make sure it is not running too close to the exhaust - it's an aftermarket straight pipe setup with no heat shields. My fuel pump is in the tank and I can hear it running even when the vapor issue occurs. Am I missing something? Any help is greatly appreciated!
#9
04-16-2015, 10:26 PM
Join Date: Apr 2015
Location: Boston, KY
Posts: 613
Likes: 0
Received 0 Likes
on
0 Posts
#10
04-18-2015, 11:45 AM
Posting Guru
#11
04-21-2015, 04:26 PM
Join Date: Apr 2015
Location: Boston, KY
Posts: 613
Likes: 0
Received 0 Likes
on
0 Posts
progress has been a bit slow because I am trying to get this thing to reliably start before doing any non-essentials. This truck just absolutely will not start after getting the engine warm and letting it sit for 10 minutes. Once I warm the truck off and turn it off, it's at MINiMUM two hours before it will start again. It doesn't matter if I hit the gas while I crank, it simply won't start. I rebuilt the carb, changed the fuel filter, changed the ignition coil, changed the ignition switch, all to no avail. All the symptoms point to vapor lock, but a lot of threads have also pointed to "tired wiring". Is there any wiring in specific I should be thinking about checking and replacing? It is an Edelbrock carb which is notorious for boiling the bowl dry. It came with an aluminum spacer and I added a cheap aluminum with phenolic resin instert-type spacer and no luck.
To recap, my setup is: Intake, gasket, aluminum open spacer, gasket, aluminum open spacer with 4-hole resin insert, gasket, carb, air cleaner. I ordered a heat shield from Edelbrock, but I'm starting to wonder if the problem is elsewhere. Any tips are greatly appreciated
BTW, the engine cranks strong regardless of temperature, just doesn't fire up after heat soak.
#12
04-22-2015, 01:22 PM
Join Date: Apr 2015
Location: Boston, KY
Posts: 613
Likes: 0
Received 0 Likes
on
0 Posts
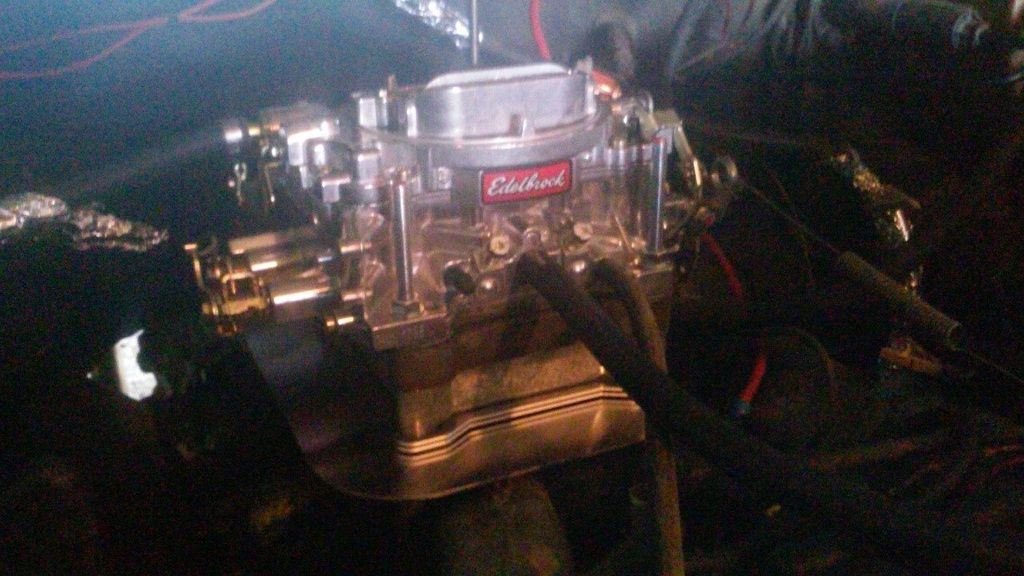
I think I have the heat soak issue solved. It was fuel related and although two spacers did not help, adding an Edelbrock heat shield seemed to do the trick. Here is the setup I'm running now
Unfortunately, as soon as I got the heat soak issue solved, my starter began giving me trouble. The last few times I started it, there was a garbled grinding noise, now the starter gear is not engaging with the flywheel at all. Should be a straight forward fix though - the starter is definitely spinning so I'm hoping it's something as easy as cleaning the bendix. Can anybody educate me on a bad solenoid vs. bad bendix, vs something else that would cause the starter to spin without engaging?

Unfortunately, as soon as I got the heat soak issue solved, my starter began giving me trouble. The last few times I started it, there was a garbled grinding noise, now the starter gear is not engaging with the flywheel at all. Should be a straight forward fix though - the starter is definitely spinning so I'm hoping it's something as easy as cleaning the bendix. Can anybody educate me on a bad solenoid vs. bad bendix, vs something else that would cause the starter to spin without engaging?
#13
04-23-2015, 10:06 AM
Join Date: Apr 2015
Location: Boston, KY
Posts: 613
Likes: 0
Received 0 Likes
on
0 Posts
Update to the build list:
To Do List:
Replace broken steps - Old ones removed
Replace front & rear glass
Set Timing - Done
Replace serpentine belts - Alternator belt done, Steering next
Replace coil - Done, but need to replace wire connectors
Replace ignition switch - Done
New Spark Plugs - Done
Add PCV valve/breather - Done
Fix fender rust, add flares
Add Fuel Pressure Gauge - Done
New Starter - Purchased, waiting for install
Replace doors with non-rusty ones
Fix rust on bed
Repaint
Replace/rebuild steering box
Fluids:
-Oil
-Trans
-Differentials
New wheels & Tires (thinking 9.00/16 bias ply)
Fix wiring issues to gauge cluster
New speed sensor - Sitting in a box waiting for install
Add horn pad to steering wheel - Done
Rebuild carburetor Done
Replace fuel filter - Done
Replace/paint bumpers
Remove bed insert and diamond plate top rails - Done
Spray in bed liner
Replace all window rubber
Re-key door locks
Replace headlights
Fix non-working reverse lights
Add rubber pads to e-brake and dimmer switch
New floor mat
New shift boots (tranny and transfer case)
Re-install air conditioning
Fix any/all fluid leaks (mainly oil)
Replace rear parking brake cables - Done
Replace headers
Add HEI ignition
Hook up rear gas tank (wiring and plumbing)
New shocks - On Hold until steering is fixed
New steering components - Will do after I get a few more paychecks under my belt
Reupholster bench seat
Probably much more.
#14
04-23-2015, 10:08 AM
Join Date: Apr 2015
Location: Boston, KY
Posts: 613
Likes: 0
Received 0 Likes
on
0 Posts
#15
04-23-2015, 01:18 PM
Join Date: Apr 2015
Location: Boston, KY
Posts: 613
Likes: 0
Received 0 Likes
on
0 Posts
Once I get the truck mostly restored (driveability and cosmetic issues fixed) I would like to start thinking about power upgrades. My first thought (since I have straight pipes and Edelbrock aluminum intake already) would be a different camshaft. Problem is, I don't know much about what to look for. If I do swap in a performance camshaft, how involved is it to put the valve-train items back together? Are there a lot of adjustments to be made or is it just a matter of putting the parts back and torqueing the bolts to spec?