When you click on links to various merchants on this site and make a purchase, this can result in this site earning a commission. Affiliate programs and affiliations include, but are not limited to, the eBay Partner Network.
Installing Electronically Controlled Fuel Tank Selector Valve 1988 Ford F150
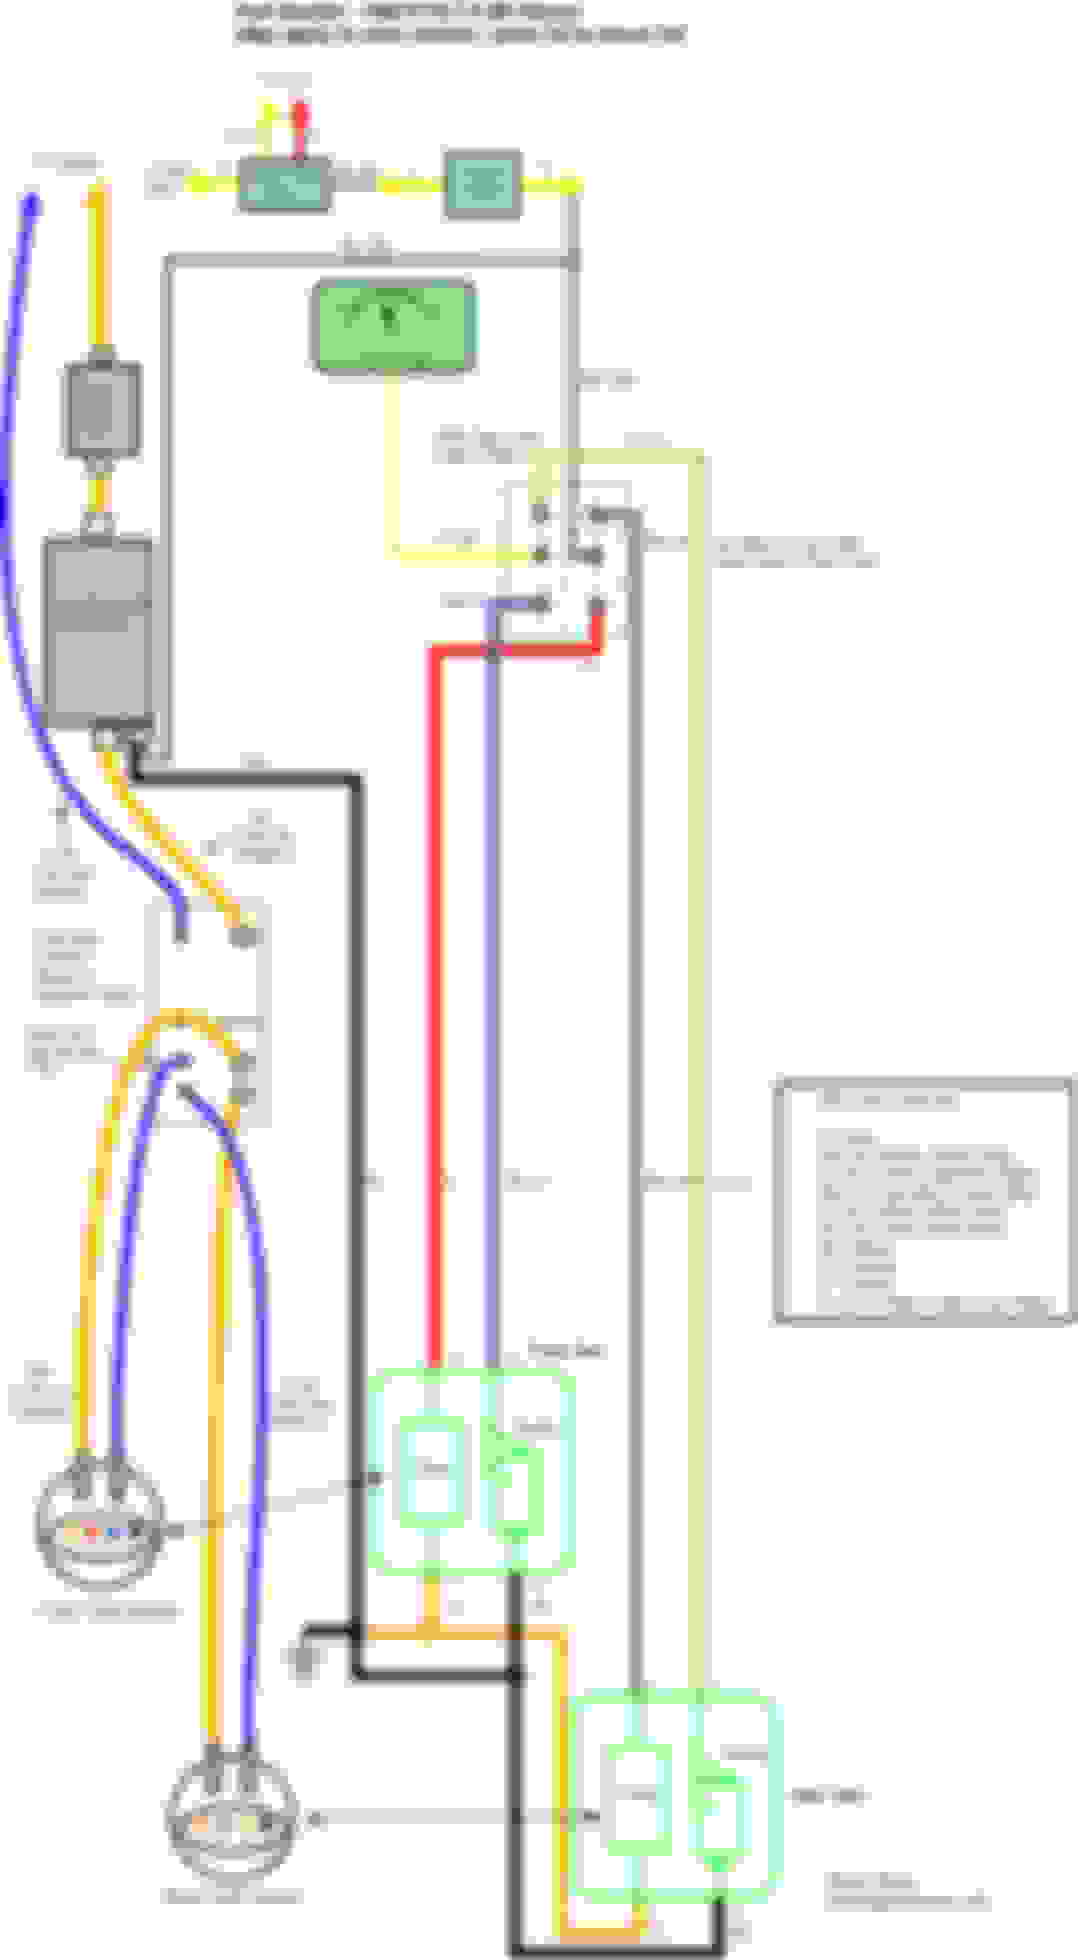
I recently had to replace my fuel tank selector valve and it was very challenging due to the fact that there is almost no info online on how to do this and the wiring diagram that comes with the tank selector valve is hard to read and has some incorrect instructions. I was able to track down the needed info and diagrams to do the swap from a pressure controlled selector valve which is facotry stock and the electronic valve autozone sells. Its best to get the valve with the pigtail and switch included. My truck required the 6 port valve with the 213 harness. Below is the diagram and image that I found that saved my *** as well as a link to the page i got it off of.
Heres the wiring diagram
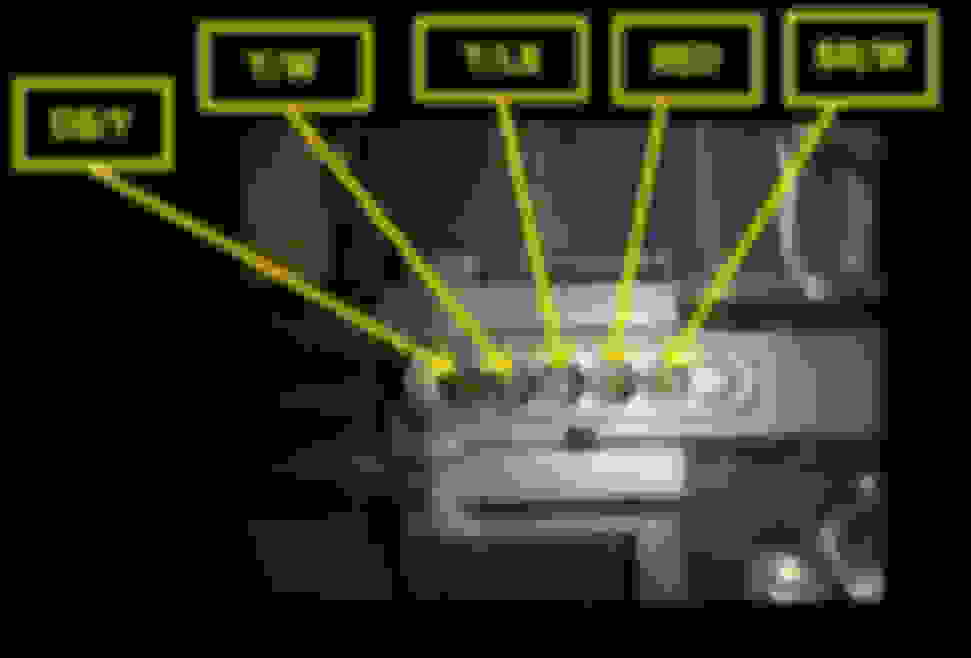
This is a picture of the valve harness socket and which wires go where
All the wires you need to splice into are right there on the frame near where the valve is just seperate the wire for the front tank from the ones to the back tank to make it easier to wire it all together. the only wire that is not in the harness on the frame is the Yellow white wire that is gonna be in the dash
on the harness for the selector switch. you will need to run a new wire from the switch on the dash to the harness on the frame for the yellow white wire. you will also need to run a 12v power source from the inertia switch as shown in the diagram above.
As for the fuel supply and return lines I added see through fuel filters before the tank valve on the supply lines and had to replace the old nylon quick release lines with the rubber fuel injection hose from autozone. you will need 3/8 supply and 5/16 return lines and get like 20 ft of each to ensure you have enough to do everything correctly.
SOME OF THIS INFO COULD BE WRONG BUT I DID THIS AND MY 1988 FORD F150 5.0 IS RUNNING FINE NOW ON BOTH TANKS I ALSO REPLACED EVERYTHING ELSE ON MY FUEL SYSTEM TO BE THOROUGH
The big problem with doing this mod is that you are doing away with the fuel reservoir for the high pressure pump. All 85-97 FI Ford truck use a fuel reservoir.
Without the fuel reservoir you can have engine surging an lack of power on hills an under high acceleration. This is why Ford put the fuel reservoir in all of these trucks and vans to eliminate this problem as stated by the FORD shop manual.
Is it possible to add a resivoir? maybe a filter canister without a filter between the valve and high pressure pump? Im on extremely limited funds or i woulda just bought a factory valve and been done with it
Originally Posted by subford
The big problem with doing this mod is that you are doing away with the fuel reservoir for the high pressure pump. All 85-97 FI Ford truck use a fuel reservoir.
Without the fuel reservoir you can have engine surging an lack of power on hills an under high acceleration. This is why Ford put the fuel reservoir in all of these trucks and vans to eliminate this problem as stated by the FORD shop manual.
I recently had to replace my fuel tank selector valve and it was very challenging due to the fact that there is almost no info online on how to do this and the wiring diagram that comes with the tank selector valve is hard to read and has some incorrect instructions. I was able to track down the needed info and diagrams to do the swap from a pressure controlled selector valve which is facotry stock and the electronic valve autozone sells. Its best to get the valve with the pigtail and switch included. My truck required the 6 port valve with the 213 harness. Below is the diagram and image that I found that saved my *** as well as a link to the page i got it off of.
Heres the wiring diagram
This is a picture of the valve harness socket and which wires go where
All the wires you need to splice into are right there on the frame near where the valve is just seperate the wire for the front tank from the ones to the back tank to make it easier to wire it all together. the only wire that is not in the harness on the frame is the Yellow white wire that is gonna be in the dash
on the harness for the selector switch. you will need to run a new wire from the switch on the dash to the harness on the frame for the yellow white wire. you will also need to run a 12v power source from the inertia switch as shown in the diagram above.
As for the fuel supply and return lines I added see through fuel filters before the tank valve on the supply lines and had to replace the old nylon quick release lines with the rubber fuel injection hose from autozone. you will need 3/8 supply and 5/16 return lines and get like 20 ft of each to ensure you have enough to do everything correctly.
SOME OF THIS INFO COULD BE WRONG BUT I DID THIS AND MY 1988 FORD F150 5.0 IS RUNNING FINE NOW ON BOTH TANKS I ALSO REPLACED EVERYTHING ELSE ON MY FUEL SYSTEM TO BE THOROUGH
i am am really having a hard time getting this valve to work. First off I went ahead and got the 87 and later model valve as the 86 and before with the reservoir was a hard find and expensive. My problems are in three folds.
1- I am unable to figure out how and where to connect the 12v wire to or from the inertia switch based on the diagram and note from Matthew.
2- When I checked the voltage on the two yellow wires going to inertia switch with the ignition on or off, it did not have any power.
3- I see notes and comments from folks that I will lose power as the revervoir is missing in the later model valve, I am unclear what alternative can be added to resume the loss of power. Secondly, why are we going to lose power when there is a lift pump in the tank and an in line high pressure fuel pump? Isn�t that sufficient to get enough fuel to th carb or fuel injection. Logically the reservoir doesn�t make sense.
I have been filling up my tank every 150 miles on a road trip from Colorado to GA and it sucks. I would like to keep the dual tank system and make it work. Any help or solution will be great.
Prashant,
I hope this helps you or anyone that�s doing this modification.
I chose to use metal barbs and tap into the existing fuel lines using only 3ft of 3/8 & 3ft of 5/16 fuel line three 3/8 barbs, three 5/16 barbs & 18 hose claps Nine 5/16 & nine 3/8.
IF you use the factory switch instead of the 6
pin switch that came with the kit the need to run the above mentioned 12v power to the inertia switch is no longer needed. As mentioned above tap into the red, brown/white stripped, yellow/light blue striped, dark blue/yellow
striped wires using the above illustrations. The wires run right by the factory location in factory lum/black split hollow hard plastic housing the wires are run through to protect them. Locate and tap into them as shown in the above diagram I used in-line snap clips. This saved time and kept the original wires from being cut/spliced. Using a 5 ft piece of wire connect the last remaining wire from the pigtail to the 5ft piece of wire it�s the one marked to destination Yellow/white stripe. Run the 5 ft of now tapped wire through the firewall at the curved section where there is a Gromit with a thicker coated silver cable going through it. I pushed the gromit up and wire through. Go into the cab easily pull the carpet from the top left corner down and fold it past the pedal. This will expose the wire pushed through the gromit. Pull the 5 ft of wire through route it to the switch pigtail using zip ties to secure it along your desired path, using the same snap electrical fittings from the lower pigtail connections, trim and tap your wire into the yellow/white stripped wire. The factory inertia switch connection will still be in place in the original switch. From here if the valve is plumbed correctly you should be able to reinstall the OEM switch trim plate headlight and wiper *****. Reconnect the battery and turn the truck over. If it doesn�t crank or cranks and stumbles like it�s starving for fuel. Under the hood locate the green relay on the drivers fender well and unplug it exposing 4 pin receivers. In the green plug place a jumper wire to the 2 larger prong holes. then on the drivers side of the intake on the fuel rail is a
Shrader valve remove the cap and get yourself a tool to press the pin in the valve down. A small tip screwdriver works great. Turn the
ignition switch to the on position. You should hear the fuel pump running. Press the Schrader valve with the screwdriver this will cause fuel to spray out of the Schrader valve, so be careful and wear eye protection and gloves. The goal here is to purge the system of any air that might be in the lines keeping the vehicle from starting or running correctly. I found if you wait about 5 to 10 seconds and press the center of the Schrader valve doing this until you get a steady stream of fuel. Flip the tank selector switch repeat previous steps. Once all the air is out of the lines for both tanks. Remove the jumper wire and reinstall the relay, rinse the fuel from the Engine bay and around the intake. Start your engine. I hope this helps
 06-20-2014, 04:39 AM