
Excursion Roof Rack Modifications

#62
 10-17-2012, 06:57 PM

 Even the same color as mine, lol.
#63
11-09-2012, 11:45 PM
I hate it when I hit the submit reply instead of the preview post button.
Anyway
Loaded the KC lights on as they have been rolling around in the garage for a few years waiting for a good use. I don't have them wired yet, that will have to wait until we get back from this trip.
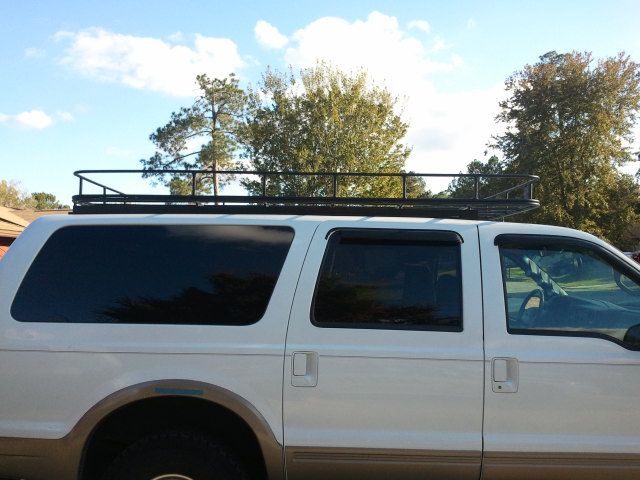
The rack is 53" wide by 95" long inside the basket area. The wind deflector is 36" wide and laid back at @ a 40 degree angle to try to match the windshield.

Yes those are two different tires. I am dropping one of the off to my brother and the other is my actual full size spare. I got on the rack and can bounce all I want and it only deflects a tiny little bit. Grab the side rails and I can rock the whole Excursion without the rack moving a all.
So was it worth all of the work? When I decide I wanted to add the Safari Rack and started pricing and sizing them the closest I could find to what I wanted was around $500 for the rack and another $200-400 for the feet and cross bars to mount it since no one makes on the will work with the factory crossbars. The biggest size was 52" wide by 48" long (66" if I bought the 18" extension).
My rack is 53 inches wide and 95 inches long of useable area inside the basket. I spent around 30 hours of time building and fitting it how I wanted it.
Here is the breakdown of costs if you are interested.
1/2" conduit $31.36
2 1/4" flat stock $5.95
Black spray paint $18.36
J-bolts 5/16 x 3" $9.60
5/16 fender washers and nylock nuts $3.10
3/8 x 4' Rubber $7.49
Metric bolts to raise rails $24.00 (stainless)
Total cash investment is $99.86
I already had the bender for the conduit, the sheet of Aluminum for the air deflector, and the KC lights. I borrowed the welder from a friend in exchange for helping him with an upcoming project.
I am happy with the time and money I have invested. I hope this inspires at least 1 person to take on a project that they normally would be wary of doing. I will let you guys know after the trip how things work out. Thanks for all of the encouragement, it really helped to keep me motivated.
Anyway
Loaded the KC lights on as they have been rolling around in the garage for a few years waiting for a good use. I don't have them wired yet, that will have to wait until we get back from this trip.
The rack is 53" wide by 95" long inside the basket area. The wind deflector is 36" wide and laid back at @ a 40 degree angle to try to match the windshield.
Yes those are two different tires. I am dropping one of the off to my brother and the other is my actual full size spare. I got on the rack and can bounce all I want and it only deflects a tiny little bit. Grab the side rails and I can rock the whole Excursion without the rack moving a all.
So was it worth all of the work? When I decide I wanted to add the Safari Rack and started pricing and sizing them the closest I could find to what I wanted was around $500 for the rack and another $200-400 for the feet and cross bars to mount it since no one makes on the will work with the factory crossbars. The biggest size was 52" wide by 48" long (66" if I bought the 18" extension).
My rack is 53 inches wide and 95 inches long of useable area inside the basket. I spent around 30 hours of time building and fitting it how I wanted it.
Here is the breakdown of costs if you are interested.
1/2" conduit $31.36
2 1/4" flat stock $5.95
Black spray paint $18.36
J-bolts 5/16 x 3" $9.60
5/16 fender washers and nylock nuts $3.10
3/8 x 4' Rubber $7.49
Metric bolts to raise rails $24.00 (stainless)
Total cash investment is $99.86
I already had the bender for the conduit, the sheet of Aluminum for the air deflector, and the KC lights. I borrowed the welder from a friend in exchange for helping him with an upcoming project.
I am happy with the time and money I have invested. I hope this inspires at least 1 person to take on a project that they normally would be wary of doing. I will let you guys know after the trip how things work out. Thanks for all of the encouragement, it really helped to keep me motivated.
I'm thinking of getting one but it attaches to the crossbars and as you know, they're already touching the roof so I'm looking for another solution.
Thanks and nice job.

#64
11-10-2012, 06:25 AM
TreadLightly
Join Date: Oct 2006
Location: SE Missouri
Posts: 1,608
Likes: 0
Received 0 Likes
on
0 Posts
#65
11-10-2012, 03:32 PM
I spaced up the factory rail about 3/4".
http://www.flickr.com/photos/53700883@N06/6516880335/I spaced my safari rack up another 3/4" with pieces of rubber. Then I bolted it down with J bolts through the factory rail.
http://www.flickr.com/photos/53700883@N06/6516880335/ by http://www.flickr.com/people/53700883@N06/, on Flickr
http://www.flickr.com/photos/53700883@N06/6516880987/http://www.flickr.com/photos/53700883@N06/6516880987/ by http://www.flickr.com/people/53700883@N06/, on Flickr
I have since removed the Safari rack and factory rails so the body shop could replace my windshield frame. I cleaned up the roof and decided to modify the Safari rack by extending it another 12". I decided I didn't like the multiple pieces of rubber and J bolts so it was time for another option.
Because I extended the Safari rack it now extends 14" forward of the front factory bolt hole. I decided the mounting should also help spread the load across the roof. I picked up a some 1 1/2" by 1 1/2" angle and decided to use it to mount the Safari Rack. I welded some small 1/2" galvanized pieces to stand the Safari rack above the angle. I used a strip of 1/2" thick rubber to set the angle on and bolted it to the factory rack bolt holes.
How far it used to extend, notice it stops at the split of the doors.
http://www.flickr.com/photos/53700883@N06/6514406103/http://www.flickr.com/photos/53700883@N06/6514406103/ by http://www.flickr.com/people/53700883@N06/, on Flickr
Now it extends a foot forward of the split in the doors.
Here you can see how clean the angle makes it look from the outside.
Here is a shot of how everything mounts together.
I still need to put my deflector back on the front and wire up the lights so they actually work. I also have a few other things I want to add when time and funds allow.
#68
11-29-2012, 08:41 PM
They are between 1 1/2 and 2 inches. I can't remember exactly.
I did get the wind deflector mounted back on the front and I put the full size spare on the rack. I even found my old soft car top carrier and put the spare inside of it so it doesn't sit up there and back in the sun. Now I need a day to wire the lights and take pics in the daylight.
I did get the wind deflector mounted back on the front and I put the full size spare on the rack. I even found my old soft car top carrier and put the spare inside of it so it doesn't sit up there and back in the sun. Now I need a day to wire the lights and take pics in the daylight.
#69
11-29-2012, 09:15 PM
They are between 1 1/2 and 2 inches. I can't remember exactly.
I did get the wind deflector mounted back on the front and I put the full size spare on the rack. I even found my old soft car top carrier and put the spare inside of it so it doesn't sit up there and back in the sun. Now I need a day to wire the lights and take pics in the daylight.
I did get the wind deflector mounted back on the front and I put the full size spare on the rack. I even found my old soft car top carrier and put the spare inside of it so it doesn't sit up there and back in the sun. Now I need a day to wire the lights and take pics in the daylight.
Garry
#70
12-16-2012, 08:28 AM
Senior User
Join Date: Feb 2010
Location: Rosemount,MN
Posts: 208
Likes: 0
Received 0 Likes
on
0 Posts
#71
12-17-2012, 03:19 PM
I am in a debate between going out the rear hatch and all of the way forward on the rack or going out the front passenger door and straight up to the rack. It will depend on how many side lights I decide to add. I also am looking at adding a 48inch long LED brake light strip along the rear of the rack to really let people know how tall it is at night and be sure they know when I'm stopping.
I think it is between 20 and 24 sticks at this point with my latest extension in it. It is a little hard to know for sure as I used some small scrap sections I had from other projects.
I think it is between 20 and 24 sticks at this point with my latest extension in it. It is a little hard to know for sure as I used some small scrap sections I had from other projects.
#72
01-02-2013, 12:26 AM

I was thinking of a thin roof rack because I was thinking about a backup camera mounted up high looking down, and so i can have some flood lights (if I have to do something outside they would illuminate the area) any ideas for either?
Also what kind of problems did yall run in when mounting a rack in regards to parking garages and stuff like that?
Also what kind of problems did yall run in when mounting a rack in regards to parking garages and stuff like that?
#73
01-02-2013, 09:13 PM
Lead Driver
#74
01-03-2013, 07:55 PM
I was thinking of a thin roof rack because I was thinking about a backup camera mounted up high looking down, and so i can have some flood lights (if I have to do something outside they would illuminate the area) any ideas for either?
Also what kind of problems did yall run in when mounting a rack in regards to parking garages and stuff like that?
Also what kind of problems did yall run in when mounting a rack in regards to parking garages and stuff like that?
I don't have any whistling noises at all. The only noises I got were humming from the straps holding my spare when they were flapping in the wind. I put a 1/2 twist in them then retightened them and they don't hum anymore.
