2004 Excursion LTD 4x4, 6.0 PSD, 99,400 miles.
After reading about all the benefits of coolant filters, I bought the DieselSite kit, and added the ball-valves and two extra filters...total cost delivered around $170.00 for the cheapest delivery option. I ordered on a Monday night and had parts in hand by Thursday morning.
First impressions were good. High quality parts kits, plenty of coolant hose, and the aluminum assembly the filter spins onto is pretty cool; a nice block of billet bling.
Here's a pic of the completed install:

The first part of the job was to install the mount to which you bolt the filter assembly. The mount fits well in its intended place. The hard part was getting the fender washer and nut onto the bolt. The bolt passes through the filter mount and then through one of the radiator brackets. The instructions say you'll need to reach behind the mount and the bracket to get the washer and nut on. I don't have huge hands, but it doesn't matter how small they are, there's NO WAY you'll get your fingers back there. A telescoping magnet did the trick for me; just enough space to get the parts onto the bolt, and then an open-end wrench fit to tighten things up.
A pic of the installed mount/filter and a closeup of where you're supposed to be able to reach. In the second picture you can see a piece of extra hose I split and put onto the mount to serve as a barrier between the mount and the AC charging line (the instructions mentioned this).


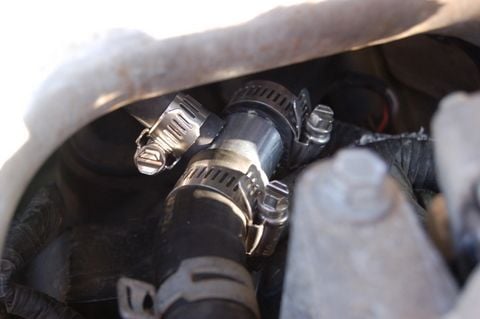
The next part was to splice the filter return line into the line that goes to the degass bottle. This was very straightforward. I just had to figure out where to cut so the added hose clamps didn't rub on the other hoses. The splice fits nicely over the top of the fan shroud. Big-picture view of the splice.

The instructions didn't mention it, but their pictures showed how you need to add the hose clamps to this tee. If you try to put all the new hose clamps at the three parts of the tee, they won't fit because the tee is small and the clamps get in each other's ways. Take the factory clamp off the end of the line and use it in place of one of the supplied hose clamps, and move the supplied hose clamp to where the squeeze clamp was near the radiator. Pic of this...

This part of the job has the potential to make a mess with coolant after you cut the line. Fortunately I was low on coolant still from when I removed the degass bottle to get to my FICM, so not too much coolant leaked out here.
The hardest part for me was splicing into the heater hose to run a line to the input part of the coolant filter. It's pretty near the firewall and the oil filler tube is in the way. After messing with it for a while, I realized the filler tube is threaded into the right valve cover and is easy to remove. Then I was worried about coolant falling into the open hole in the valve cover. I wondered if the oil filler cap was the right thread size to screw into the valve cover...it sure was! So I screwed the filler cap into the valve cover...problem solved!
Oil filler tube in the way...

Oil filler tube removed...

Oil filler cap screwed into right valve cover...yes, it's in bad shape, don't know what got onto it that is eating it up.

After the oil filler tube was out of the way, there was a lot more room to get the heater hose removed. I took it out completely, after marking where I wanted to cut, so as to make the cuts easier and more accurate. After splicing the aluminum tee into the line and reinstalling the heater hose, I had to twist the hose clamps so they didn't rub on wiring bundles and other stuff.
Three pics of the heater hose tee installed, they're not very good because it's a hard place to take a picture with an auto-focus camera since it tries to focus on objects in the near-field sometimes rather than the tee itself.


This splice also can make a big mess, so I had a bunch of shop towels under the hose when I pulled it. There are some wiring bundles and connections on the right valve cover bank (don't know what they are, yet) that I didn't want to get wet.
Last picture shows, roughly, how I routed the line from the heater hose to the inlet side of the filter. I tried to keep the hose away from the intercooler pipe both near the tee and going into the filter. This was made more difficult at the filter end because of the combined length of the ball valve and brass hose barb coming out of the filter housing. It looks a little silly routed through/around the AC lines, but it keeps the hose away from sharp stuff and the intercooler pipe. Easy enough to move if I need to.
Last picture with a question. This valve is on the heater hose near the aluminum tee. There's this gray line, looks like a pneumatic line, that goes into the valve. I knocked it off the valve. It doesn't look like I broke anything but it doesn't really snap back into place either. It just kinda pushes on, rubber boot over rubber nipple and it's not very secure. Is this the way it's supposed to be?
Overall the DieselSite kit is a good deal, fits well and the instructions are very plain and easy to follow. I'm no mechanic, but after fixing my FICM I'm not afraid any more to dive into stuff like this. If I can do it, anyone can!
Oh yeah, after I got this done, I had the coolant system flushed at the dealer. I'm approaching 100k miles so it was prolly time anyway. Cheers!