F100 Drip rail removal

#32
 07-31-2011, 10:56 AM

Join Date: Jul 2009
Location: Stony Plain,AB Canada
Posts: 370
Likes: 0
Received 0 Likes
on
0 Posts
Randy thanks for the detail of the drip rail removal. Questions, are the 56 and 53-55 cabs the same at the top of the front window? The reason I ask is, there is discussion around building up the front lip and I didn't see that with yours? Looks like there is a factory built lip there.
By leaving the spot welds in-tacked until the end is a great idea but when you took those off to loose the edge what happens?
By leaving the spot welds in-tacked until the end is a great idea but when you took those off to loose the edge what happens?
#34
07-31-2011, 08:02 PM
I shaved the drip rails on my 55 when I chopped the top. I created a character line where the drip rail was by welding in a steel rod. I shot a few pictures but the detail is really hard to capture in light gray primer with lots of sanding dust.


I let the the character line fade out just as it turned down the at the rear of the door.

I let the the character line fade out just as it turned down the at the rear of the door.
#35
07-31-2011, 10:30 PM

Randy thanks for the detail of the drip rail removal. Questions, are the 56 and 53-55 cabs the same at the top of the front window? The reason I ask is, there is discussion around building up the front lip and I didn't see that with yours? Looks like there is a factory built lip there.
By leaving the spot welds in-tacked until the end is a great idea but when you took those off to loose the edge what happens?
By leaving the spot welds in-tacked until the end is a great idea but when you took those off to loose the edge what happens?
As to removing the rail, you can see in my gallery that I did it in sections. Once I re-welded the upper and lower cab sections thru a removed area, I removed the area next to it. You need to make sure that the cab retains its structure thru the operation. If the entire drip rail were to be removed, the cab would shift and tweak. The likelihood of of getting the geometry back is remote.
#36
08-01-2011, 10:48 AM
Sam
and I wish I had rounded the door corner
#37
08-01-2011, 11:11 AM
I've entertained rounding the door corner for a while now. I'll probably go ahead and do it while I'm trying to adjust some of the door gaps. For some reason the door gaps on the passenger side are really large.
#38
08-01-2011, 02:58 PM
Join Date: Jul 2009
Location: Stony Plain,AB Canada
Posts: 370
Likes: 0
Received 0 Likes
on
0 Posts
I have noticed that my passanger door gaps are a little larger than the drivers as well and with little adjustment it means filling those gaps with steel. I did oblong my door bolt holess to give me about another 1/8-3/16" movement but still wasn't enough.
So back to the drip rails, am I right to think that the front brow is then total fabricated with metal/filler the complete length of the front windshield? There is no raised edge at all?
So back to the drip rails, am I right to think that the front brow is then total fabricated with metal/filler the complete length of the front windshield? There is no raised edge at all?
#39
08-01-2011, 03:31 PM
I have noticed that my passanger door gaps are a little larger than the drivers as well and with little adjustment it means filling those gaps with steel. I did oblong my door bolt holess to give me about another 1/8-3/16" movement but still wasn't enough.
So back to the drip rails, am I right to think that the front brow is then total fabricated with metal/filler the complete length of the front windshield? There is no raised edge at all?
So back to the drip rails, am I right to think that the front brow is then total fabricated with metal/filler the complete length of the front windshield? There is no raised edge at all?

With the drip rail, I'm not sure that I understand what you're asking. I did something a little extra on mine to create a defined character edge that is not in the stock panels. Maybe I can blow some of the sanding dust off my truck and put some extra lighting on it so that a photo might show better detail.
#40
08-01-2011, 04:53 PM
Join Date: Jul 2009
Location: Stony Plain,AB Canada
Posts: 370
Likes: 0
Received 0 Likes
on
0 Posts

#41
08-01-2011, 06:17 PM
 ) Sam's photo shows what you have after welding and finish work.
I know it's hard to see in my photos but if you look close you can see the added character line.
I'll try to look through my old F100 show photos to see if I can find some other treatments. I've seen a few that were really different and looked really good. I don't know if you're looking for a different treatment or not.
#42
08-01-2011, 08:49 PM
Join Date: Jul 2009
Location: Stony Plain,AB Canada
Posts: 370
Likes: 0
Received 0 Likes
on
0 Posts
Thanks again Drew, if I get the look that is on Sams truck with just taking the drip rail off I'm good as gold! (Slight massaging where need)
It's hard to see that with the drip rail in place and once one starts there is no turning back, my reasoning for all the clarifcation...a little gun shy here!
It's hard to see that with the drip rail in place and once one starts there is no turning back,
my reasoning for all the clarifcation...a little gun shy here!
#43
08-01-2011, 09:16 PM
Thanks again Drew, if I get the look that is on Sams truck with just taking the drip rail off I'm good as gold! (Slight massaging where need)
It's hard to see that with the drip rail in place and once one starts there is no turning back, my reasoning for all the clarifcation...a little gun shy here!
It's hard to see that with the drip rail in place and once one starts there is no turning back,
my reasoning for all the clarifcation...a little gun shy here!(altho this cab is still out in the shop)
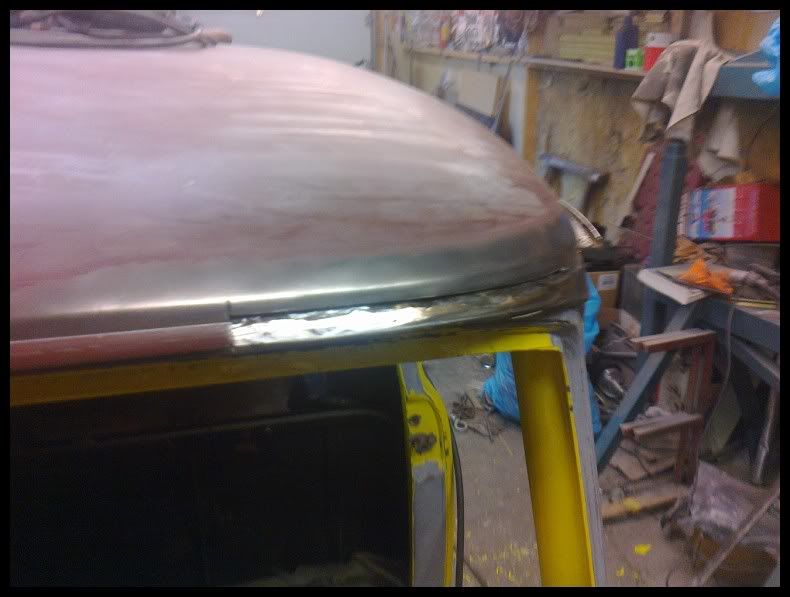
notice the ridge line just above the drip rail, as it turns towards the front.
Sam
#45
08-02-2011, 03:04 AM
Elder User
Join Date: May 2010
Location: Netherlands
Posts: 687
Likes: 0
Received 0 Likes
on
0 Posts
Here is a nice article for rounding the doors
Putting A Curve In Square Door Corners - Tech Articles - Custom Rodder Magazine
Putting A Curve In Square Door Corners - Tech Articles - Custom Rodder Magazine