Powerstroke upgrade! Engine swap started..
#31
 05-05-2010, 01:21 PM

#32
05-05-2010, 03:42 PM
Join Date: Jan 2009
Location: Wyoming
Posts: 1,955
Likes: 0
Received 0 Likes
on
0 Posts
I just finished up stripping and coating the new radiator support. Where the support bolts to the frame, there has always been a ton of dirt and grime that collects there.. I drilled out a second hole in that section of the support, so that in the future when I wash the truck, it has a place to drain out, instead of sitting there with standing water and dirt, causing future rust.
I sanded down the battery trays, and coated them with rust inhibitor, but I think I will have to get some of that plastic spray on coating, so that I dont have battery goo burning the plates again as well.
There will be a night and day difference between what it was and what it will be! LOL! I am not a fan of greasy spots myself, so all the old ick is coming off!
#33
05-07-2010, 05:04 PM


#34
05-07-2010, 08:59 PM
Join Date: Jan 2009
Location: Wyoming
Posts: 1,955
Likes: 0
Received 0 Likes
on
0 Posts
Back to working with those motor mounts.. So as I said, I did some mocking up for the motor mounts to get the powerstroke in.
On the old mounts, the passenger side just unbolts nicely, while the drivers side.. not so much! There were 4 factory pressed slugs holding it to the crossmember, along with the one bolt to the frame.. I dont know why Ford did this..
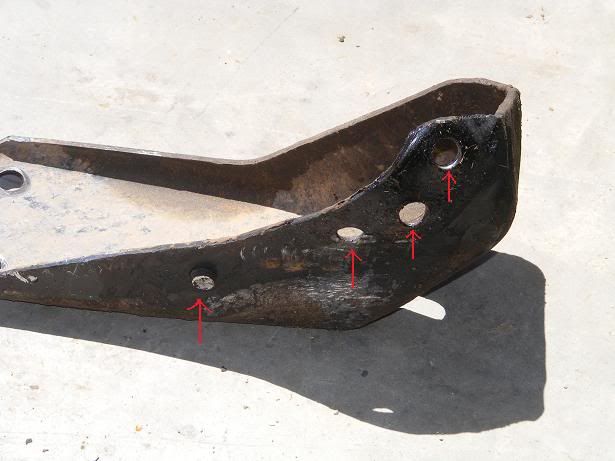 They are a complete bugger to get to! But its out!
The passenger side powerstroke mount just bolts right on..
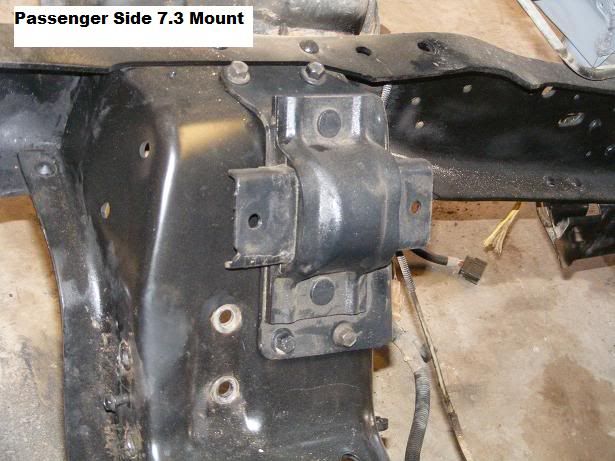
While the drivers side needs a little tweaking. Only one of the four bolts match up, while the bottom two bolts need to be drilled out on the cross member. The other top mount bolt, sits off onto nothing! The cross member on the gas model, has a large hole cut out for the oil filter on the 5.8. Now, either a plate can be welded on, or it can be left as is. There are three of the four bolts holding the mount on, and it does fit face to face with the crossmember, so i am sure there is plenty holding power there.. Your choice! LOL! I will most likely fab un a plate to cover it, then drill out a hole for the fourth bolt..
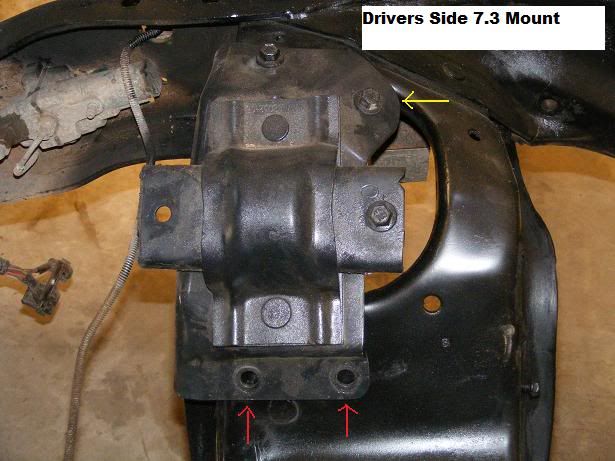
On the old mounts, the passenger side just unbolts nicely, while the drivers side.. not so much! There were 4 factory pressed slugs holding it to the crossmember, along with the one bolt to the frame..
I dont know why Ford did this.. They are a complete bugger to get to! But its out!The passenger side powerstroke mount just bolts right on..
While the drivers side needs a little tweaking. Only one of the four bolts match up, while the bottom two bolts need to be drilled out on the cross member. The other top mount bolt, sits off onto nothing! The cross member on the gas model, has a large hole cut out for the oil filter on the 5.8. Now, either a plate can be welded on, or it can be left as is. There are three of the four bolts holding the mount on, and it does fit face to face with the crossmember, so i am sure there is plenty holding power there.. Your choice! LOL! I will most likely fab un a plate to cover it, then drill out a hole for the fourth bolt..

#36
05-08-2010, 02:28 PM
Join Date: Jan 2009
Location: Wyoming
Posts: 1,955
Likes: 0
Received 0 Likes
on
0 Posts
I had thought about swapping crossmembers, but there were problems I had to consider with that.
The crossmember has even more slugs to drill out and they are pretty good sized, so I would spend even more time working through that. Both crossmembers were he same when it comes to the D-50 addition, so that had no issue in consideration.
On top of there being more slugs to deal with, along the forward facing part of the crossmember, on the inside of the frame, the crossmembers have been welded to the frame. If I go and cut these welds, I will have to make sure that after the transfer, my welds do not have any flaws or hairline fatigue spots. I really dont want to mess with the structural integrity of the frame. With the 4-wheel drive being added, the diesel swap, and the type of work my trucks go through over long periods of time, Any mistake I make now, will haunt me soon after, LOL! i am also on a limited budget as for now, so hiring a quality welder to come out and do the work wouldnt be affordable for a bit.
It shouldnt too long from now before its done and out of the shop!
#37
05-12-2010, 03:57 PM
Join Date: Jan 2009
Location: Wyoming
Posts: 1,955
Likes: 0
Received 0 Likes
on
0 Posts
More Pics..
With everything on hold, waiting for some misc small parts to come in, I had time to get the fuel tank swaps completed!
I found some interesting things out, and figured I would share!
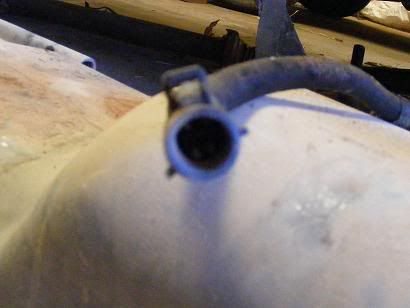
Fuel tanks were easy to get in and out of both trucks. Connectors came off easy and the filler necks did as well. I had pulled the rear harness off the donor truck just in case.. I am glad I did! The connectors are different beween the gas system and the diesel system. At first glance they look identical, but the diameter of the connector on the gas system is slightly bigger, and uses large round pins inside, where the diesel uses a slightly smaller diameter connector, and slot pins..
Gas connector..
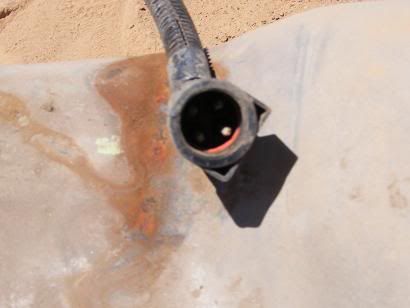
Diesel Connector..
Now that I have discovered this, I wondered if I was going to have to splice either my harness, and then figure out the wiring differences to the PCM, or use the donor trucks harness and splice it, to lengthen the harness as it is off of a Ext cab, where I have the CC.
Much to my surprise, I went ahead and laid out the Ext. Cab harness under my CC, and the lengths are perfect! From front to rear! So, I have to splicing to do, no middifying, just simple "plug and play"!

Now I have another harness to clean up, and get some dialectric into it, then on it goes! I will have minor rewiring to do at the tail end of the harness, as I have several additions I wired in originally (headache rack, trailer plugs, back-up sensors). But this is a nice transition.
The fuel lines have to go on before I button it all up. If the lines are not long enough, that can be easily fixed, as they are not high pressure lines, and have rubber line sections already on it. I get longer rubber lines and put them on.. Thats it!
I found some interesting things out, and figured I would share!
Fuel tanks were easy to get in and out of both trucks. Connectors came off easy and the filler necks did as well. I had pulled the rear harness off the donor truck just in case.. I am glad I did! The connectors are different beween the gas system and the diesel system. At first glance they look identical, but the diameter of the connector on the gas system is slightly bigger, and uses large round pins inside, where the diesel uses a slightly smaller diameter connector, and slot pins..
Gas connector..
Diesel Connector..
Now that I have discovered this, I wondered if I was going to have to splice either my harness, and then figure out the wiring differences to the PCM, or use the donor trucks harness and splice it, to lengthen the harness as it is off of a Ext cab, where I have the CC.
Much to my surprise, I went ahead and laid out the Ext. Cab harness under my CC, and the lengths are perfect! From front to rear! So, I have to splicing to do, no middifying, just simple "plug and play"!
Now I have another harness to clean up, and get some dialectric into it, then on it goes! I will have minor rewiring to do at the tail end of the harness, as I have several additions I wired in originally (headache rack, trailer plugs, back-up sensors). But this is a nice transition.
The fuel lines have to go on before I button it all up. If the lines are not long enough, that can be easily fixed, as they are not high pressure lines, and have rubber line sections already on it. I get longer rubber lines and put them on.. Thats it!
#38
05-19-2010, 02:20 AM
Join Date: Jan 2009
Location: Wyoming
Posts: 1,955
Likes: 0
Received 0 Likes
on
0 Posts
Another day of success and frustration! I knew that things couldnt go back together this easy! LOL!
The good stuff.. Just as I had suspected and planned for, after gutting the rest of my truck of all of the fuel systems, tanks, lines, return lines, wiring harness on the back half of the truck, I got the diesel lines installed! The fuel lines actually lined up perfectly from an Extended Cab truck onto my Crew Cab! The tank selector valve bolted right up into place of the old gas one, with no problems!
Fuel lines: Now, I am short by about 6 inches once the lines enter the engine compartment. So, I will section out a part of the fuel lines under the cab, and install the rubber lines to lengthen the steel lines. These are not high pressure lines, so I dont have to get extreme with super heavy duty lines. On the diesels, the high pressure fuel isnt in the line, but the HPOP to heads and injectors.
Wiring: Went wonderful! It did fit, and with very minimal issue! I didnt have to pull all my rear lighting out, as there is a connector just after the last rail of the chassis in the rear. Plug and Play! I re-ran the diesel harness along the chassis and into the engine compartment. The harness was barely snug the first time I brough it up. To alleviate this tightness concern, instead of running the harness along the inside bottom of the chassis, I ran it along the inside top of the chassis. Not only did it give me an extra 3 inches of harness into the engine compartment, but in the future will keep the harness from collecting more dirt by resting on the bottom of the inside of the chassis.
The rough part: I am sure this is a specific problem to me, but taking parts from a SRW chassis, and using them on a DRW chassis posed one issue! The fuel necks! I have to put together something tomorrow to get the filler necks to work. The dually trucks have their fuel ports on the dual fender, which is a few inches longer then the SRW trucks. Fuel Tanks swap and mount in the same spot with no problems, its just the fuel necks that need a remedy. The fuel necks have two hoses, one inside the other, that runs from the metal neck, and into the tank. The inside hose is a smaller diameter then the diesel fuel neck and hose. I want to use the diesel neck as to refrain from any fuel pump mix ups in the future (not that I would, but I dont need a hand putting the wrong fuel in). I will use the fuel hose from the gas system, and put it on the diesel neck, this way I still have the large port for the nozzel, while still having the length to reach the tanks!
I would have had this buttoned up with the back half of the truck, but that fuel neck was a real PIA! It didnt dawn on me until I had the fuel lines hooked up to the tanks, along with the wiring harness, and the tank was being installed!
I will say for anyone messing with fuel tanks in the future.. When you go to put the fuel tank back on, remove the steel neck from the rubber hose. Clamp the rubber hose back onto the fuel tank, then install the fuel tank. This way, you are not fighting with getting your hand up on top of the fuel tank once its in, and you can still put the metal neck on with out much headache!
I have some more pics.. Just got to bring the camera in again and get them up! I will get the done tomorrow as well.
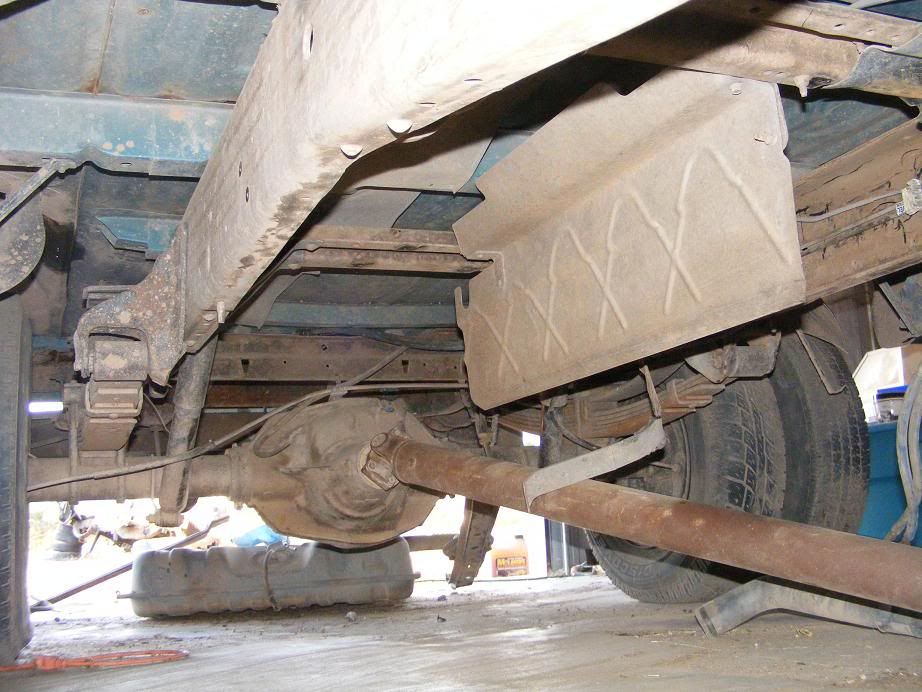
So far, the fuel system for the diesel is about finished, the trans filter and fluid has been changed and new seals installed. The 4-wheel drive is about finished as well. I have to finish with a couple new holes to drill out for the rear shackles and would have that done by now, if I didnt break the drill bit earlier! The engine is about all buttoned up. New O-Rings from DieselO-Rings.com were put in, including the turbo O-rings. As more sensors come in, they are getting replaced one at a time. Everything is coming together nicely so far! Once the 4-wheel drive is finished being mounted, the trans and transfer case will go in. I dont want to mess around with getting the suspension finished while the engine is in. It could be done, but since I have a stripped chassis, I might as well take advantage of it! The donor truck also has several guard plates mine did not come with that will get mounted as well.
My biggest problem I see ahead, will be the rear drive line. I have both from both trucks, but not sure I can get the configuration set on this, as the drive lines from the donor truck, were from an 4x4 Ext. Cab chassis, while the drive lines from mine are a 2-wheel drive Crew Cab chassis. One thing at a time! LOL! Other then that, this project is a plug and play deal!
The good stuff.. Just as I had suspected and planned for, after gutting the rest of my truck of all of the fuel systems, tanks, lines, return lines, wiring harness on the back half of the truck, I got the diesel lines installed! The fuel lines actually lined up perfectly from an Extended Cab truck onto my Crew Cab! The tank selector valve bolted right up into place of the old gas one, with no problems!
Fuel lines: Now, I am short by about 6 inches once the lines enter the engine compartment. So, I will section out a part of the fuel lines under the cab, and install the rubber lines to lengthen the steel lines. These are not high pressure lines, so I dont have to get extreme with super heavy duty lines. On the diesels, the high pressure fuel isnt in the line, but the HPOP to heads and injectors.
Wiring: Went wonderful! It did fit, and with very minimal issue! I didnt have to pull all my rear lighting out, as there is a connector just after the last rail of the chassis in the rear. Plug and Play! I re-ran the diesel harness along the chassis and into the engine compartment. The harness was barely snug the first time I brough it up. To alleviate this tightness concern, instead of running the harness along the inside bottom of the chassis, I ran it along the inside top of the chassis. Not only did it give me an extra 3 inches of harness into the engine compartment, but in the future will keep the harness from collecting more dirt by resting on the bottom of the inside of the chassis.
The rough part: I am sure this is a specific problem to me, but taking parts from a SRW chassis, and using them on a DRW chassis posed one issue! The fuel necks! I have to put together something tomorrow to get the filler necks to work. The dually trucks have their fuel ports on the dual fender, which is a few inches longer then the SRW trucks. Fuel Tanks swap and mount in the same spot with no problems, its just the fuel necks that need a remedy. The fuel necks have two hoses, one inside the other, that runs from the metal neck, and into the tank. The inside hose is a smaller diameter then the diesel fuel neck and hose. I want to use the diesel neck as to refrain from any fuel pump mix ups in the future (not that I would, but I dont need a hand putting the wrong fuel in). I will use the fuel hose from the gas system, and put it on the diesel neck, this way I still have the large port for the nozzel, while still having the length to reach the tanks!
I would have had this buttoned up with the back half of the truck, but that fuel neck was a real PIA! It didnt dawn on me until I had the fuel lines hooked up to the tanks, along with the wiring harness, and the tank was being installed!
I will say for anyone messing with fuel tanks in the future.. When you go to put the fuel tank back on, remove the steel neck from the rubber hose. Clamp the rubber hose back onto the fuel tank, then install the fuel tank. This way, you are not fighting with getting your hand up on top of the fuel tank once its in, and you can still put the metal neck on with out much headache!
I have some more pics.. Just got to bring the camera in again and get them up! I will get the done tomorrow as well.
So far, the fuel system for the diesel is about finished, the trans filter and fluid has been changed and new seals installed. The 4-wheel drive is about finished as well. I have to finish with a couple new holes to drill out for the rear shackles and would have that done by now, if I didnt break the drill bit earlier! The engine is about all buttoned up. New O-Rings from DieselO-Rings.com were put in, including the turbo O-rings. As more sensors come in, they are getting replaced one at a time. Everything is coming together nicely so far! Once the 4-wheel drive is finished being mounted, the trans and transfer case will go in. I dont want to mess around with getting the suspension finished while the engine is in. It could be done, but since I have a stripped chassis, I might as well take advantage of it! The donor truck also has several guard plates mine did not come with that will get mounted as well.
My biggest problem I see ahead, will be the rear drive line. I have both from both trucks, but not sure I can get the configuration set on this, as the drive lines from the donor truck, were from an 4x4 Ext. Cab chassis, while the drive lines from mine are a 2-wheel drive Crew Cab chassis. One thing at a time! LOL! Other then that, this project is a plug and play deal!
#39
05-19-2010, 04:50 AM
Elder User
Join Date: Jul 2009
Location: Live VT, Work MA
Posts: 768
Likes: 0
Received 0 Likes
on
0 Posts
Awesome write up.....I told you at some point the semi-daily write up would be cathartic to vent.
Actually when I was doing the log cabin thing and writing it up weekly, it helped me organize my thoughts of where I was in the process and what is next.
Your project looks to be coming along pretty well..........I would imagine the fuel filler issue isn't a show stopper, just an unexpected detour.
Looking forward to your next post.
Steve
#40
05-19-2010, 06:36 AM
Postmaster
Join Date: Nov 2006
Location: The Woodlands, TX
Posts: 2,807
Likes: 0
Received 0 Likes
on
0 Posts
#41
05-19-2010, 03:47 PM
Join Date: Jan 2009
Location: Wyoming
Posts: 1,955
Likes: 0
Received 0 Likes
on
0 Posts
More pics..
Here are the pics I said I would get on.. Take a peak..
Cleaned out Chassis:
Fuel rails snapped right into place..
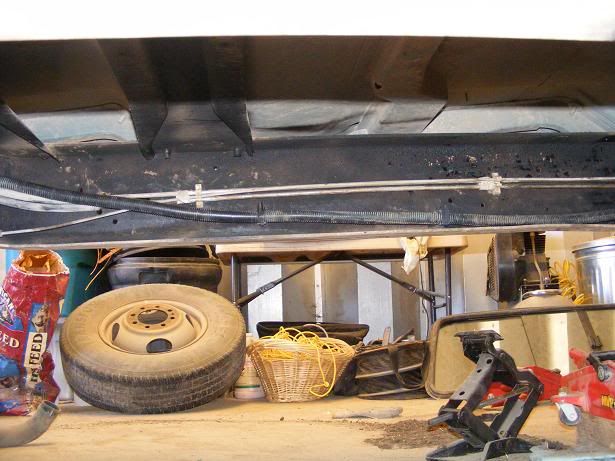
Even the fuel selector valve fits right where the original gas model was..
The remaining harness's hanging to dry, and new dialetric grease waiting to go on! I will suggest that buying the large can of the stuff is important. Before anything is snapped back together, I use a ton of this stuff to water seal it and prevent corrosion or shorting!
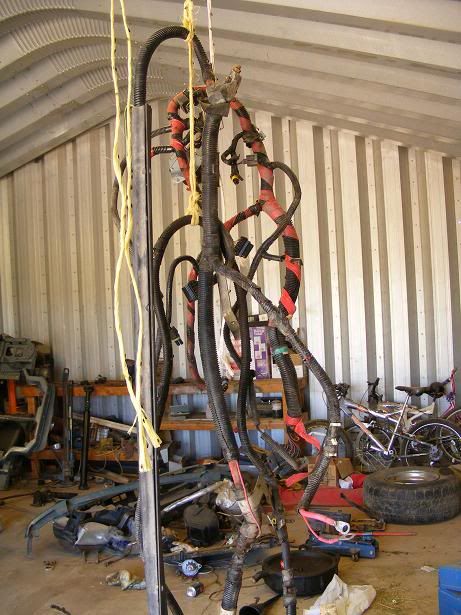
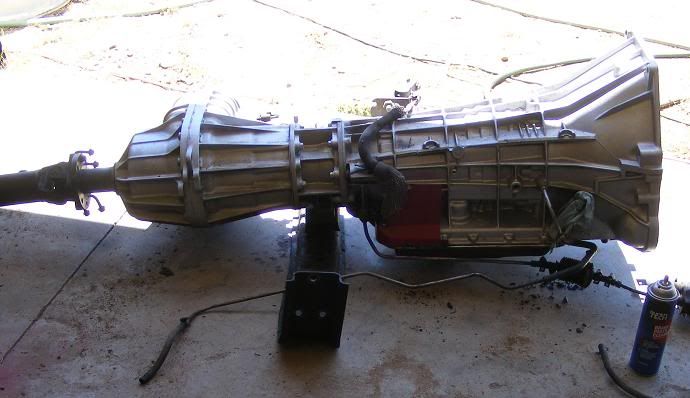
And the infamous transmission and transfer case, after clean up! Preparing to go in next!
Cleaned out Chassis:
Fuel rails snapped right into place..
Even the fuel selector valve fits right where the original gas model was..
The remaining harness's hanging to dry, and new dialetric grease waiting to go on! I will suggest that buying the large can of the stuff is important. Before anything is snapped back together, I use a ton of this stuff to water seal it and prevent corrosion or shorting!
And the infamous transmission and transfer case, after clean up! Preparing to go in next!
#43
05-20-2010, 01:40 PM
Join Date: Jan 2009
Location: Wyoming
Posts: 1,955
Likes: 0
Received 0 Likes
on
0 Posts
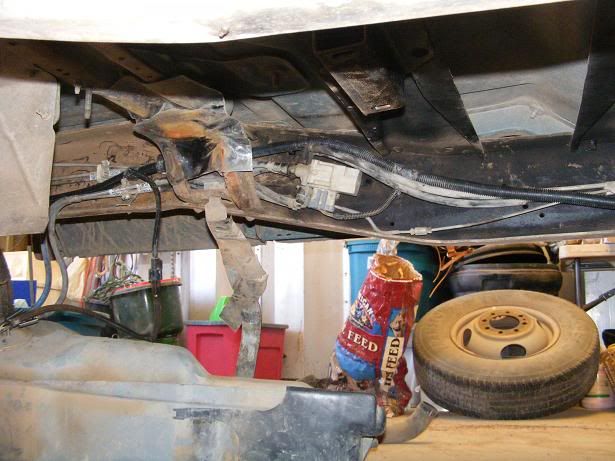
Up at the front end I did, where I have my suspension swap out and everything else under the hood. Thats where I have lots of peices going back together, and I hate the corrosion and debris collected there, where I am spending a lot of time.
I stopped about 3 foot back under the cab. I have to pick up more of that fame coating before I would continue, as I used most of it up on the front end with all the various parts. I dont have the fuel tanks in completely yet, as the lines are hooked up along with the sending units, but until I that filler neck issue figured out, the tanks are resting right under the truck ready to go in. It will get there!
I stopped about 3 foot back under the cab. I have to pick up more of that fame coating before I would continue, as I used most of it up on the front end with all the various parts. I dont have the fuel tanks in completely yet, as the lines are hooked up along with the sending units, but until I that filler neck issue figured out, the tanks are resting right under the truck ready to go in. It will get there!
#44
05-21-2010, 02:14 PM
Fleet Owner
#45
05-22-2010, 09:14 PM
Join Date: Jan 2009
Location: Wyoming
Posts: 1,955
Likes: 0
Received 0 Likes
on
0 Posts
Now thats interesting.... I wondered about that for a few! I figured I would see how it sits once I get the front finished up, but I was curious if there was going to be a noticable difference!