Trouble at nose of cam: Installation
#1
 03-02-2010, 05:45 PM

Trouble at nose of cam: Installation
I had this same type of problem a couple years ago, but then I was eliminating the fuel pump eccentric, unlike now.
The cam is in engine, having not been removed. I took the spacers and eccentric off of the nose and placed on table. Did not remove thrust plate or its spacer. When I go to reinstall the cam gear with the same hardware taken off, the last forward spacer sticks beyond the end of the cam. So if the cap screw that holds it all together is tightened, it forces the backside of cam gear into thrust plate, and also pulls cam forward so there is zero end play. After the problem came up I removed the thrust plate and its cam spacer and they are fine, installed correctly. It is driving me nuts. Another guy in S.F. is having the same problem and is due to call tonight. Help! All of the correct parts are on hand, in fact 3 sets. Diagram is in front of me.
The cam is in engine, having not been removed. I took the spacers and eccentric off of the nose and placed on table. Did not remove thrust plate or its spacer. When I go to reinstall the cam gear with the same hardware taken off, the last forward spacer sticks beyond the end of the cam. So if the cap screw that holds it all together is tightened, it forces the backside of cam gear into thrust plate, and also pulls cam forward so there is zero end play. After the problem came up I removed the thrust plate and its cam spacer and they are fine, installed correctly. It is driving me nuts. Another guy in S.F. is having the same problem and is due to call tonight. Help! All of the correct parts are on hand, in fact 3 sets. Diagram is in front of me.
#2
03-02-2010, 10:03 PM

Is any of the parts you removed bossed to allow a fit over the others? Also, did you change the cam gear? if so verify that the new one is of the same thickness as the old on.
Lastly, install the gear and chain. rotate the engine in operating rotation by hand several times see if that gives it the neccisary clearence. The cam may need to walk forward a bit to give that neccisary clearance. SOmeone else probobly has the right awnser but this is what I would start looking for.
Lastly, install the gear and chain. rotate the engine in operating rotation by hand several times see if that gives it the neccisary clearence. The cam may need to walk forward a bit to give that neccisary clearance. SOmeone else probobly has the right awnser but this is what I would start looking for.
#3
03-02-2010, 10:58 PM

Cargo Master
I think you're alright. You could not have changed the end play unless you removed the timing gear and thrust washer. I'm going on memory here but I think it goes cam bolt, thick flat washer, spacer washer, Pump eccentric (just another spacer in your case), another spacer (sometimes a fuel pump counter weight), timing gear, thrust washer.
#4
03-02-2010, 11:13 PM
I think you're alright. You could not have changed the end play unless you removed the timing gear and thrust washer. I'm going on memory here but I think it goes cam bolt, thick flat washer, spacer washer, Pump eccentric (just another spacer in your case), another spacer (sometimes a fuel pump counter weight), timing gear, thrust washer.
When you come up to a detail like this without having a vast background in builds, it is nerve wracking.
#5
03-04-2010, 11:28 PM
I did some work on the nose today. Manually ground the counterweight replacement spacer on some 180 grit sandpaper laid onto a flat surface. After reinstalling everything a dial caliper showed .002 cam end play. Spec is .001 to .011 (or .012). So tomorrow will go at it again with grinding the spacer face and try to gain 1 or 2 thou more. Looking good  .
.
.
#6
03-05-2010, 06:39 AM
Cargo Master
I dug up the link to your original question on YBF.
Advice needed on installation of Rollmaster
Have a look at the picture several posts down. The pieces that set the clearance are items 9265 and 9269. 9265 should be the thickest of the 2. Grinding on anything else will not properly change the clearance. You can get more clearance by continuing to grind on the spacer behind the fuel pump eccentric but it will result in all of the pieces on the nose of the cam being loose when the bolt is tight. The results, once the engine is running, will not be favorable. I hope you haven't truly gained 2 thou by grinding on it; if you have, it's too late and you'll need another. Also, if the engine is assembled with push rods installed and valves adjusted, you might not get an accurate reading of the clearance. The spring pressures acting on the cam will fight you at least a little.
#7
03-05-2010, 11:16 AM
I dug up the link to your original question on YBF.
Advice needed on installation of Rollmaster
Have a look at the picture several posts down. The pieces that set the clearance are items 9265 and 9269. 9265 should be the thickest of the 2. Grinding on anything else will not properly change the clearance. You can get more clearance by continuing to grind on the spacer behind the fuel pump eccentric but it will result in all of the pieces on the nose of the cam being loose when the bolt is tight. The results, once the engine is running, will not be favorable. I hope you haven't truly gained 2 thou by grinding on it; if you have, it's too late and you'll need another. Also, if the engine is assembled with push rods installed and valves adjusted, you might not get an accurate reading of the clearance. The spring pressures acting on the cam will fight you at least a little.
Advice needed on installation of Rollmaster
Have a look at the picture several posts down. The pieces that set the clearance are items 9265 and 9269. 9265 should be the thickest of the 2. Grinding on anything else will not properly change the clearance. You can get more clearance by continuing to grind on the spacer behind the fuel pump eccentric but it will result in all of the pieces on the nose of the cam being loose when the bolt is tight. The results, once the engine is running, will not be favorable. I hope you haven't truly gained 2 thou by grinding on it; if you have, it's too late and you'll need another. Also, if the engine is assembled with push rods installed and valves adjusted, you might not get an accurate reading of the clearance. The spring pressures acting on the cam will fight you at least a little.
I know what you are saying about the front assembly being loose, but that is not the case with the few thousandths removed from the eccentric replacement, number 6290. The end washer still sticks out beyond the end of the cam, and the parts are still drawn up snug with cap screw tightening.
It appears to me that there is no other way to get the necessary end play.
I will double check spacer 6262, the one inside thrust washer, and make sure it does not project beyond washer. Also will double check end play with a different eccentric replacement of original thickness.
Heads are off block.
Trending Topics
#8
03-05-2010, 11:45 AM
Cargo Master
There are two different sets for parts 6265 and 6269. If the two sets are mix and matched, the result will be no end play or too much end play.
I'll steal the image and put it here so it's easier for everyone to follow.
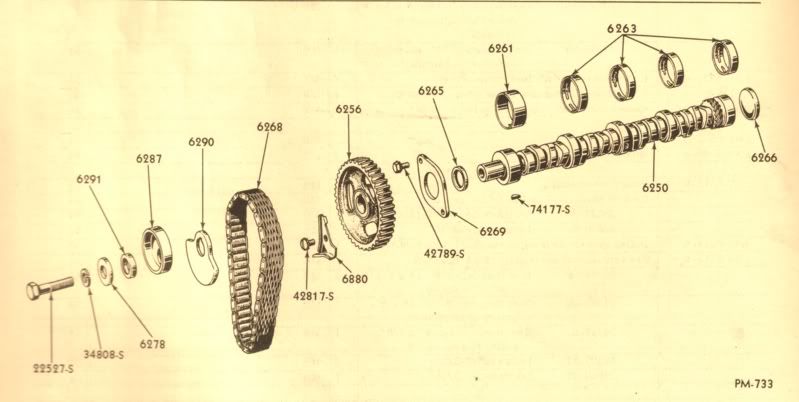
Try to picture what's happens when the cam bolt it tightened. All of the parts on the nose of the cam will be held tightly to the face of the front journal of the cam. These parts include 34808-s, 6278, 6291, 6287, 6290, 6256, and 6265. It is the difference in the size of 6265 compared to 6269 that creates the clearance. Changing the thickness of anything other than 6265 or 6269 will not change the clearance until you've gone too far and everything is no longer held tightly in place. If you've now measured .002", you had .002" before. If there is no clearance, the cam will not turn.
It sounds like you have it all apart now. Measure 6265 and 6269. Subtract 6269 from 6265. The difference should be the approximate amount of end play the two will provide.
Something else just came to mind. It is possible that the cam core plug is driven in too far. If everything else checks out, hit the nose of the cam with a rubber hammer to see if you can drive the plug out slightly. I made that mistake the first time I built an engine. Be careful not to hit it too hard, drive the plug out and force the cam into the block.
I'll steal the image and put it here so it's easier for everyone to follow.
Try to picture what's happens when the cam bolt it tightened. All of the parts on the nose of the cam will be held tightly to the face of the front journal of the cam. These parts include 34808-s, 6278, 6291, 6287, 6290, 6256, and 6265. It is the difference in the size of 6265 compared to 6269 that creates the clearance. Changing the thickness of anything other than 6265 or 6269 will not change the clearance until you've gone too far and everything is no longer held tightly in place. If you've now measured .002", you had .002" before. If there is no clearance, the cam will not turn.
It sounds like you have it all apart now. Measure 6265 and 6269. Subtract 6269 from 6265. The difference should be the approximate amount of end play the two will provide.
Something else just came to mind. It is possible that the cam core plug is driven in too far. If everything else checks out, hit the nose of the cam with a rubber hammer to see if you can drive the plug out slightly. I made that mistake the first time I built an engine. Be careful not to hit it too hard, drive the plug out and force the cam into the block.
#10
03-05-2010, 06:53 PM
It is done. Timing cover is installed. Charlie you were right.
Started by measuring the nose from its end to the outside face of 1st cam journal. The cam in engine is 1.408 long up front. Measured an ECK cam the same way, and it is 1.451 long. Both measurements done away from radius. Thought that was pretty weird but proceeded.
Measured 4 pairs of thrust washer 6269 and inside spacer 6265 that I have on hand. All were the same so no mismatch there.
Installed a non altered counterbalance replacement, 6290 along with everything else and measured end play. .002.
Decided to put on the new timing set, did, remeasured end play and it is .003. So that is a wrap!
I have a difficult time comprehending some spatial issues, and really dont understand this one. But now know what to do and will remember it!
#11
02-01-2012, 05:57 PM
Freshman User
Join Date: Jan 2012
Location: In a hot Desert
Posts: 25
Likes: 0
Received 0 Likes
on
0 Posts
There are two different sets for parts 6265 and 6269. If the two sets are mix and matched, the result will be no end play or too much end play.
I'll steal the image and put it here so it's easier for everyone to follow.
Try to picture what's happens when the cam bolt it tightened. All of the parts on the nose of the cam will be held tightly to the face of the front journal of the cam. These parts include 34808-s, 6278, 6291, 6287, 6290, 6256, and 6265. It is the difference in the size of 6265 compared to 6269 that creates the clearance. Changing the thickness of anything other than 6265 or 6269 will not change the clearance until you've gone too far and everything is no longer held tightly in place. If you've now measured .002", you had .002" before. If there is no clearance, the cam will not turn.
It sounds like you have it all apart now. Measure 6265 and 6269. Subtract 6269 from 6265. The difference should be the approximate amount of end play the two will provide.
Something else just came to mind. It is possible that the cam core plug is driven in too far. If everything else checks out, hit the nose of the cam with a rubber hammer to see if you can drive the plug out slightly. I made that mistake the first time I built an engine. Be careful not to hit it too hard, drive the plug out and force the cam into the block.
Thanks!
#13
02-07-2012, 03:10 AM
Freshman User
Join Date: Jan 2012
Location: In a hot Desert
Posts: 25
Likes: 0
Received 0 Likes
on
0 Posts
#15
02-15-2012, 11:47 PM
Freshman User
Join Date: Jan 2012
Location: In a hot Desert
Posts: 25
Likes: 0
Received 0 Likes
on
0 Posts
lost cam spacer
Hey Mike seems I lost your email address, here's my address stan.balafas@Yahoo.com.
No rush Mike, I've got some newly discovered piston trimming and shifted my attention.
Also re building my 60.gal.compressor with new pump, motor and fittings, new weld bung
for. New 3/4 inch line, plugging the 1/2 inch previously used fitting... more volume and pressure... media blast and paint in my own garage.