52 F1 New Bed Wood Project, will need all the help I can get
#1
 03-17-2015, 08:01 PM

Join Date: Feb 2015
Location: Clearwater, FL
Posts: 61
Likes: 0
Received 0 Likes
on
0 Posts
52 F1 New Bed Wood Project, will need all the help I can get

Here goes. Somebody please tell me how to post my project, do I post the pictures of progress here in this thread?
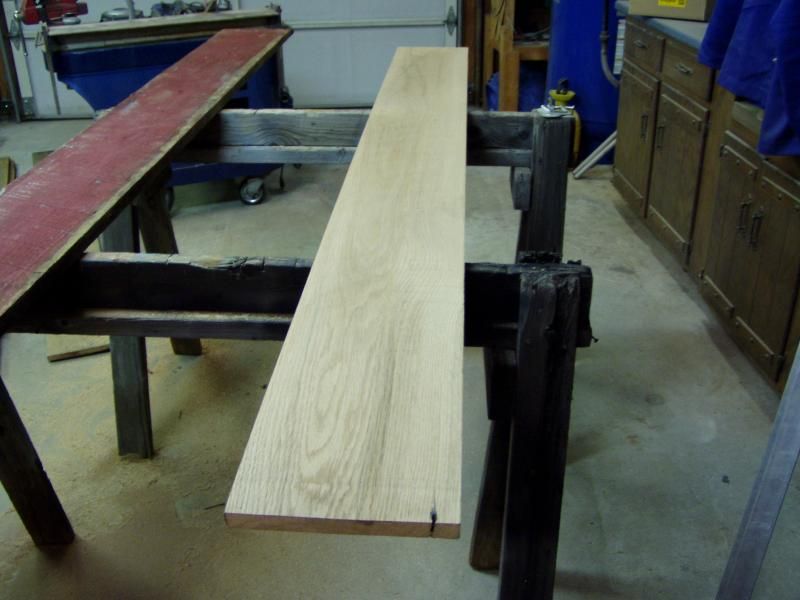
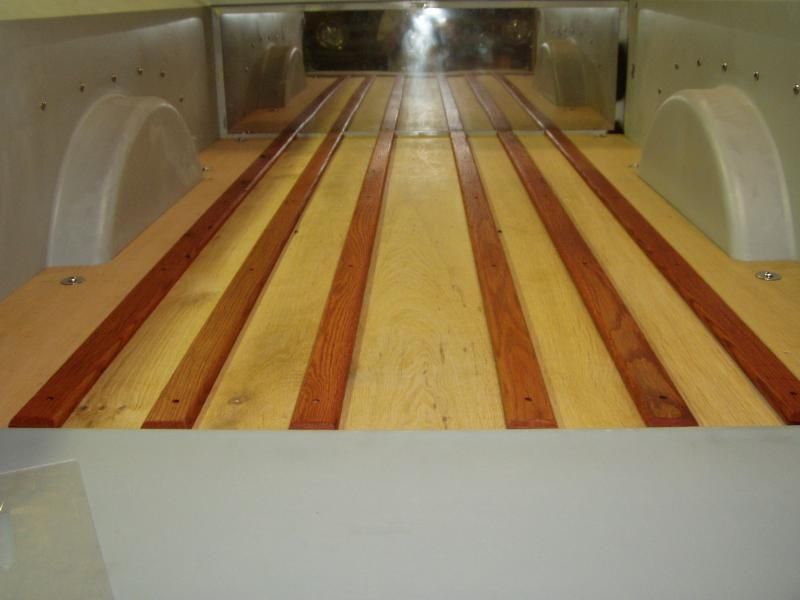
Here's the bed I started with, and how much I got removed tonight, all but one strip.
How do I get my dialogue to appear above the picture?

#3
03-17-2015, 11:22 PM
#4
03-18-2015, 07:32 AM
Join Date: Feb 2015
Location: Clearwater, FL
Posts: 61
Likes: 0
Received 0 Likes
on
0 Posts
I'll be using the bed for occasional hauling but plan on getting some protection to lay over it like a mat or diamond plate. I might garage the truck, but want to build the bed floor as if is not garaged. For wood I'm undecided, but my fall back is red oak, but I'm looking for something better. I'm thinking about barn wood. I might have that on an old house property I have in AL, which has old sheds, chicken coops, etc. I'm gonna use ss strips, polished.
The truck's already built, but lacks an interior an other non-essentials. I'm redoing the bed now because 1) it rotted through and I was afraid to pick up a load of cinder block I need, and 2) the paint on the sides of the bed is tore up from hauling. Right now a few questions I have are:
I want to sand and treat everything under the truck that is now exposed. What should I use? Some kind of undercoat, a por 15 product? What's normal for rust prevention down there?
I'm looking for an idea for the bed sides. Something durable. I've thought maybe diamond plate.
#5
03-18-2015, 11:39 AM

Join Date: Aug 2011
Location: Tucson, AZ
Posts: 649
Likes: 0
Received 0 Likes
on
0 Posts
Hey RJ,
I've been working on our bed wood. Here is a link to a not-too-long but detailed thread about bed wood finishing. https://www.ford-trucks.com/forums/1...g-sealing.html
I think I also have a PM from Chuck (AXRacer) who knows tons about this topic. I'll try to find it and send it on to you.
Tyler
I've been working on our bed wood. Here is a link to a not-too-long but detailed thread about bed wood finishing. https://www.ford-trucks.com/forums/1...g-sealing.html
I think I also have a PM from Chuck (AXRacer) who knows tons about this topic. I'll try to find it and send it on to you.
Tyler
#6
03-18-2015, 11:46 AM
Join Date: Aug 2011
Location: Tucson, AZ
Posts: 649
Likes: 0
Received 0 Likes
on
0 Posts
Quote:
Originally Posted by Tyler S
hey chuck, it's Tyler. I am getting ready to apply the tung oil to my cherry bed wood. Have you posted any instructions for that particular procedure? My intention is to mix 50-50 with mineral spirits for the first application only (for deeper penetration), then go 100% after that. I am planning to use a lint free cloth to wipe it on, let it sit for a few mins, then wipe it off. Let it dry for a couple days, lightly "sand" it with a scotch brite pad to get any dust off, then apply a second coat. I'll repeat for a total of 5 coats. Am I in the ball park? Also, do I need to sand the wood BEFORE the first coat? It is pretty smooth as is. Very smooth. So.....Thx Tyler
PS Is there any reason to use the scotch brite pad on the underside since it won't be visible? I was just gonna apply the 5 coats to the underside without sanding. t
Originally Posted by AXracer
Tyler, I assume you want a rich looking wood finish since you bought cherry wood? The finer the surface of the wood is the more the grain will "pop". I could tell you why, but it would be too much typing right now. I would recommend giving the wood a really good sanding. If it was mine I'd even use a cabinet scraper, but that's probably more than you would want to do. I assume the wood has been run through a thickness planer on both sides? If so I would use a random orbit sander first with 150 grit on all sides of the boards then vacuum the board completely clean. Make sure the board has an even finish when you hold a strong light close to the board so the light washes over the surface at as low an angle as possible. This sanding will likely take an hour or so per board. (Sanding is a perfect job for your son, set the board across 2 sawhorses to be at a comfortable height.) Use only enough pressure on the sander so it doesn't run across the surface. Let the sandpaper rather than muscle do the work. Heavy pressure won't make it go any faster and can actually mar the surface.
HINT: put a layer of clear or tan plastic packing tape (not duck tape!) on the back side of the new sheet of sandpaper before putting it on the sander, it will last twice as long. Check the paper frequently and replace it immediately if it starts to tear or deteriorate. After sanding with the 150 grit, change to 220 grit and re-sand the top surface for 1/2 hr per board. After that change to 400 grit and sand the top surface again. always vacuum the board between grits or when changing worn paper. Finally after the 400 sanding, wipe the vacuumed surface of the board with a wet with water but not dripping clean rag to wet, not soak, the surface (while wet you can see a good approximation of what the wood is going to look like finished). Allow the wood to dry completely for at least a couple hours to overnite, then sand the now fuzzy surface with 400 once more. Spend the day or day +1/2 doing as good a job of sanding as possible, you'll not need to ever do it again and the time will be very worth it in the end with a job that will be admired.
I always apply every coat of tung oil with a green scotchbrite pad, rubbing it vigorously into the surface in the direction of the grain. IMPORTANT: Keep continuously rubbing in more oil so the surface(s) stay wet with oil for a full 20 minutes, you want each coat to penetrate as far as possible! After 20 minutes VIGOROUSLY scrub off ALL remaining oil on the surface, It should look and feel completely dry, and a clean rag should slide rather than stick. Rubbing a dry finger over it should not feel oily or leave a mark. Allow each coat to dry overnight. Next day run a clean rag over the surface, if it sticks at all you didn't wipe enough! Do a better job on the new coat! You don't need to sand the dry coats, the scotch brite applicator will take care of it as you apply the new coat. There should not be any shiny places especially in the corners after drying. Each coat will take less oil and fewer reapplications to keep wet for 20 min. and scrub off easier. When wiping the last coat give it an extra vigorous wiping with a fresh dry clean cloth at the end. I'd suggest going to your favorite wholesale club and pick up a large package of shop towels for wiping and change to a fresh one frequently. Tung oil will not air dry, so any left on the surface will eventually get gummy and sticky. As the cherry ages it will get darker and richer looking. If it ever gets dull, just give it another thin coat of oil and a vigorous wiping. (about once a year).
#7
03-18-2015, 12:41 PM
Join Date: Feb 2015
Location: Clearwater, FL
Posts: 61
Likes: 0
Received 0 Likes
on
0 Posts
Trending Topics
#8
03-18-2015, 12:57 PM
Join Date: Aug 2011
Location: Tucson, AZ
Posts: 649
Likes: 0
Received 0 Likes
on
0 Posts
My understanding is that, yes, it does, but so does any other sealer. But apparently when reapplying the tung oil you do not have to sand the old off as you would with a varnish or other sealer. You just reapply and get back on the road. If you want real answers though, ask Chuck (AXracer). Dude knows trucks and wood. For reals. T
#9
03-18-2015, 03:47 PM
The tung oil (make sure you are using 100% pure Tung Oil, NOT "tung oil finish", "danish oil", "Watco" or any other such product, read the ingredients on the label, if it says it contains anything but tung oil, put it back!) will likely need to be refreshed when it starts looking dry, but as Tyler says just apply a fresh coat like you did the previous ones, no sanding necessary. Just be sure to keep the wood wet with the oil for 20 minutes then SCRUB all the excess oil off the surface with lots of clean rags. Tung oil is not a surface coating and any left on the surface will not dry, just get sticky. Red oak will turn grey, white oak will turn black with exposure to sun/weather. Tung oil appied to weathered barn wood will darken the wood test on a piece of scrap to be sure you like the results. Note that reclaimed weather exposed wood is very soft and will scrape and gouge easily. 100% tung oil is available from suppliers catering to fine woodworkers like Woodworkers Supply, Rocklers, It runs about 22.00 a quart, but goes a long ways, each coat will use substantially less oil.
#10
03-18-2015, 06:25 PM
Join Date: Feb 2015
Location: Clearwater, FL
Posts: 61
Likes: 0
Received 0 Likes
on
0 Posts

#11
03-18-2015, 07:06 PM
I'll be using the bed for occasional hauling but plan on getting some protection to lay over it like a mat or diamond plate. I might garage the truck, but want to build the bed floor as if is not garaged. For wood I'm undecided, but my fall back is red oak, but I'm looking for something better. I'm thinking about barn wood. I might have that on an old house property I have in AL, which has old sheds, chicken coops, etc. I'm gonna use ss strips, polished.


#13
03-18-2015, 07:35 PM
Senior User
Join Date: Feb 2011
Location: Huntsville, Al
Posts: 298
Likes: 0
Received 0 Likes
on
0 Posts
Although Red Oak is a preferred product by many as it is most readily available, White Oak is more rot resistant. Many if not all of Henry's wood creations left the factory with noting more than a coat of varnish with coal black to color.
Here's an article that should lead you in the right direction and stay away as Xracer said from blended finishes.
https://books.google.com/books?id=2hhPIyxe754C&pg=PA194&lpg=PA194&dq=what+d id+ford+use+as+finish+for+wooden+truck+beds&source =bl&ots=lMo f_osX&sig=b1ZqGvU-AmRKqgtu7jNnh2B0a_o&hl=en&sa=X&ei=jhcKVdaLB4vFgwSH ioSwDw&ved=0CCoQ6AEwAjgK#v=onepage&q=what%20did%20 ford%20use%20as%20finish%20for%20wooden%20truck%20 beds&f=false
Here's an article that should lead you in the right direction and stay away as Xracer said from blended finishes.
https://books.google.com/books?id=2hhPIyxe754C&pg=PA194&lpg=PA194&dq=what+d id+ford+use+as+finish+for+wooden+truck+beds&source =bl&ots=lMo
f_osX&sig=b1ZqGvU-AmRKqgtu7jNnh2B0a_o&hl=en&sa=X&ei=jhcKVdaLB4vFgwSH ioSwDw&ved=0CCoQ6AEwAjgK#v=onepage&q=what%20did%20 ford%20use%20as%20finish%20for%20wooden%20truck%20 beds&f=false
#14
03-19-2015, 12:13 AM
For the metal underneath I'd suggest a moisture cured urethane like POR 15 or Sherwin Williams Super Rexthane. Moisture cured urethanes stick to steel like a second skin even when the steel is covered with tight rust since the paint will actually suck out every bit of moisture and the hard glossy finish is very durable, highly chip and scratch resistant, impervious to water, grease, oil, even acetone and brake fluid once cured. It requires no primer, hardner or mixing with anything, covers very well in one or two coats, and can be applied easily with brush or roller. Power wash off any grease, oil or gunk, give it a hand wire brushing to remove any loose rust and apply the finish. It is the recommended industrial finish for the inside of steel or concrete municipal drinking water storage tanks and jet hanger floors.
#15
03-19-2015, 06:32 AM
Join Date: Feb 2015
Location: Clearwater, FL
Posts: 61
Likes: 0
Received 0 Likes
on
0 Posts
Thanks AXracer for answering my question. Particularly in detail, that's what newby's need. Sounds great, pay a little more for the paint and not have to sand all the rust off. I knew there was a good answer out there. Am I correct that these products are about $130/gallon? Is this commonly used on the insides of the fenders, too? Engine compartment?
Thanks again
Thanks again