4x4, diesel, camper van project: TTB, 6.9 IDI, pop-top
#16
U-joints are a weak link in a drivetrain, the TTB has an extra, and lifting one requires a more expensive kit to drop everything to keep the geometry correct. Their limitation is exposed when tire selection comes up, but if you aren't trying to put it in the clouds on tractor tires they are perfect, the D50 TTB is only available in diesel applications I believe, 35" tires push it on them, and a heavier vehicle with that tire choice is going to break parts. I like them because you can get it under there without forcing you to raise the van way in the air, FYI a solid axle under an engine cradle designed for I-beams, even with the trimming, you are going to be pretty far up. When the TTB starts to fail is when people have put lockers in them and 38" tires, and start trying to rock climb. I traded tires to a guy, giving him my 35"x15.50" R15 TSL swampers, he put them on his TTB truck, then a Bronco with one, I don't recall him breaking anything, he played in the mud, it's loose, nothing to ****** the tire and cause it to require force to turn.
I understand that a solid axle pumpkin will not clear the cradle without a ton of lift, but this is irrelevant to my build, as I am not using a solid axle. Hell, I'm not even using the stock 351 engine cradle!
Thanks for the input though. Although I have researched for endless hours, this is my first time attempting any sort of thing even remotely like this(I have literally zero experience with 4x4 projects), so I love hearing from others.
I'm working on the write-up of getting the TTB in there, I should have that and pictures posted very soon. Then all of my insanity will be explained.
#17
I always wanted to do a solid axle swap in the past, removing the cradle and installing frame mounted engine mounts, but on a Bronco II to make a small low crawler, but money is nonexistent now.
I've never had a TTB, all my 4x4's were solid axles, and I beat on them in the woods, wanted a van in the past tho.
I wish I had the photos of the TTB E150 I once saw, sat like a regular 80's Econoline but 2" higher, I don't think it was as high as my 99 one ton.
I've never had a TTB, all my 4x4's were solid axles, and I beat on them in the woods, wanted a van in the past tho.
I wish I had the photos of the TTB E150 I once saw, sat like a regular 80's Econoline but 2" higher, I don't think it was as high as my 99 one ton.
#18
getting a TTB in a van
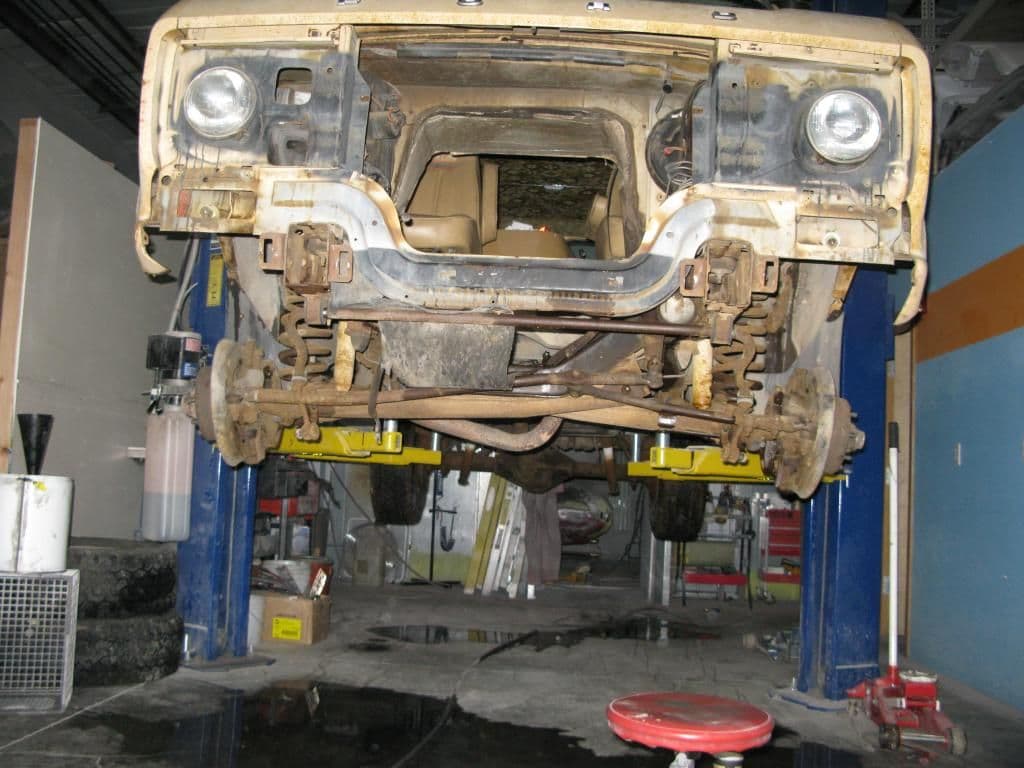
It was now time to make it a 4x4. So out with the old, and in with the new it was.
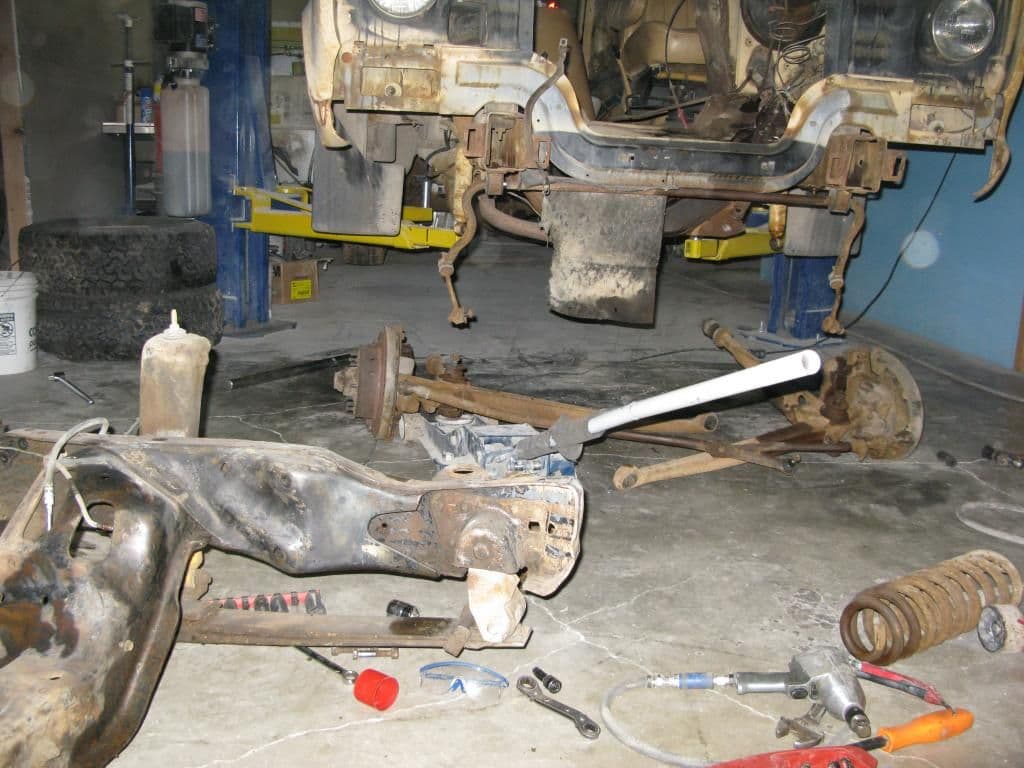
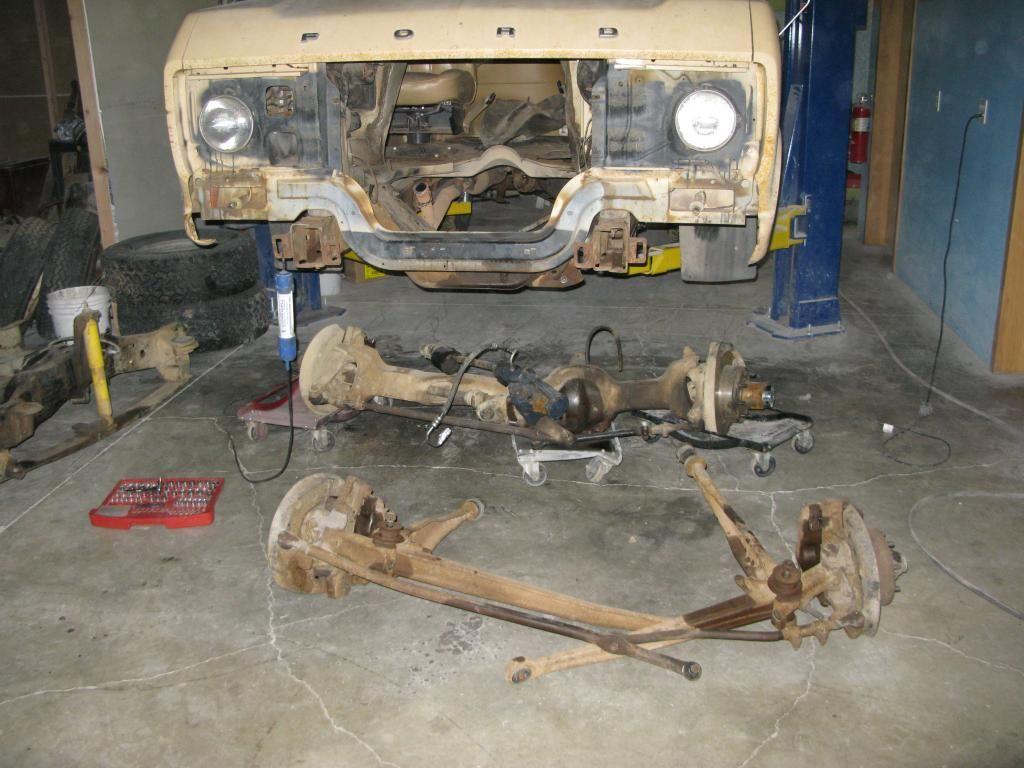
I have searched and searched and was unable to find any documentation of any kind online of anyone swapping a TTB under a van. That meant I was on my own to figure out a way to do this swap. I came up with 2 directions I could have gone with this. For one, I could have kept the stock 351/ i-beam suspension engine cradle. This would mean I would have to fabricate new mounting locations for the TTB beams and line those up as well as fabricating new motor mount brackets to place the diesel where I wanted it. Option 2 would be to actually slice the stock 351 cradle out and splice in the TTB/ diesel engine cradle from the truck. This would be a ton of cutting and welding, but it would be killing 2 birds with one stone by giving me my TTB beam mounts as well as a perfect place to set the diesel. Also, it would give me the opportunity to box in the frame behind the engine cradle for a bit of extra strength. I decided that it made the most sense to actually cut out the old 351 engine cradle and splice in the one from the truck for the diesel. I knew it would be a lot of work, but it was going to be the easiest and strongest way to pull this swap off. So I got to work.
I really didnít take any pictures of the actual stages of this part, which I regret. I could have done a much better job of documenting this (especially considering I myself failed to find any information at all on people doing such a thing), but the job is done now so itís too late. I would gladly answer any questions though if anyone was considering doing this (highly doubtful). So Iíll just explain my process as thoroughly as possible.
The first step was to get the stock 351 engine cradle out of there. No easy task, and it took TONS of cutting, beating, prying, and abuse to get it out of there. Using an oxyacetylene cutting torch, I sliced the center, flat section out so I had room to slide both sides out from where they nestled in the frame rail. I sliced multiple cross cuts in the welded rivet heads (those things are freaking huge- well over a half inch wide) that hold the engine cradle in the frame so I could air chisel the heads off and drive them out with an air hammer. Part of the cradle is welded to the inside of the frame rail, so I sliced that part to free it from the frame. Then on one side (I donít remember exactly where) part of the cradle tapered forward into the frame rail and was welded in place. I sliced vertically through that part right where it was flush with the top of the frame rail. Then finally after a ton of prying with an extremely long pry bar and beating the crap out of them with a 20 lb hammer, I got both halves out of the frame.
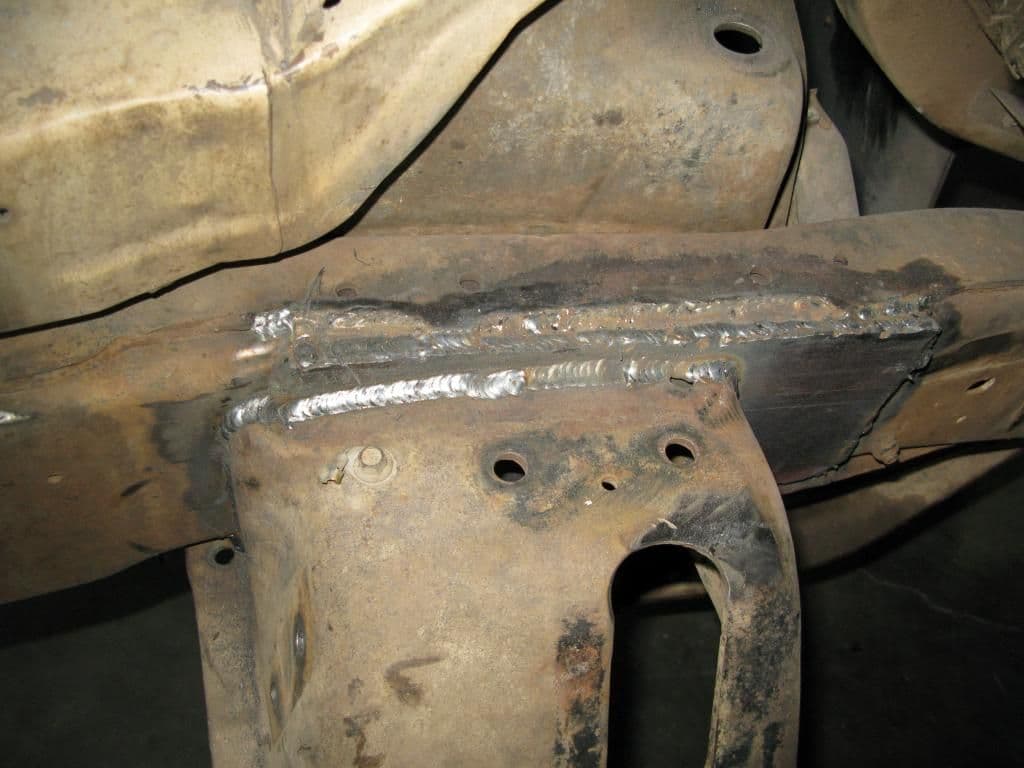
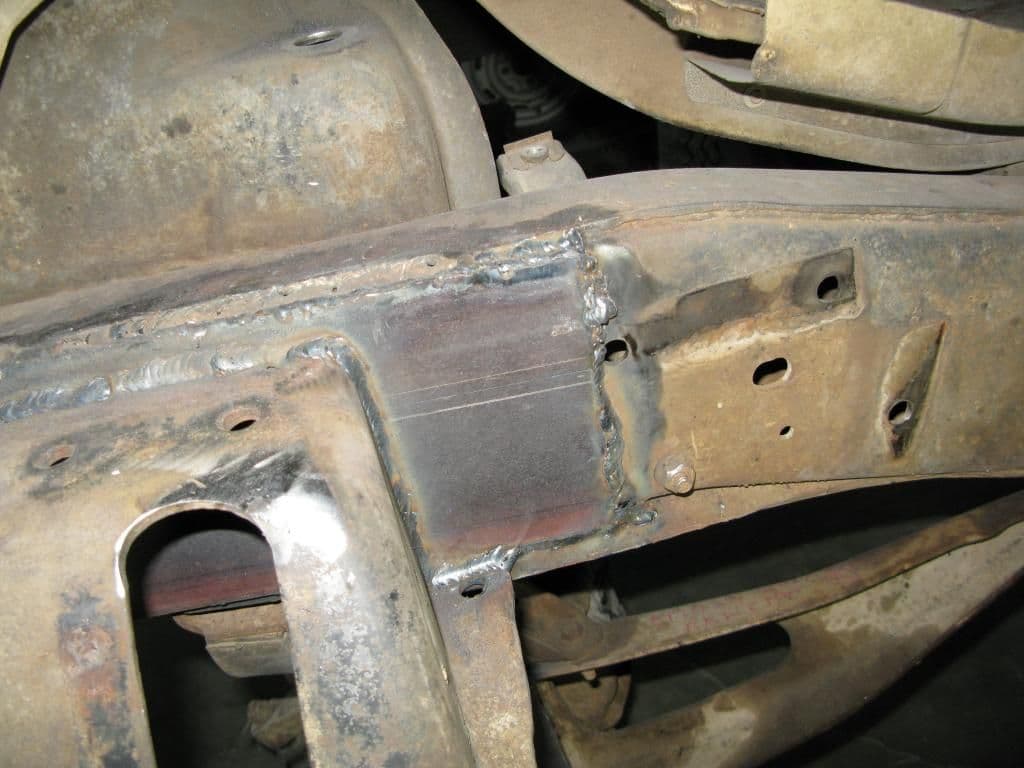
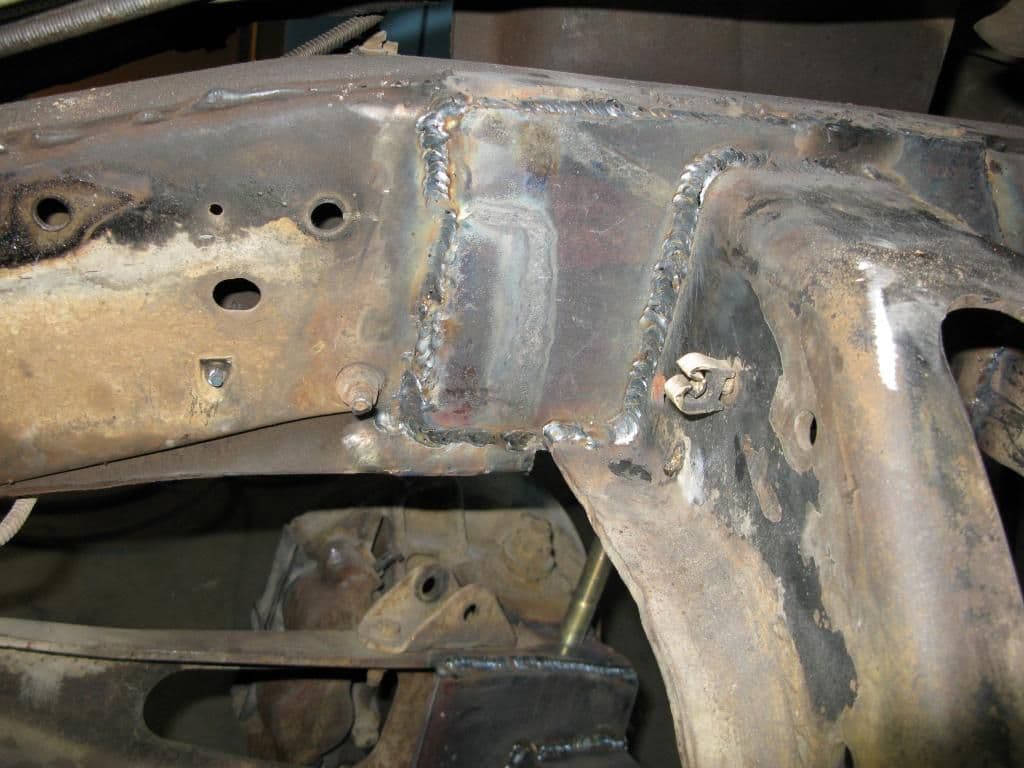
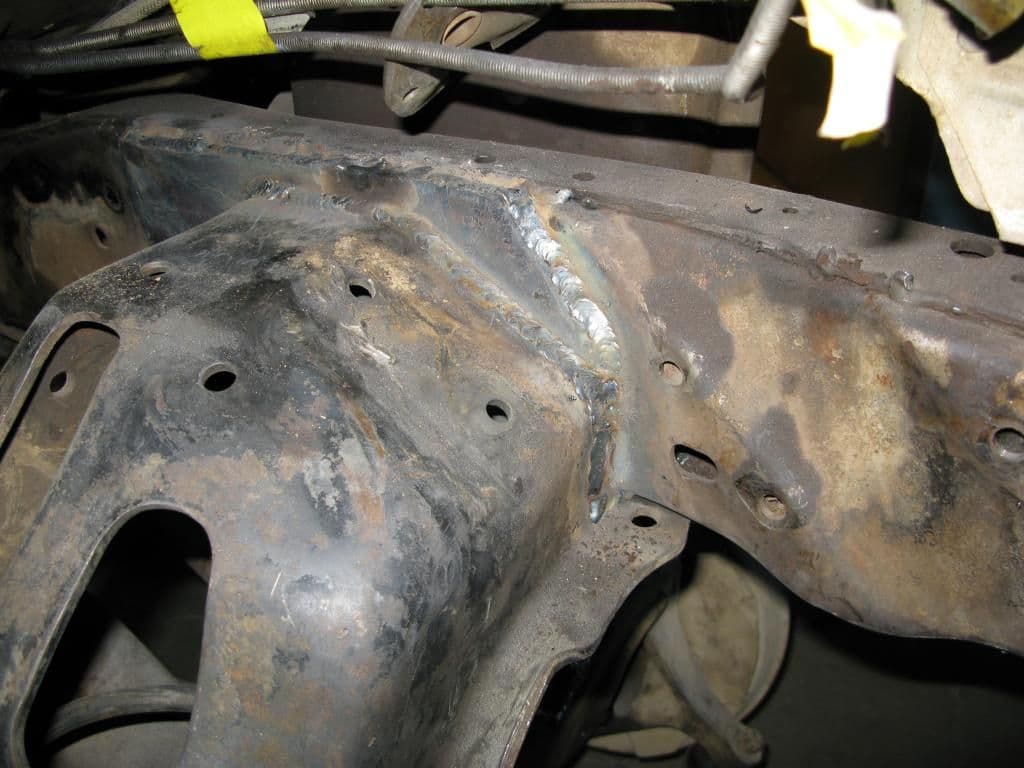
Next I wanted to box in the inside and top of the frame rail where the old cradle had sat to reinforce everything and give me a nice flat surface to weld the TTB/ diesel engine cradle to. First I welded a long skinny piece of 3/8Ē plate to the inside of the top of the frame rail. Next I measured and cut out a big piece of 3/8Ē plate to weld to the face of the inside of the frame rail that would completely cover the open section where the old engine cradle once sat. I was careful to avoid putting anything where the power steering box sits on the driverís side.
These pictures were taken after I got the new engine cradle welded in, but show how I boxed everything in to accept the new engine cradle.
Now I was ready to get the TTB/ diesel engine cradle into the van. So first I removed it from the old truck frame rails. Like on the van cradle, there were many on those weld-on rivets holding the cradle to the frame so it was the same procedure: put slices through the rivet heads, air chisel the head off, air hammer the rivet out. This cradle was not welded to the frame rails, so after getting the 15 or 20 rivets out I just pried and hammered the frame rails off the cradle.
Now for lining everything up. As Iíve said many times before, I am no expert here and certainly do not pretend to be one either. I knew what I wanted to accomplish, but sure as hell didnít know how to get there. Through trial and error, this was my method. Iím sure some of you might think of other ways to do this, but this is what I did:
I realized that the easiest way to get everything lined up under the van chassis was to bolt the engine cradle to the TTB front end and line it up that way. I put this assembly on jack stands and got ready to measure everything out. But this is where things got interestingly challenging. Even bolted to the cradle, the thing was a floppy mess. Each side of the front end travels in an arch, which I knew would throw off any measurement side to side unless each side was in the exact same position. On top of this, the engine cradle is unbalanced and even with jack stands under both the front and rear of it, everything wants to flop inconveniently on multiple axis. Not to mention the side with the heavy differential attached. I spent hours using multiple angle finders and many jack stands to try to get both sides level to each other while keeping the cross member level with that. This was an absolute nightmare and frustrating as all hell because as you move one thing on one side, everything else changes because of how it was bolted together. After hours of failed attempt after failed attempt to get it lined up, I was pretty lost. I actually got to thinking, ďif I had only decided to do a freaking SAS this thing would be soooo simple to line up. Everything wouldnít be flopping around like 3 wet noodles and I could just measure and put it in.Ē Then I had an epiphany: just make the damn thing a solid axle.
I researched exactly which angle the axle tubes should have when at normal ride height so that when I would be able to line everything up most effectively. On the dana 44, the axle/ hub should line up with the pivot bolt centerline (give or take an inch). So first I leveled one side with the engine cradle. I accomplished this by using bailing wire between the axle tube and the engine cradle. I tightened the bailing wire until the axle tube and the engine cradle were perfectly level with each other.
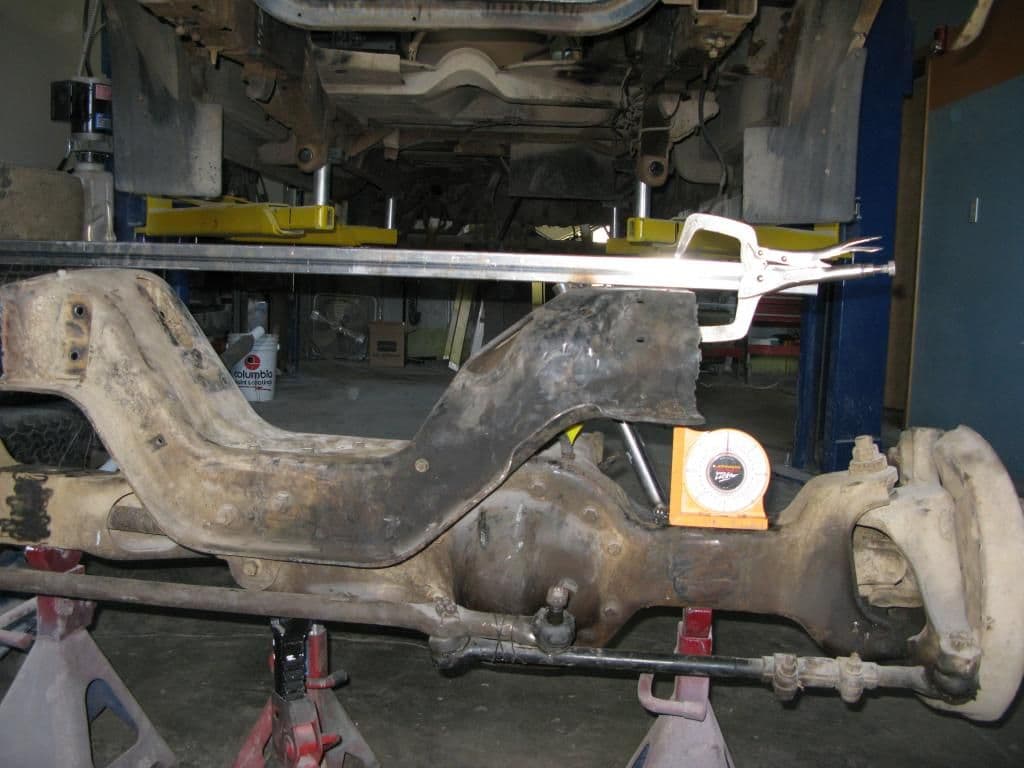
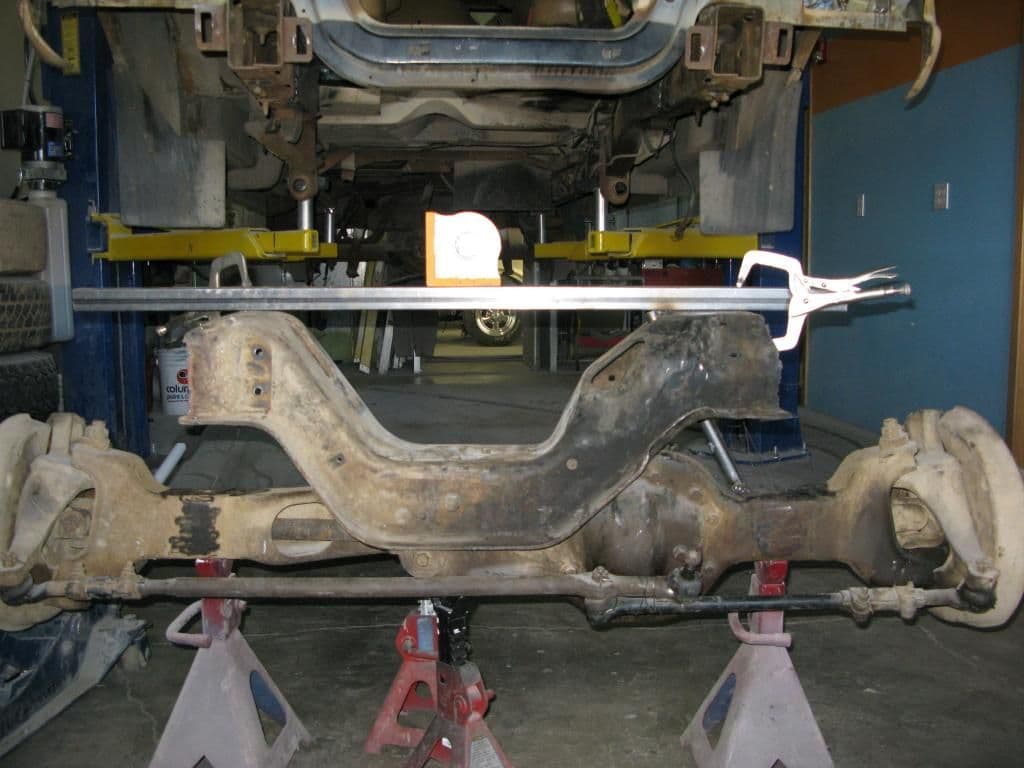
Then I welded a piece of ľĒ wall tubing to both the engine cradle (through the slot for the motor mount bolts) as well as the top of the axle housing to hold everything in place.
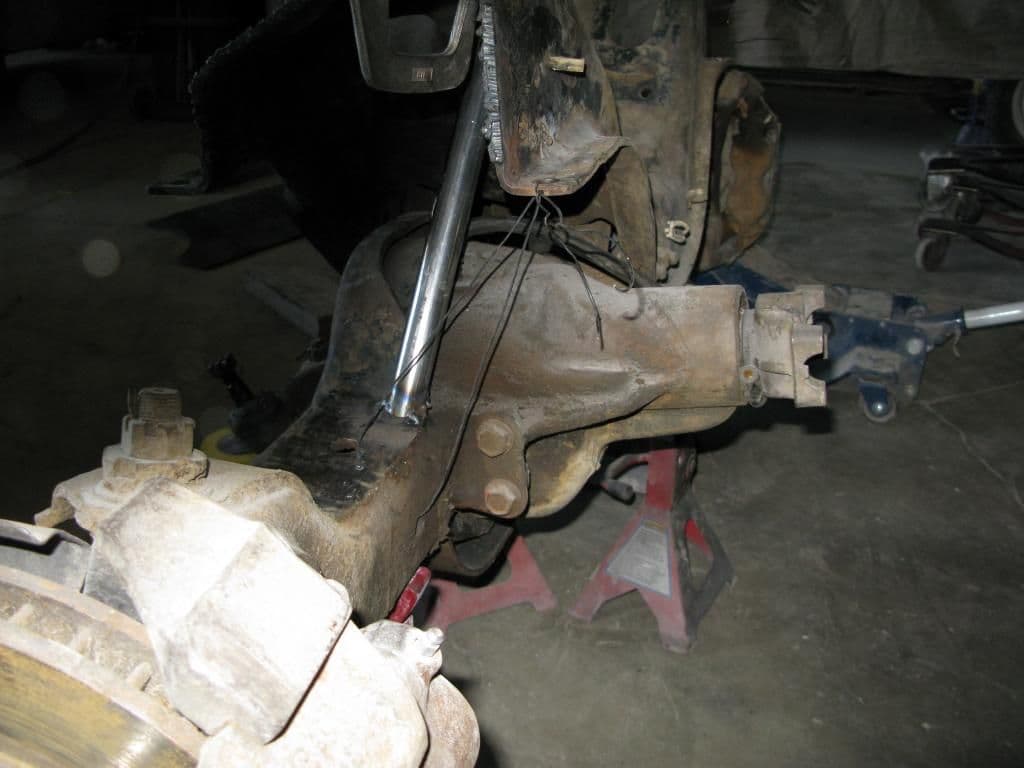
Next I did the same thing with bailing wire to level the other axle tube with the engine cradle (which was now level with the other axle tube). Once again I welded in a piece of tubing to hold everything in place.
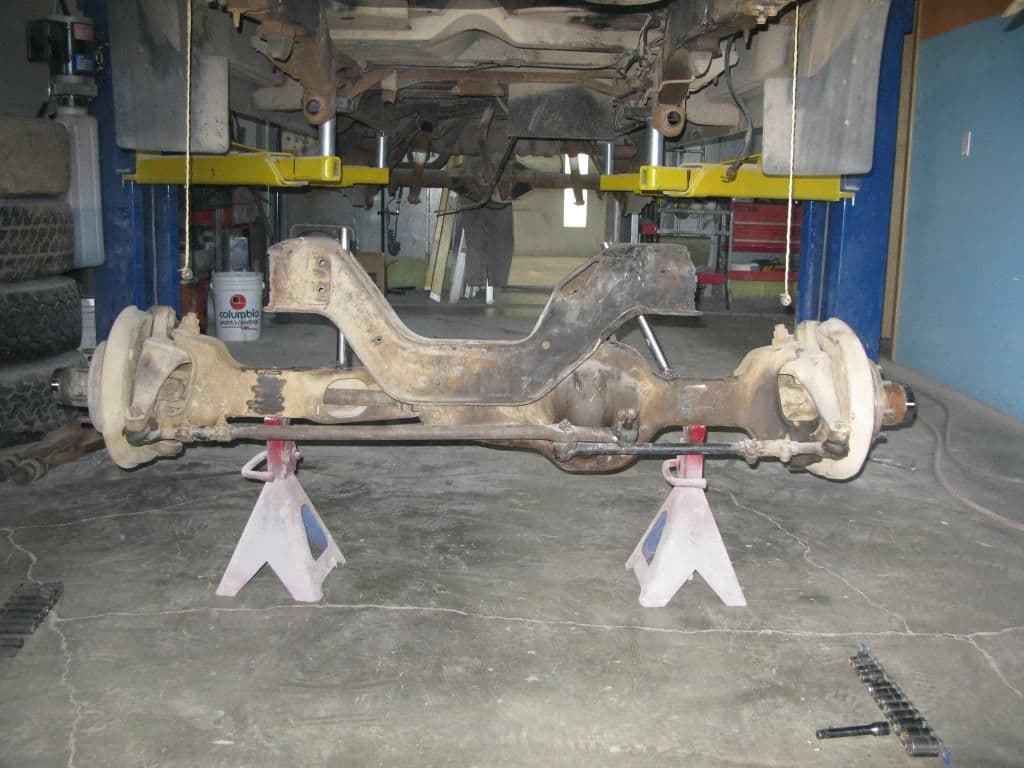
And there it is! A floppy, pain in the *** TTB temporarily converted into an easy to manipulate ďsolidĒ axle. A pretty clever solution if you ask me. I'm sure there are other ways I could have done this, but this way certainly seemed to work.
I scooted this assembly under the van and lowered the van until the frame was just barely touching the top of the engine cradle. Although van frame rails are slightly wider than those under a truck, the engine cradle slips inside the frame rails on a truck. This little bit of extra width on the truck engine cradle made it just barely (about a half inch) too wide to slip between my now boxed in frame rails on the van. No problem. I used a straight edge held flat against the inside of the frame rail to draw a line on the engine cradle. I pulled out the oxyacetylene torch and carefully trimmed the truck engine cradle right on this line.
Now it was time to get this crazy contraption aligned under the van frame/ chassis. To do this, I hung a plumb bob down from the same spot on the spring perch on either side of the van. The plumb bob came down just about exactly on top of the ball joint on either side, making it very easy to get everything roughly lined up. Next I began to cross measure from multiple points on the van frame to both upper ball joints. I also measured from the center of the rear hubs to the front hubs on either side. I had someone who is very knowledgeable and experienced in suspension help me measure and make sure I wasnít missing anything too important. After measuring neurotically from probably way more points that I really needed to and after sufficiently bugging the crap out of my buddy with my paranoia as he insisted many times that it was way beyond being more than good enough, I called it good. I was probably way more careful and intolerant of anything being even slightly miss measured, but that's how I am (especially with something I am inexperienced with)
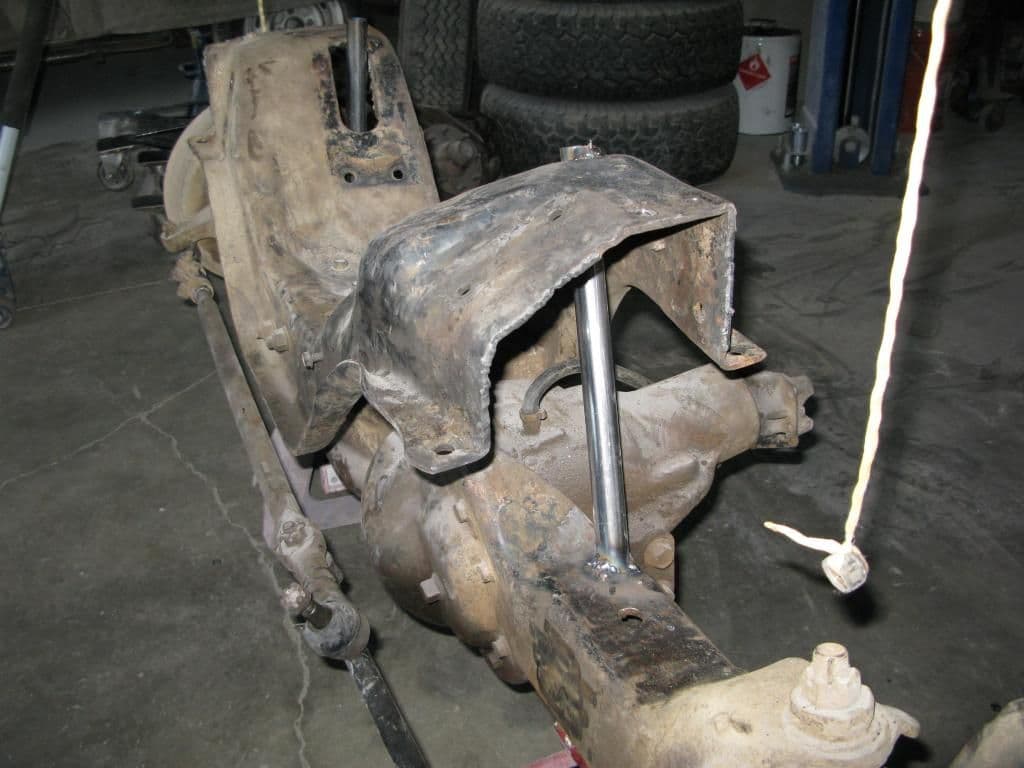
One thing to note here is caster. The TTB should be run with 2-7 degrees of caster, so I measured 4.5 degrees of caster before welding it all solid.
Now the TTB was officially hanging from the van.
Information:
Many sites were helpful, but this one in particular was a godsend:
Steering Tech - An in-depth discussion about TTB Steering and Alignment
It explains how the TTB works and exactly what to look out for in setting one up.
#19
I hope you didn't weld the radius arm on the TTB, thats what it looks like in one of the photos. Thats great work BTW, there are many TTB parts available, people pretty much throw them away, you can collect the D50 axles for parts if you was to ever need it, gives you the ability to play and test durability.
#20
#21
your project is looking good, the TTB is tougher than most think, maintenance is key. the dana 50 TTB is one tough axle, Ujoints are much stronger than a dana 60 and have external full clips, not the little internal Cclips.
I had a 1983 F150 shorty 4x4 that I yanked the 300 6cyl out of and dropped in a rebuilt 6.9 I never broke the dana44 TTB front, even on 35" mud TA's. I only changed it after I blew up the 31spline 8.8 in the rear. only problem with the leaf TTB is the short beams and limited articulation.
F250 TTB dana 44 was only used up to around 1989 , but the 50 was used right up to 1997 so there are a lot more of them for parts around.
you are doing well, keep up the good job .
#25
hello everyone. I know, it has been a very long time. Life has been a little crazy lately and I've had all sorts of distractions going on. I havn't had too much time to invest in my project lately, but it is still coming along. It seems like any spare free time I get I end up working on my project instead of writing about it on here. But I will try to get some pictures and post up some stuff in the next week or so.
As a little teaser though I will say that the front end swap is done: coil springs/ shocks are in, and more importantly/ interesting is a very unique/ very heavy duty custom steering setup is done being built.
Also the motor/ tranny/ t-case are all installed and just about ready to be fired up. I also have my clutch pedal assembly installed and ready to go.
Sorry again for the disappearance. Expect to see some pictures of the progress very soon.
#27
Iv got a 88 ford kingpin axle I'm planning on installing in my cummins van.. But I'm wondering if I'm making the right decision.
#29
hello everyone. I know, it has been a very long time. Life has been a little crazy lately and I've had all sorts of distractions going on. I havn't had too much time to invest in my project lately, but it is still coming along. It seems like any spare free time I get I end up working on my project instead of writing about it on here. But I will try to get some pictures and post up some stuff in the next week or so.
As a little teaser though I will say that the front end swap is done: coil springs/ shocks are in, and more importantly/ interesting is a very unique/ very heavy duty custom steering setup is done being built.
Also the motor/ tranny/ t-case are all installed and just about ready to be fired up. I also have my clutch pedal assembly installed and ready to go.
Sorry again for the disappearance. Expect to see some pictures of the progress very soon.
As a little teaser though I will say that the front end swap is done: coil springs/ shocks are in, and more importantly/ interesting is a very unique/ very heavy duty custom steering setup is done being built.
Also the motor/ tranny/ t-case are all installed and just about ready to be fired up. I also have my clutch pedal assembly installed and ready to go.
Sorry again for the disappearance. Expect to see some pictures of the progress very soon.
I am very interested in your turnout. TTB axles and parts litter junkyards around here. I am about to acquire a '79 Pathfinder Quadravan but I also want to build a 4wd van from scratch using a 2wd E250 or E350 and would like to use a TTB front axle/suspension for form/function and sheer parts availability.
Thread
Thread Starter
Forum
Replies
Last Post
jayro88
Pre-Power Stroke Diesel (7.3L IDI & 6.9L)
39
05-21-2017 12:58 PM
Ben Cooper
Pre-Power Stroke Diesel (7.3L IDI & 6.9L)
32
12-30-2015 04:10 PM
crash1
1968-Present E-Series Van/Cutaway/Chassis
3
02-23-2009 09:06 AM
kaotikedge_111100
Pre-Power Stroke Diesel (7.3L IDI & 6.9L)
22
09-12-2008 05:04 PM


