My 1985 F-150 4x4 update thread
#1
 06-23-2013, 02:49 AM

Join Date: Mar 2013
Location: Arkansas
Posts: 258
Likes: 0
Received 0 Likes
on
0 Posts
My 1985 F-150 4x4 update thread
I figured I would start an update thread so I would have a general location to post updates to my truck. I'll start from the beginning so everyone can be on the same page.
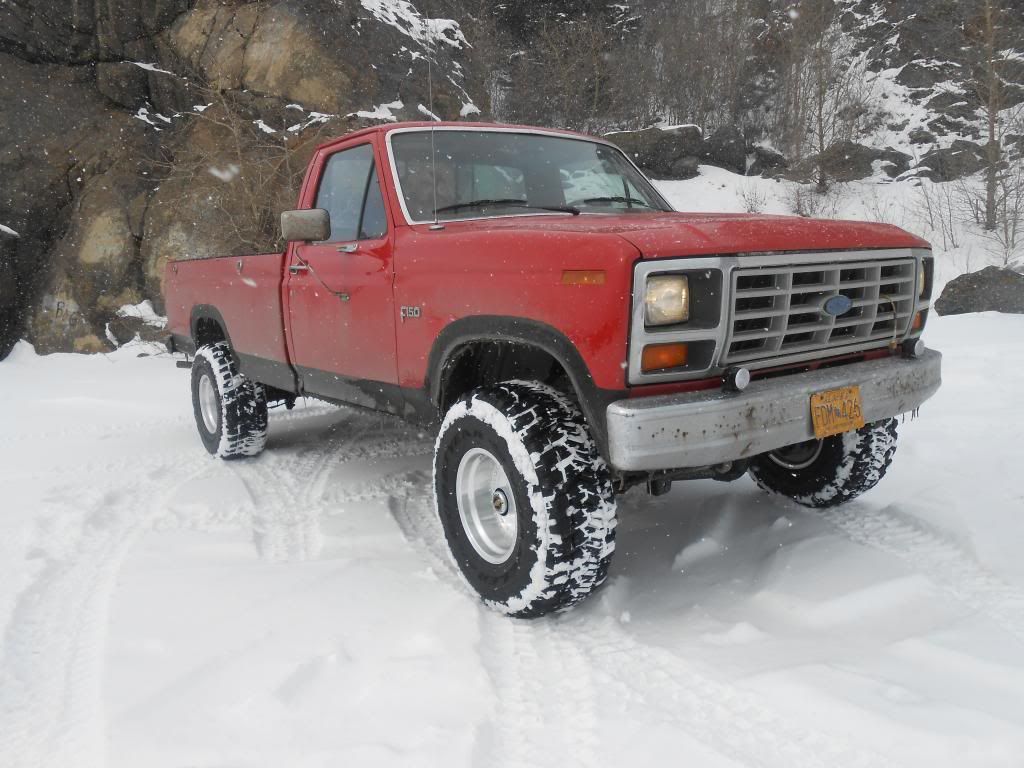
It all started back in January of this year when I opened up good ole Craiglist and there she was, my future truck. I made some quick phone calls, arranged a meeting, and a few short hours later I was the proud new owner of a 1985 F-150 4x4. It is just a plain ole work truck base model, but it has the desirable H6 axle code, which I believe is the 9" 3.55-1 limited slip front and rear.
As you can imagine, a truck this age didn't come without its fair share of problems. It was in dire need of a carb rebuild and nearly every front end component having anything to do with the steering and handling was completely shot.
On top of all that, it has some pretty bad rust issues, most likely worse than i can imagine, but at this point I am only concerned with the mechanical issues.
The first thing I took care of was some corrosion with the battery cables and I replaced the starter solenoid. Then I changed the fuel filter and got a smaller air cleaner because the one on there was hitting the boot on top of the distributor cap.
The next big thing I did was replace all the ball joints and tie rod ends out, they were shot and I had a wobble when applying the brakes or just slowing down in general. I also ordered new radius arm bushings and pivot arm bushings.
I also replaced the coil with a high performance coil from Accell, along with new copper core spark plugs and some high performance 8mm wires.
Here are some pics:
Truck after purchase and installation of 4" Rough Country suspension lift sporting the 31x12.50 riding on the 15x8 chrome spokes.


A look at the interior, pretty basic, but in really nice shape.

New wheels sitting in my garage waiting for the tires to get in.

After new wheels and tires


New tie rod ends and ball joints


Axle pivot bushings and radius arms bushings, not yet installed


Some ignition upgrades

You can see also the carb is looking alot cleaner, I took it all apart and cleaned it and replaced all the parts and gaskets because it was leaking gasoline. I installed the spark plugs and coil, but not the wires yet, waiting for the cap and rotor and module upgrade.

I have a leak from the water pump, probably a bad gasket

As you can see, I have some leakage problems with this, at some point it was throwing oil and other engine juice everywhere.

My door plate, you can see the axle code there, don't be jealous

The following pics just show some of the more visible rust problems


And a nice surprise happened this week, my crappy exhaust decided to take a dump on me, now it runs like crapola

So there you have it. I plan on slowly going through the whole motor and tranny and t case along with the front and rear differential. I want this thing to run and drive better than new. When I am satisfied with the mechanics, I will dive into the body and cosmetic issues.
Should be a fun project, and I look forward to working on it and documenting it. This site has really motivated me to get serious with this ole girl.

#3
06-23-2013, 08:04 AM
Posting Legend
Good job on the steering. That is a must. Rust on the cab corners is typical of these trucks, but is usually worse than it looks since there are many layers of metal there. Tabco makes and sells very good replacement panels. As for the coolant leak, any leak in that area, like from the heater hose or bypass hose, will pool at that spot, so it may not be the water pump.
#4
06-23-2013, 03:11 PM
Join Date: Mar 2013
Location: Arkansas
Posts: 258
Likes: 0
Received 0 Likes
on
0 Posts
Got a few questions on what I think is some old emissions stuff.
What is the hose with the plug in the top at the rear of the engine? Can I plug it another way?

What is this box next to the battery? I'm assuming this had something to do with the AIR system that was once on this truck.

It has a hose connected to a steel line that looks like it runs to the gas tank? Is this needed?

The connectors sitting atop of each valve cover, what are they and do i need them?


What in the heck is this coffee can sitting in here for?

I would like to tidy the engine bay up a little and try to do away with any loose wires leading to nothing. Any help is appreciated.
#5
06-23-2013, 03:56 PM
Posting Legend
The hose at the back of the engine is part of the AIR system. There's a manifold across the back of the heads that the hose is connected to. It is illegal to remove emissions equipment, but for off road use you can remove the manifold and plug the holes with short 5/8-11 bolts.
The box is the charcoal canister that absorbs gas vapors when the vehicle isn't being driven and gives them back to the carb when running. It is another thing that shouldn't be removed, as even if your carb doesn't have the vent line at least your gas tank does.
The hose is coming from the vent in the gas tank to take vapors to the canister. You HAVE TO HAVE a vent or the tank will collapse or the engine will stall.
The connections are for the non-existent TAB and TAD relays that control various emissions stuff that appears to be missing. If you aren't going to have the relays you don't need the connections.
The orange juice can is a vacuum reservoir that is used either for the cruise control or the HVAC system. You need it.
#6
06-23-2013, 07:18 PM
Join Date: Mar 2013
Location: Arkansas
Posts: 258
Likes: 0
Received 0 Likes
on
0 Posts
Up here in Alaska, there are no inspections or emission testing so not too worried about removing emissions equipment, especially when it has been disconnected. I appreciate the help, I might have to take the wiring harness out and get rid of the stuff no longer needed. I want to pull the motor to clean it up and replace all the gaskets, so I might try to squeeze the wiring harness in too.
Today, I replaced the leaky fuel pump....what a PITA that was, they have that thing wedged in there pretty tight. I also tied up the hanging exhaust pipe and got rid of the tail pipe, i can drive it now at least. Here are some pics.
New fuel pump. Just a tip, but try and clean all around this area so you can keep the mating surface on the fuel pump clean, because it takes alot finagling to work that thing in there. Removing the oil filter would help greatly too.

I tied the exhaust up with an old coat hanger...hey, you got to do what you got to do

Since my exhaust is crap anyways, I was wanting to put some long tube headers on. It looks like Flowtech makes a set for under $200. Was wondering what kind of fitment issues I would be going up against on the drivers side?
#7
06-23-2013, 07:45 PM
Posting Legend
Trending Topics
#8
06-23-2013, 11:25 PM
Join Date: Mar 2013
Location: Arkansas
Posts: 258
Likes: 0
Received 0 Likes
on
0 Posts
Is there another simpler way to vent the gas tank?
Fitment issues with long tube headers?
#9
06-24-2013, 07:46 AM
Posting Legend
I don't know how the EEC, not AIR computer, was integrated with the wiring on an 85. But Ford may have kept it separate to simplify things, although by 85 the computer was under the dash and that will make pulling the wiring more difficult.
As for headers, I worked on a guy's truck recently where the headers made it almost impossible to change spark plugs. It was awful. Don't know what brand they were but I would suggest that you check that issue out before buying.
As for headers, I worked on a guy's truck recently where the headers made it almost impossible to change spark plugs. It was awful. Don't know what brand they were but I would suggest that you check that issue out before buying.
#10
06-24-2013, 10:04 PM
Join Date: Mar 2013
Location: Arkansas
Posts: 258
Likes: 0
Received 0 Likes
on
0 Posts
The only thing I can see that might be operational with the EEC is the little canister that leads to my gas tank. Isn't the other outlet supposed to go to my intake somewheres? I took some pics of 2 things that might be the EEC, hopefully someone can help me identify them. My Chiltons manual isn't really helping me out on this.
This is the first one


And the other which is right in front of the first little guy


What are these and what do they do?
On another note, today I installed my steering stabilizer that has been in my garage forever, looks nice

I also cleaned up all the new shocks that came with the lift and put the nice little stickers on them, they look alot better now

EDIT: One last thing, what would it take to switch to an aftermarket ECU, like mallory or MSD? just the box and distributor and coil? I already have the Edelbrock performer carb that has the vacuum advance port on it for the distributor. Since some/most of the emissions crap has been taken off, i don't feel like it is running like it should be and I don't think the TFI distributor is doing like it should, would the emissions stuff affect the TFI?
#11
06-24-2013, 10:51 PM
Posting Legend
The first pic is of a relay, I think. Google the # on it. The second item is the voltage regulator for the alternator. As for the canister, there was a valve that was operated by something, probably the ECU, that allowed the carb to pull vapors into it.
But, I think what you are called the ECU is the ignition module, which is probably an DIS-II. Show a picture of it, please.
But, I think what you are called the ECU is the ignition module, which is probably an DIS-II. Show a picture of it, please.
#12
06-24-2013, 10:55 PM

First one is the MAP sensor. It measures the vacuum in the engine and it's for the EEC. It looks like it's not even connected. The second one is the voltage regulator for the Alternator. You'll need that.
I also see you still have the TFI ignition - you'll need the computer and assorted junk till you swap a DSII ignition in.
I also see you still have the TFI ignition - you'll need the computer and assorted junk till you swap a DSII ignition in.
#13
06-24-2013, 11:16 PM
Join Date: Mar 2013
Location: Arkansas
Posts: 258
Likes: 0
Received 0 Likes
on
0 Posts
Here is the pics of the Distributor, I am positive it is the TFI-IV.


Is the DuraSpark II setup better than the TFI-IV? Is it also better than a totally aftermarket MSD or Mallory setup?
Where is this port supposed to go to?

I am just having problems with it idling correctly when first started and it takes too many cranks to start in my book, especially when it is warm, it should fire up on first crank. I thought maybe replacing the coil and spark plugs would cure this, but it didn't. However, it does run quite a bit better, especially at low RPM's under load.
#14
06-24-2013, 11:46 PM
Is the DuraSpark II setup better than the TFI-IV? Is it also better than a totally aftermarket MSD or Mallory setup?
That connection goes to vacuum but I'm not sure where. The manifold I believe. I don't think it goes to ported vacuum. I'm not sure if you also need a TPS, which the edelbrock carb doesn't have.
You're best bet is to just do a DSII swap.
#15
06-25-2013, 12:00 AM
Join Date: Mar 2013
Location: Arkansas
Posts: 258
Likes: 0
Received 0 Likes
on
0 Posts
So that would involve the DSII computer, distributor, and coil correct? I don't think the coil I just purchased would work(which is the accell coil you see in the pics), but I do have a Blaster II coil in the garage that would work pretty well.
What years 351W used the DSII? Having trouble finding anything on it.
EDIT: Would these items convert my setup?
What years 351W used the DSII? Having trouble finding anything on it.
EDIT: Would these items convert my setup?