
92 F150 coolant leaks, oil leaks & other fixs
#1
 03-13-2013, 02:51 PM


Join Date: Mar 2013
Location: Lynnwood, WA
Posts: 33
Likes: 0
Received 0 Likes
on
0 Posts
92 F150 coolant leaks, oil leaks & other fixs
I have a 92 F150 extended cab with a 5.0 litre engine that has several coolant leaks. the shop that gave it a pressure test said
"coolant leaks seen at timing cover to block gasket, water pump is seaping out vent hole, radiator is leaking at passenger side tank."
given I have lots of time on my hands and the gumption to dig into these leaks, additionally driven by its taking more than a quart of water to fill radiator to level after any trip over 10 miles, I've taken a few things off to get at the timing cover.
my trucks engine compartment no longer has in it the coolant radiator, the alternator, the smog air pump, the upper intake manifold and the drivers side exhaust manifold.
the exhaust manifold was removed due to it having cracked between 2 and 3 sparkplugs making my truck sound more and more like an unmuffled engine. didn't know until I removed it that it was more than cracked... it came off in two pieces
yup, as usual fixing coolant leaks has leaked into other fix's while I'm at it
while running amuck in around and under my truck, I came across much oil so decided to change out the oil pan filter. my friend Lee lent me his engine hoist so I have my engine up on blocks and will be starting oil pan removal shortly.
my manual is online at alldatadiy.com it shows a technical service bulletin that says I need to use Silicone Sealant on both sides of my new oil pan gasket to prevent leaks.
anyone know about this? should I use an additional sealant? if so suggestions?
"coolant leaks seen at timing cover to block gasket, water pump is seaping out vent hole, radiator is leaking at passenger side tank."
given I have lots of time on my hands and the gumption to dig into these leaks, additionally driven by its taking more than a quart of water to fill radiator to level after any trip over 10 miles, I've taken a few things off
to get at the timing cover.my trucks engine compartment no longer has in it the coolant radiator, the alternator, the smog air pump, the upper intake manifold and the drivers side exhaust manifold.
the exhaust manifold was removed due to it having cracked between 2 and 3 sparkplugs making my truck sound more and more like an unmuffled engine. didn't know until I removed it that it was more than cracked... it came off in two pieces
yup, as usual fixing coolant leaks has leaked into other fix's while I'm at it
while running amuck in around and under my truck, I came across much oil so decided to change out the oil pan filter. my friend Lee lent me his engine hoist so I have my engine up on blocks and will be starting oil pan removal shortly.
my manual is online at alldatadiy.com it shows a technical service bulletin that says I need to use Silicone Sealant on both sides of my new oil pan gasket to prevent leaks.
anyone know about this? should I use an additional sealant? if so suggestions?
#3
03-13-2013, 04:04 PM
Posting Guru
#4
05-22-2013, 04:03 PM
Join Date: Mar 2013
Location: Lynnwood, WA
Posts: 33
Likes: 0
Received 0 Likes
on
0 Posts
The oil pan gasket I have is one piece rubber. Came from the Ford dealership down the street from my house. The one I took off the oil pan was also one piece rubber. I have no idea how long it's been in place but it was leaking some. I've seen worse. 
Now that too much time has passed, I get to figure out how to put my jigsaw puzzle back together.
92-black-night says in www.ford-trucks.com/forums/1232971-timing-chain-questions.html "I'm sure you lined up the timing marks. Yes ?". My answer is no. It only goes on one way...

Since I didn't align the timing marks what do I do to align them? What happens if I don't?
Now that too much time has passed, I get to figure out how to put my jigsaw puzzle back together.
92-black-night says in www.ford-trucks.com/forums/1232971-timing-chain-questions.html "I'm sure you lined up the timing marks. Yes ?". My answer is no. It only goes on one way...
Since I didn't align the timing marks what do I do to align them? What happens if I don't?
#5
05-23-2013, 03:02 AM
Posting Guru
Once you removed the old chain, the cam and crank were able to move independently of each other. If the timing marks don't line up, the engine won't run very well.
Hard to see the timing mark on the crank sprocket, but if they don't line up it's an easy fix. Take the timing chain off, rotate the crank so you're at top dead center on the #1 piston, rotate the cam so that when you install the timing chain and sprockets, everything is lined up.
Hard to see the timing mark on the crank sprocket, but if they don't line up it's an easy fix. Take the timing chain off, rotate the crank so you're at top dead center on the #1 piston, rotate the cam so that when you install the timing chain and sprockets, everything is lined up.
#6
05-25-2013, 07:32 PM
Join Date: Mar 2013
Location: Lynnwood, WA
Posts: 33
Likes: 0
Received 0 Likes
on
0 Posts
Getting back to my project. Thanks for the info Bob.
ah, so if I were able to pull off the old and put on the new timing chain without either cam or crank having twisted I'd be set. I'm 99.99% sure I did that. To verify, I twisted the crank to see if the marks would line up. I'm just a touch off because I twisted the crank just that little bit too much. I made the marks visible with a little red coloring.
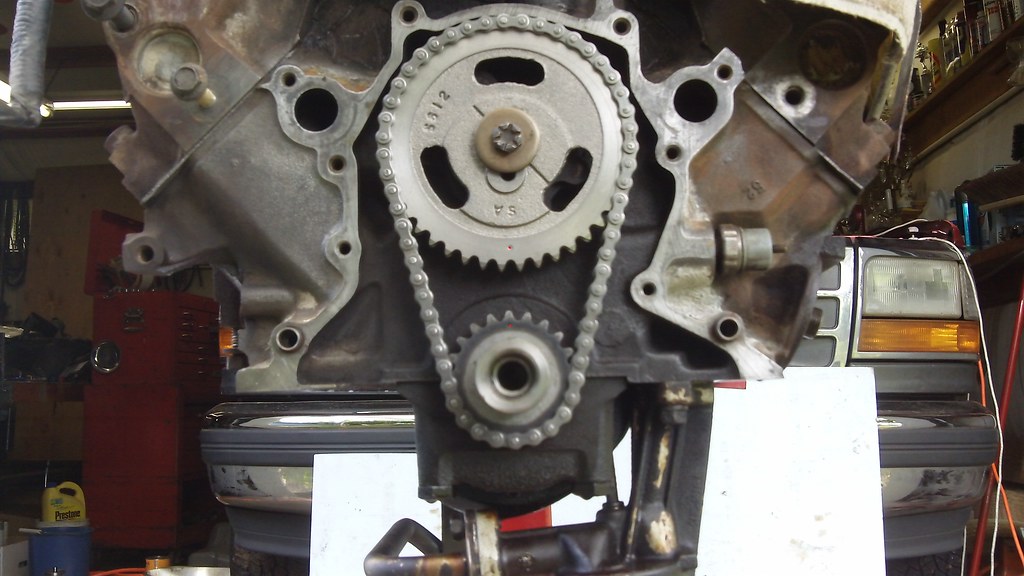
I'm as close to TDC on piston 1 as I can determine.
I've read, of course can't find it right now, that I should include in the vertical line running through the timing marks the timing mark on the harmonic balancer? If that's true, I have additional adjustments to make since its currently at about 5 o'clock when the timing marks are aligned.
ah, so if I were able to pull off the old and put on the new timing chain without either cam or crank having twisted I'd be set. I'm 99.99% sure I did that. To verify, I twisted the crank to see if the marks would line up. I'm just a touch off because I twisted the crank just that little bit too much. I made the marks visible with a little red coloring.
I'm as close to TDC on piston 1 as I can determine.
I've read, of course can't find it right now, that I should include in the vertical line running through the timing marks the timing mark on the harmonic balancer? If that's true, I have additional adjustments to make since its currently at about 5 o'clock when the timing marks are aligned.
#7
05-25-2013, 07:47 PM
Posting Guru
That looks correct to me! If the #1 is at TDC, those marks line up perfectly. If you were even just one tooth off, they'd be way out.
I wouldn't worry about the balancer at this point, so long as #1 is at TDC. Not sure how you checked for that, but I've found that it's easiest to remove the #1 plug, and stick a length of coat hanger through the plug hole, using it as a gauge while you turn the crank.
I wouldn't worry about the balancer at this point, so long as #1 is at TDC. Not sure how you checked for that, but I've found that it's easiest to remove the #1 plug, and stick a length of coat hanger through the plug hole, using it as a gauge while you turn the crank.
Trending Topics
#8
05-25-2013, 10:39 PM
Join Date: Mar 2013
Location: Lynnwood, WA
Posts: 33
Likes: 0
Received 0 Likes
on
0 Posts
#9
05-26-2013, 05:04 AM
Posting Guru

#11
05-26-2013, 04:13 PM
Join Date: Mar 2013
Location: Lynnwood, WA
Posts: 33
Likes: 0
Received 0 Likes
on
0 Posts
thanks Encho and Bob. I've invested a lot into this repair so am doing my best to take my time so I can get to using my truck again without fear of getting to do it again for same or issues I intruduced. 
In reading about putting my engine back together, I've come across reference to a Torque-to-Yield bolt Harmonic Balancer Questions... - F150online Forums that holds the harmonic balancer in place. Any ideas how to tell if I have or should have one of these?
In reading about putting my engine back together, I've come across reference to a Torque-to-Yield bolt Harmonic Balancer Questions... - F150online Forums that holds the harmonic balancer in place. Any ideas how to tell if I have or should have one of these?
#12
05-26-2013, 05:32 PM
Join Date: Mar 2013
Location: Lynnwood, WA
Posts: 33
Likes: 0
Received 0 Likes
on
0 Posts
#13
05-26-2013, 05:56 PM
Join Date: Mar 2013
Location: Lynnwood, WA
Posts: 33
Likes: 0
Received 0 Likes
on
0 Posts
Of course there are other issues I'm fixing along the way, cause I'm there and I see them. The one I'm currently contemplating: replacing piston 1, 2 & 3 fuel injector wire connectors. The first two due to wire wear and the third due to the over exuberance of he who disconnected it...

The picture is supposed to show:
A friend suggests not breaking into the wiring harness during this process. Thus using the wire connectors above the harness vs taking it apart a bit to do the splicing where it can then be covered again "inside the harness".
thoughts? can I replace just the connectors that need it? inside/outside the harness? should I replace the whole harness?
The picture is supposed to show:
- the warn wires to piston 2
- the replacement connector and
- the wire connectors I intend to use to attach the replacement.
A friend suggests not breaking into the wiring harness during this process. Thus using the wire connectors above the harness vs taking it apart a bit to do the splicing where it can then be covered again "inside the harness".
thoughts? can I replace just the connectors that need it? inside/outside the harness? should I replace the whole harness?
#14
05-26-2013, 07:18 PM
Posting Guru
Your harmonic balancer doesn't have TTY bolts, so no worries there. I didn't read that whole link, but you can re-use your original bolts with no issues.
As far as torquing, I normally use an impact gun... If that's not available to you, you should be able to put something (crow bar, screwdriver etc) on the flywheel/flexplate to hold it in place while torquing the harmonic balancer.
For the fuel injector connectors, I'd recommend not using crimp on connectors. A much more reliable way to splice would be to solder the splice, and use some heat shrink tubing over the splice.
