'86 F150 Resto-Mod or The (mis)Adventures of El Guapo
#46
 09-11-2012, 11:02 PM

Join Date: Oct 2009
Location: Jonesborough, TN
Posts: 723
Likes: 0
Received 0 Likes
on
0 Posts
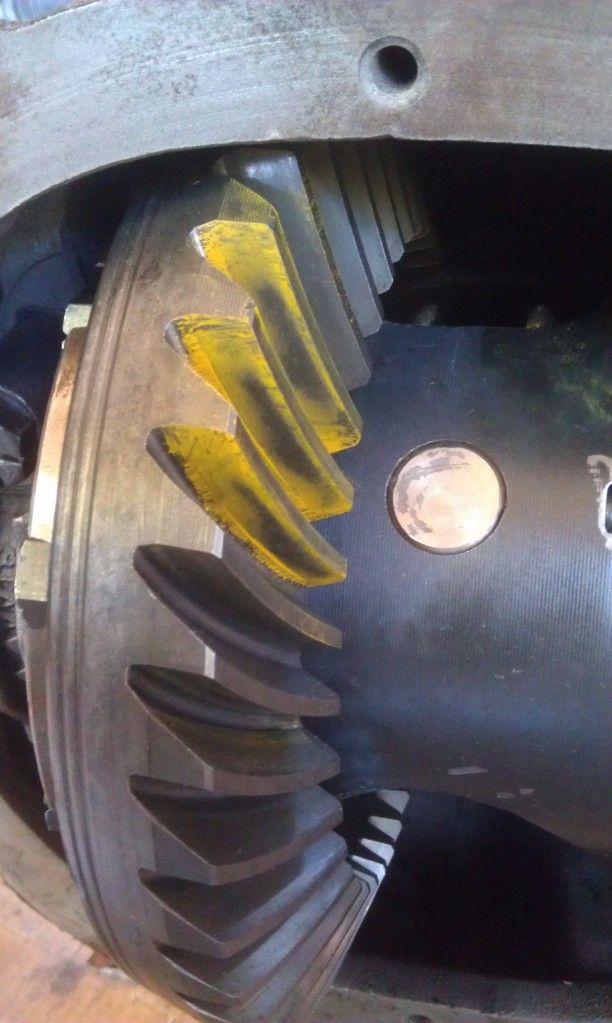
With the front end rolling, and the motor weighing it down, it was time to get the rear axle reassembled and bolted in. The rear axle was thoroughly cleaned to make sure there was not any left over abrasive inside the pumpkin or axle tubes. The ring gear was unbolted from the old, open differential, and with about 50 blows on a punch around the back edge of the ring gear, it finally dropped free. I had ordered new Timken bearings to replace the front and rear pinion bearings, differential carrier bearings, and wheel bearings, along with new seals, and of course a new crush sleeve, pinion nut, and ring gear bolts.
I was unable to get the ring gear seated on the Eaton Posi, but the wife was gone, so I was able to sneak the Posi unit into the freezer, and the ring gear into the oven (about 275 degrees). After about an hour, the ring gear was able to drop right onto the diff making sure the bolts lined up correctly. Torqued to spec and I was on my way.
Now my dilemma was getting the rear pinion gear off the pinion. Without a press, I was stuck. I called around, but the only place I found that would even consider it, wanted $60 a throw.
I discovered that Harbor Freight had 20 Ton presses on sale a few weeks back. I figured it would only cost $20 more to buy my own press than to pay $60 multiple times to press bearings off, and then on. Plus I wouldn't have to work around someone else's schedule. The wife agreed, so I was on my way to town. WooHoo! New tool.
Got the press home, and assembled. Sweeeet!!
I wanted to keep the posi clean, so I taped it completely closed. After taping, I very carefully cut the carrier bearing with my die grinder using the cut off wheel. Then with the help of a cold chisel and hammer broke the bearing and slid it off the carrier. Pressing the new carrier bearings on was a breeze with the new press. I don't know if it was important, but I made sure to keep the races with the bearings that they came with.
I slipped the bearing splitter below the rear pinion bearing and was easily able to press that bearing off. I used a cartridge roll in my die grinder to clearance the rear pinion bearing to use it as a test bearing. The new inner and outer pinion races were set in place and hammered in using the driver from Autozone. I didn't think to grind down the outside of the old race for test fitting with the old "test bearing", but as it turned out, it didn't make any difference.
I installed the pinion with the new bearings and seal. While I was at it, I installed the wheel bearings and seals. The pinion yoke was placed and the old nut used to tighten it to set the pinion preload. The differential carrier was then wrestled back into place with the shims that had been removed with the old diff.
I checked the backlash which was .012. Right on the money. Wear pattern was acceptable. Wrestling that diff out of the pumpkin was a chore, but I carefully pried it out, and then removed the pinion to add the crush sleeve. As I started tightening the pinion to crush that sleeve, I discovered that it was going to take more than my two cheater bars and I could bring to the fight. That's when I discovered the pinion crush sleeve eliminator or pinion spacer. It only requires 125 ft lbs of torque, and with the .013 shim, my pinion preload was 15 in-lbs. Perfect.
Crush sleeve eliminator. If you ever have to replace a crush sleeve, this is the way to go. Best $18 I think I spent so far (and that included shipping).
I reinstalled the differential carrier with the shims, and after bolting in the caps, double checked the backlash. .012. Perfect. I checked the wear pattern and it was acceptable, so I applied a dab of red Loc-tite to the carrier bolts and torqued them down.
I bolted on the brake backing plates that I had already set up with new wheel cylinders, shoes, and hardware. I installed the axles and C-clips and buttoned up the diff.
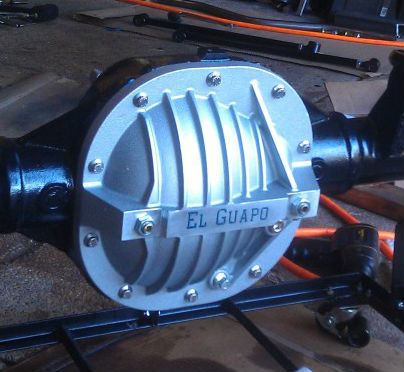
Last thing to do was the new diff cover.
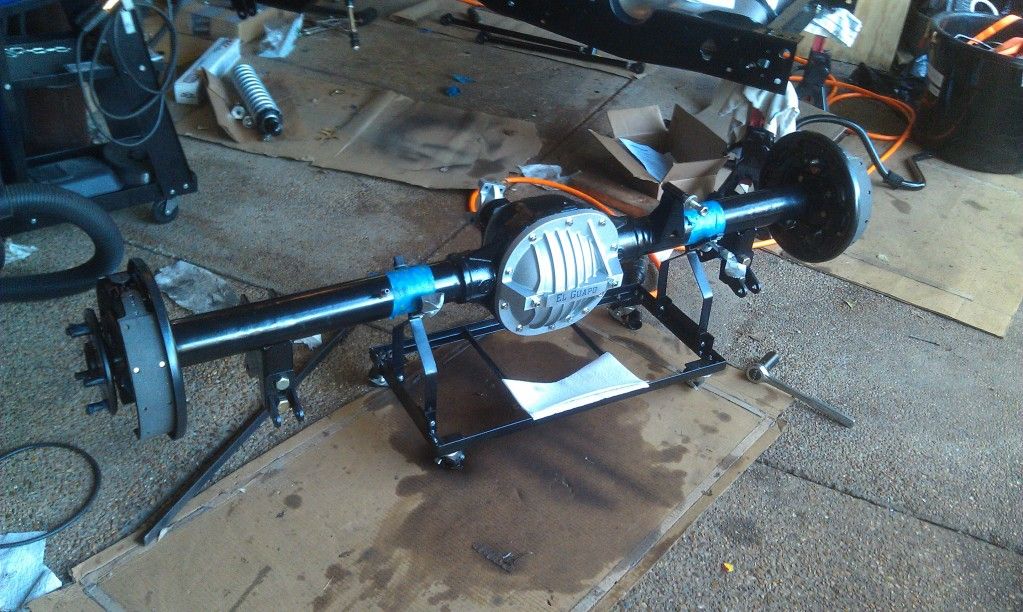
It was slid up under the frame, with a little help from my daughter who was visiting, and I the four link bars reconnected, the Panhard bar reinstalled.
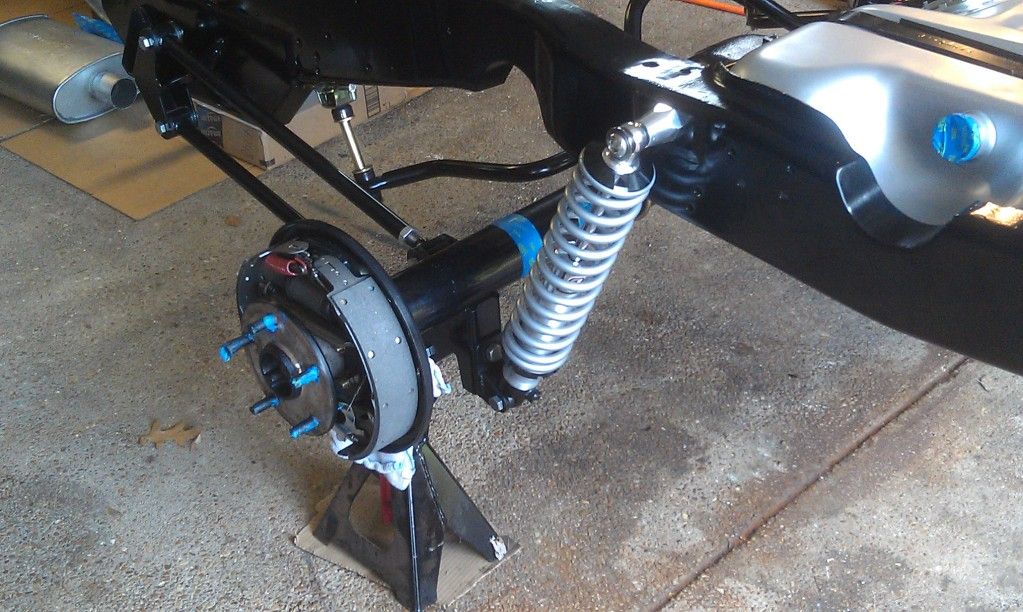
Reinstalling the Coilovers is next. Stay tuned.
I was unable to get the ring gear seated on the Eaton Posi, but the wife was gone, so I was able to sneak the Posi unit into the freezer, and the ring gear into the oven (about 275 degrees). After about an hour, the ring gear was able to drop right onto the diff making sure the bolts lined up correctly. Torqued to spec and I was on my way.
Now my dilemma was getting the rear pinion gear off the pinion. Without a press, I was stuck. I called around, but the only place I found that would even consider it, wanted $60 a throw.
I discovered that Harbor Freight had 20 Ton presses on sale a few weeks back. I figured it would only cost $20 more to buy my own press than to pay $60 multiple times to press bearings off, and then on. Plus I wouldn't have to work around someone else's schedule. The wife agreed, so I was on my way to town. WooHoo! New tool.
Got the press home, and assembled. Sweeeet!!
I wanted to keep the posi clean, so I taped it completely closed. After taping, I very carefully cut the carrier bearing with my die grinder using the cut off wheel. Then with the help of a cold chisel and hammer broke the bearing and slid it off the carrier. Pressing the new carrier bearings on was a breeze with the new press. I don't know if it was important, but I made sure to keep the races with the bearings that they came with.
I slipped the bearing splitter below the rear pinion bearing and was easily able to press that bearing off. I used a cartridge roll in my die grinder to clearance the rear pinion bearing to use it as a test bearing. The new inner and outer pinion races were set in place and hammered in using the driver from Autozone. I didn't think to grind down the outside of the old race for test fitting with the old "test bearing", but as it turned out, it didn't make any difference.
I installed the pinion with the new bearings and seal. While I was at it, I installed the wheel bearings and seals. The pinion yoke was placed and the old nut used to tighten it to set the pinion preload. The differential carrier was then wrestled back into place with the shims that had been removed with the old diff.
I checked the backlash which was .012. Right on the money. Wear pattern was acceptable. Wrestling that diff out of the pumpkin was a chore, but I carefully pried it out, and then removed the pinion to add the crush sleeve. As I started tightening the pinion to crush that sleeve, I discovered that it was going to take more than my two cheater bars and I could bring to the fight. That's when I discovered the pinion crush sleeve eliminator or pinion spacer. It only requires 125 ft lbs of torque, and with the .013 shim, my pinion preload was 15 in-lbs. Perfect.
Crush sleeve eliminator. If you ever have to replace a crush sleeve, this is the way to go. Best $18 I think I spent so far (and that included shipping).
I reinstalled the differential carrier with the shims, and after bolting in the caps, double checked the backlash. .012. Perfect. I checked the wear pattern and it was acceptable, so I applied a dab of red Loc-tite to the carrier bolts and torqued them down.
I bolted on the brake backing plates that I had already set up with new wheel cylinders, shoes, and hardware. I installed the axles and C-clips and buttoned up the diff.
Last thing to do was the new diff cover.
It was slid up under the frame, with a little help from my daughter who was visiting, and I the four link bars reconnected, the Panhard bar reinstalled.
Reinstalling the Coilovers is next. Stay tuned.
#47
09-12-2012, 09:01 AM
Posting Legend
#48
09-12-2012, 09:18 AM
Join Date: Oct 2009
Location: Jonesborough, TN
Posts: 723
Likes: 0
Received 0 Likes
on
0 Posts
the engraved area. Engraving was $15. Not bad, IMHO.
I, too, am looking forward to seeing how the suspension works out. In theory, it should be great, but we know theory and reality don't always play well together. Tonight, I will pick up the 1/2 inch hex bit to tighten up the coilovers, and then tighten all the locknuts on the four link bars and panhard rod, and hopefully have time to put the rear sway bar back on. Then the wheels, and it will roll, once again.

Last edited by 86fordtruck; 09-12-2012 at 09:25 AM. Reason: typo
#49
09-12-2012, 10:16 AM
Senior User
Join Date: Aug 2011
Location: Dearborn Heights, MI
Posts: 448
Likes: 0
Received 0 Likes
on
0 Posts
#50
09-12-2012, 05:18 PM
Senior User
Join Date: Jan 2012
Location: Escanaba, MI
Posts: 152
Likes: 0
Received 0 Likes
on
0 Posts
#51
09-12-2012, 06:49 PM
Join Date: Oct 2009
Location: Jonesborough, TN
Posts: 723
Likes: 0
Received 0 Likes
on
0 Posts
Thanks Boss, Loner.
I stuck with the 3.55 for the rear gear ratio for now. It will give me good economy while still allowing me to get the rear wheels turning quickly. Changing it out, while a pain, if needed should be that difficult, now that I have a better idea what I'm doing. That crush sleeve eliminator is definitely recommended if you ever have to replace the crush sleeve.
I stuck with the 3.55 for the rear gear ratio for now. It will give me good economy while still allowing me to get the rear wheels turning quickly. Changing it out, while a pain, if needed should be that difficult, now that I have a better idea what I'm doing. That crush sleeve eliminator is definitely recommended if you ever have to replace the crush sleeve.
#53
09-12-2012, 07:20 PM
#54
09-12-2012, 08:53 PM
Join Date: Oct 2009
Location: Jonesborough, TN
Posts: 723
Likes: 0
Received 0 Likes
on
0 Posts
Thanks, 81ChopTop.
loner-dwp, Sorry, but I got a late start this evening, so didn't really get anything done. I am missing two of my lock nuts, which has me stymied. Have to track down some new ones, and then torque the upper coilover bolts. Then I'll clean up a little and get you some pictures, very soon.
loner-dwp, Sorry, but I got a late start this evening, so didn't really get anything done. I am missing two of my lock nuts, which has me stymied. Have to track down some new ones, and then torque the upper coilover bolts. Then I'll clean up a little and get you some pictures, very soon.

#56
09-16-2012, 08:19 PM
Join Date: Oct 2009
Location: Jonesborough, TN
Posts: 723
Likes: 0
Received 0 Likes
on
0 Posts
Well, it was a productive weekend. Had to drop the fuel tank so I could tighten the upper coilover mount. That task done, I reinstalled the tank and then finished bolting up the rear end and the sway bars. Also, I bolted in the new crossmember that I fabricated to replace the one that I cut out (it interfered with 4-link suspension). Now, it was time to clean up my mess, and it's ready to put the wheels back on and roll it around.
El Guapo's frame with the 4-link coilover suspension, ready to put drums and wheels on.

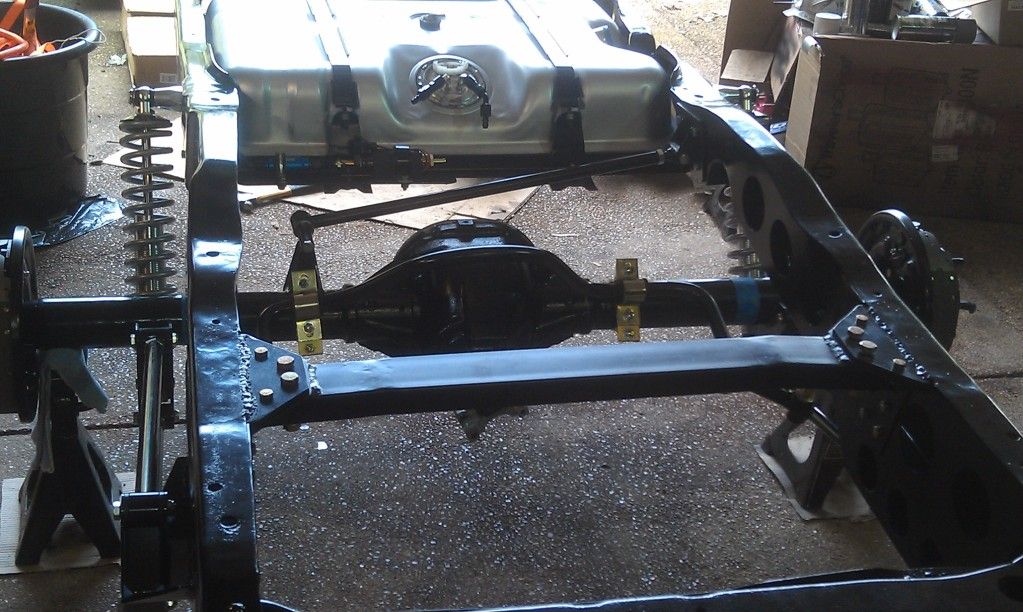
Later, this afternoon I started tacking up the exhaust.
More to come! Stay tuned.
El Guapo's frame with the 4-link coilover suspension, ready to put drums and wheels on.
Later, this afternoon I started tacking up the exhaust.
More to come! Stay tuned.
#58
09-17-2012, 10:24 AM
Hey, really liking your progress, you're doing a fantastic job.
Just out of curiosity, and you may have mentioned this earlier, but did you consider doing a watts linkage instead of a panhard rod? I realize the arc for the panhard bar is pretty small since you have enough room for a long bar, hence you won't have much lateral movement, but you also have a ton of room for watts setup as well.
Either way, the ride/handling component is going to be far superior to the stock setup....
#59
09-18-2012, 08:05 AM
Join Date: Oct 2009
Location: Jonesborough, TN
Posts: 723
Likes: 0
Received 0 Likes
on
0 Posts
#60
09-18-2012, 08:16 AM
Join Date: Oct 2009
Location: Jonesborough, TN
Posts: 723
Likes: 0
Received 0 Likes
on
0 Posts
Hey, really liking your progress, you're doing a fantastic job.
Just out of curiosity, and you may have mentioned this earlier, but did you consider doing a watts linkage instead of a panhard rod? I realize the arc for the panhard bar is pretty small since you have enough room for a long bar, hence you won't have much lateral movement, but you also have a ton of room for watts setup as well.
Either way, the ride/handling component is going to be far superior to the stock setup....
Just out of curiosity, and you may have mentioned this earlier, but did you consider doing a watts linkage instead of a panhard rod? I realize the arc for the panhard bar is pretty small since you have enough room for a long bar, hence you won't have much lateral movement, but you also have a ton of room for watts setup as well.
Either way, the ride/handling component is going to be far superior to the stock setup....
With the Panhard rod, the lateral movement is less 3/16" at 5" of vertical travel. I don't plan to be autocrossing this thing, so it should be fine. Also, it simplifies running the exhaust, but you will have to stay tuned to see what I do with that.
