
My fast and easy paint job.
#1
 05-16-2012, 04:59 AM


Join Date: Apr 2012
Location: Two Rivers, Alaska
Posts: 19
Likes: 0
Received 0 Likes
on
0 Posts
Heya Guys,
I started to post this in the thread with questions about doing budget re-paints, but decided it was a little off the current topic at hand there, more of just me showing off what I've done ... Thought Maybe a new thread would be more in order. My experiance with budget paint jobs has told me one thing above all else; Its all in the prep. Do the exact same prep you would do for $300 a gallon fancy paint for anything else, no matter how cheap...
Wash and sand the truck, wash again. Ventilate the area, but very little if any actual air movement. control the temp both when spraying and after. Prime it. Regaurdless of how nice your paint is, without primer, it ain't gonna stick to the stock paint/metal. I've seen spendy fancy paint peel after poor prep... and rattle can $50 jobs last for years and look fabulous, because the prep was done right.
Also, a clear coat over the top, even a cheap one, can make a big difference. It adds a LOT of UV/fade resistance, not to mention shine and durability.
a buddy has painted two trucks with plain old rustoleum, had it mixed to the colors he wanted at home depot... About 2 gallons each of rust red primer, and color, thinned to about milk consistency or a little thicker, with plain ol' paint thinner. A cheap Craftsman HVLP gun, sprays easy, finishes nice, and he sprayed the NAPA paint store brand clear coat over it for UV/fade and scratch resistance. 3 years on the one already, no fade and it is pretty durable.
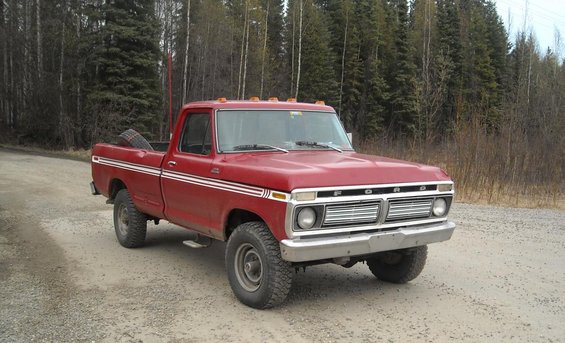
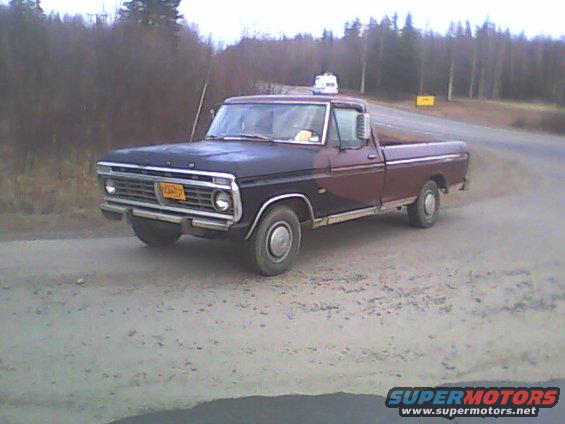
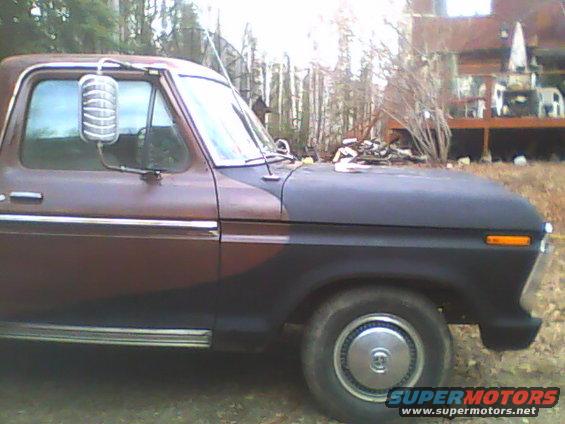
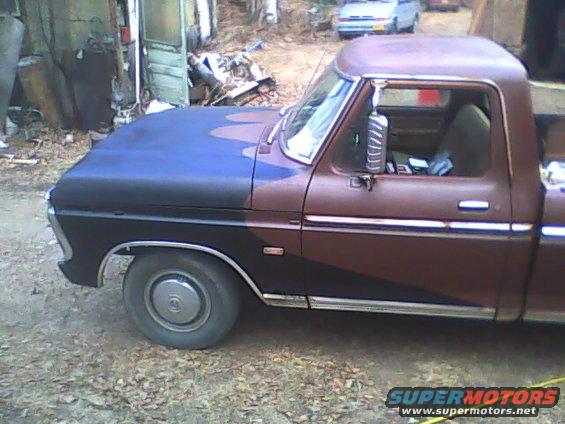
I went with rustoleum from spray cans. Yes, spray paint. Same paint as what you get if you have rustoleum enamel mixed by the gallon(like my buddy did) just a lot easier to spray(IMO) in slower, thinner coats.
later this summer I was gonna spray it in factory tu-tone blues, color matched in the same rustoleum he got, but what I wanted to do changed, and I waned to see how I would like the truck in red. So I decided to try an even easier route, and rattle can it with the same paint. As you can see, the truck is not super straight... Its my daily driver, and work rig. I've just been getting tired of it becoming a rainbow rig, with different colored replacement pannels and mis-matched trim. Wanted to even out the look.
Had done this before with good results on my off road rig, with individual replacement panels, but not the whole truck at once. So I knew if I liked it, it could stay on, especially with auto grade clear over it. but if I hated the color, then it wasn't as much of a $$ loss if I had to sand it off and re-do it in another color.
I used 7 cans primer, 5 cans color. (+1 can of white for the stripes) Another 5 of color will go on it over easy scratch areas, and on body lines etc where it gets more wear, before I spray clear on it.
Before;

Primed;
Fresh outa the shop 24hrs after shooting color;
About 3 weeks later(Man, red shure shows dirt and dust more than blue does!) Did spray in black bed liner in there at some point, as you can see above, blue bed in a red truck looked terrible...
I washed the truck, sanded the factory paint with 220, tack clothed, washed again, let dry over night in the shop, primed with rustoleum automotive primer, sanded again with 220, re-primed lightly. Started spraying at the front and went back; By the time I got the tail gate done, dry time was up at the front, and could start spraying the next coat.
Its just as smooth, and shiny as the factory paint was--its actually on there thicker than the factory paint/primer was too. Almost as scratch resistant; slightly softer paint, but put on thicker; it evens out for durability.
Quality Rattle can paint can put out a great finish, Big key is very slight draft ventilation but no real air flow that will cause it to dry too fast, a controlled temp and humidity in the shop, and letting it set to fully cure at the same controlled temp.
When I get cash saved up again next month I'll dig out my HVLP gun and spray a clear(probably the NAPA store brand) over it for a little more scratch resistance..
one cool thing, one guys i know that has done 'real' 2 stage paint jobs, with higher end paints, can't believe its spray paint... it looks like a mid level single sage paint.
G.
(yes, gonna replace the body rot holes as soon as I can afford the patch panels!)
I started to post this in the thread with questions about doing budget re-paints, but decided it was a little off the current topic at hand there, more of just me showing off what I've done
... Thought Maybe a new thread would be more in order. My experiance with budget paint jobs has told me one thing above all else; Its all in the prep. Do the exact same prep you would do for $300 a gallon fancy paint for anything else, no matter how cheap...Wash and sand the truck, wash again. Ventilate the area, but very little if any actual air movement. control the temp both when spraying and after. Prime it. Regaurdless of how nice your paint is, without primer, it ain't gonna stick to the stock paint/metal. I've seen spendy fancy paint peel after poor prep... and rattle can $50 jobs last for years and look fabulous, because the prep was done right.
Also, a clear coat over the top, even a cheap one, can make a big difference. It adds a LOT of UV/fade resistance, not to mention shine and durability.
a buddy has painted two trucks with plain old rustoleum, had it mixed to the colors he wanted at home depot... About 2 gallons each of rust red primer, and color, thinned to about milk consistency or a little thicker, with plain ol' paint thinner. A cheap Craftsman HVLP gun, sprays easy, finishes nice, and he sprayed the NAPA paint store brand clear coat over it for UV/fade and scratch resistance. 3 years on the one already, no fade and it is pretty durable.
I went with rustoleum from spray cans. Yes, spray paint. Same paint as what you get if you have rustoleum enamel mixed by the gallon(like my buddy did) just a lot easier to spray(IMO) in slower, thinner coats.
later this summer I was gonna spray it in factory tu-tone blues, color matched in the same rustoleum he got, but what I wanted to do changed, and I waned to see how I would like the truck in red. So I decided to try an even easier route, and rattle can it with the same paint. As you can see, the truck is not super straight... Its my daily driver, and work rig. I've just been getting tired of it becoming a rainbow rig, with different colored replacement pannels and mis-matched trim. Wanted to even out the look.
Had done this before with good results on my off road rig, with individual replacement panels, but not the whole truck at once. So I knew if I liked it, it could stay on, especially with auto grade clear over it. but if I hated the color, then it wasn't as much of a $$ loss if I had to sand it off and re-do it in another color.
I used 7 cans primer, 5 cans color. (+1 can of white for the stripes) Another 5 of color will go on it over easy scratch areas, and on body lines etc where it gets more wear, before I spray clear on it.
Before;
Primed;
Fresh outa the shop 24hrs after shooting color;
About 3 weeks later(Man, red shure shows dirt and dust more than blue does!) Did spray in black bed liner in there at some point, as you can see above, blue bed in a red truck looked terrible...
I washed the truck, sanded the factory paint with 220, tack clothed, washed again, let dry over night in the shop, primed with rustoleum automotive primer, sanded again with 220, re-primed lightly. Started spraying at the front and went back; By the time I got the tail gate done, dry time was up at the front, and could start spraying the next coat.
Its just as smooth, and shiny as the factory paint was--its actually on there thicker than the factory paint/primer was too. Almost as scratch resistant; slightly softer paint, but put on thicker; it evens out for durability.
Quality Rattle can paint can put out a great finish, Big key is very slight draft ventilation but no real air flow that will cause it to dry too fast, a controlled temp and humidity in the shop, and letting it set to fully cure at the same controlled temp.
When I get cash saved up again next month I'll dig out my HVLP gun and spray a clear(probably the NAPA store brand) over it for a little more scratch resistance..
one cool thing, one guys i know that has done 'real' 2 stage paint jobs, with higher end paints, can't believe its spray paint... it looks like a mid level single sage paint.
G.
(yes, gonna replace the body rot holes as soon as I can afford the patch panels!)
Last edited by AK Adventurer; 05-16-2012 at 05:18 AM. Reason: forgot somethin'
#3
05-16-2012, 03:25 PM
Join Date: Apr 2012
Location: Two Rivers, Alaska
Posts: 19
Likes: 0
Received 0 Likes
on
0 Posts
#4
05-16-2012, 07:03 PM
#5
05-16-2012, 07:12 PM
I also still need to talk to a buddy of mine that has access to a paint booth and see if he could do it for cheap (I've "known" the owner of the shop for 15+ years as well).
#6
05-16-2012, 07:16 PM
That's my problem. I want to spray mine soon but it will be outside. I'm kind of tempted to do all the prep work and just spend a few hundred at Maaco and let them spray it.
I also still need to talk to a buddy of mine that has access to a paint booth and see if he could do it for cheap (I've "known" the owner of the shop for 15+ years as well).
I also still need to talk to a buddy of mine that has access to a paint booth and see if he could do it for cheap (I've "known" the owner of the shop for 15+ years as well).
#7
05-16-2012, 07:30 PM
I'll most likely just end up rattle canning it with some friends. It'd be a good excuse to drink a bunch of beer and cook some flesh on the bbq.
Trending Topics
#8
05-17-2012, 12:06 AM

#9
05-17-2012, 01:41 AM
Join Date: Apr 2012
Location: Two Rivers, Alaska
Posts: 19
Likes: 0
Received 0 Likes
on
0 Posts
That green looks good!
You can spray outside. This is my third truck painted like this, and the only one I've done indoors.. Only reason it got done in the shop was my buddy was gone that saturday ,and it was raining... I went and used his shop so i didn't have to wait out the rain. Otherwise i had planned to do it outside.. The idea is consistancy of enviroment, not exactly a perfect enviroment. Just do it with a light breeze to control the bugs, and a Hot day. Park the truck in the sun and let it get warm an hour or so before spraying, and be done spraying a couple hours before the temp drops below around 60(if it does in your location...) so the paint has time to chemically 'gas off'.... It will set up and cure at almost any temp.( I've sprayed in the shop at 60 deg, waited an hour for it to gas/tack off, and then driven home at -30f... it sets up fine, just takes longer.)
Any chance of rain, at all... skip for another day. Trust me. even a light misting rain on fresh, tacky paint can make a mess...
This truck was sprayed in my driveway, at about 45 deg, in a light wind, high humidity and on the verge of rain. I did it in fast light coats, so if it did rain it would be dry fairly fast, and not be a heavy coat to be damaged by the water... not ideal, but it worked. Its just as good as the red one is in overall finish. I Don't reccamend trying to beat the rain though, itd oes in your nerves. But ouside is deffinatelly doable. (Krylon matte leather brown,and flat black-- Krylon finishes smoother, easier... more forgiving to spray, but isn't as thick of a paint, and less forgiving in prep work- doesn't 'stick' as well as Rustoleum.)
I go a question for you guys;
what color do I paint the rims on the red one? white to match the stripe, or silver to match grill/bumpers? I thought about white with a red pin stripe around them too... Most other accessories will be white, like a roll/light bar I'm building, tool box, etc. I can't decide.
G.
#10
05-17-2012, 08:02 PM
#11
05-17-2012, 09:00 PM

You do not need a booth to paint base coat/clear coat. I just painted my wrangler in November under the trees next to the barn. Harbor freight 15 buck spray gun. I used the omni paint. First auto I ever painted. First time we ever used bc/cc also. I got about 4 little black bugs in the clear. It came out well for not much more than you spent. My total was around 500 for paper, primer, paint, and tape. I did no bodywork, because it's a Jeep. (supposed to be rugged)
before paint
<a href="http://www.flickr.com/photos/love_ford_trucks/6207532951/" title="IMAG0100 by ford collection, on Flickr"><img src="http://farm7.staticflickr.com/6159/6207532951_7d9638ea2a.jpg" width="500" height="299" alt="IMAG0100"></a>
after paint
<a href="http://www.flickr.com/photos/love_ford_trucks/6206199642/" title="IMAG0145 by ford collection, on Flickr"><img src="http://farm7.staticflickr.com/6151/6206199642_f87ee0bbfd.jpg" width="500" height="328" alt="IMAG0145"></a>
#12
05-31-2018, 07:38 PM
#13
05-31-2018, 09:10 PM

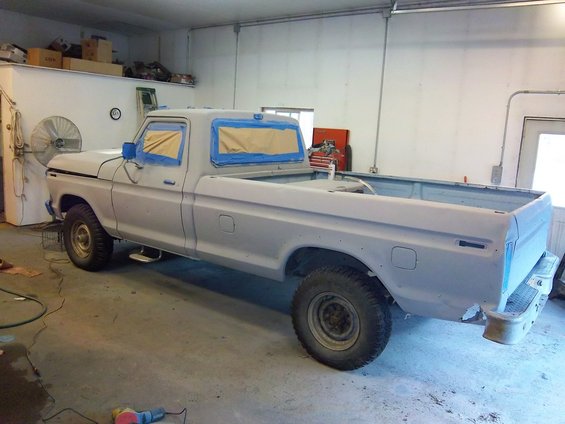
79 in primer

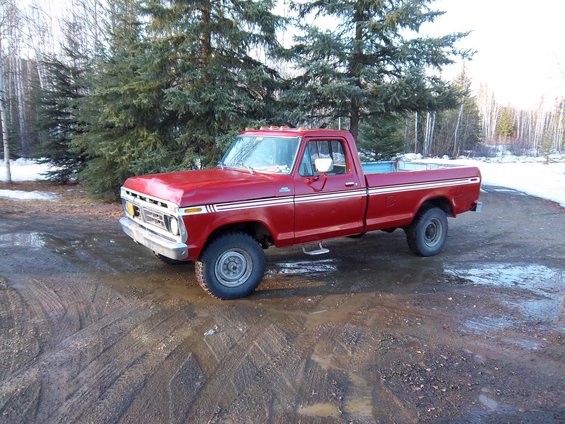
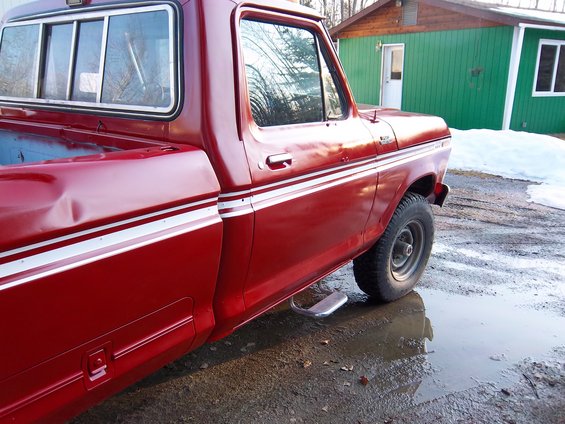
79 painted ih red and gloss black $250 paint job

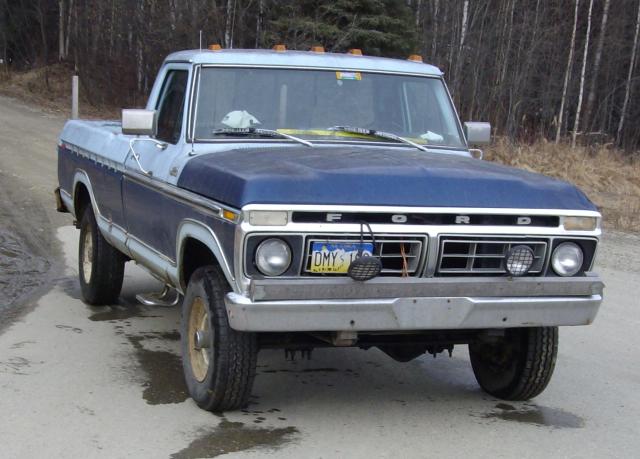
75 high boy rustoleum cobalt blue, simi gloss black and metallic silver

300 dollar paint job
both trucks were painted on the cheap total of $550 in paint and materials. The high boy has no vinyl striping its all paint. They both still need to be wet sanded and buffed out. bt for a garage paint job they turned out good. Building on a shoe string budget


#15
06-01-2018, 02:20 PM
