1970 F250 4x4 Cummins Conversion Build Thread - Lots of Pics!
#76
 06-27-2012, 12:12 AM

Join Date: Oct 2011
Location: Willard
Posts: 207
Likes: 0
Received 0 Likes
on
0 Posts
#77
06-27-2012, 11:34 PM
Logistics Pro
Looking good I went with a 2wd nv4500 and will be using a divorced NP205 I have a Dana 24 in it now the stock intermediate shaft needs to be shortened about 6" to fit nicely I'm going to get all new driveshafts made because of how much lift I have so I might get a new one made instead of shortening the stock one I'm going with cc joint shafts to help with the angles on the drivetrain I like your idea of reusing the stock crossmember top piece to box it back in makes for a more stockish look got my cummins sitting in my frame today and held in by my motor mounts finished them up today and bolted in now need to get my steering box mounted and then I can pull the motor and weld up the crossmember cutting it close but might be driving it by the winter I'm hoping got more bodywork to do yet
#78
06-28-2012, 09:09 AM
Join Date: Oct 2011
Location: Willard
Posts: 207
Likes: 0
Received 0 Likes
on
0 Posts
Looking good I went with a 2wd nv4500 and will be using a divorced NP205 I have a Dana 24 in it now the stock intermediate shaft needs to be shortened about 6" to fit nicely I'm going to get all new driveshafts made because of how much lift I have so I might get a new one made instead of shortening the stock one
Your making good progress. Continue the course!
I am heading out on vacation with the family for a couple of weeks. Should be ready to hit it hard and heavy when I get back.

#79
07-24-2012, 11:29 PM
Join Date: Oct 2011
Location: Willard
Posts: 207
Likes: 0
Received 0 Likes
on
0 Posts
14 Bolt Axle Rebuild Part #3:
Clean up the differential case halves with a wire wheel or some emery. Make sure that the inner contact surfaces are clear from any rust or build up. Solvent tank and blow dry with a air nozzle. I pre-lubed the differential case surfaces that would contact the detroit locker with a little grease (not too much - just a little).
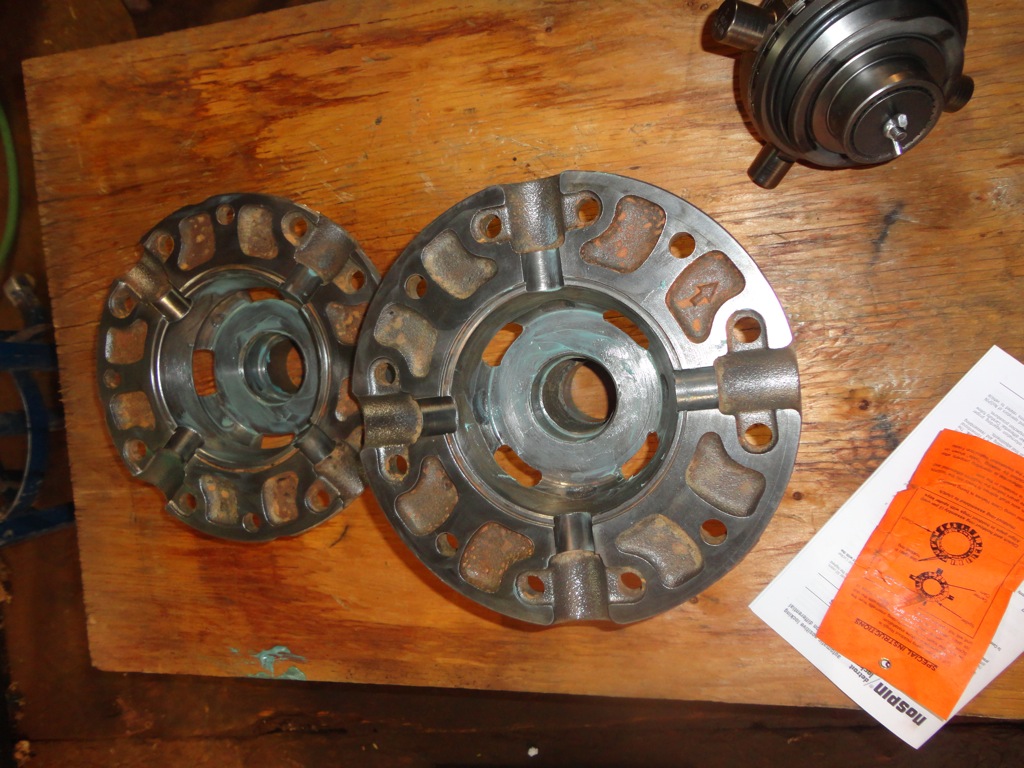
Place the detroit locker inside of the case halves (doesn't matter which direction). Make sure to match up the marks you put in the two halves of the differential case so that everything go's back the way it came apart. Sometimes the case halves will have an arrow stamped on the inside of the case halves incase you forgot to mark them when you took the case apart.
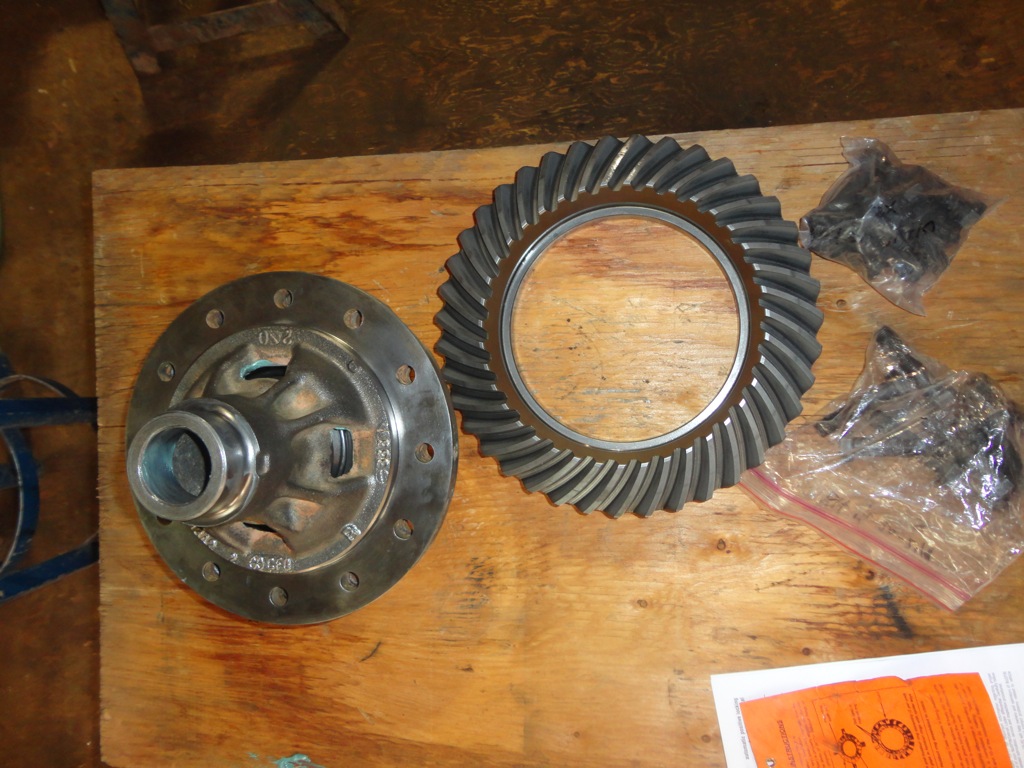
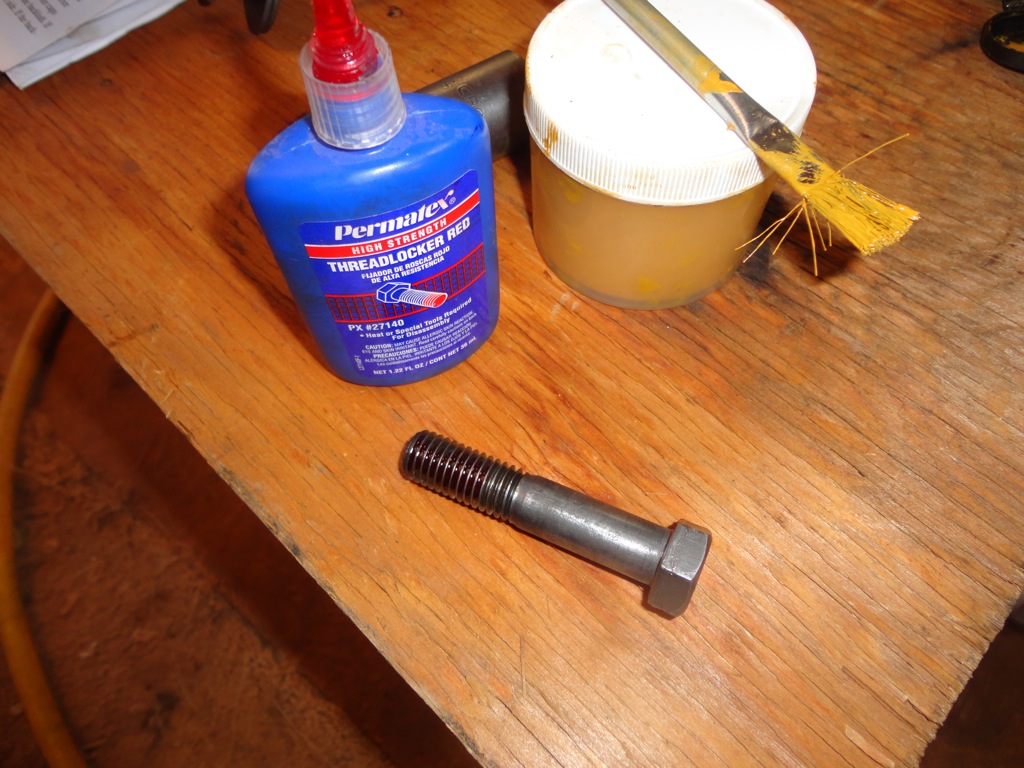
Install the ring gear to the differential case with new bolts. The size of bolt you will need will depend on the gear ratio you have chosen, so make sure and order these when you order your gears. I went with a 488:1 gear ratio set. Locktite the ring gear bolts and torque them using a crisscross pattern to 100 ft lbs.
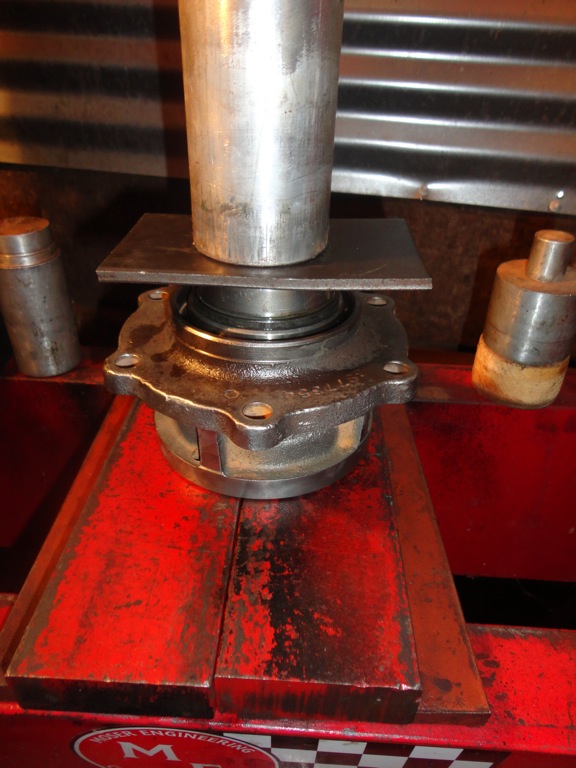
Press the bearings onto both sides of the differential case / ring gear assembly.
Install the drive pinion bering into the case using a mini sledge hammer and a striking tube.
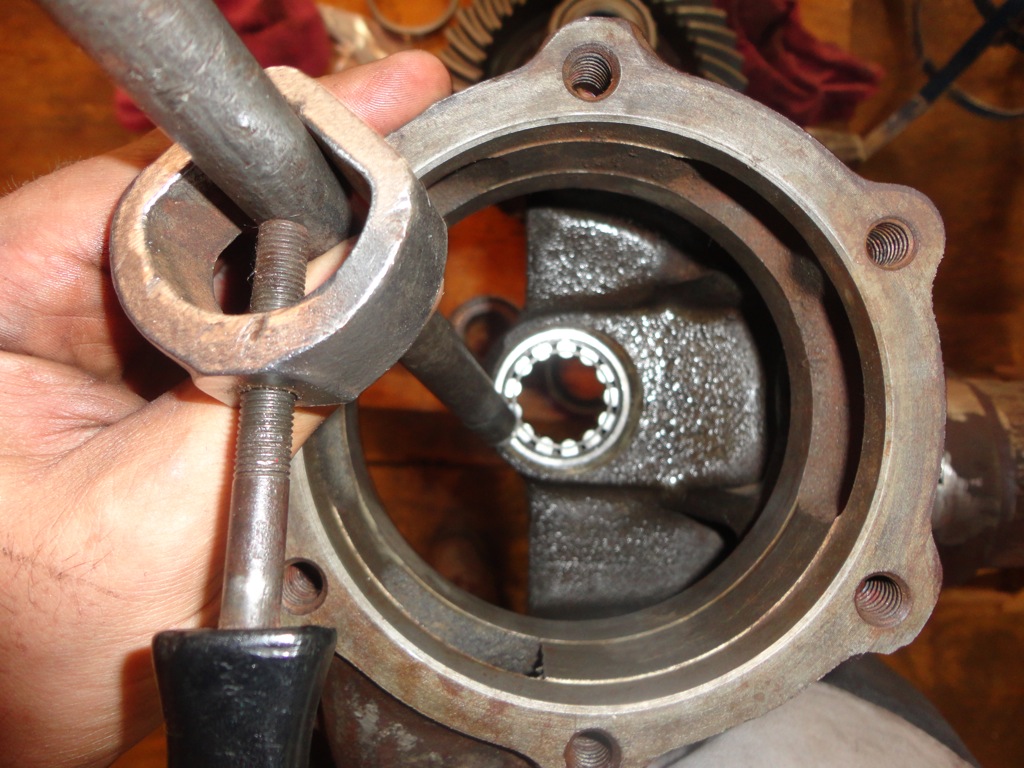
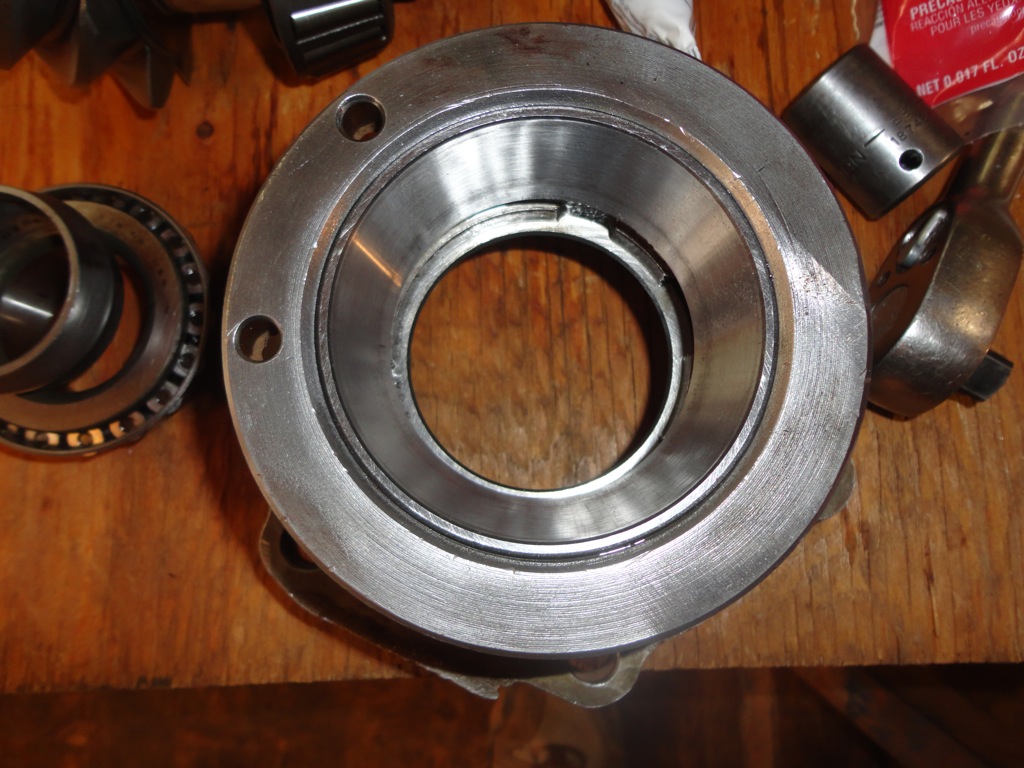
Clean up the pinion housing again using a wire wheel and some emery. Solvent tank and blow dry with a air nozzle. Press in the bering races.
Press the bering on the pinion.
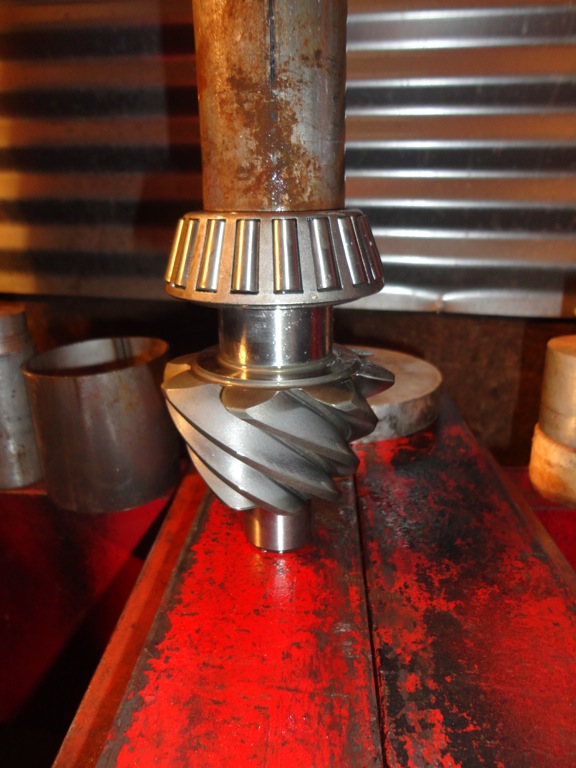
Place the pinion in the pinion in the pinion housing and slip the crush sleeve over the pinion shaft.
Press the other pinion bering on the shaft over the crush sleeve. VERY IMPORTANT! DO NOT PRESS THE BERING ALL THE WAY DOWN. ONLY PRESS THE BERING UNTIL THERE IS NO SLOP IN THE PINION HOUSING. The crush sleeve is there so that you can achieve the proper pressure between the two bearings. You will have to torque the bering trough the yoke nut to achieve the proper bering drag. More on this in a moment.
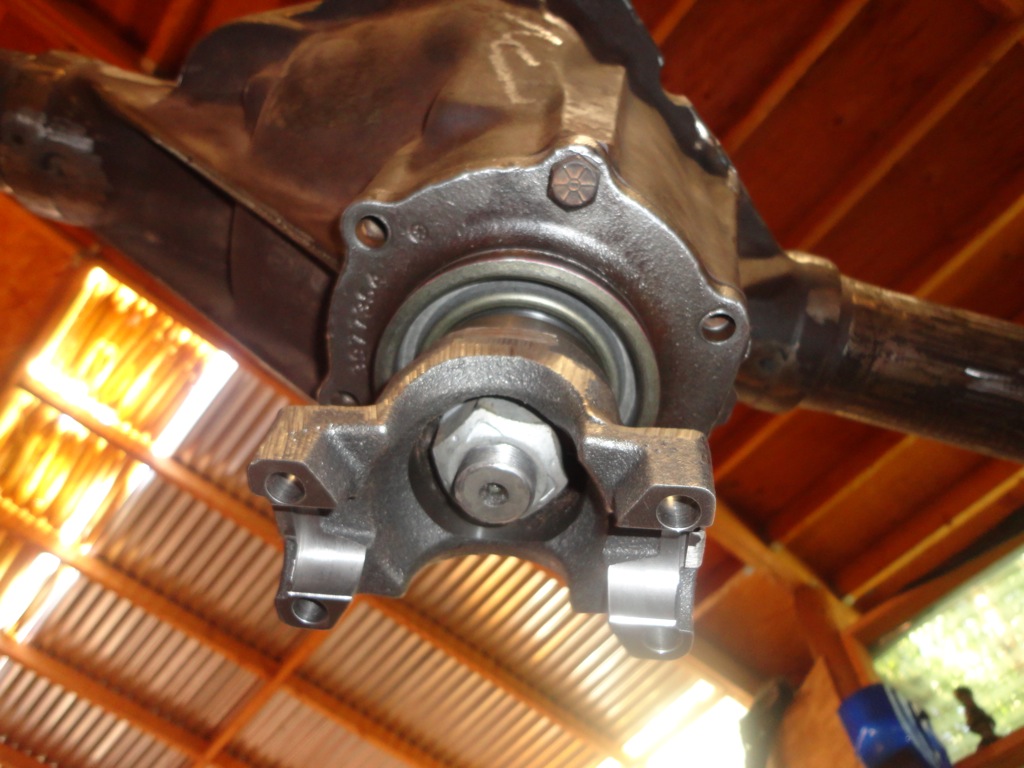
Press or hammer on the pinion seal.
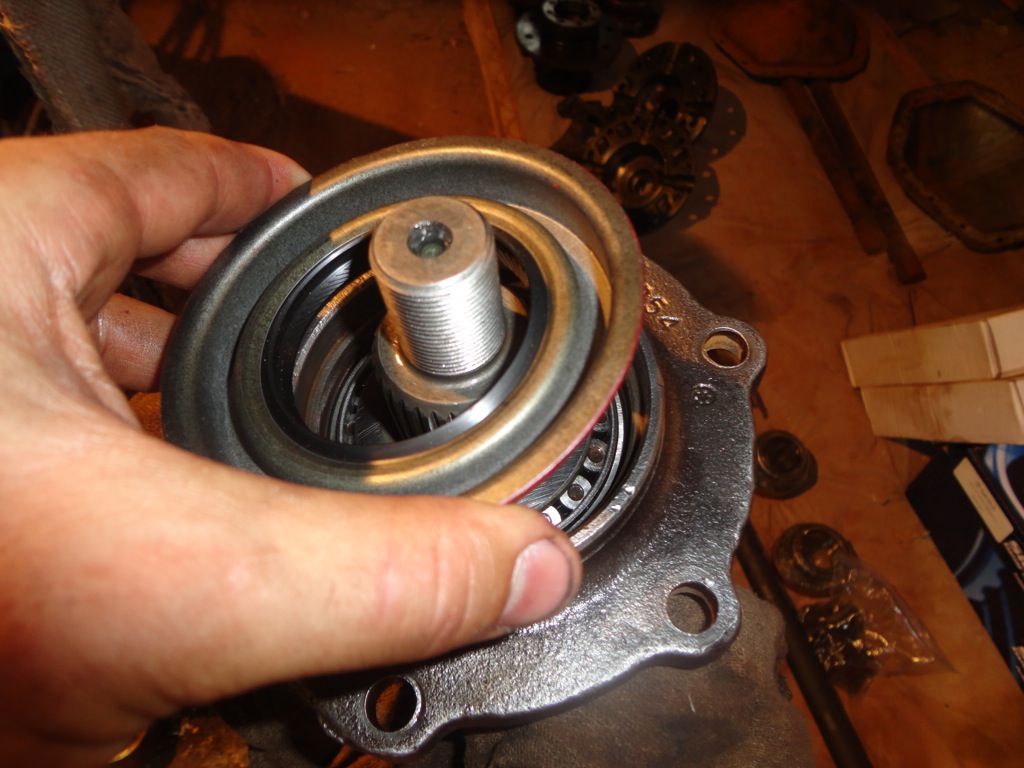
Add a little silicone around the splines of the top of the yoke to avoid any future leaks that may sneak past.
Locktite the yoke nut.
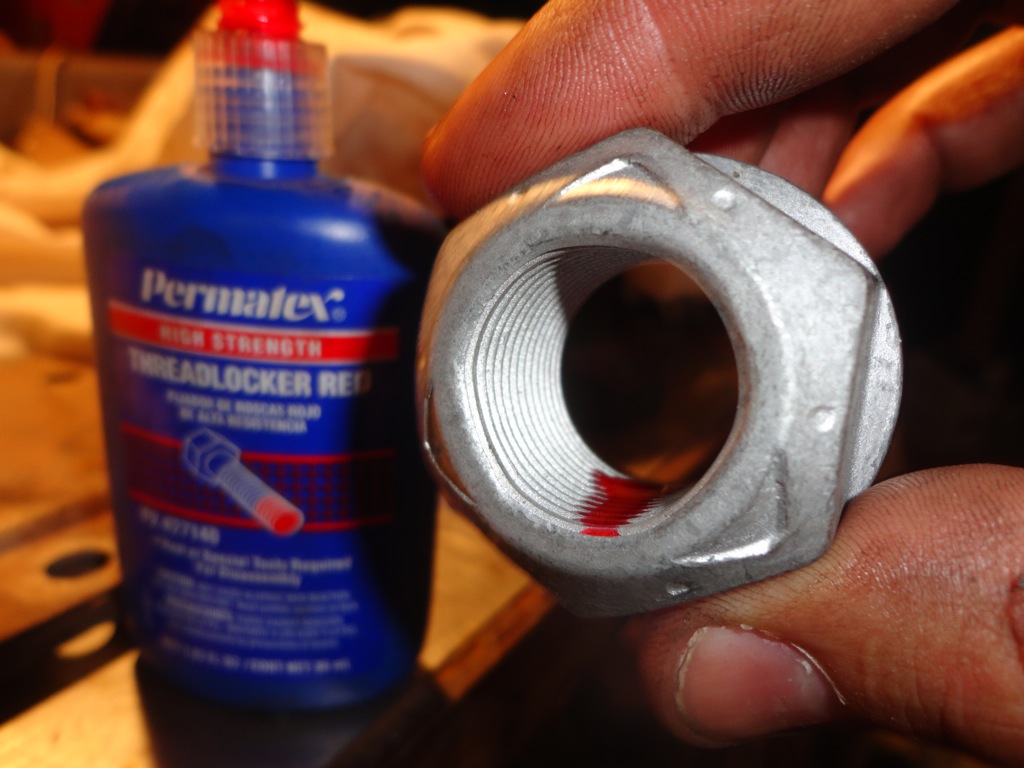
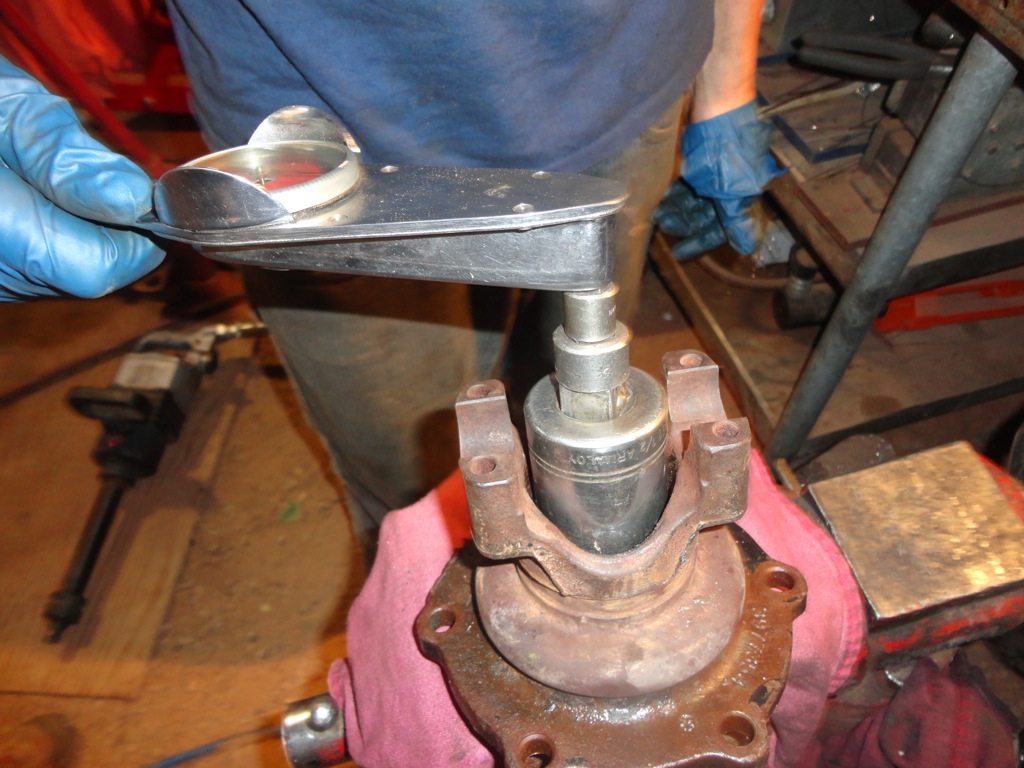
Install the yoke nut. I had to use a 3/4 inch impact gut with two helpers and a home made yoke holder while the whole assembly was in a vise to get the nut all the way down. This thing is a beast! IMPORTANT! DONT TIGHTEN THE NUT ALL THE WAY DOWN WITHOUT CHECKING YOUR PINION BERING LOAD! When the nut is getting close to tight, take a inch pound torque wrench and spin the whole yoke / pinion assembly from the yoke nut. The proper drag is 25-35 inch pounds. If you don't have enough drag, tighten the nut a little more until you do. If you go to far, you will have to take everything apart and get a new crush sleeve and start the whole process over again.
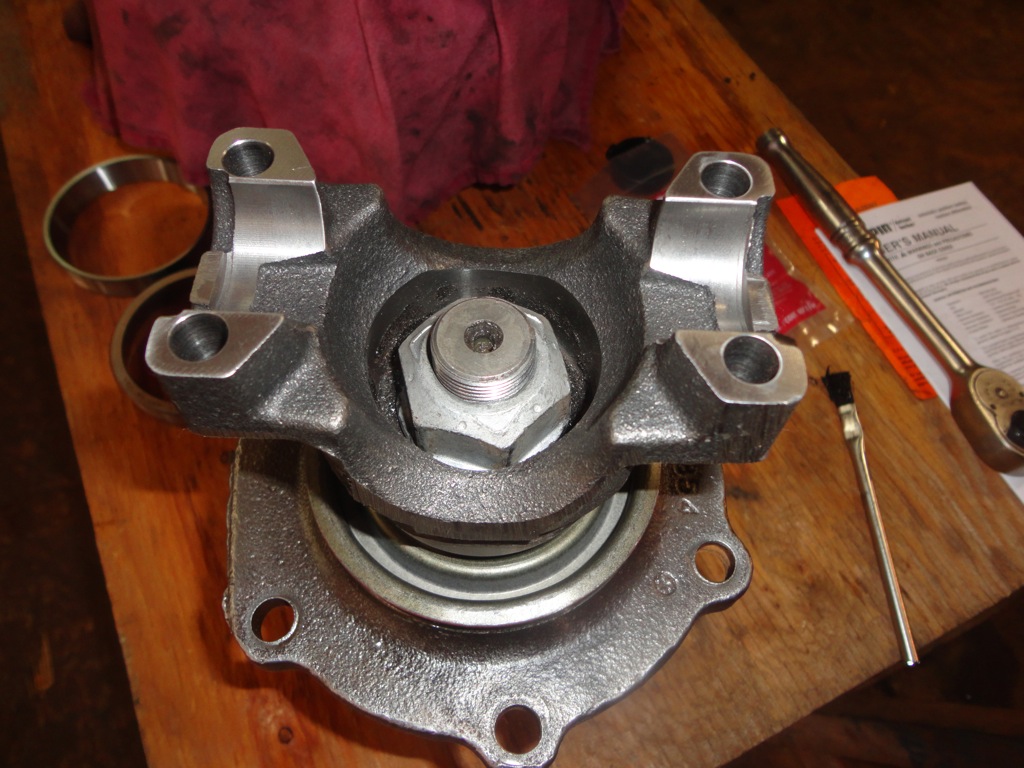
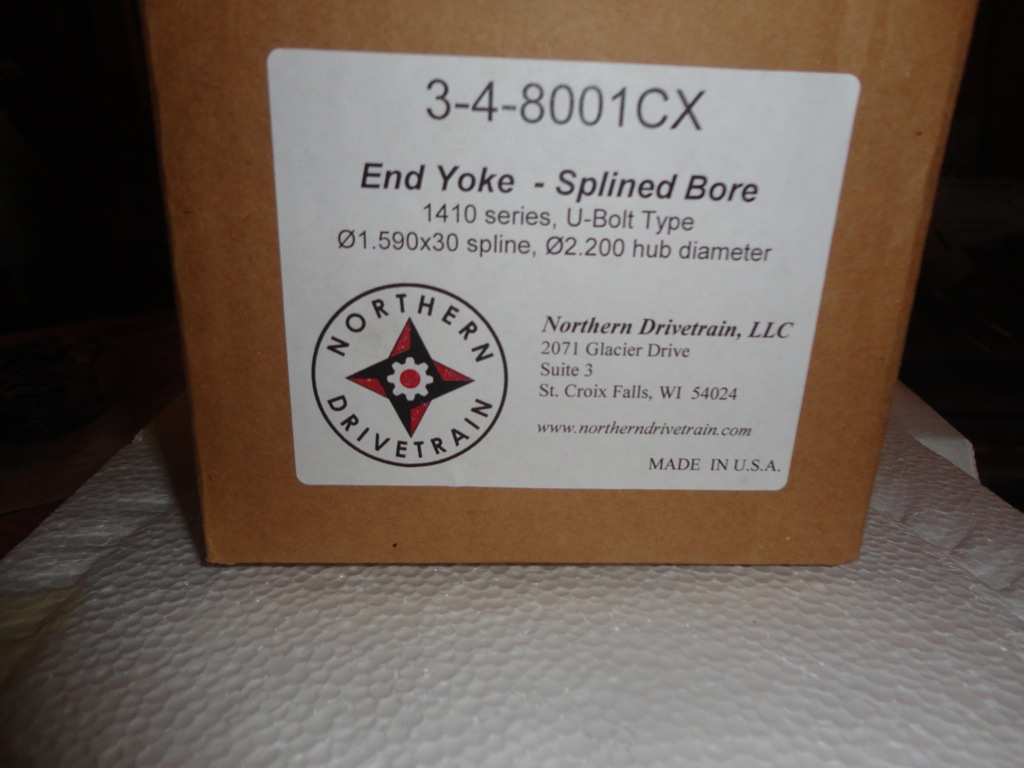
I used a custom 1410 u-joint yoke on my axle to improve drive line angle capability. This yoke also comes with u-bolt style retainers instead of the stock strap type retainers. I ordered it from Northern Drivetrain.
Remove the wing nut and washers from the detroit locker in the differential case. Check to make sure that the end of a axle shaft slips to the splines of the detroit locker in the differential case. Save the wing nut / washer assembly from the detroit locker incase you ever need to take the differential case apart again. You will need it to keep the detroit locker from exploding apart into a million pieces.
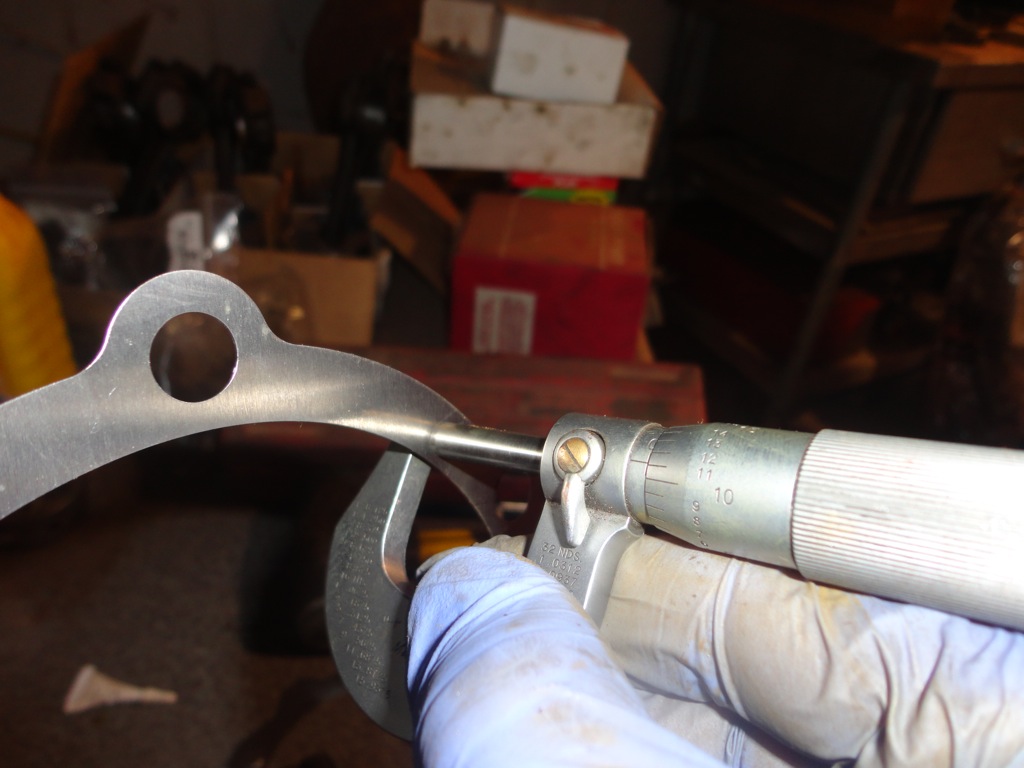
Use a micrometer to measure the pinion shims that came off of your pinion housing when you took the rear axle apart. Mine measured 18 thousands. I selected a 17 thousands new shim from the shims that were sent with my gears / bering set.
I will be hopefully finishing up this 14 bolt rear axle tomorrow. Until then
Clean up the differential case halves with a wire wheel or some emery. Make sure that the inner contact surfaces are clear from any rust or build up. Solvent tank and blow dry with a air nozzle. I pre-lubed the differential case surfaces that would contact the detroit locker with a little grease (not too much - just a little).
Place the detroit locker inside of the case halves (doesn't matter which direction). Make sure to match up the marks you put in the two halves of the differential case so that everything go's back the way it came apart. Sometimes the case halves will have an arrow stamped on the inside of the case halves incase you forgot to mark them when you took the case apart.
Install the ring gear to the differential case with new bolts. The size of bolt you will need will depend on the gear ratio you have chosen, so make sure and order these when you order your gears. I went with a 488:1 gear ratio set. Locktite the ring gear bolts and torque them using a crisscross pattern to 100 ft lbs.
Press the bearings onto both sides of the differential case / ring gear assembly.
Install the drive pinion bering into the case using a mini sledge hammer and a striking tube.
Clean up the pinion housing again using a wire wheel and some emery. Solvent tank and blow dry with a air nozzle. Press in the bering races.
Press the bering on the pinion.
Place the pinion in the pinion in the pinion housing and slip the crush sleeve over the pinion shaft.
Press the other pinion bering on the shaft over the crush sleeve. VERY IMPORTANT! DO NOT PRESS THE BERING ALL THE WAY DOWN. ONLY PRESS THE BERING UNTIL THERE IS NO SLOP IN THE PINION HOUSING. The crush sleeve is there so that you can achieve the proper pressure between the two bearings. You will have to torque the bering trough the yoke nut to achieve the proper bering drag. More on this in a moment.
Press or hammer on the pinion seal.
Add a little silicone around the splines of the top of the yoke to avoid any future leaks that may sneak past.
Locktite the yoke nut.
Install the yoke nut. I had to use a 3/4 inch impact gut with two helpers and a home made yoke holder while the whole assembly was in a vise to get the nut all the way down. This thing is a beast! IMPORTANT! DONT TIGHTEN THE NUT ALL THE WAY DOWN WITHOUT CHECKING YOUR PINION BERING LOAD! When the nut is getting close to tight, take a inch pound torque wrench and spin the whole yoke / pinion assembly from the yoke nut. The proper drag is 25-35 inch pounds. If you don't have enough drag, tighten the nut a little more until you do. If you go to far, you will have to take everything apart and get a new crush sleeve and start the whole process over again.
I used a custom 1410 u-joint yoke on my axle to improve drive line angle capability. This yoke also comes with u-bolt style retainers instead of the stock strap type retainers. I ordered it from Northern Drivetrain.
Remove the wing nut and washers from the detroit locker in the differential case. Check to make sure that the end of a axle shaft slips to the splines of the detroit locker in the differential case. Save the wing nut / washer assembly from the detroit locker incase you ever need to take the differential case apart again. You will need it to keep the detroit locker from exploding apart into a million pieces.
Use a micrometer to measure the pinion shims that came off of your pinion housing when you took the rear axle apart. Mine measured 18 thousands. I selected a 17 thousands new shim from the shims that were sent with my gears / bering set.
I will be hopefully finishing up this 14 bolt rear axle tomorrow. Until then
#80
07-25-2012, 11:42 PM
Join Date: Oct 2011
Location: Willard
Posts: 207
Likes: 0
Received 0 Likes
on
0 Posts
14 Bolt Rebuild Part #4:
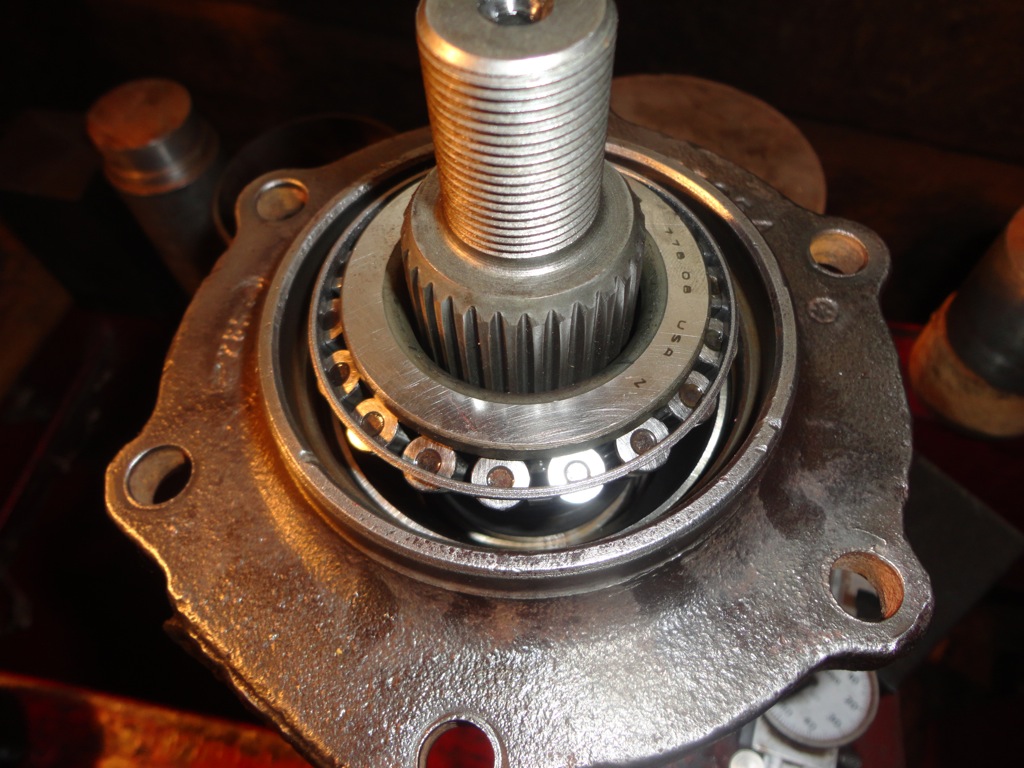
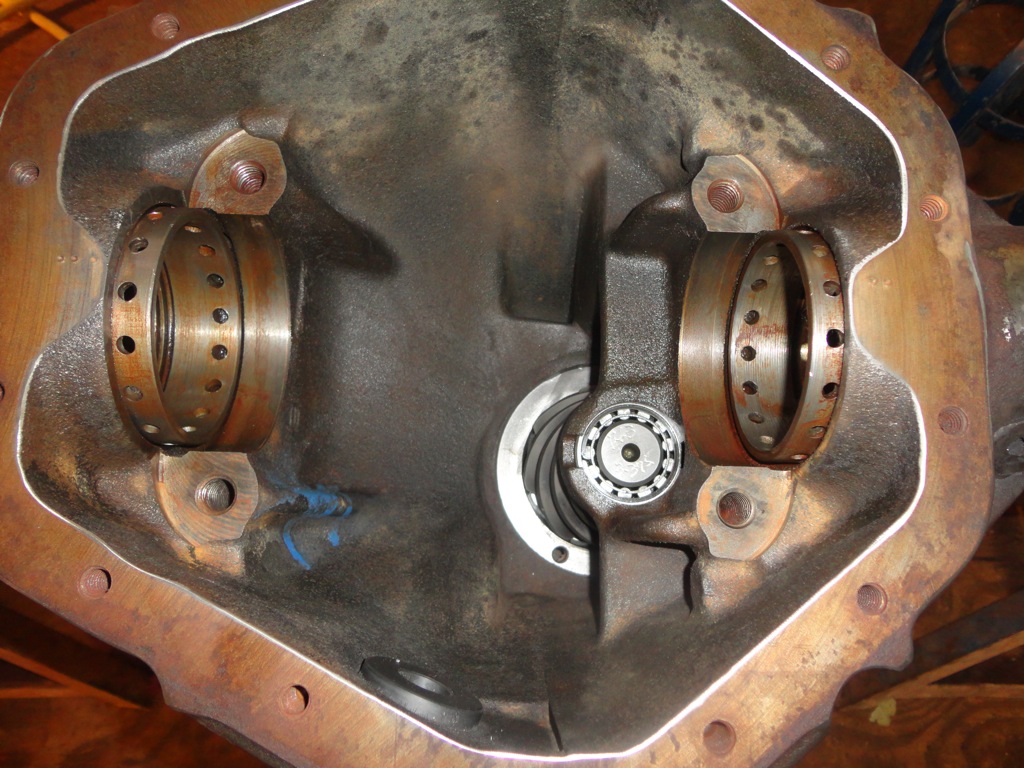
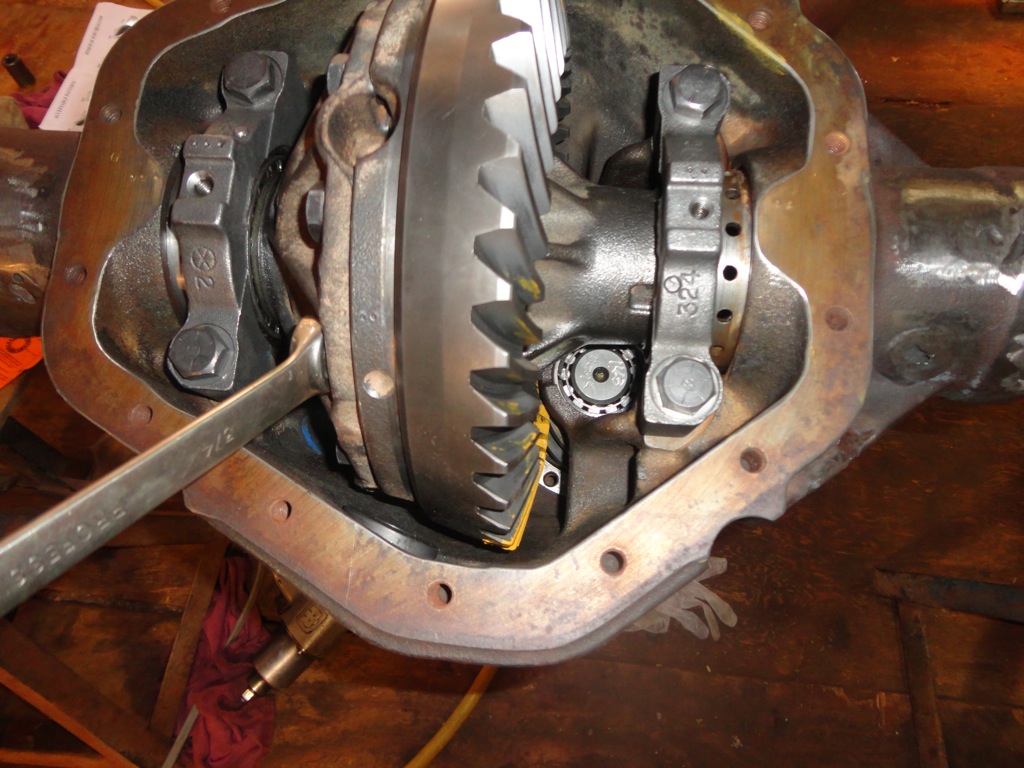
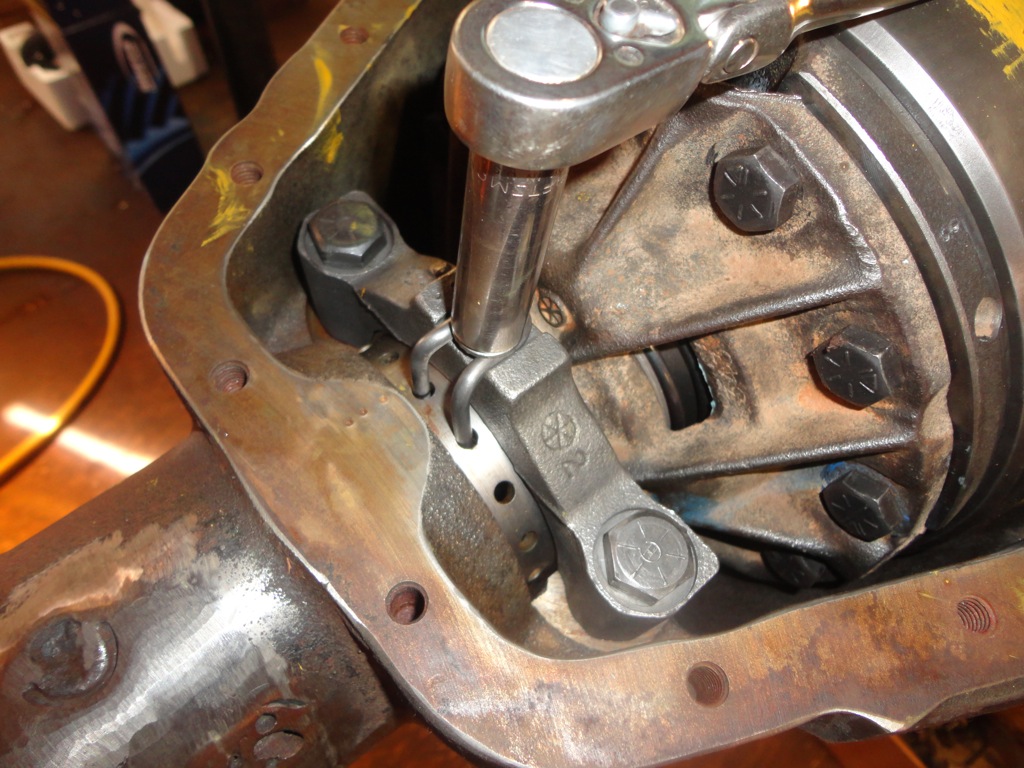
Insert the pinion into the housing with a shim that is close to the original shim size. Only use two bolts since you will have to take this in and out to change the shim when setting up the gears.
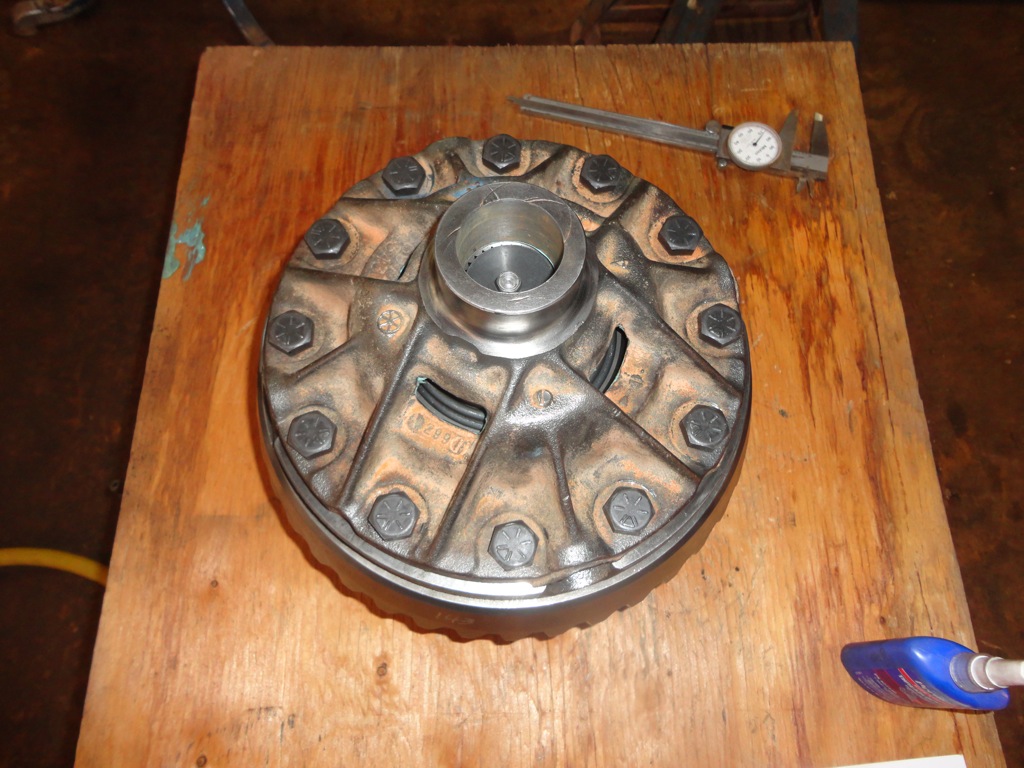
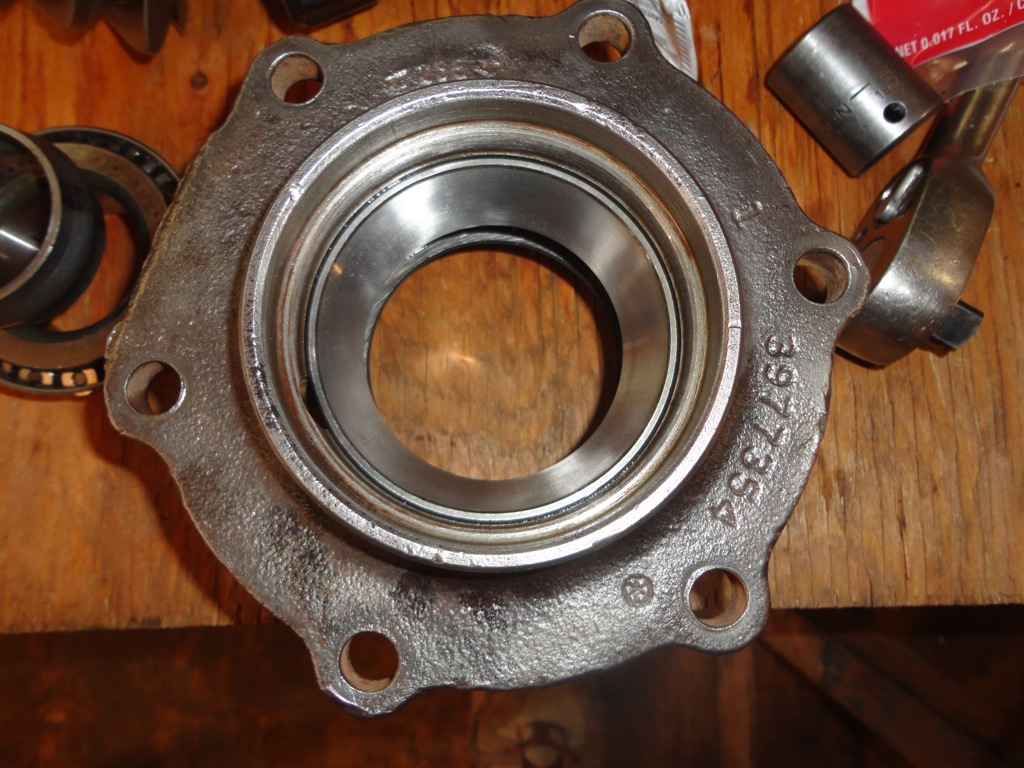
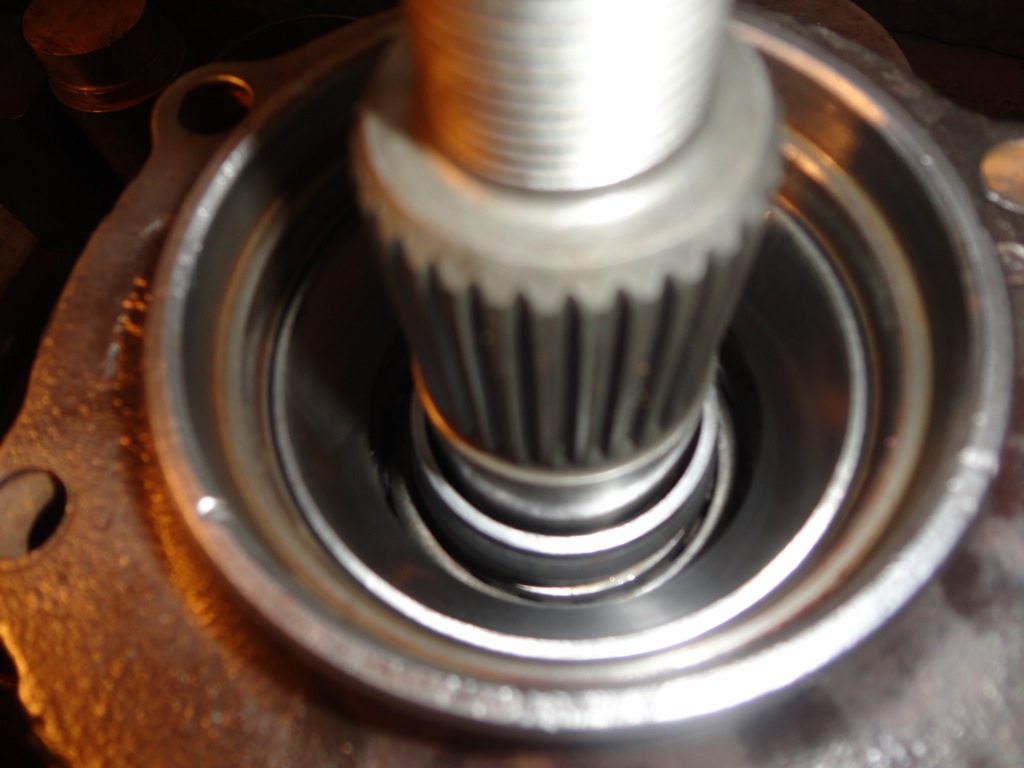
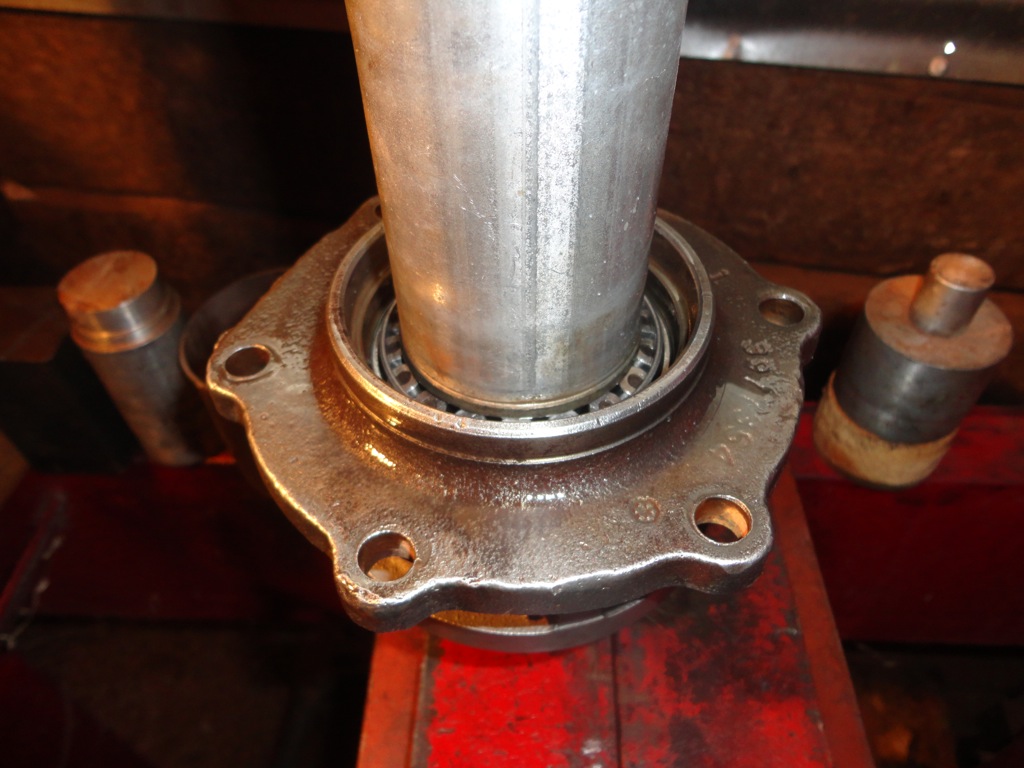
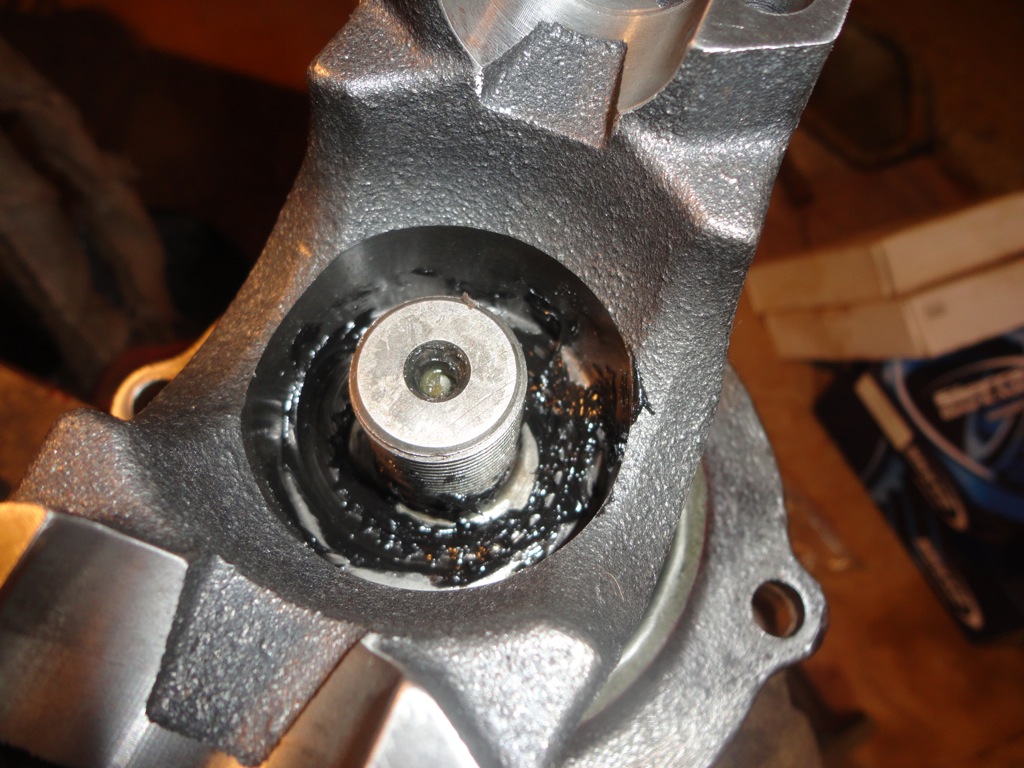
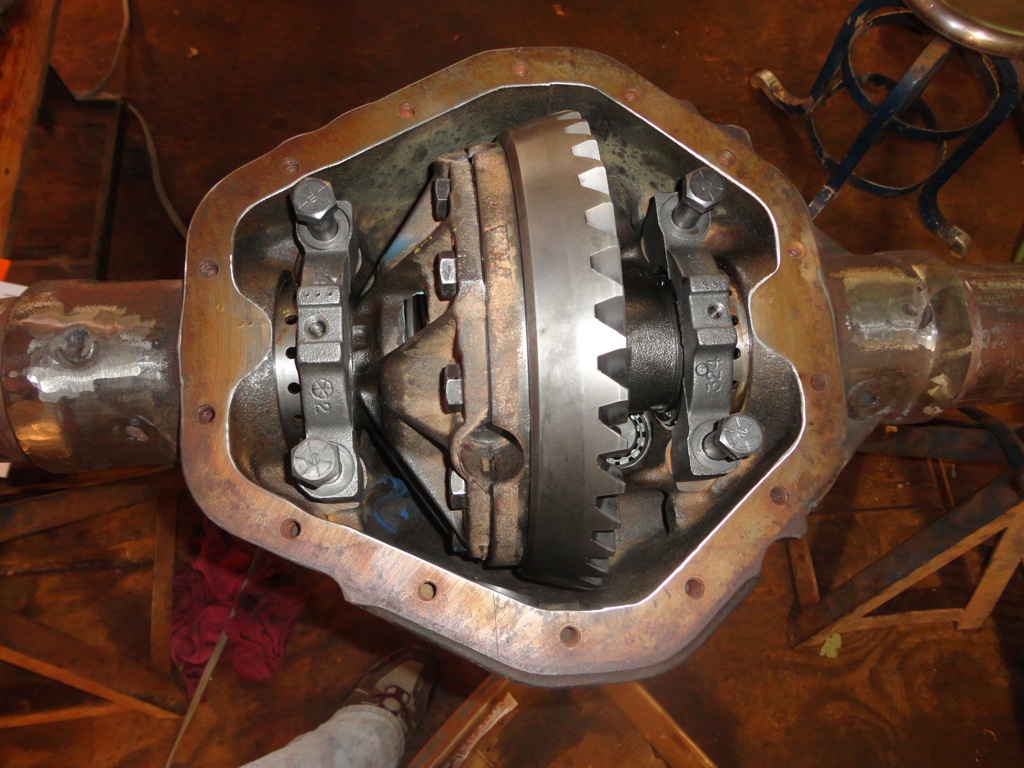
The top view with the pinion inserted.
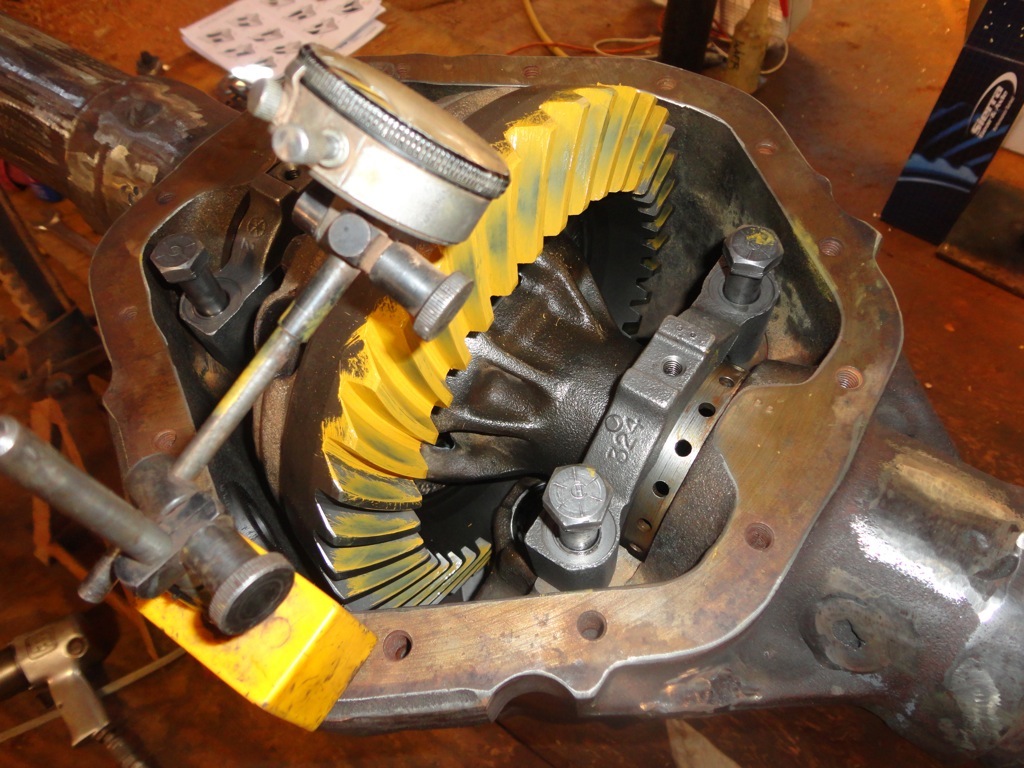
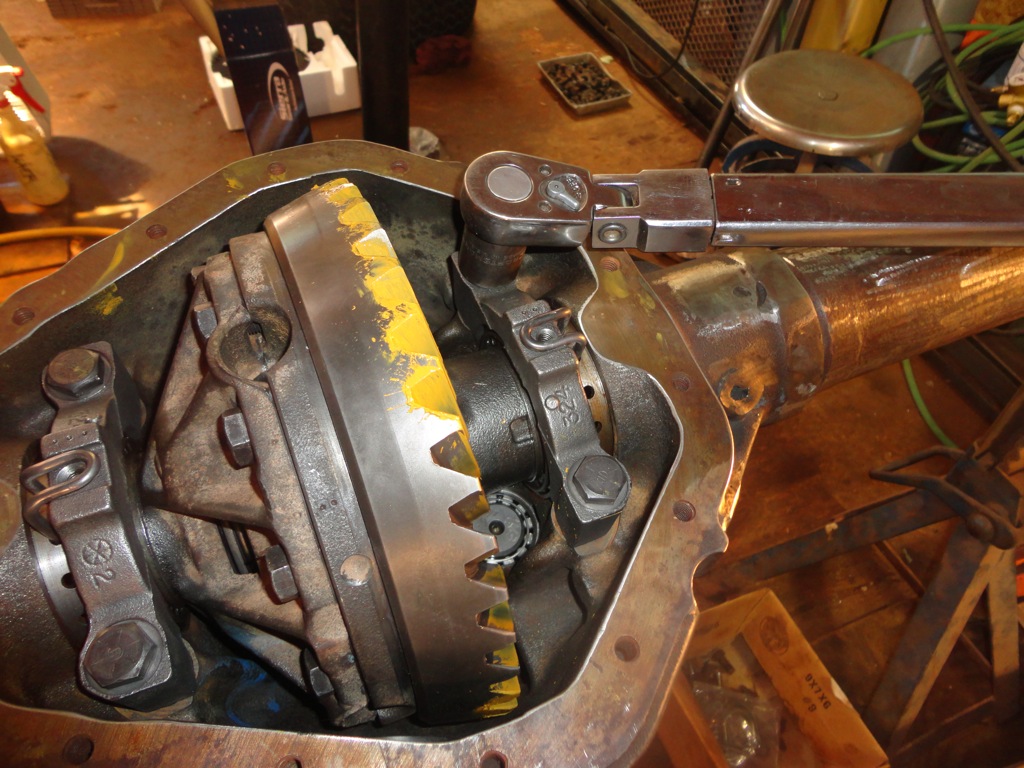
Insert the ring gear assembly and tighten down the bering retainers. Start with the left side (passenger) and then move to the right (drivers).
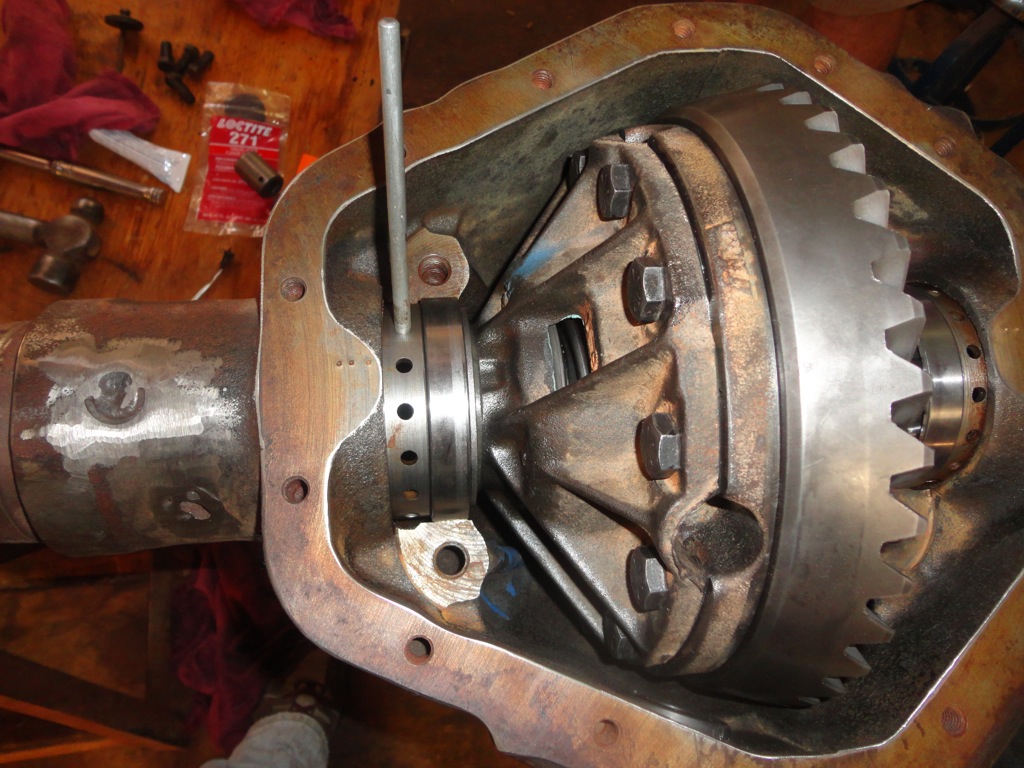
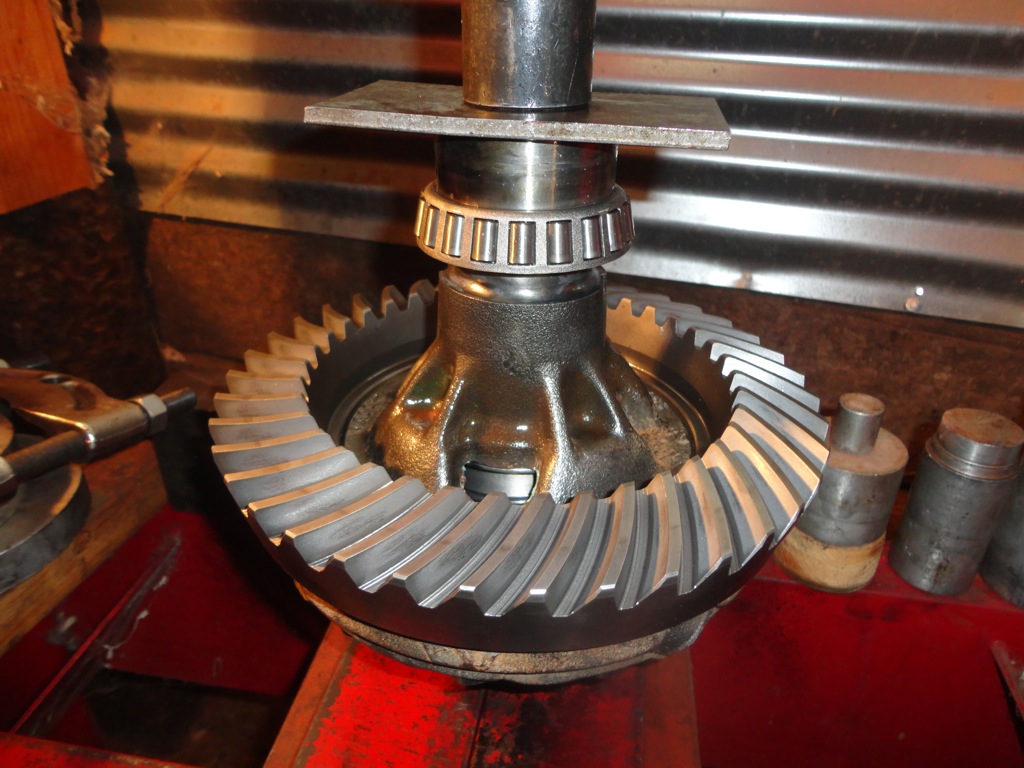
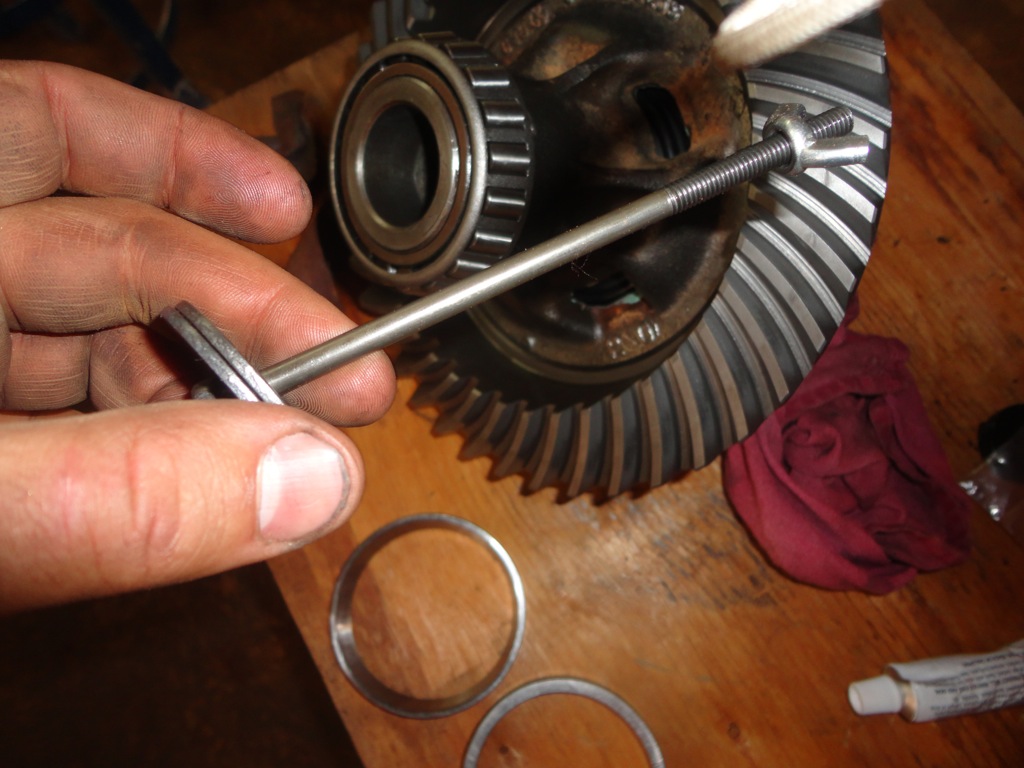
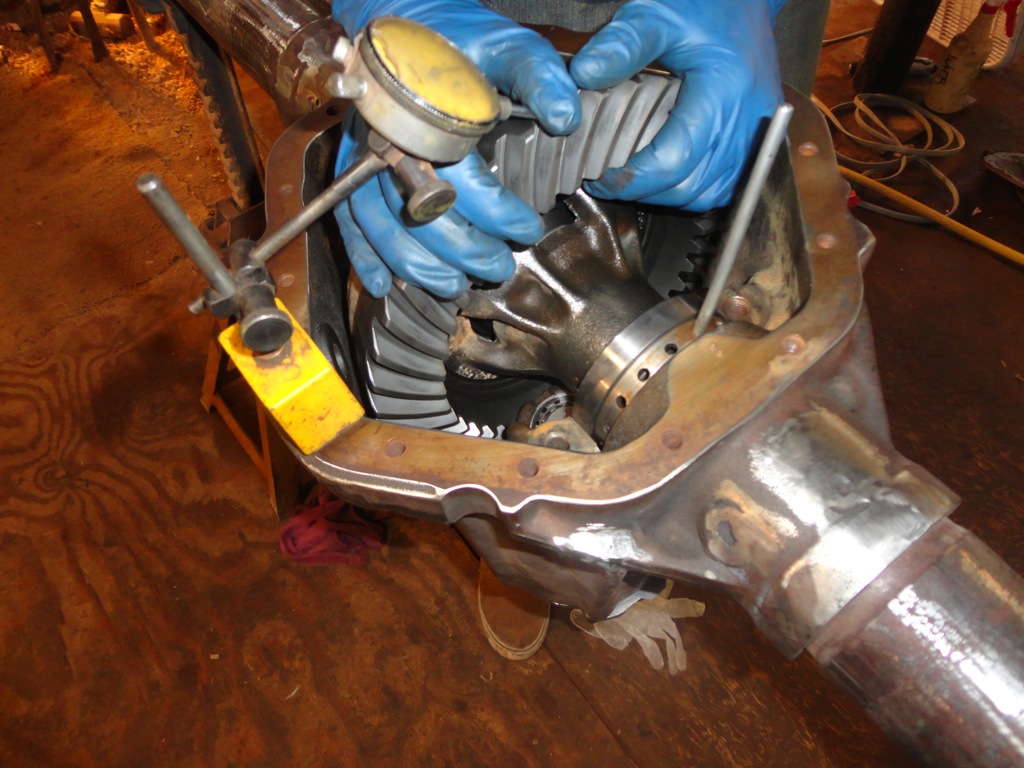
Now check the backlash. Using a gauge as shown, rock the ring gear back and forth to check the backlash. Appropriate backlash is between 6 & 10 (thousands?). loosen / tighten the bering retainers to adjust the backlash.
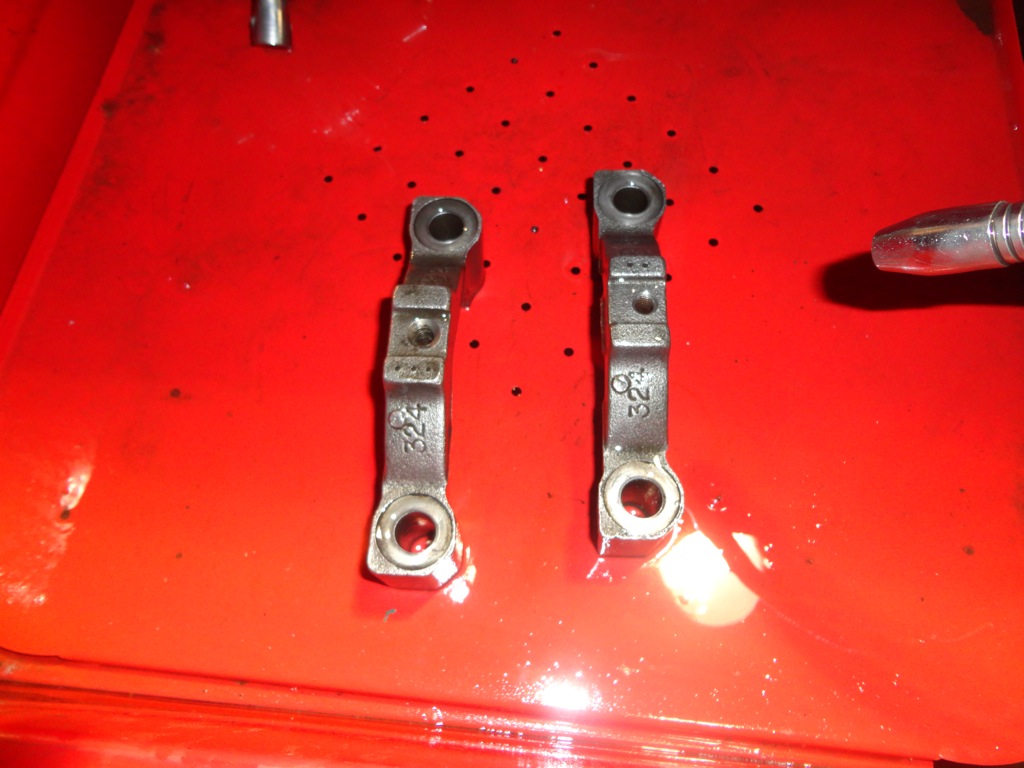
Clean the main caps and insert them onto the housing once backlash is set. Remember that you marked the main caps so that you could not mix up the direction or side that they go on.
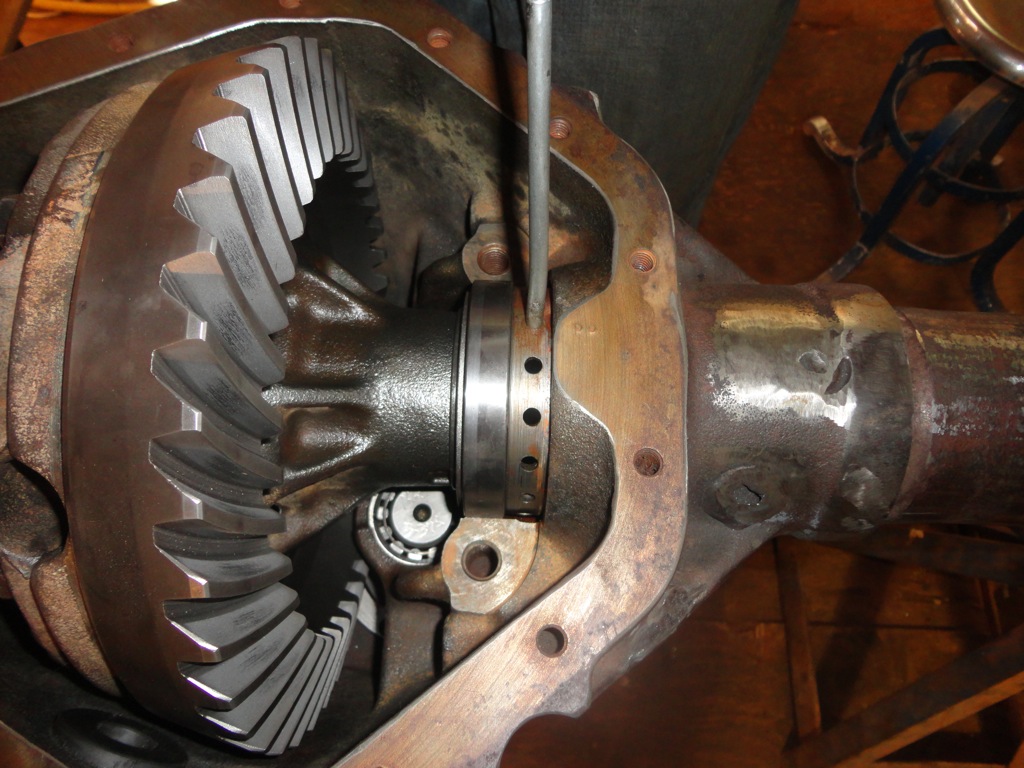
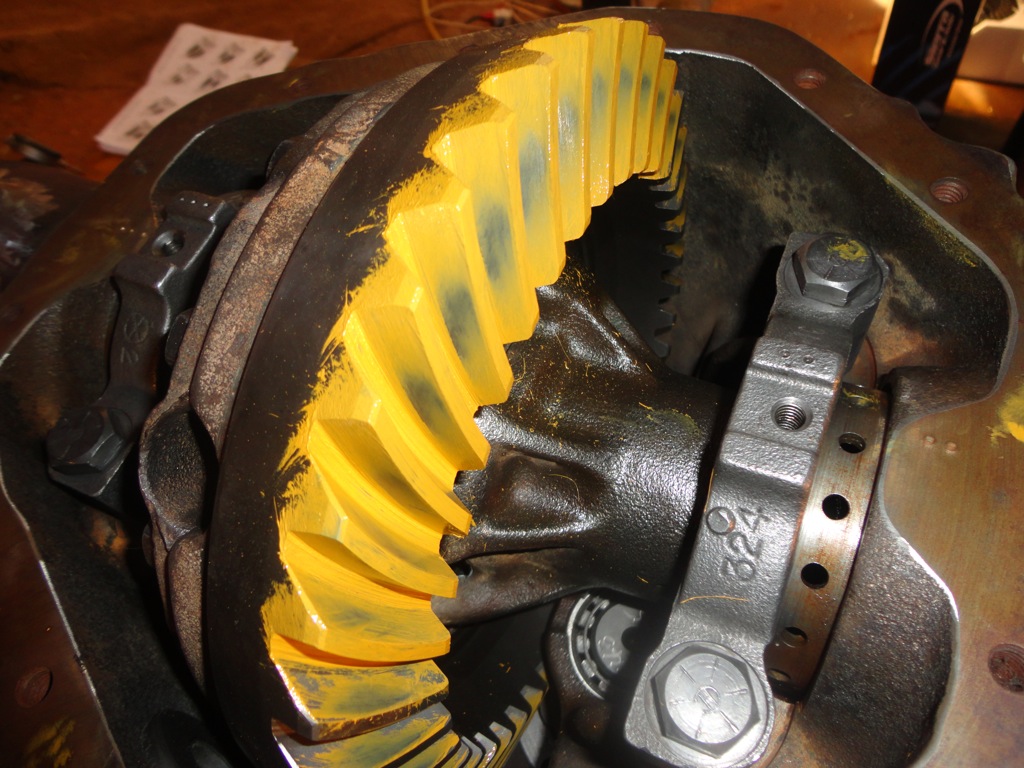
Paint on the provided ring gear paint onto about 1/4 of the ring gear on both sides of the teeth. You don't need a ton, so don't over do it.
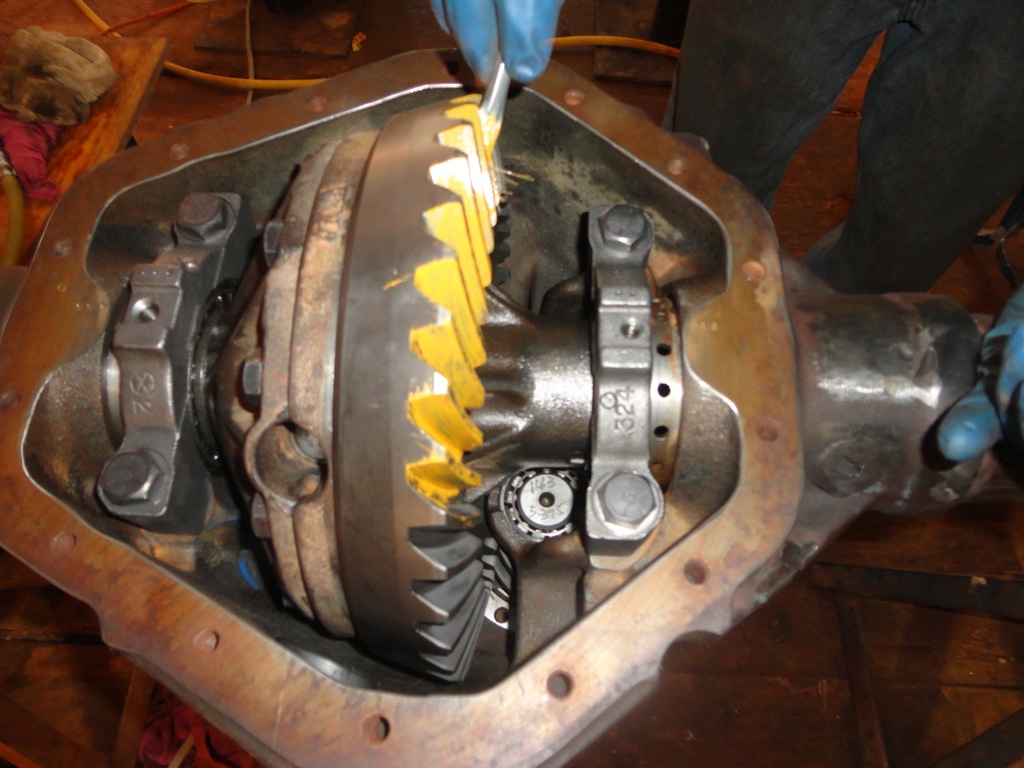
Rotate the ring gear around using a wrench and rock it back and forth where the paint makes contact to the pinion gear.
Here is my first attempt. The wear pattern shows that I need to insert less of a shim. I started with 17 thousands.
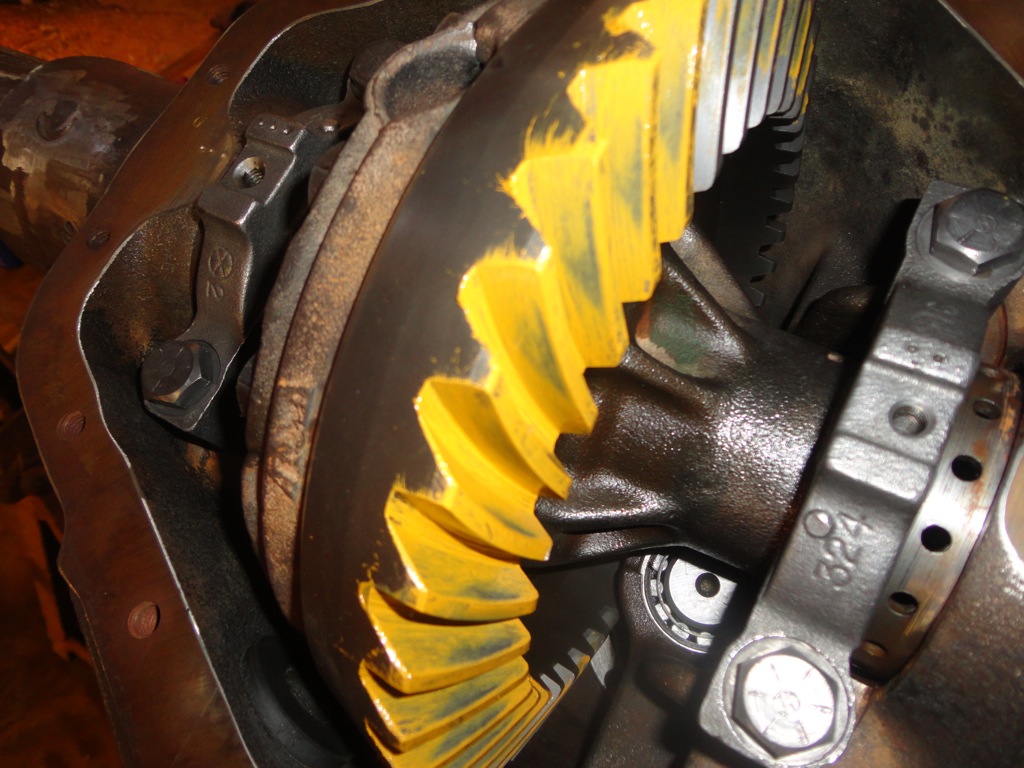
After inserting a 11 thousands shim on the pinion housing. Still no bueno
I did the whole process over after inserting a 9 thousands and 7 thousands, still no bueno - but continuing to make progress 
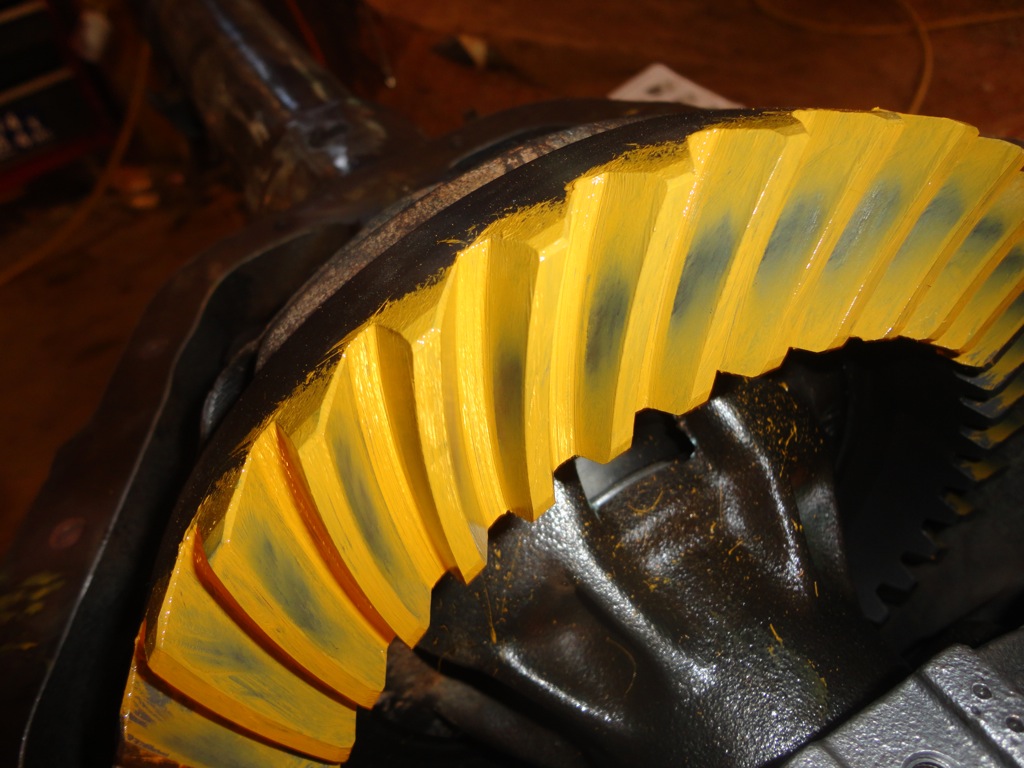
My back lash was set at 6 (thousands?), so I tried reseting it at 10 (thousands?) to see how things would change.
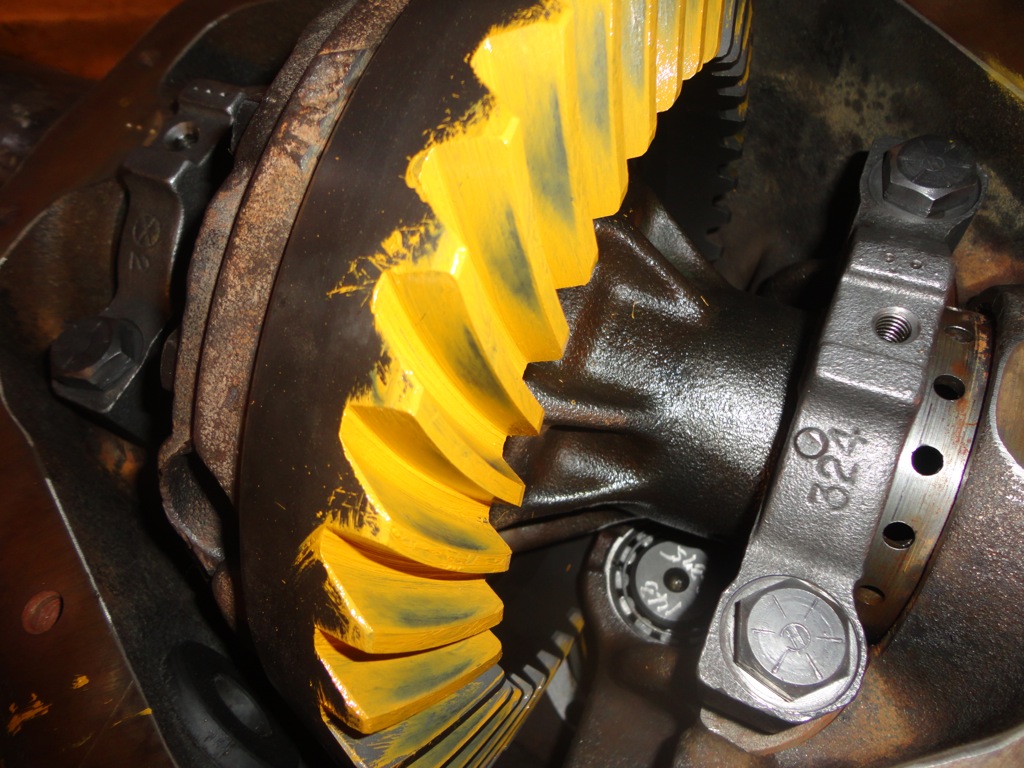
I still needed more adjustment, so I removed the shim all together from the pinion housing and reset the adjustment back to 6 (thousands?) on the backlash.
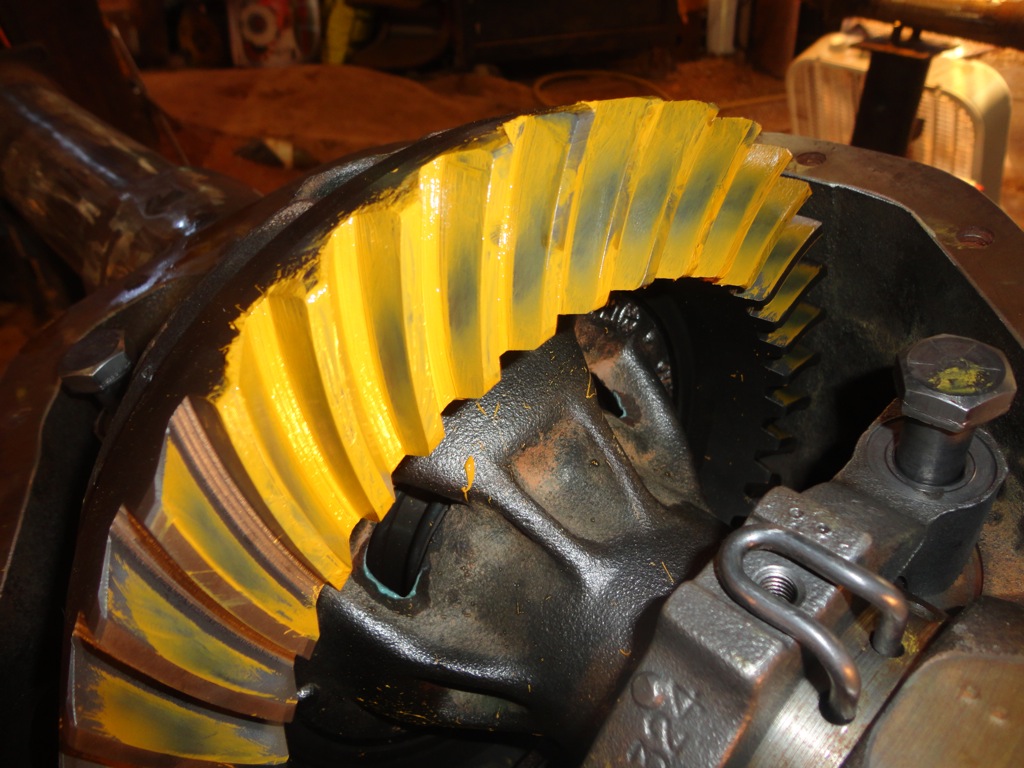
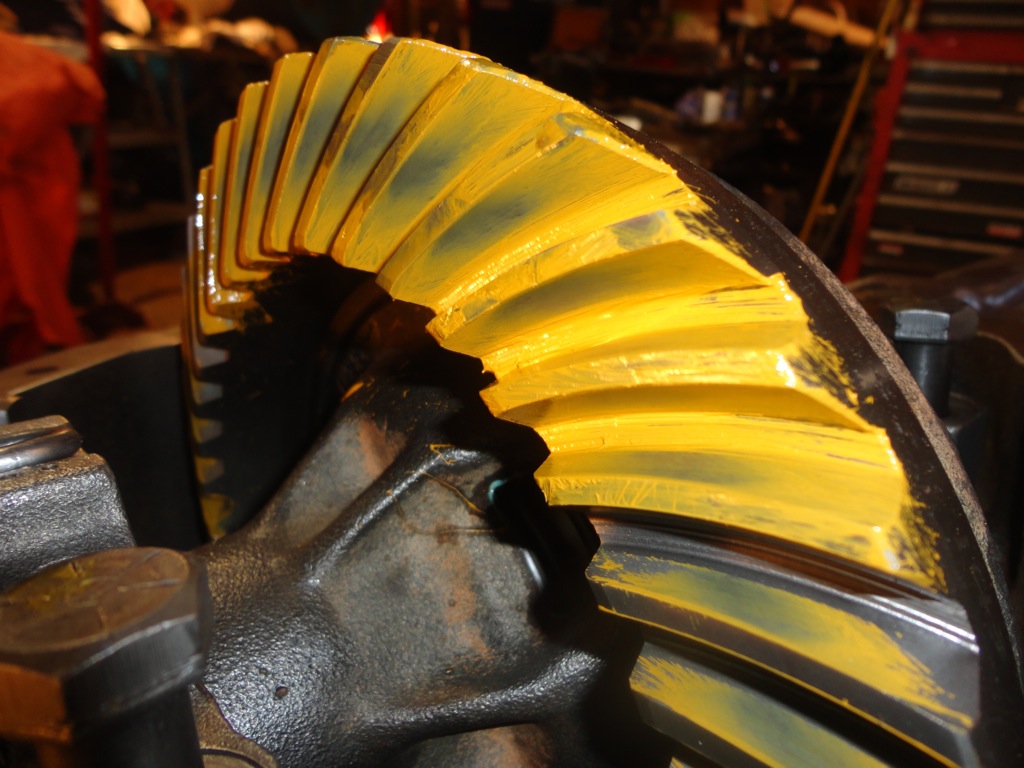
Bam! That was the ticket. Notice that the wear pattern is an oval and in the center of the gear.
Tighten down the bering retainers. Locktite the main cap bolts and torque the main caps down to 135 ft lbs.
Install the bering retainer stop.
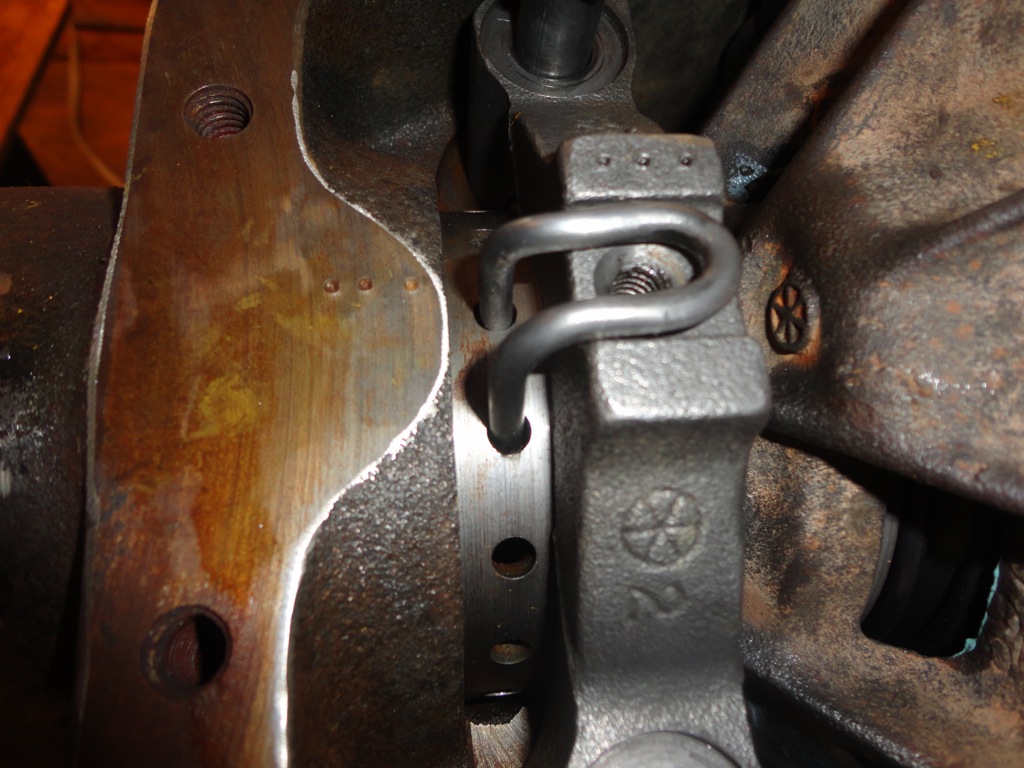
Locktite the bolt and tighten it down.
Clean the differential cover and install it with silicone to the differential housing. I torqued the bolts to 50 ft lbs just for consistency.
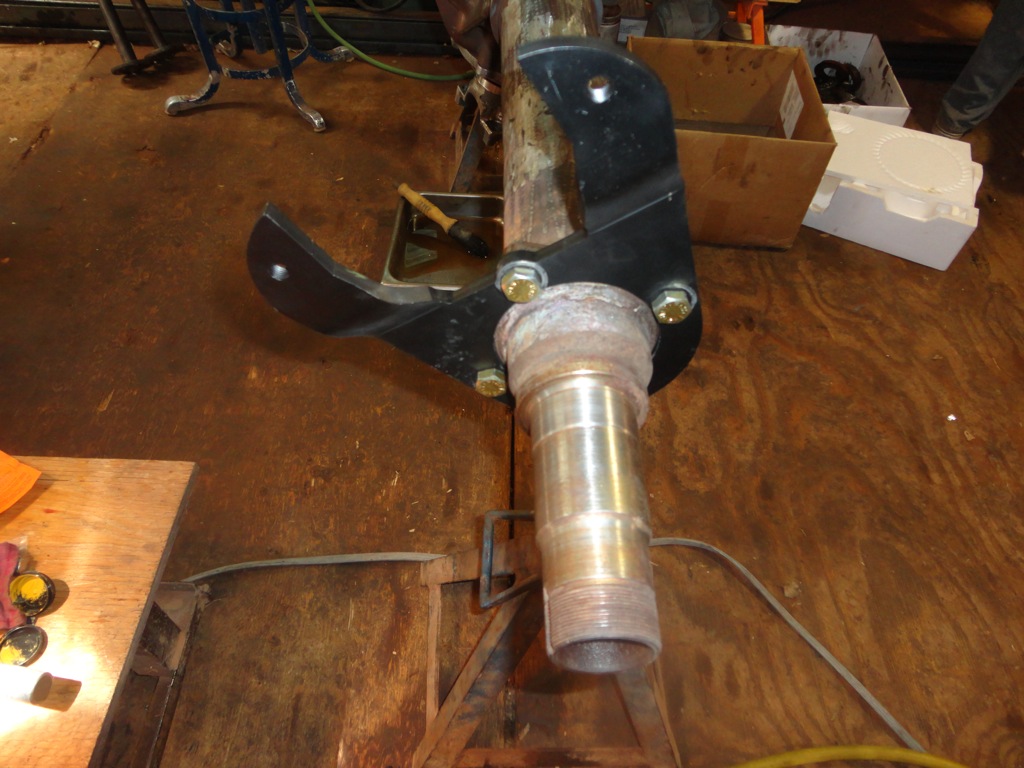
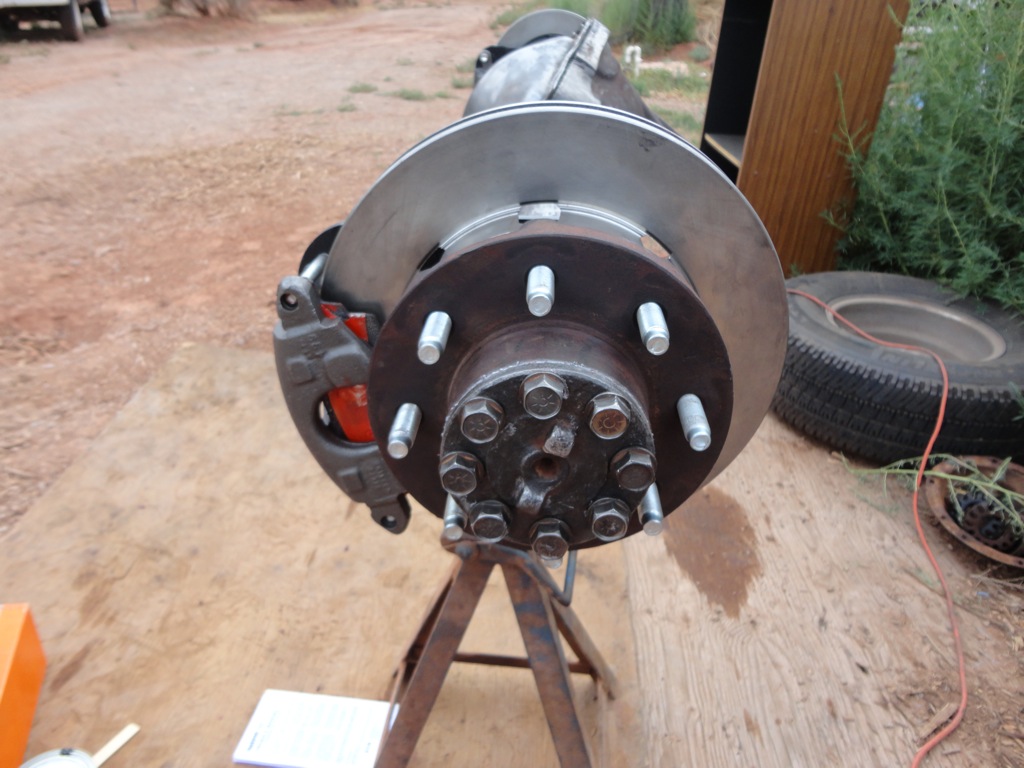
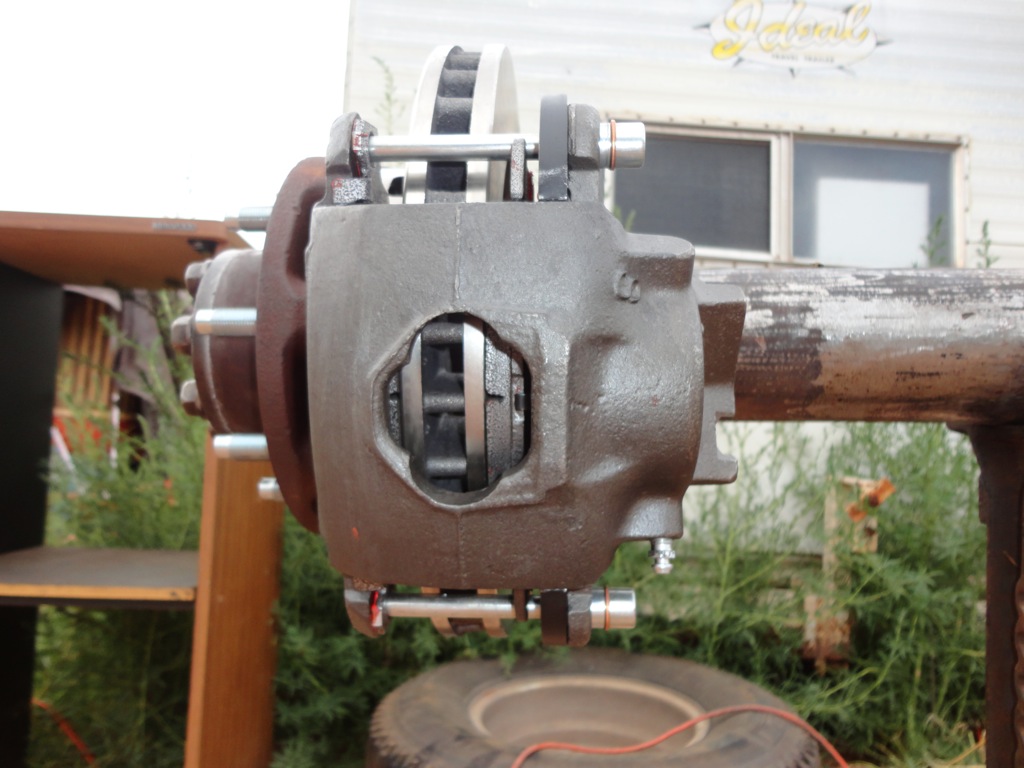
Clean up the spindle with some emery to knock any rust or burrs off of the bering surface. I ended up using a surface prep pad on a die grinder to finished the job (not showed in the picture). Here are my ruff stuff disk brake brackets installed. They installed easy and came with new bolts to match. I highly recommend them, they worked great.
Slide the hub / rotor assembly on the spindle making sure not to damage the seal.
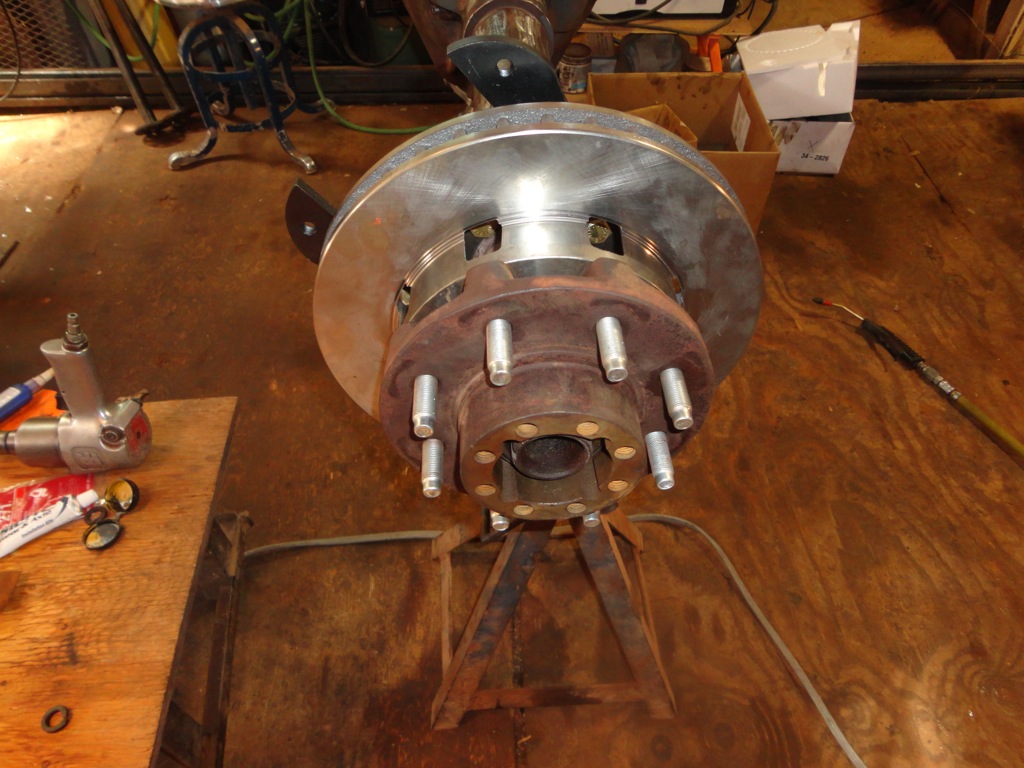
And this is where I had to end for the day I will finish up the rear end next week (?)
Insert the pinion into the housing with a shim that is close to the original shim size. Only use two bolts since you will have to take this in and out to change the shim when setting up the gears.
The top view with the pinion inserted.
Insert the ring gear assembly and tighten down the bering retainers. Start with the left side (passenger) and then move to the right (drivers).
Now check the backlash. Using a gauge as shown, rock the ring gear back and forth to check the backlash. Appropriate backlash is between 6 & 10 (thousands?). loosen / tighten the bering retainers to adjust the backlash.
Clean the main caps and insert them onto the housing once backlash is set. Remember that you marked the main caps so that you could not mix up the direction or side that they go on.
Paint on the provided ring gear paint onto about 1/4 of the ring gear on both sides of the teeth. You don't need a ton, so don't over do it.
Rotate the ring gear around using a wrench and rock it back and forth where the paint makes contact to the pinion gear.
Here is my first attempt. The wear pattern shows that I need to insert less of a shim. I started with 17 thousands.
After inserting a 11 thousands shim on the pinion housing. Still no bueno
I did the whole process over after inserting a 9 thousands and 7 thousands, still no bueno
- but continuing to make progress My back lash was set at 6 (thousands?), so I tried reseting it at 10 (thousands?) to see how things would change.
I still needed more adjustment, so I removed the shim all together from the pinion housing and reset the adjustment back to 6 (thousands?) on the backlash.
Bam! That was the ticket. Notice that the wear pattern is an oval and in the center of the gear.
Tighten down the bering retainers. Locktite the main cap bolts and torque the main caps down to 135 ft lbs.
Install the bering retainer stop.
Locktite the bolt and tighten it down.
Clean the differential cover and install it with silicone to the differential housing. I torqued the bolts to 50 ft lbs just for consistency.
Clean up the spindle with some emery to knock any rust or burrs off of the bering surface. I ended up using a surface prep pad on a die grinder to finished the job (not showed in the picture). Here are my ruff stuff disk brake brackets installed. They installed easy and came with new bolts to match. I highly recommend them, they worked great.
Slide the hub / rotor assembly on the spindle making sure not to damage the seal.
And this is where I had to end for the day
I will finish up the rear end next week (?)
#81
07-26-2012, 01:53 PM
Logistics Pro
#82
07-26-2012, 02:41 PM
Join Date: Oct 2011
Location: Willard
Posts: 207
Likes: 0
Received 0 Likes
on
0 Posts
Cost can vary a little bit based on how you approach the rebuild. From what I remember here is the cost brake down for my rebuild:
Used rebuildable 14 bolt axle: $100
Detroit locker, gears, bearings, set up kit: $900
Disk brake conversion parts: $250
Upgraded 1410 yoke: $115
Total cost: $1365
Not too bad for a premium setup
Good to hear you snagged a Dana 60 front axle and are making progress on your crew cab beast. Feel free to drop a pic or two as you make progress.
#83
07-26-2012, 10:39 PM
Logistics Pro
Thanks that's about the cost range I was thinking I got my 14 bolt for 120 with 3.73 gears I want to try that ratio first since its in the middle of the most common gears 4.10 and 3.55 I've made some progress got the motor sitting in on its own now motor mounts and trans mount done finished installing the 78-79 4x4 power steering box just need my steering column back from powdercoat so I can work on the shaft length and get my 60 rebuilt and do the crossover. Steering I'm working on the brakes now putting a hydroboost setup off a 2006 dodge cummins my only worry is if it will fit with the pusher intake I want for it ill get some pics up of what I did since I finished the suspension
#84
07-27-2012, 01:11 AM
Join Date: Oct 2011
Location: Willard
Posts: 207
Likes: 0
Received 0 Likes
on
0 Posts
Thanks that's about the cost range I was thinking I got my 14 bolt for 120 with 3.73 gears I want to try that ratio first since its in the middle of the most common gears 4.10 and 3.55 I've made some progress got the motor sitting in on its own now motor mounts and trans mount done finished installing the 78-79 4x4 power steering box just need my steering column back from powdercoat so I can work on the shaft length and get my 60 rebuilt and do the crossover. Steering I'm working on the brakes now putting a hydroboost setup off a 2006 dodge cummins my only worry is if it will fit with the pusher intake I want for it ill get some pics up of what I did since I finished the suspension
Plug your drive train specs and tire size into this calculator:
Gear Ratio Calculator
Compare the results with standard cummins RPM ranges on youtube or elsewhere to select the right gear ratio.
#85
07-30-2012, 09:38 AM
#86
07-30-2012, 08:31 PM
Join Date: Oct 2011
Location: Willard
Posts: 207
Likes: 0
Received 0 Likes
on
0 Posts
14 Bolt Axle Rebuild Part #5:
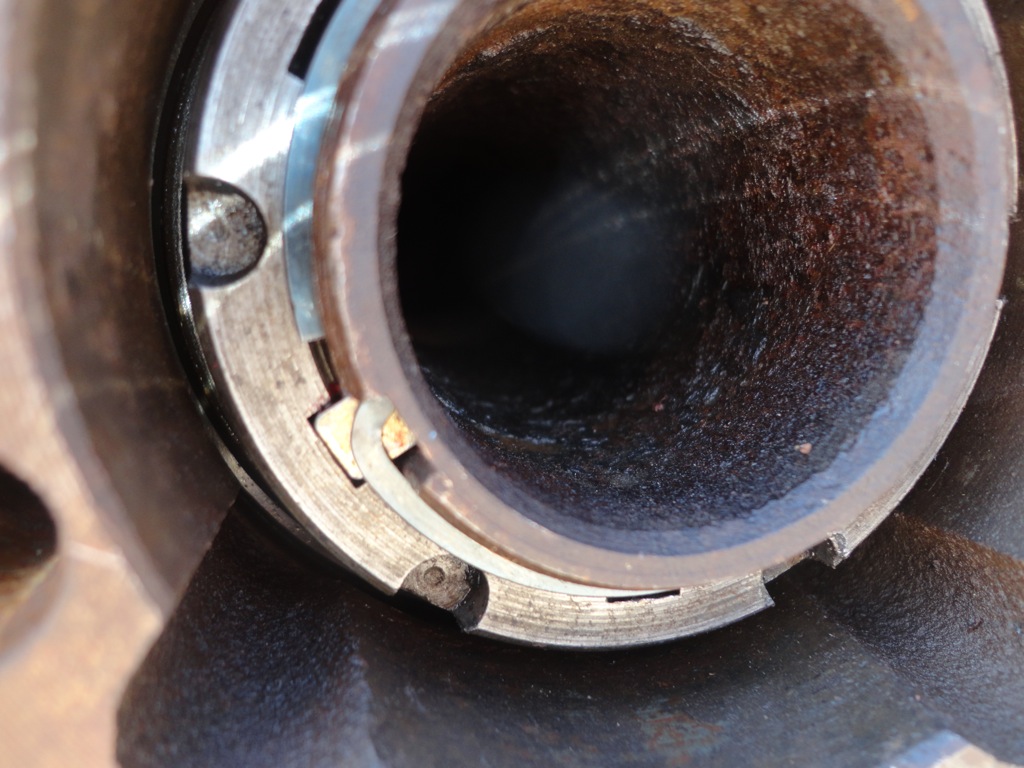
Install the axle bering / hub retaining nut using a special castle style axle nut socket.
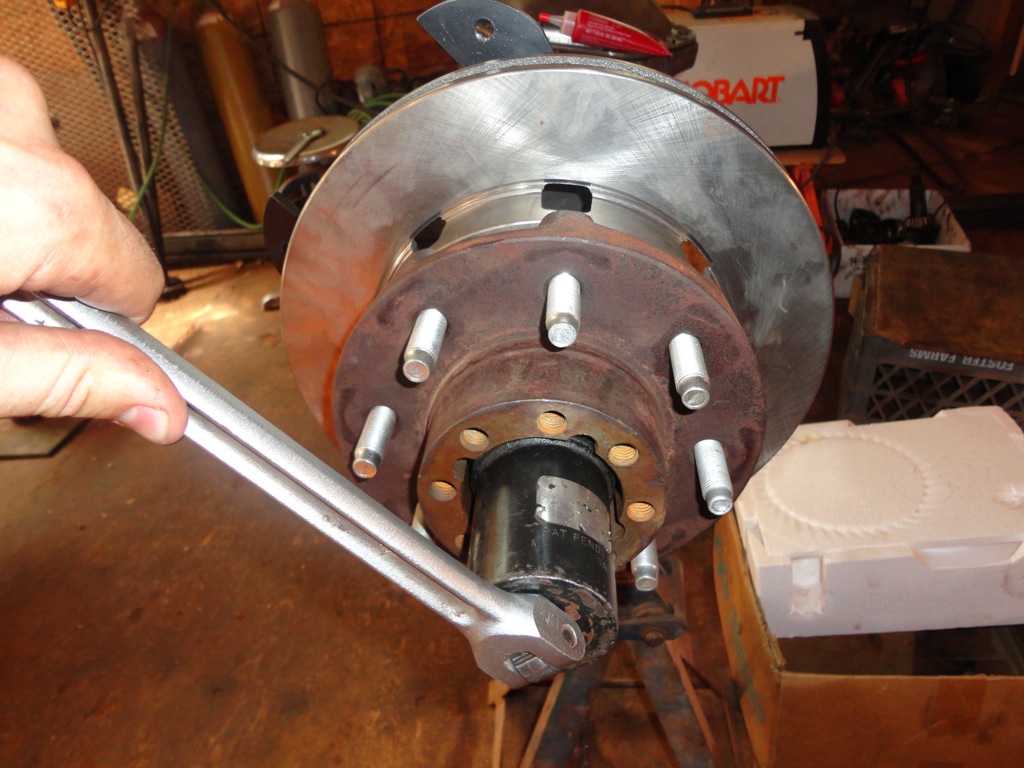
I tightened the hub nut with a impact gut to set the hub on the spindle. Then I backed it off and hand tightened it. When I met resistance, I checked my nut to see how far it was from the key slot in the spindle. I went ahead and tightened it down to match the spindle key slot. The hub should have no slop and should spin smoothly on the spindle.
I thought I would have this thing all buttoned up and painted today, but I lost the spindle nut keys (specialized woodruff key) that holds the spindle nut in place So I will have to pick up a set at the GM dealer before I can finish things. The funny thing is that the guy who is helping me with the rebuild specifically told me not to loose that key
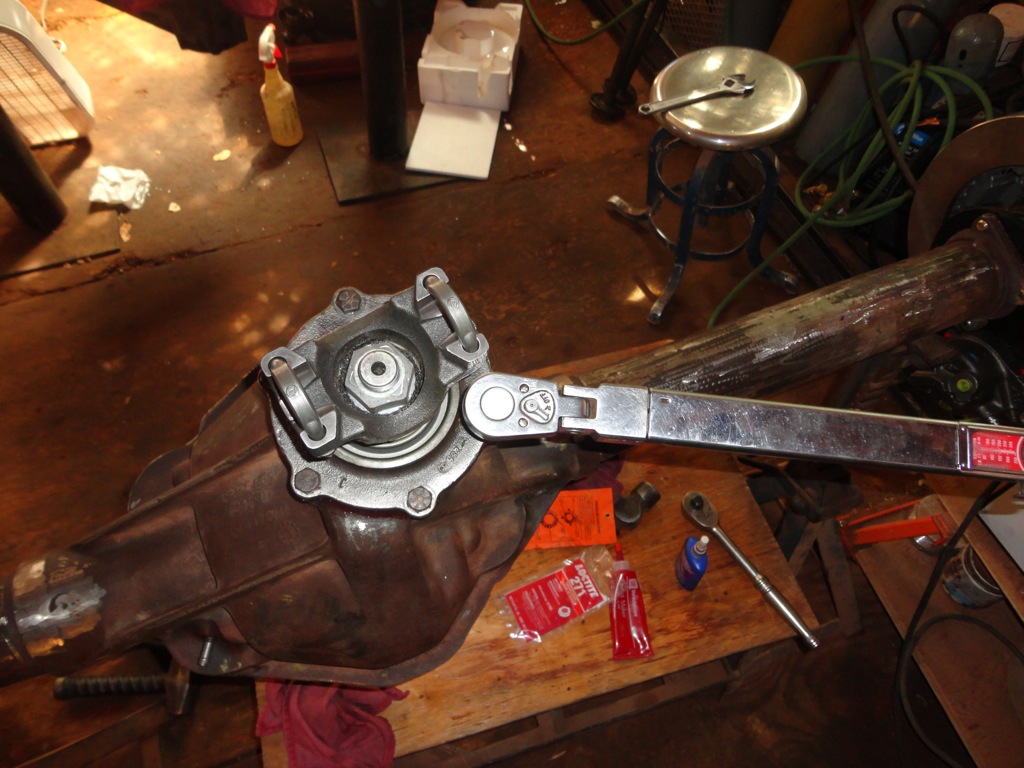
I went ahead and did the final install on the pinion housing. You have to use a special gasket sealer for this that won't add thickness to surface. Here is the gasket sealer you need to use:
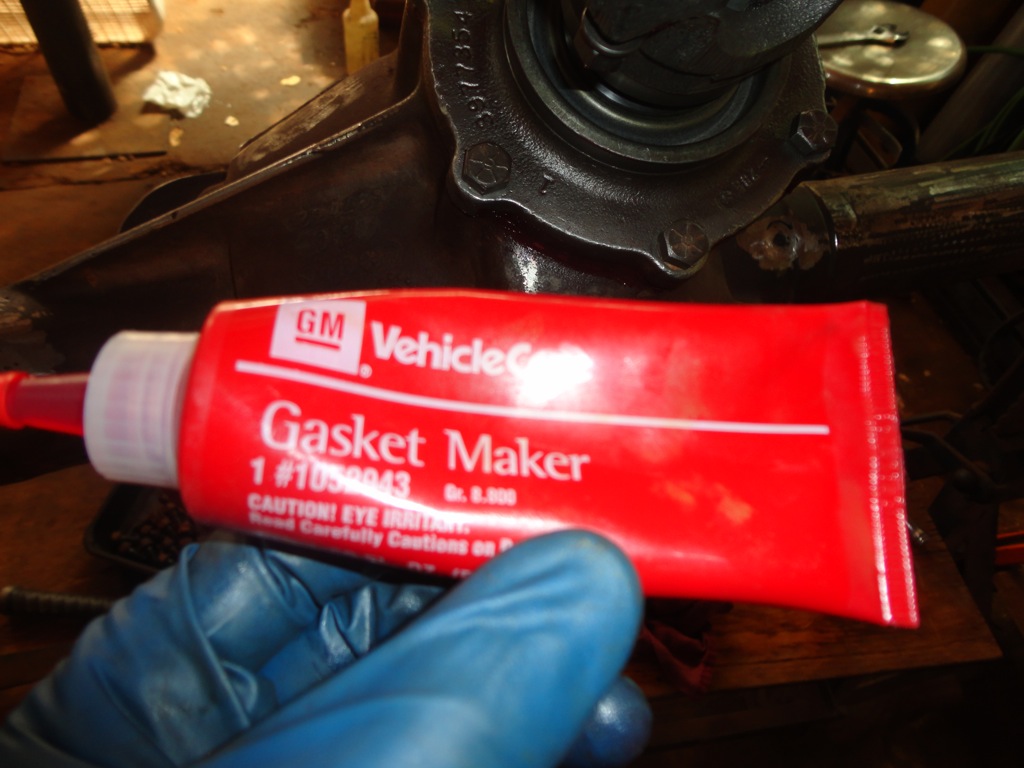
Squeeze it into the o-ring grove on the corner of the housing surface and torque the bolts to 70 ft lbs. Loctite the bolts.
I am having good success parting out the wrecked Dodge I purchased. Looks like I am going to make around $1500 to $2000 back on it.
Glad to be of service Mr Lug Nut. This was the first time I have ever rebuilt and axle. Luckily one of my neighbors (who is also one of my church members) is a 4x4 axle specialist in the area. He walked me through the whole process. I partly documented the rebuilt so that I could reproduce it again if I need to. I will be doing the rebuild on the Dana 60 front as soon as I can afford the parts. An air locker, gear set, and bearings add up you know.
Install the axle bering / hub retaining nut using a special castle style axle nut socket.
I tightened the hub nut with a impact gut to set the hub on the spindle. Then I backed it off and hand tightened it. When I met resistance, I checked my nut to see how far it was from the key slot in the spindle. I went ahead and tightened it down to match the spindle key slot. The hub should have no slop and should spin smoothly on the spindle.
I thought I would have this thing all buttoned up and painted today, but I lost the spindle nut keys (specialized woodruff key) that holds the spindle nut in place
So I will have to pick up a set at the GM dealer before I can finish things. The funny thing is that the guy who is helping me with the rebuild specifically told me not to loose that key I went ahead and did the final install on the pinion housing. You have to use a special gasket sealer for this that won't add thickness to surface. Here is the gasket sealer you need to use:
Squeeze it into the o-ring grove on the corner of the housing surface and torque the bolts to 70 ft lbs. Loctite the bolts.
I am having good success parting out the wrecked Dodge I purchased. Looks like I am going to make around $1500 to $2000 back on it.
Glad to be of service Mr Lug Nut. This was the first time I have ever rebuilt and axle. Luckily one of my neighbors (who is also one of my church members) is a 4x4 axle specialist in the area. He walked me through the whole process. I partly documented the rebuilt so that I could reproduce it again if I need to. I will be doing the rebuild on the Dana 60 front as soon as I can afford the parts. An air locker, gear set, and bearings add up you know.
#87
08-01-2012, 11:47 PM
Join Date: Oct 2011
Location: Willard
Posts: 207
Likes: 0
Received 0 Likes
on
0 Posts
14 Bolt Axle Rebuild Part #6:
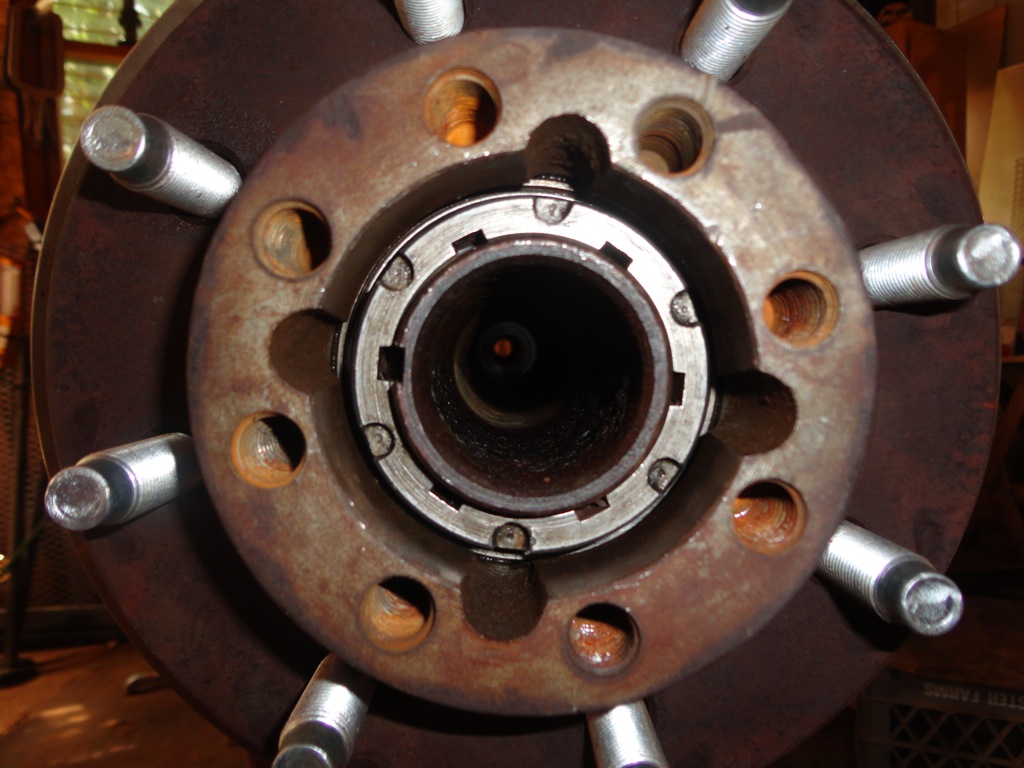
Here are the spindle nut keys that I lost. $6 at the dealer for two. Of course I found the others I lost the minute I got home.
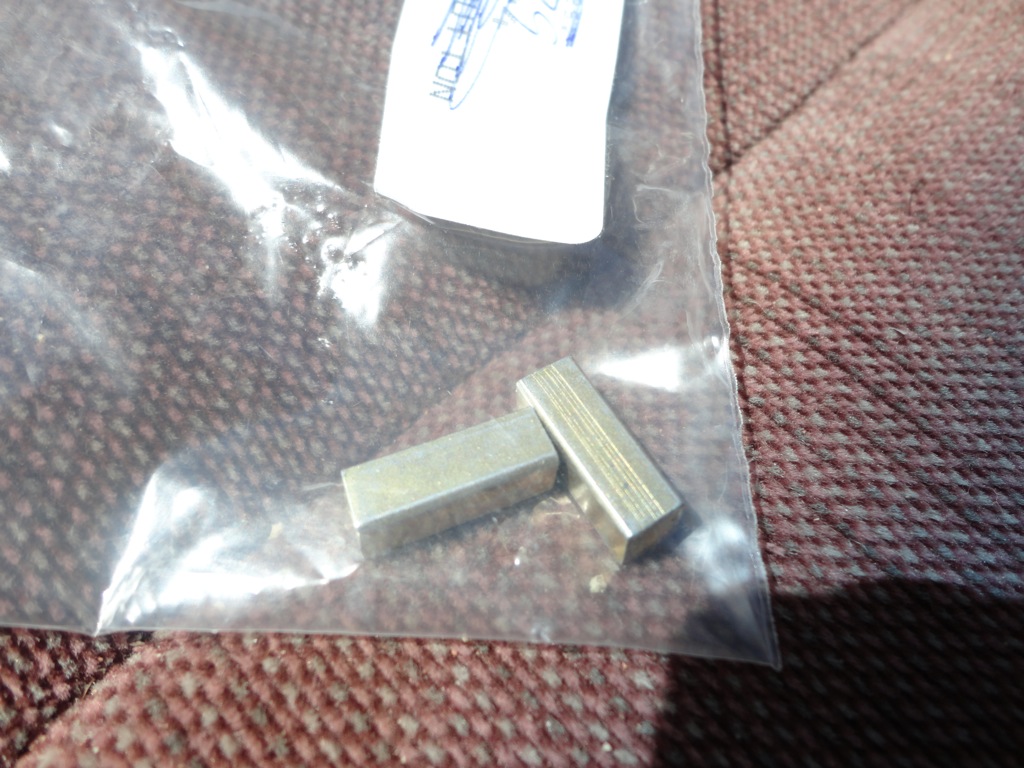
Here they are installed with the lock ring retainer on the spindle nut.
Slid in the axles in, siliconed the sealing surface, loctited the bolts, torked them to 90 ft lbs.
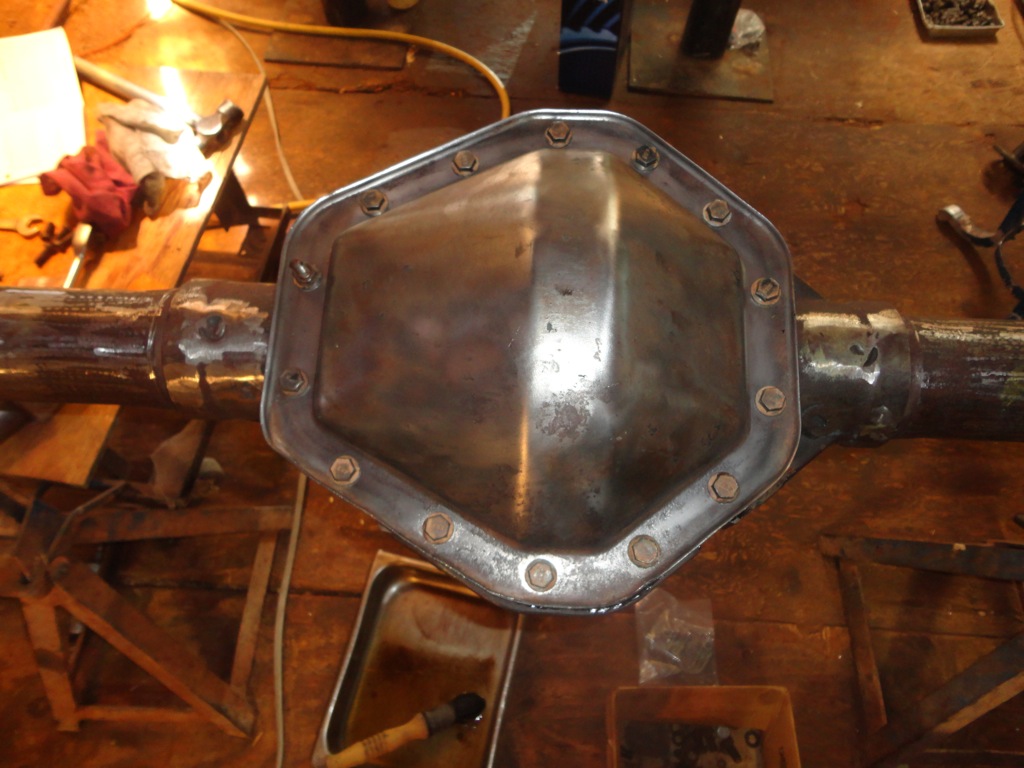
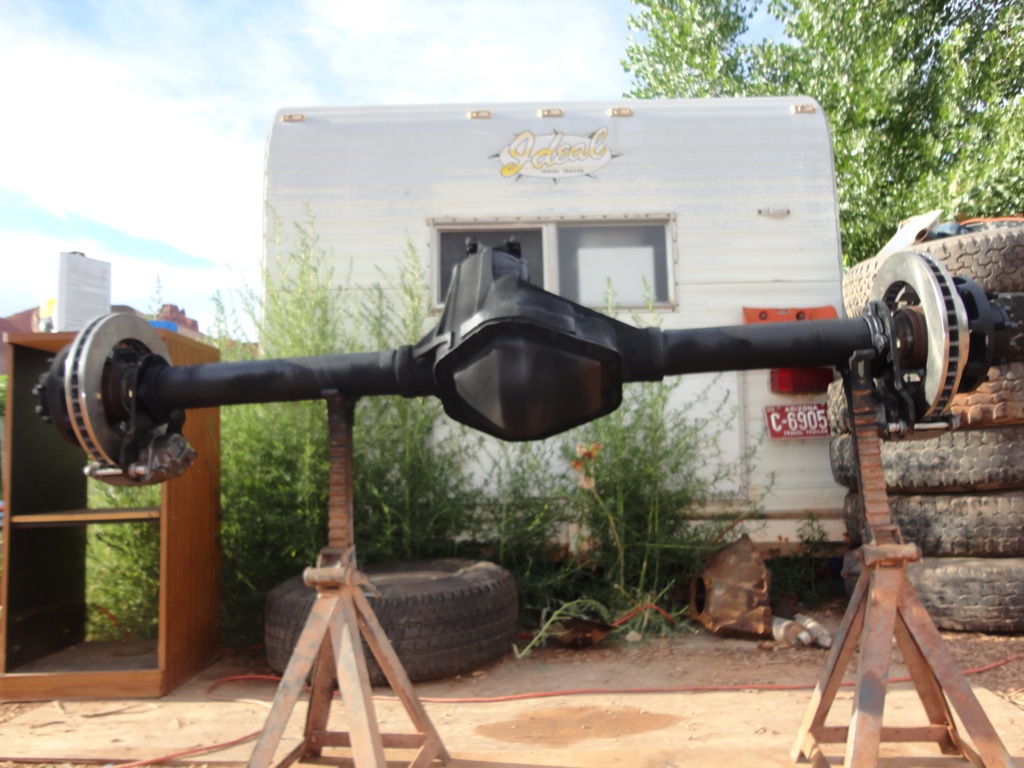
Here is the axle complete:
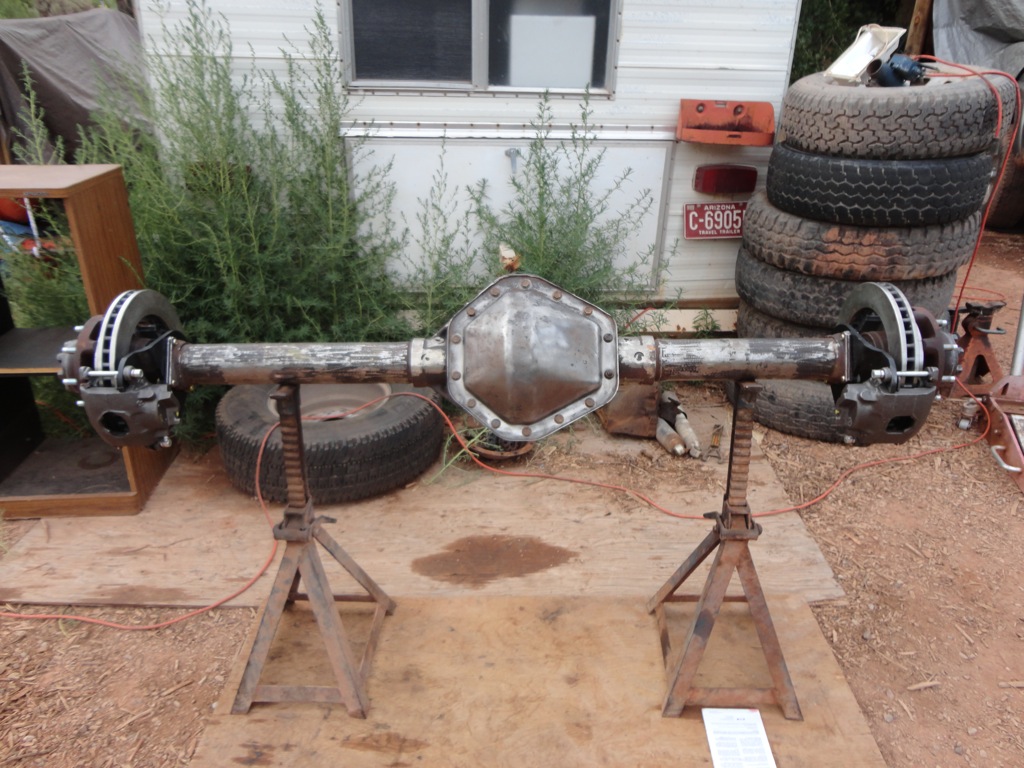
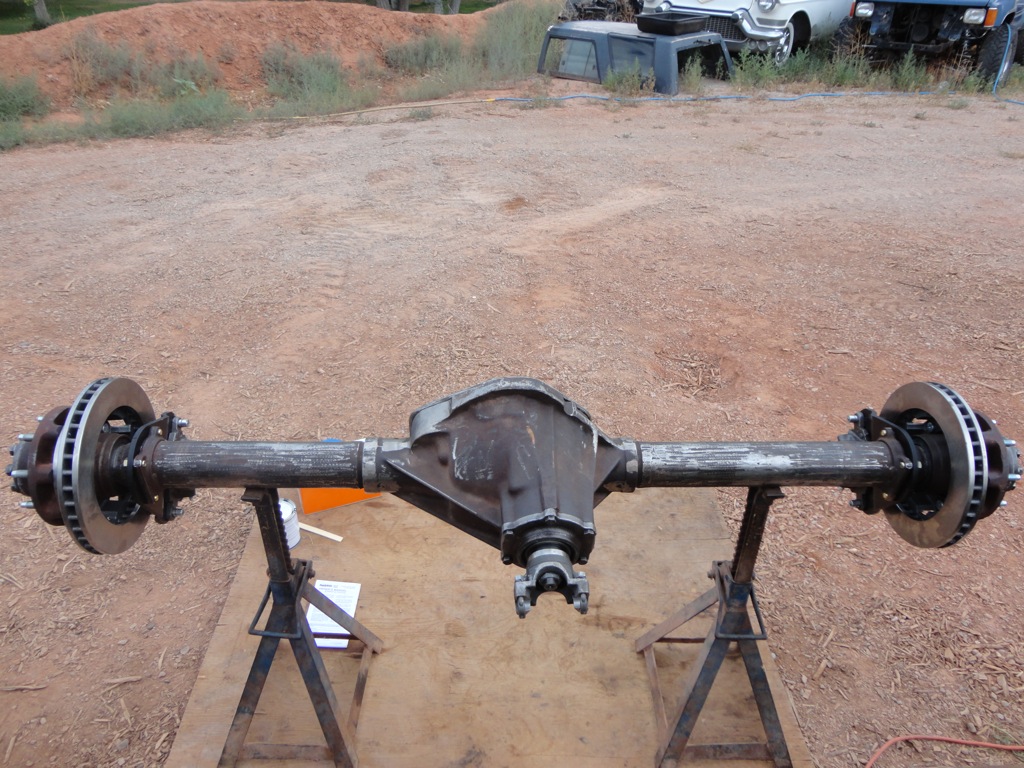
Painted the axle with some rust encapsulator. I will wait to cover it with a finish coat of paint after the spring mounts are welded on and the axle is installed.
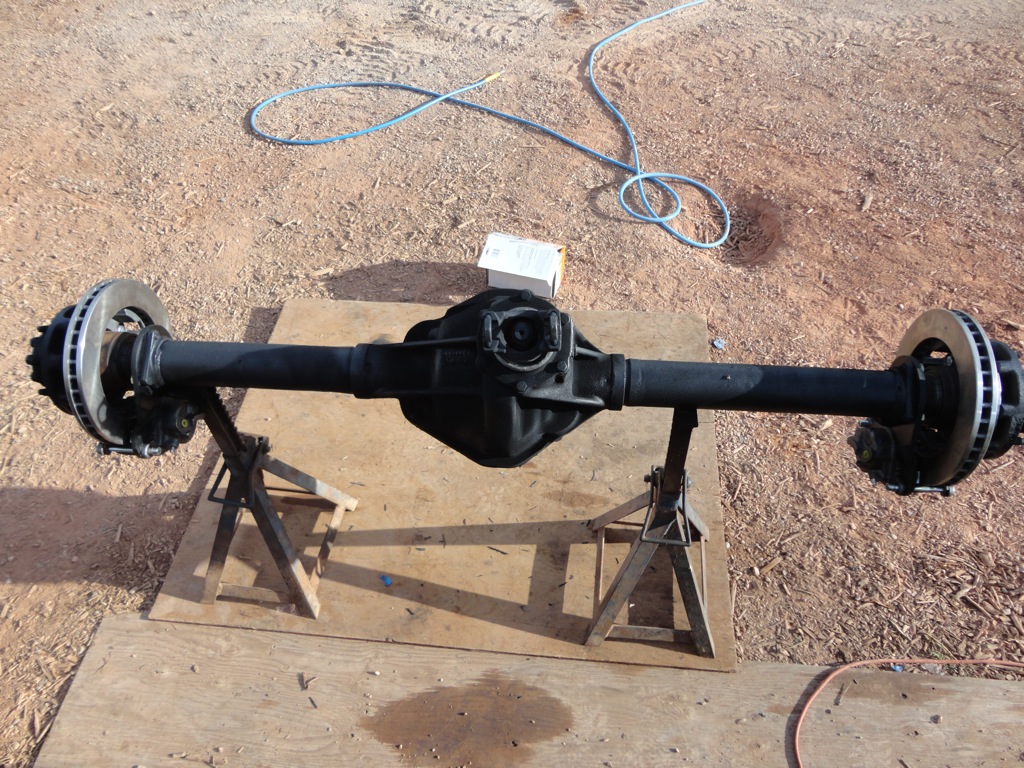
There you have it. Axle build complete.
Here are the spindle nut keys that I lost. $6 at the dealer for two. Of course I found the others I lost the minute I got home.
Here they are installed with the lock ring retainer on the spindle nut.
Slid in the axles in, siliconed the sealing surface, loctited the bolts, torked them to 90 ft lbs.
Here is the axle complete:
Painted the axle with some rust encapsulator. I will wait to cover it with a finish coat of paint after the spring mounts are welded on and the axle is installed.
There you have it. Axle build complete.
#88
08-02-2012, 06:48 AM
Logistics Pro
#89
08-02-2012, 10:27 AM
Join Date: Oct 2011
Location: Willard
Posts: 207
Likes: 0
Received 0 Likes
on
0 Posts
 Oh well, next step is to get the front axle build and make it a roller. I just need about $2500 to pull that off.
#90
08-03-2012, 07:57 AM
Logistics Pro
i hear that on the 60 arb lockers are salty but needed mine will have one for now i'm going to get the 14 bolt semi built discs seals cleaning and run the 3.73 at first so i know what gears ill need for sure then finish it with the good stuff same with the front i'm going to just do what i can until i get the right ratio i'l be doing my hydroboost install this weekend parts are here today another step further we go